Draining my rear seat hatch

The friendliest place on the web for anyone who enjoys boating.
If you have answers, please help by responding to the unanswered posts.

DavidM

Valued Technical Contributor
Joined
Aug 17, 2012
Messages
6,804
Location
USA
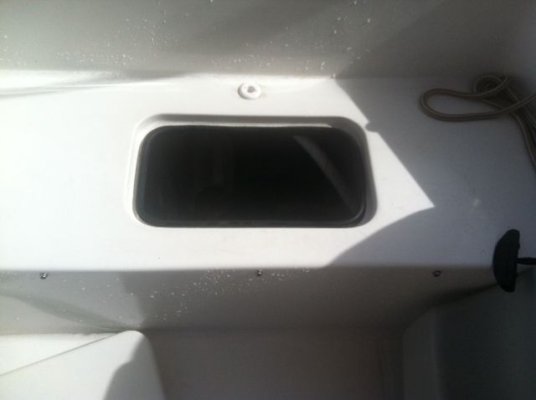
You guys are pretty clever at coming up with clever solutions to obscure problems, so I have one for you. Please refer to the attached pic of the rear seat hatch on my Ponmpano 23.

Due to the configuration and slope of the seat, the rim around the hatch fills with rain water and overflows into the bilge compartment below, getting everything down there wet. The water never gets high enough to get over the drain fitting in back of the hatch- it overflows into the hatch first. Bad design for sure.

I have thought about gluing a fitting into the grove that would accept a small hose. I would then splice that hose into the one currently hooked to the rear drain and plug that one off. That should let any water drain through the fitting into the hose and out the side. Anyone know of small diameter fittings that would fit nearly flush in that groove. Mine would just be a barbed fitting that I would glue in place.

Anyone got any better ideas? How about suggestions for the builder that might require a small mod to his molds? One idea is to mold a deep groove to channel the water forward. This is routinely done on sailboat bench hatches.

David
 

Attachments

  • Pompano 23 rear seat hatch.jpg
    Pompano 23 rear seat hatch.jpg
    23 KB · Views: 97
...Anyone know of small diameter fittings that would fit nearly flush in that groove. Mine would just be a barbed fitting that I would glue in place...David

How about using a flaring tool with cooper tubing to make your own? After you drill your hole in the rim you can countersink it and use epoxy to glue it in. If you want barbs, get the torch and some solder.
 
Is there any way to seal around the hatch itself so the water can't get through?
 
How about using a flaring tool with cooper tubing to make your own? After you drill your hole in the rim you can countersink it and use epoxy to glue it in. If you want barbs, get the torch and some solder.

I like this idea. With it just being a seat drain, I don’t think you would even need barbs on the copper tubing to keep the drain hose on. Probably just use a hose clamp on the straight copper tube will be good enough.
 
How about using a flaring tool with cooper tubing to make your own? After you drill your hole in the rim you can countersink it and use epoxy to glue it in. If you want barbs, get the torch and some solder.

I’ve done exactly that. It looks neat and works great. No barb needed. I didn’t even clamp the drain hose to the copper tube. Just push it on.
 
What do they say about great minds thinking alike???
 
I like the copper tube flaring idea. Keep 'em coming. The hatch does have a rubber seal but it won't keep a half inch of water from leaking through.


David
 
You could replace that mushroom head thru-hull drain with a flush thru-hull but I don’t think they are available with hose barbs. You would also need a coupling and pipe hose barb to connect the hose.
https://shop.hamiltonmarine.com/products/thru-hull-1-2--cf-250-full-threaded-flush-head-10578.html

I seem to recall using something similar when I added a drain in the bottom of a seat locker on our old boat. The key was getting the fitting flush with the surface as that's a really big countersink lip. Underneath I used a landscaping irrigation fitting to a hose barb.

It had to go through a number of layers of decking and I didn't want to risk water intrusion. So I drilled the hole oversize and then fashioned a mold to put a slug of epoxy around the edges and then re-drilled through that to the final diameter of the fitting. There was just enough thread underneath to get the barb elbow attached. Seems to work, solved the water/mildew problems in that locker and gave no outward signs of later complications through many winter seasons.

I don't know that you'd have to take an overkill approach like mine since that's probably just a thin shell of fiberglass. Just make sure to seal up around it properly.
 
I've modified some standard through hulls, with and without the hose barb, so they are turned into a flush type through hull.

I have a lathe but if you know anyone who has one it won't take long.

I've done it with bronze units and nylon units for much the same reason, the water overflows the standard ones and gets below.


I like the flaring and epoxy though.
 
I would start by removing the fitting and seeing if the area needs to be cleaned up. My solution would be to see if you could mount the same fitting from underneath by drilling 3 or 4 holes that are counter sunk in the seat. Use stainless steel flathead sheetmetal screws into the face that is currently above the seat.

The other solution would be similar to above except attach a 1" thick 2 " x 2" block of starboard underneath. Instead of drilling the hole so it comes out the bottom, have it turn 90 degrees out the side. Tap it for a hose barb fitting and route the drain hose so that it doesn't interfere with putting stuff in the compartment.

Ted
 
How about using a flaring tool with cooper tubing to make your own? After you drill your hole in the rim you can countersink it and use epoxy to glue it in. If you want barbs, get the torch and some solder.

This is an idea that has been used in several spots on my boat with good results.
 
Given that it's under a seat you might want to consider having a way to avoid small items from falling into it. Or at least make sure any hose connected to it empties into a readily retrievable area. I'm thinking rings or other jewelry.
 
Good point... maybe add a drop leg w cap w hose T'd off the side?
 
If it's already going into a bilge, leave it that way. Likewise if it's going into a sump box. Just make sure there's at least one point before going overboard that you'd have a chance to retrieve something. But also understand this is yet another place for crud to collect and clog, and be a potential winterizing factor.
 
looks to me like the hatch will leak regardless unless that groove is much deeper than it looks in the pix.
You may have two problems, a leaky hatch and a poor drain design. Replacing the hatch with one that seals may be needed then any of the above solutions can be used to replace the mushroom drain.
 
Thanks for all of your suggestions. I don't think making the mushroom drain flat is going to help. If I slowly dribble water into the hatch top, the groove fills with water and overflows into the bilge before the level gets high enough to begin to go over to the mushroom drain, flat or not.


So the only simple suggestion is to glue a flared piece of copper tubing into a hole in the groove, hook a hose to it and then to the existing drain line. Plug the mushroom fitting.


David
 
Greetings,
Mr. dj. I think Mr. B (post #19) has just hit upon the overall best solution. Fiddle diddling around with drains, filling and patching holes and the ever present possibility of a clog may cause you more grief than what you have now.
 
I believe it would be impossible to reliably seal the hatch cover.


David
 
Greetings,
Mr. dj. I think Mr. B (post #19) has just hit upon the overall best solution. Fiddle diddling around with drains, filling and patching holes and the ever present possibility of a clog may cause you more grief than what you have now.

A hatch could work, they have rubber seals under their door. One that's 'as large' as the existing hole might be easy to just install right over it. No cutting and no losing any strength the existing lip might provide (to reduce seat flex). Downside would be the hatch probably sitting proud of the surface and being a problem for an cushion over it, or as a toe-stubber.
 
If the hatch size is common perhaps installing a new flush hatch would be simplest.
 
I believe it would be impossible to reliably seal the hatch cover.


David
I'm thinking the raised rim of the hatch will prevent most? Of the water from ever getting to the removable cover and seal... but the seal and positive pressure of the latch should do a good job of sealing. If you recess the existing drain the combo should be affective.
 

Latest posts

Back
Top Bottom