GregBrannon
Guru
Our 8D start battery for the genny and stbd engine called it quits on an overnight last month. Thankfully, I was able to parallel the house bank to get everything started to finish the weekend and get us home. I replaced the 8D with two group 31s: Here's a pic of the new setup:
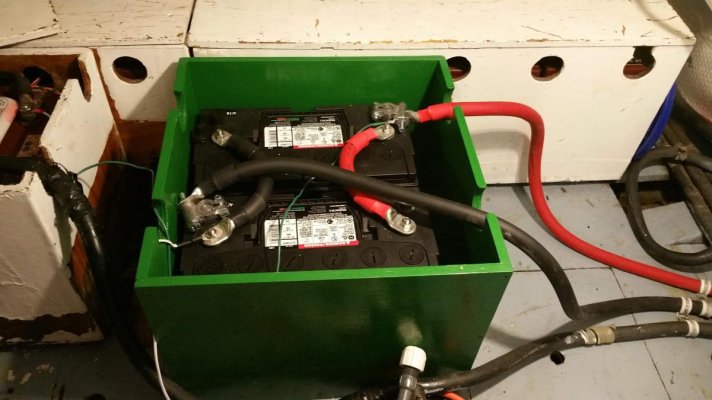
The cables and box are new. There's a lid for the box not shown. The three boxes partially visible behind and to the left of the new box each contain 4 Trojan T105s that make up the house bank. I decided it was a good time to replace the old charger that I assume came with the boat when it was new, and I decided on the Promariner Pronautic 1250P. Here's a pic of the new in front of the old after I'd wrestled the old one out of the engine room:
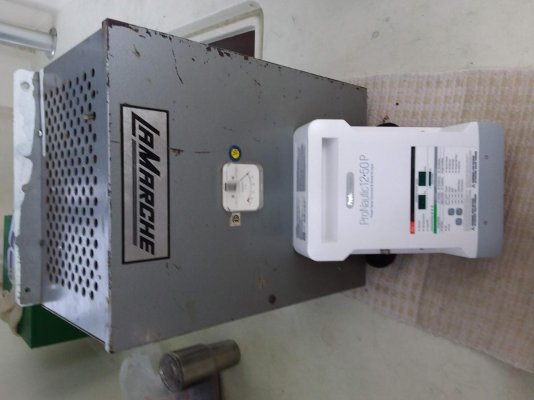
(I'll work on rotating photos another time. Other than that, adding photos is going better than expected.)
When I replaced the original charger, I discovered that it was able to do 2 banks and that it was wired to do both the start battery and the house bank. The existing inverter was also charging the house bank. I researched using 2 chargers on a single bank, and while it can be done to decrease recharge times if connected in an optimal way, the two chargers were not connected optimally. I was concerned that the failure of the 8D might have been caused or accelerated by the ancient charger, and now the house bank was suspect. I inspected the T105s and found that every one had a bulging case, some so that the terminals were raised and distorted. Not good. (I should have noticed this when I watered them monthly, but either I wasn't paying attention or it was a recent development.)
It looked like the season was over. I didn't take pictures of the bulging cases, but I don't think they'd have shown well anyway.
The house bank boxes were installed fore and aft with the two boxes end to end between the stringers. As I was taking out the house batteries, I noticed that the deck under the two end-to-end boxes was sagging with some delamination visible. That was unsettling. I removed the battery boxes to see how bad things were underneath. Here's what I found.
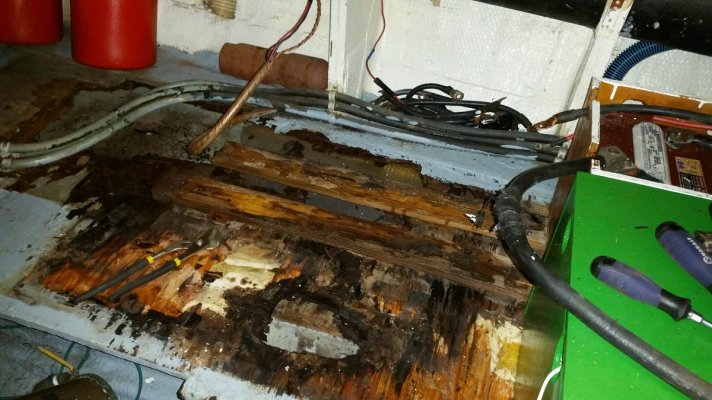
That picture looks like there may have been existing concerns when the boxes were previously placed, so the person doing the work added the 1x4s to increase (?) the structural strength. I originally thought I could cut out the deck to the boxes shown to the right of the picture, but as I made that cut, I saw the rot continued under those boxes. In the end, I pulled out most existing decking under the boxes and replaced it. It took some time getting it done, and I have pictures of intermediate steps, but here's how the new deck looked after install and paint:
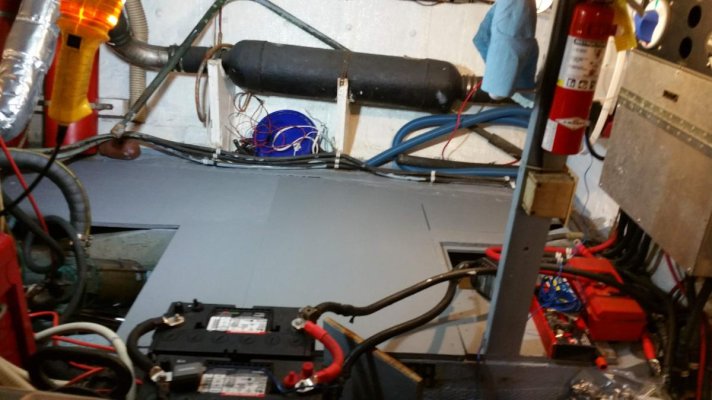
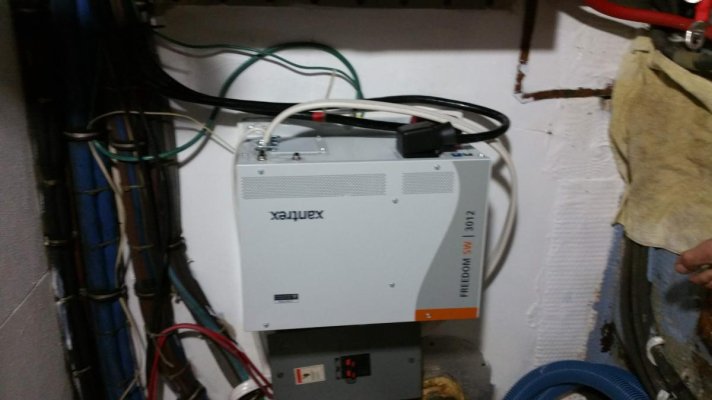
Our existing inverter was a modified sine wave Trace 3012, roughly 12-years old. We've had problems with the modified sine wave so had been looking forward to getting a true sine wave inverter (someday). I decided on the Xantrex Freedom 3012. It doesn't do the new battery chemistries, but I don't care. Here's the new inverter installed where the old one used to be:
Here are the new house batteries in the battery boxes, 2 reconditioned and one completely rebuilt:
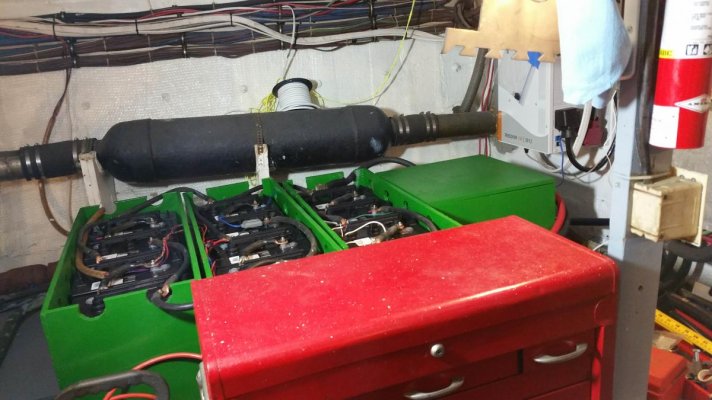
I installed them athwartship so that the weight would be borne by the stringers rather than running most of the weight between the stringers. The paint was still drying on the lids when I took the picture.
I'm not completely happy with the way the old wiring is run in and around the new boxes, but I'll fix that with time. There is some original welding cable you can't see that has to go, but I can't afford changing it all at once. Right now, everything is wired up and works great. I don't have much experience with it all yet, but I do know that the pure sine wave inverter doesn't distort audio from my tuner/amp like the old one used to. I was hoping to get the boat out for a day trip or a fall overnight, but it may have gotten too cold too quickly to make that happen.

The cables and box are new. There's a lid for the box not shown. The three boxes partially visible behind and to the left of the new box each contain 4 Trojan T105s that make up the house bank. I decided it was a good time to replace the old charger that I assume came with the boat when it was new, and I decided on the Promariner Pronautic 1250P. Here's a pic of the new in front of the old after I'd wrestled the old one out of the engine room:

(I'll work on rotating photos another time. Other than that, adding photos is going better than expected.)
When I replaced the original charger, I discovered that it was able to do 2 banks and that it was wired to do both the start battery and the house bank. The existing inverter was also charging the house bank. I researched using 2 chargers on a single bank, and while it can be done to decrease recharge times if connected in an optimal way, the two chargers were not connected optimally. I was concerned that the failure of the 8D might have been caused or accelerated by the ancient charger, and now the house bank was suspect. I inspected the T105s and found that every one had a bulging case, some so that the terminals were raised and distorted. Not good. (I should have noticed this when I watered them monthly, but either I wasn't paying attention or it was a recent development.)
It looked like the season was over. I didn't take pictures of the bulging cases, but I don't think they'd have shown well anyway.
The house bank boxes were installed fore and aft with the two boxes end to end between the stringers. As I was taking out the house batteries, I noticed that the deck under the two end-to-end boxes was sagging with some delamination visible. That was unsettling. I removed the battery boxes to see how bad things were underneath. Here's what I found.

That picture looks like there may have been existing concerns when the boxes were previously placed, so the person doing the work added the 1x4s to increase (?) the structural strength. I originally thought I could cut out the deck to the boxes shown to the right of the picture, but as I made that cut, I saw the rot continued under those boxes. In the end, I pulled out most existing decking under the boxes and replaced it. It took some time getting it done, and I have pictures of intermediate steps, but here's how the new deck looked after install and paint:

Our existing inverter was a modified sine wave Trace 3012, roughly 12-years old. We've had problems with the modified sine wave so had been looking forward to getting a true sine wave inverter (someday). I decided on the Xantrex Freedom 3012. It doesn't do the new battery chemistries, but I don't care. Here's the new inverter installed where the old one used to be:

Here are the new house batteries in the battery boxes, 2 reconditioned and one completely rebuilt:

I installed them athwartship so that the weight would be borne by the stringers rather than running most of the weight between the stringers. The paint was still drying on the lids when I took the picture.
I'm not completely happy with the way the old wiring is run in and around the new boxes, but I'll fix that with time. There is some original welding cable you can't see that has to go, but I can't afford changing it all at once. Right now, everything is wired up and works great. I don't have much experience with it all yet, but I do know that the pure sine wave inverter doesn't distort audio from my tuner/amp like the old one used to. I was hoping to get the boat out for a day trip or a fall overnight, but it may have gotten too cold too quickly to make that happen.
