Fuel tank replacement job

The friendliest place on the web for anyone who enjoys boating.
If you have answers, please help by responding to the unanswered posts.

fryedaze

Guru
Joined
Sep 4, 2011
Messages
1,721
Location
USA
Vessel Name
Fryedaze
Vessel Make
MC 42 (Overseas Co) Monk 42
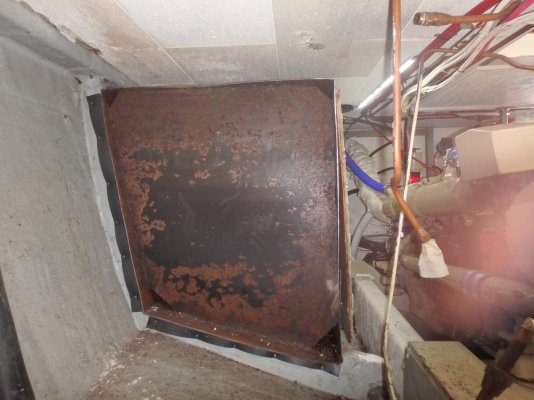
Well, its time for another tank replacement thread. I know we have done this many times, because I have spent hours reading the TF threads during my pre-job research. The tank has had about a 4 oz a week leak for about a year. It was very manageable but I want it fixed before it is not manageable and things go really bad. The tank is 175 gal, 62"X27"X31 shaped like the hull.
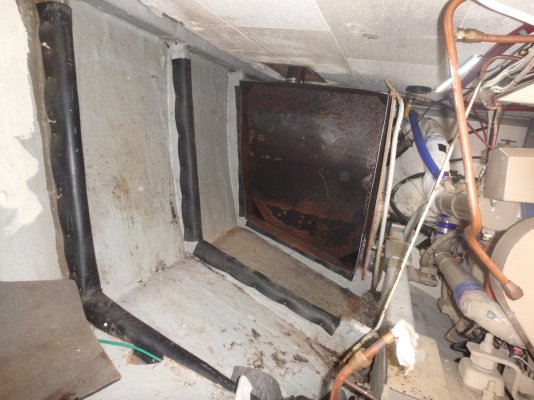
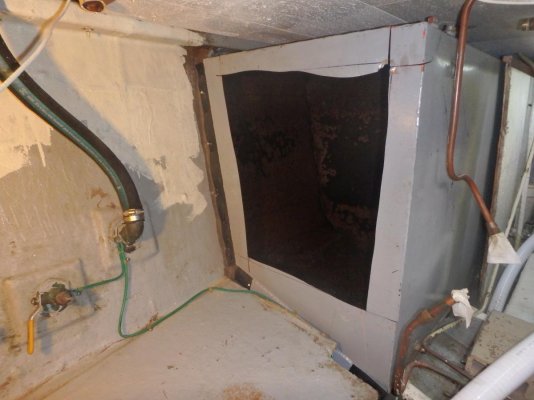
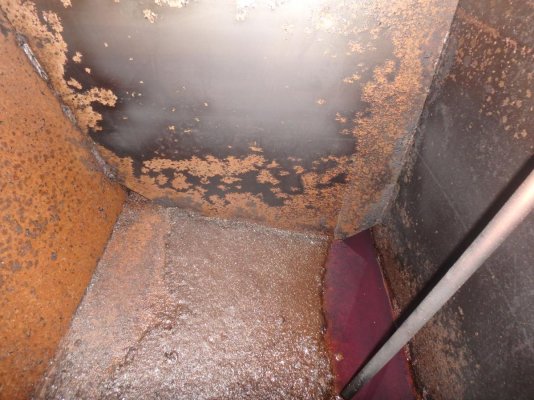
We spent the first day removing the holding tank, removing interferences and pumping the fuel over to the port tank. The hold tank hose removal was a little gaggy. Today we removed some of the soundproof enclosure and cut a hole in the forward wall to see what we a dealing with inside. Using Diablo carbide tipped Sawzall blade and I am impressed so far. The steel is slightly less than 1/8" thick.
The tank will be replace with two aluminium 31"X 27"X29" tanks piped together with 1 1/2" hose. Wish me luck. I will try to keep up with the pictures.

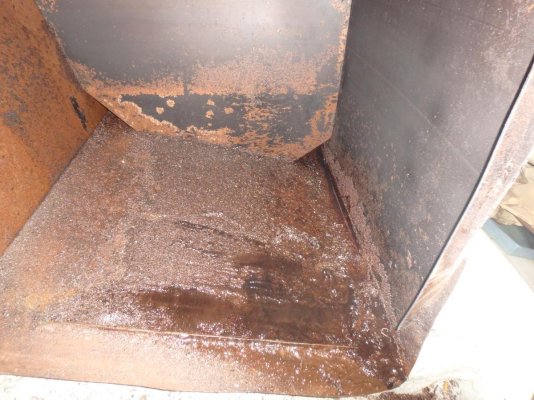
BTW, the sludge next to the fuel return pipe is 1/2" deep.
 

Attachments

  • P7233490.jpg
    P7233490.jpg
    91.2 KB · Views: 363
  • AP7233496.jpg
    AP7233496.jpg
    111.4 KB · Views: 363
  • AP7243498.jpg
    AP7243498.jpg
    114.4 KB · Views: 341
  • AP7243511.jpg
    AP7243511.jpg
    100.7 KB · Views: 355
  • AP7243502.jpg
    AP7243502.jpg
    191.4 KB · Views: 362
  • AP7243510.jpg
    AP7243510.jpg
    197.4 KB · Views: 355
Are you going to have to pull the engine to get them out and the new ones in?
 
Are you going to have to pull the engine to get them out and the new ones in?

No, I will cut it up into pieces to get it out of the boat. It is a tough job but, I have a great deal of patience and time.;)
 
No, I will cut it up into pieces to get it out of the boat. It is a tough job but, I have a great deal of patience and time.;)
Ain't nothin an old Nuke can't handle! Just like a steam generator replacement.....lots of planning and "slow is fast"!
 
Ain't nothin an old Nuke can't handle! Just like a steam generator replacement.....lots of planning and "slow is fast"!

You got that right. Add a little Old Weller Antique 107 on the rocks after a long day and we will get ur done.:thumb:
 
I see these type problems and often wonder why the "blivets" (rubber tanks) used by the army and others couldn't be put into a frame to prevent rolling around and use that as a tank replacement. Rather than removing engines and using a Sawzall on anything but the offending tank.
 
I'll definitely be following along as I will be doing the same job later this year.

Kevin
 
I am thinking about replacing my tanks. This is apparently the last boat of any size that we will own so I want to get everything done that may need doing, except routine maintenance, before I get too old to do it. I will have to pull the engines in order to even get to them. I probably will do one tank a year over the winter and clean up everything that is inaccessible with the engines in. Something to keep me busy over the winters.
 
Ha! I wish I could find Weller Antique over here......love that wheated bourbon!

Found a case in Southport NC in 2016. Had my name on a list here for 18 months and finally was "rationed" 3 bottles. I am a big fan of wheats too.
 
Last edited:
Fryedaze:

Thanks for taking and posting this brilliant series of photos. I appreciate how you started with the photo of the waste tank in front of the fuel tank, then one with the waste tank removed, then a photo of the hole you had cut in the front of the fuel tank, and then those last two shots of the interior of the fuel tank.

The visual image of the corrosion and sludge inside the old steel fuel tank is very revealing. Even though I have read about the corrosion inside old steel fuel tanks for years, it is remarkable to actually see a picture of it. The sludge, so close to the fuel return pipe, is mind-blowing. May I ask how old the fuel tank was?

I noted you are having to cut up the old fuel tank in order to remove it; how do you plan to get the new fuel tank back in? In other words, are you going with a smaller new tank?

Great job, and really great documentation.

Thanks,
Pea
 
Fryedaze:

May I ask how old the fuel tank was?

I noted you are having to cut up the old fuel tank in order to remove it; how do you plan to get the new fuel tank back in? In other words, are you going with a smaller new tank?

Thanks,
Pea

The tank is 29 years old. 5200 engine hours. Probably about 10,000 gal of fuel through this tank. I will use two smaller tanks.
 
"I will use two smaller tanks."

This is a great solution as smaller tanks can be empty , until required .

Plastic tanks seem the ultimate solution , tho I have not yet seen plastic with useful sumps , just bottom drains.
 
Hi Dave,
Definitely time to do the job. That's an amazing amount of sludge. Are you planning to replace the sanitation hose with the non permeable type?

Ted
 
"I will use two smaller tanks."

This is a great solution as smaller tanks can be empty , until required .

Plastic tanks seem the ultimate solution , tho I have not yet seen plastic with useful sumps , just bottom drains.

Plastic is probably the best. I assumed the cost would be significantly more, but I haven't researched it. The two custom aluminium replacement tanks will cost around $1600 to have fabricated. I would loose too much capacity if I used off the shelf plastic tanks.
 
Hi Dave,
Definitely time to do the job. That's an amazing amount of sludge. Are you planning to replace the sanitation hose with the non permeable type?

Ted

Yes, man they are pricey!
 
Did you price the hose by the roll? I bought a 50' roll and had about a foot left. Think the Trident 101 was around $300 for a roll.

Ted
 
Did you price the hose by the roll? I bought a 50' roll and had about a foot left. Think the Trident 101 was around $300 for a roll.

Ted

Not yet, thanks I will.
 
Plastic is probably the best. I assumed the cost would be significantly more, but I haven't researched it. The two custom aluminium replacement tanks will cost around $1600 to have fabricated. I would loose too much capacity if I used off the shelf plastic tanks.


Peggie Hall has often mentioned (Ronco? I think) tanks that can be had in a bazillion various sizes and shapes... and maybe she's said they'll custom make one for you, too. (Not sure about that last.) Anyway, if those tanks, or some products they sell, are rated for fuel, might be worth a look...

BTW, our club will be in Solomons, first week in August at Zahnisers. I might be able to spring for a beverage... :)

-Chris
 
Day 3

Today we spent 8 hrs cutting up the tank. The Diablo carbide tipped blades are GREAT!. When making vertical cuts the weight of the saw is all you need with a fresh blade. I used 8" and 4" blades. the 4" blade were used against the hull so I didn't risk cutting a hole in the boat:). I only used 5 blades and I didn't that so the cutting went easy.
The tanks had two baffle plates. The sludge was the same through out the tank. I took 1.5 gallons of sludge out. The sludge had the consistency of thick cake icing. I believe it is made up of rust and what ever the black coating is on the inside of the tank.
Cutting up the tank is a heavy physical job and I will be "feel the burn" for many days.
The boss monitored the job today. She was Safety, QC, Supervisor, Management, and HR. At the end of the day she said " now I see why the boat yard owner said this was a nasty dangerous job, you wont be doing the other tank, someone else will cut it out." I hope she forgets by next year. I just saved a bundle:blush:.
Tomorrow is clean up and measuring for new tanks. After tomorrow I will take a break until Tuesday.
 

Attachments

  • AP7253519.jpg
    AP7253519.jpg
    124.7 KB · Views: 210
  • AP7253522.jpg
    AP7253522.jpg
    123.8 KB · Views: 206
  • AP7253524.jpg
    AP7253524.jpg
    189.4 KB · Views: 192
  • AP7253528.jpg
    AP7253528.jpg
    141.9 KB · Views: 196
  • AP7253530.jpg
    AP7253530.jpg
    198.2 KB · Views: 197
  • AP7253531.jpg
    AP7253531.jpg
    117.6 KB · Views: 182
  • AP7253553.jpg
    AP7253553.jpg
    148 KB · Views: 200
  • AP7253554.jpg
    AP7253554.jpg
    131.6 KB · Views: 204
Good job. It looks like a tough job. I had a tank replaced in a previous boat. They cut out the steel tank and made a custom fiberglass tank. Had to cut out the back of the cabin to get the new one in but it was a beauty. Good luck and keep us informed.
 
Did you find the root cause of the leak? Mine was from 35+ years of moisture on the outside bottom of the tank.

I used a coal tar epoxy to coat the exterior of the new tank before installation. It’s very thick and sticky, but I highly recommend it.
 
Looks like (photo#5) there was actually a low point drain fitting right behind the pickup/return lines, was there a valve installed there?
If so, it’s use could have saved your tanks.
Thanks for the photos, a grim reminder that tanks need regular maintenance.
 
Definitely install drain valves at the very bottom and install the inspection ports immediately too.

I just replaced all my poop hoses with schedule 40 PVC pipe. Permanent and cheap. NO y-valves, only on/off valves. Install with threaded couplers every section or every few feet so you can unscrew and remove the various assemblies. Works great. Oh, install two vent lines to the poop tank for that spring freshness a happy poop tank can provide.

I don't know your boat model but it might be a good time to investigate a fuel chest with a recessed filler and an overflow drain that drains back to the tank?
 
Did you find the root cause of the leak? Mine was from 35+ years of moisture on the outside bottom of the tank.

I used a coal tar epoxy to coat the exterior of the new tank before installation. It’s very thick and sticky, but I highly recommend it.

The bottom inside weld seam had a very small crack at one of the support stringers. There was no way to get to it. I am familiar with coal tar. I am inclined to let the aluminium breath. Years down the road coating can lift and set up corrosion if moisture enters.
 
Thanks for showing this!
 
Make sure the tanks are made from a 5000 series alloy and DO NOT PAINT.
 
Make sure the tanks are made from a 5000 series alloy and DO NOT PAINT.

Thanks, my research also cam up with don't paint or coat.
 

Latest posts

Back
Top Bottom