Water Pump Impeller Fragments

The friendliest place on the web for anyone who enjoys boating.
If you have answers, please help by responding to the unanswered posts.

grandbanksbayfield

Senior Member
Joined
Nov 22, 2017
Messages
132
Location
U.S.
Vessel Name
Solvogn
Vessel Make
Grand Banks 32
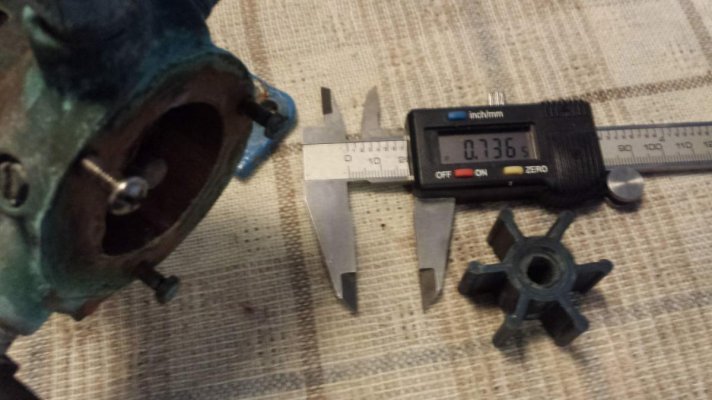
Three days ago while on the final lap out of Lake Superior (Bayfield WI to Mackinaw City MI) this happened: We tied up at the Harbor of Refuge just south of Whitefish Point. Boat (GB32 with 135 HP Lehman) had been running at about 175 F for the past 200 miles. In the morning we started across Whitefish Bay towards to Sault St. Marie and noticed she was running at 190 -- a sudden, unwelcome change. I texted my mechanic back in Bayfield and he said to check the intake into the freshwater cooler when we stopped, but that it was probably okay to keep running if we had sufficient coolant in the engine block, temperature was constant and there were no obvious leaks, etc. The boat had a good water flow out the exhaust. We proceeded and got to Mackinaw City the next day with the engine running right on the 190 mark. The following morning we took the endcaps off the engine cooler. The zinc had completely turned to white chalk and crumbles of it were in front of the cooling tube unit. Removed all of this crap and flushed out the unit from both ends with a garden hose and sprayer. All tubes were clean and we could shine a flash light through them, but they had a little scale in them. Next: Removed the hoses from the ends of the oil cooler (first thing behind the water pump). Its intake end was FULL of crumbled parts of water pump impeller blades. There was almost a quarter of a cup of these in the intake end. We got them out and then backflushed the unit and it was clean. Thereafter, we assembled everything again, tightened down the hose clamps and declared a victory. Two things we noticed that should be heeded: First, when removing hoses from these units, do not loosen them with any tool that will compress them because the end nipples are made of soft bronze or brass and can crush easily getting out of round. Secondly: After the oil cooler unit, the large particles will not be able to get into the engine cooler tubes - they are about 3/16 inch in diameter. If those tubes are clear, you probably have nothing to worry about in the transmission cooler. Finally: If you buy an older boat, it us a good idea to disassemble this system or have a marine mechanic do it for you and check it for obstructions. A lot of people replace fried water pump impellers and never even think of where the pieces went. Another mystery: Why did this not happen early in the voyage? The fragments were there when we left Bayfield. Perhaps running the engine at real cruising rpm for hours on end compacted them together so they were less porous? Who knows? This situation was just like we had installed a new, hotter thermostat. By the way, we started the job at eight and buttoned it up at eleven and went out for lunch. It was not fun, but very interesting. My friend Lee and I do not plan to come out of retirement and go into marine mechanics -- believe me!!
 
Last edited:
When outfitting ocean sailboats we would install a Sendure Y strainer just after the rubber impeller sea water pump.

If they were made in sizes to fit larger systems it would be a simple install, and prevent this style of problem.


Inspecting / cleaning is only seconds .
 
Did you change your impeller also??? Got to wonder where those pieces came from,if not from the impeller that's in there now. Maybe time for new impellers and zincs.
 
Last edited:
Interesting- Two days ago replaced a perfectly good impeller but because the boat is new to us I stuck my finger up the pump outlet. Neatly folded up in there was a large chunk of some past impeller nearly blocking the outlet but not visible from the pump.
Had to remove the hose to get it out.
I'm sure the engine would have been overheating if run like this.
Your post makes me think we should check the inlet side of the exchanger!
 
Solvogn

Did you change your impeller also??? Got to wonder where those pieces came from,if not from the impeller that's in there now. Maybe time for new impellers and zincs.


Impeller had just been changed. Checked that out first.
 
When outfitting ocean sailboats we would install a Sendure Y strainer just after the rubber impeller sea water pump.

If they were made in sizes to fit larger systems it would be a simple install, and prevent this style of problem.


Inspecting / cleaning is only seconds .

I have 2 of those Sendure inline strainers before the pumps. They are actually screwed into the elbow screwed into the ball valve thru hull. For years I wondered what they were, they were missing the filter. I made new filters so now they are functional. they lay horizontally. In an emergency flooding, you could close the thru hull and undue the filter cap and
i suppose suck in bilge water as an extra bilge pump, go to be pretty desperate to try that, I think so.

For me they help protect pump water coming into the pump.But never have they caught anything in their fiters.

What I have experienced, impeller failures cause engine overheating. And people may leave little rubber bits in the throat of the heat exchanger, which on my boat is one center bolt to remove end cap to check and it is only couple inches deep. I have to take off the pump to change an impeller and immediately connected after the pump with 2 inches of hose is the HE.

If I see a missing piece of an impeller, than I will check the HE by removing the end cap.
 
When outfitting ocean sailboats we would install a Sendure Y strainer just after the rubber impeller sea water pump.

If they were made in sizes to fit larger systems it would be a simple install, and prevent this style of problem.


Inspecting / cleaning is only seconds .

That's a brilliant idea.

If there was a strainer with a glass bowl you could see when the impeller was starting to fall. That said, an annual replacement is a good practice and would avoid the problem.
 
"I have 2 of those Sendure inline strainers before the pumps."

Before the pump filters only water entering the pump

After the pump catches even tiny bits of impeller.
 
You dodged a bigger bullet. Once the zincs go, the copper tubes are next. Typically the transmission oil cooler. Resulting in a transmission full of sea water. Zincs are cheap, keep a large supply on hand.
 
Finding all the pieces require extra work to disassemble the system. Mechanics bypass this stop because owners balk at the cost for what they consider a simple impeller change.
When I boat my boat I found zinc and impeller pieces ready to block cooling tubes.

For those boats with sudden temp changes or sometimes hot but other times cool look for impeller pieces that sometimes block then fall down away from the tubes.
 
Did you change your impeller also??? Got to wonder where those pieces came from,if not from the impeller that's in there now. Maybe time for new impellers and zincs.

I had this boat 5 or 6 years without losing any impeller bits, and developed an overheat problem that was solved when I found impeller bits in the transmission oil cooler, blocking the flow. Those bits had been there since before I had the boat, but took that long to migrate to a position where they could cause an issue.
 
"I have 2 of those Sendure inline strainers before the pumps."

Before the pump filters only water entering the pump

After the pump catches even tiny bits of impeller.

Yes, but by design of my system, not possible to physically fit that way.
It has been setup like that for almost 50 years now.
 
I had this boat 5 or 6 years without losing any impeller bits, and developed an overheat problem that was solved when I found impeller bits in the transmission oil cooler, blocking the flow. Those bits had been there since before I had the boat, but took that long to migrate to a position where they could cause an issue.

My HE tubes are all 1/4 inch tubing. Any impeller fragments I have seen cant fit, they are too big.

My raw water flow from pump is all of it into Engine HE, then it heads into the combo oil trans coolers and splits off that into risers and the exhaust mixer.
 
My Sendure HE are 90/10 nickel copper tubes, lots were made that were not nickel tube. These are original to the 1970 boat. The combo cooler, I know one was replaced by previous owner as they dont match, I think other is original Sendure brand. Neither has a place for a zinc, but do have a 1/8 inch drain plug.

Screenshot showing 90/10 nickel/copper tubes, I am not surprised most HE are not made of nickel tubing! Someone specced a choice of nickel tubing, I suppose this was Palmer, one thing they did right.

Think of all the zinc metal that would not have been wasted, and also the replacement cost to owners not wasted and also wasted lost profits for the companies making HE. They plan these to eventually fail.

I have been into my Sendure HE, and it was silver braised the tubes to the thick copper outer shell. I suppose some HE tubes are lead soldered?

My Onan MCCK HE I think must also be nickel tubing as in almost 50 years of life in the sea water, has no leaking tubes, and there are no zincs in the MCCK system at all that uses a HE.
 

Attachments

  • PALMER.png
    PALMER.png
    83 KB · Views: 69
Last edited:
This is not rocket science. There is a simpler solution. That sea-water circuit will kill your engine somewhere you don't want to be at exactly the wrong time. Change the impeller EVERY year. That's it. If you use your engine more than the average, then change it every twice a year. Its a piece of rubber that spins billions of times inside a metal housing - what is fundamentally wrong with that concept?
 
Last edited:
I was out for 5 hours today in Chisman creek. About 2 hours into running the gen, I heard a hissing sound. No raw water flow. I do have a high temp cut off on the exhaust, shut it down before it shut itself down. I have a 7 lb cap. Picked up hatch and it was steaming out the HE and could smell hot antifreeze. Let it cool, restarted and saw no water exiting the with exhaust and the water lift muffler sounded hollow. So I assume the impeller has self destructed. I was about 3 years old.

I will show some pics in a few days. Impeller was made by Globe.
 
Price has gone to ridiculously high for MCCK impellers as in $70 and much more.

I am going to convert my existing pump shaft from D drive style to pin style.
Jabsco impeller number 4528-0001 is a $7 part off ebay and uses a 3/8 shaft.
Plan is to hacksaw a slot into the SS 316 pump shaft, then spread open to fit the pin of the new impeller. Since the seal area for the shaft is 3/8 or bigger in these pumps, wont impact the rear seal at all. SS 316 is a very malleable alloy.
Problem is Onan sold itself to Cummins and Cummins abandoned Onan parts, so stuff has gotten very pricey.

Same sized dimensions as the Onan MCCK impeller, 1 9/16 height, 3/4 width.

https://www.ebay.com/itm/Hot-Sell-W...472109?hash=item44217acced:g:TGoAAOSwh9FbBMhM
 
It looks like Globe has an impeller of the right size and configuration for about $40 but if your modifications to accept a pin drive are as easy as they sound it seems like a good way to go.

Ken
 
It looks like Globe has an impeller of the right size and configuration for about $40 but if your modifications to accept a pin drive are as easy as they sound it seems like a good way to go.

Ken

I think it will be great to use a very common impeller used on many engines.

The Globe, I have in there has failed, and lots of negative reviews around too.
Either the 'Brandonite' is not what it used to be or its those composite plastic cores cracking.
The Globe, I had to file the inside hole bigger to fit the pump as others with Onan water pumps said also. Back then I called and talked to them and complained, and they went and measured and claimed everything they had was properly made, but this was not my experience.

After I get into this, I will post up pics of the conversion process. I rebuilt a few of these, using new ball bearings and seals, so I am familiar with the pump. The entire shaft can be separated from the outer bearing shell by removing the end seals and popping off the ball bearing retainer. And you can replace the balls. I rebuilt the Oberdorfer and Onan pump on my MCCK. Basically it is like any water pump, even the same size shell is used in cars.
 
Last edited:
Removed the pump. Impeller did not disintegrate into pieces, the rubber still flexes and no cracks, but when measured it is worn on its side which is why it lost prime. 0.736 is what it measures and it is supposed to be 0.75.
I was able to suck on the input line it flowed well, boy that was nasty, it got in my nose too.

I think a simple small AC electric water pump could work. What is the pumping losses of an impeller vs the electrical cost of centrifugal pump? I can mount it low enough to work.

Still plan to split open the drive end for the new impeller.
 

Attachments

  • 20180629_120532.jpg
    20180629_120532.jpg
    90.1 KB · Views: 70
This is not rocket science. There is a simpler solution. That sea-water circuit will kill your engine somewhere you don't want to be at exactly the wrong time. Change the impeller EVERY year. That's it. If you use your engine more than the average, then change it every twice a year. Its a piece of rubber that spins billions of times inside a metal housing - what is fundamentally wrong with that concept?


That is my thought. I’ve never replaced an impeller that had missing pieces off the blades. Maybe because I’ve always replaced the impellers yearly?
 
I will give credit to Globe impellers, I have been using 2 for 2 different pumps and neither has disintegrated yet, although they wear the edges down, which is to be expected.
Another good reason to change them out.
I bought this globe impeller in October 2013, so now is 2018, almost 5 years of use! I checked my email to find out the date. Of course not continuous usage of the gen. I do not keep a record of hours, but might average a couple hours per week for about 4 years.

I used my dremel to slice down a slot in the 316 SS pump shaft, and it went fast. Kept it cool by dipping in water. The wheel is too small to finish, so I used my handheld jigsaw blade to finish the slot. When the new impeller arrives, I will spread open the slot and fit it properly parallel to the bore of the impeller.

The whole thing seems very easy so far. It ought to actually be about a perfect fit when I am done.

Behind this is a ceramic seal disc and rubber washer. Since its diameter is much bigger than the drive shaft, it will fit fine over the expanded drive shaft. A C clip secures rubber disc and ceramic seal washer to the shaft, and it fits into the ring slot cut in the shaft.

My plan is to slam a piece of steel down the slot the width of the pin in the impeller, then bend the ears in parallel to fit the bore. Since I am going from 5/16 to 3/8, this ought to be just about perfect.
 

Attachments

  • 20180629_131123.jpg
    20180629_131123.jpg
    114.4 KB · Views: 79
  • 20180629_132141.jpg
    20180629_132141.jpg
    72 KB · Views: 65
Last edited:
"I have 2 of those Sendure inline strainers before the pumps."

Before the pump filters only water entering the pump

After the pump catches even tiny bits of impeller.


When an impeller sheds its vanes, the debris are forced into the pumps gratings by the remaining vanes, and though you might think that would be only on the downstream side of the pump, it can happen on the intake side too.
These will lurk between the pump and he strainer, often only blocking the pump inlet when the motor is revved up.
So a wye strainer on both sides of the pump is not too far fetched, for those that refuse to install a new impeller annually.
Two of them before the pump might have been an attempt to sidestep an intake strainer.
 
I burned an impeller in my 1989 Ford Lehman engine. As I recall I sucked up a plastic bag, over heated, and before I knew it, destroyed the impeller. Now looking back, maybe it overheated because the impeller exploded. Took a few hours climbing over this stb engine to extract what I could from the pump body, then dismantle all of the hoses to get out the bits. Also, the heat exchanger zinc was toast (this may have been a different event). When I cleaned it up I used bamboo skewer sticks to clean out the tubes. Also, I only bought the factory zincs once. Then I bought zincs online for a fraction of the cost and cut 1/2" off so they would fit right. Engine ran cool after that.
 
Why are you using zinc anodes in freshwater and not magnesium?
 
Hi from across the Atlantic in Guernsey, Channel Islands.

I remove, check and replace if necessary, the impellors on our two Cummins and two Onans every year. It's far too much hassle to find the bits if one breaks. I buy replacements from Cummins (and in the UK, Onan parts come from Cummins) just to make sure I'm not buying sub-standard copies.

I also carry complete replacement pumps which are far easier to replace than impellors at sea if something goes wrong.

And for zincs, yes, changed every 6 months if the boat is not used, and every 3 months if we're cruising.

I you have a limescale build up in the engine, I used this method to de-scale: Descaling the heat exchanger | Play d'eau

All the best - GPB
 
I successfully modified the pump shaft to take the pin drive impeller style.
I am not familiar with the Jabsco 4528 impeller design, does the SS pin simply push into the impeller, or screw in?

On this one, it simply is held by the rubber, not threaded into the brass. I was wondering what would happen if the pin worked out, would be bad. I used some instant glue and secured the pin to the impeller.

Perfect fit to the pump and shaft now. the pin is quite a bit wider that I thought.
And if your going to press this apart, don't press on those ears, press on the bottom of the slot. Quite possible those smaller ears could bend now. Or have a collared adapter to slide over the shaft when pressing it out.

I actually have a backup original pump in case this mod fails, but it wont fail. This is how they work.
 

Attachments

  • 20180703_153310_5.jpg
    20180703_153310_5.jpg
    188 KB · Views: 55
Last edited:
Its hard to see for sure but is that a threaded "pin" in there? I would have assumed the impeller came with the pin in place. Either way, I wouldn't feel comfortable relying on glue to hold the pin in. Next time, I would would suggest using something like a spring pin (sometimes called a roll pin) that has a bit of a press fit in the impeller.

Ok I looked it up and I'm a bit surprised how they do it. It looks like a set screw to me. Next time I would suggest using red loctite on the screw threads. Or perhaps "buggering" the threads with a pair of pliers or something so it is a bit hard to screw in which should keep it from backing out. Or maybe the action of the drive shaft on the "pin" buggers the threads and keeps it from backing out? Obviously, it must work.

Ken

It must work because most people would just put it in without thinking.
I also got a close up picture of a genuine jabsco, and it shows no threads, just slides in. The rubber must be sufficient to hold the pin in place.

https://www.amazon.com/Jabsco-4258-0001-Impeller-4528-0001-P-Replacement/dp/B077QDNJQJ

I ordered another exact same one for less at $3.96
It feels like good quality rubber on this impeller.
https://www.aliexpress.com/item/Imp...herwood-9979-Jabsco-4528-001/32714701567.html

Loctite would help it stay in place. but got to make sure does not overflow which would interfere with being able to slide it onto the shaft. The small amount of instant glue, I had t scrape off the inside of the impeller bore for it to again smoothly slide on.

I also thought you might be able to expand the ends like a rivet by hitting it with a drift, but the might slightly bend the pin, then it wont slide on.

This impeller is also used on some shafts where is just a pin hole not a slot.

This SS pin is actually a long set screw, so you can turn it with an angle wrench.

I really like switching away from a design that is going to have fewer future buyers and parts selling like gold, saw one seller selling a genuine Onan impeller for $103, which is crazy.
And nice to get these so cheap now.
 
Last edited:

Latest posts

Back
Top Bottom