Mounting stanchions to teak rails

The friendliest place on the web for anyone who enjoys boating.
If you have answers, please help by responding to the unanswered posts.

Westiculo

Senior Member
Joined
Feb 27, 2017
Messages
271
Location
US
Vessel Name
Rose Mary
Vessel Make
42 Grand Banks Motoryacht - 1985
I'm trying a different method for mounting my rails.
My varnish had gone to **** and water had rotted the wood at most screws holding the rails on and the stanchions to the cap rail.

I want to avoid all rot and I never want to do this again. See what you think of my approach.

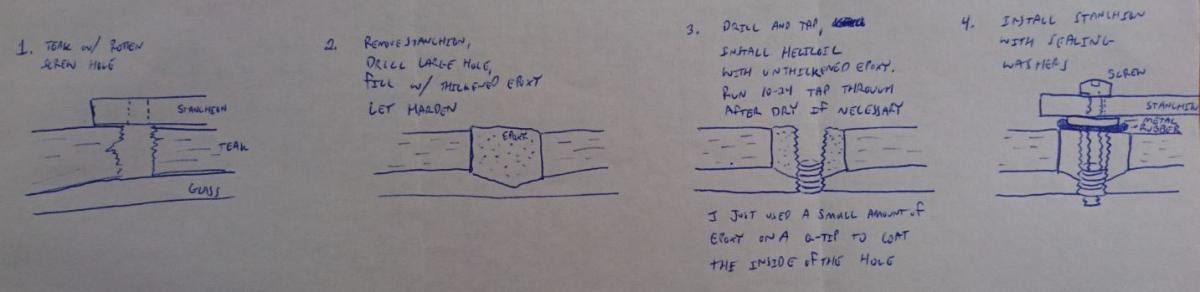
I over-drilled the screw holes with a large size bit and filled the hole with thickened epoxy. Drilled again and threaded in a stainless helicoil with a bit of epoxy. I ordered some sealing washers from mcmaster that have a bit of neoprene rubber on the back side (see photos). I am mounting these washers between the stanchion and the wood with no other sealant/caulk/butyl.

I feel like a genius! No caulk or butyl mess, the stanchions no longer ding up the teak which lets moisture in to ruin the varnish job, and even if a tiny bit of water gets in the screw holes, they are impervious due to the epoxy. Most importantly - my rails are rock solid. The only downfall is it took 2 full days to make it happen.

What did I overlook?? Will it work?
 

Attachments

  • Rail mounting.JPG
    Rail mounting.JPG
    48.4 KB · Views: 109
  • Standoff rail stanchion.JPG
    Standoff rail stanchion.JPG
    55.7 KB · Views: 113
Greetings,
Mr. W. Very nice. A couple of things that may or may not be an issue. IF the rubber degrades, the stanchion will loosen. Any stresses imparted to the stanchion will be focused on 4 points as opposed to spread over the whole base of the stanchion. Water will collect under and be encapsulated by the bolt heads and may lead to crevice corrosion. OK, three things...
 
I do like the idea of the helicoil. Makes it easier to install and remove the stanchions, as necessary.
Yours is the first installation I have heard of.
I agree with the problems of force dispersal and the deterioration and compression of the neoprene rubber washer.. If you continue in your desire for washers, nylon washers might be better choice.
 
I think (and hope) that’s about as good as one can do with it....surely better than factory. Lets us know if your genius become a frustrated genius over time. A boat and nature often make fools out of our best efforts, and this one was a good one.
 
Thank guys. Good points. I am hoping the neoprene stays solid for a good long while. It's supposed to be highly weather and salt resistant. If it does go bad and the stanchion gets wobbly, at least I know it has gone bad. The force is now distributed into the epoxy at the four points instead of into the teak - I'm fairly happy about this. The washers are a combo of neoprene bonded to stainless so they dont make a watertight seal with the stanchion, just with the teak. My thought was if water gets in between the screw and stanchion, it wont be around long before evaporating since it isn't truly sealed.

Nature has definitely made me a fool before, so I'll let you know if the genius lasts.
 
Hi West,
Is this the McMCarr washer you chose?...

"These washers are rated to withstand pressure up to 100 psi. They are one-piece rubber-to-metal bonded washers that create a stronger seal than metal or rubber alone. Made of 18-8 stainless steel, they have good chemical resistance and may be mildly magnetic. The silicone seal has excellent weather resistance. Washers are reusable."

Interesting idea you came up with there.
RSVP towards the end of the season and tell us how it's doing, thanks!
 
I actually used the ones that aren't pressure rated with the neoprene seal. They are decent. I have this theory that if it seals too well, water ends up getting in there and rotting stuff, better to keep most water out and making sure there's still a pathway to evaporate. I have used the ultra high pressure 316 washers before with the pvc seal. Those are freaking amazing. Absolutely no water getting in, they're also pretty expensive and not reusable which is why I went for the other kind. Try out those pvc ones sometime though, they are awesome. I've never been so excited about washers before.
 
Kudos! For thought, action and execution!

However, more thoughts but w/o action or execution:

Are not the Teak railcaps mounted on the fiberglass bulwarks? Why, then, don't the stanchion fasteners extend into the fiberglass rather than depend upon the Teak?

Obviously, you could never (reasonably) install backup plates and nuts under the fiberglass. But you could ensure that your stanchion fasteners did engage on the 'glass by using adequately sized sheet metal screws with the correct pilot holes. After all, that's what's holding the Teak railcap on to the boat. You could have drilled and tapped for machine screws into the fiberglass were you confident that there was enough 'glass thickness to develop enough strength in the smaller threads. You're basically doing the same thing by bonding the helicoil into the Teak, except that the Teak is transferring the load through its bedding and fasteners to the boat's 'glass.

As for gaskets doing all the work of sealing, that's pretty common anywhere. I'd suggest making gaskets of neoprene (think neoprene or EPDM roofing samples...) sized shy of the outline of the stanchion base and I'd bed it all in sealant to keep water out of the space between Teak and base.
 
Good call on fastening to the glass, not the teak. When I did it I drilled straight through the teak with the large hole so the thickened epoxy goes all the way down to the fiberglass below. I then installed the helicoils 3/4 inch deep so they are attaching the stanchions to the fiberglass not to the teak, as you have pointed out. Unfortunately, there was only about 3/16 inch of fiberglass under the teak, so it was hard for me to drive the helicoils in far enough without driving them straight through. I was probably being on the conservative side, so they are partially installed in the glass and partially in the teak portion if that makes sense. Only downfall here is that it would definitely be difficult to remove the cap rails, but it it's already extremely difficult to remove the cap rails since they are bedded solid.
 
Sounds good! When you say 'drive' the helicoil, what do you mean about how the 'coil engages the hole? Are the 'coil's threads engaging in an epoxy-laden hole in the 'glass? If so, how did you keep the epoxy from seeping through the helicoil into the space required by the fastening?

Inquiring mind wants needs to know! I'm preparing/girding myself for installing 133 similar threaded inserts in our 1857 house's windows. I have made interior storm sash for 18 of the huge double-hung windows and pointy-top storm sash for the attic Gothic Revival windows. I initially fastened the storm sash onto the window frame using ordinary 'deck' screws but a few years' removal and replacement (seasonal for some, occasional cleaning for all) means stripped holes; I then installed 10-24 threaded inserts but it's hell finding the holes w/o cross threading, or missing the insert altogether, and consequent cross words. I'm contemplating replacing all the fasteners with 1/4-20 capscrews and inserts but the space available in the frame means that boring the oversized hole and installing the insert means making a splintered mess. The pic is of the sort of insert McMaster-Carr sells, available in zinc or stainless and made for soft wood. Thinking I'll have to mill the holes with a small router/Dremel and epoxy the insert in.
 

Attachments

  • insert.png
    insert.png
    10.6 KB · Views: 233
West..., "I've never been so excited about washers before."

LOL
I hope you and your washers will be happy together. May you two have a lasting and fulfilling relationship.
 
Last edited:
Great Job I think you have a great fix if the washers hold up as hoping
 
Greetings,
Mr. DH. I have used such an insert to repair one of MY stanchions in a manner similar to Mr. W. minus the epoxy. I used brass inserts and butyl tape hoping that the tape would seal sufficiently well to eliminate any rotting of the teak around the insert due to water intrusion. I plan (HAH!) to do the remaining stanchions at some point in the future.


I can appreciate the alignment difficulties you describe IF the stanchions had to be removed on a semi regular basis. When we had storm windows, eons ago, they were attached using hook and eye fittings for some and those twisty lock things for some of the smaller ones.


th
 
Heckrotte, that looks like a helluva nice insert - I just used the standard helicoil; they seem to do the job. It can be tough to get them to line up, like you mentioned. It's easier in the stanchions because I set them pretty deep, and used the stanchion as a pattern to drill the holes. Alignment is much tougher if they're set right under the surface.

Made a horrible picture of how I did it: see below.
When you can't read my writing.
1. no surprise, your teak rotted right around the screw hole
2. remove stanchion, drill large hole, fill with thickened epoxy, let harden
3. drill and tap, install helicoil with unthickened epoxy (I just used a small amount with a q-tip to coat the inside of the hole), run appropriate tap through threads after it's hard if necessary
4. install stanchion with sealing washers

For the helicoils I bought (10-24), you purchase a 10-24 helicoil tap and run it through the hole. then you screw the helicoil in and break off the tang - this is the part where I added a little unthickened epoxy to make sure the helicoil was good and stuck in there. Some of it does seep through the threads, which is why you run a normal 10-24 tap through after it's hardened to make sure the threads are clean. Just let the epoxy seep through, then clean it up afterwards - this should work as long as you don't use a crapload of epoxy in a blind hole, then you'll just end up with a helicoil embedded in epoxy.
Hopefully that helps,

Wes
 

Attachments

  • How she be done..jpg
    How she be done..jpg
    34 KB · Views: 83
Culo,
I would (and do) fill the whole are under tha stanchion plate w SikaFlex or equivalent. And my screws are machine threaded. They act like self tapping screws in the wood and and FG below. The screws are quite long.

Never had a problem. No washers or epoxy needed. And the lateral forces on the stanchion won’t transmit to rubber washers and alow movement back and forth pushing on the washers. Sorry but I don’t care for your idea.
 
From a engineering point of view the washers are a bad idea in many ways. Sorry but I think you have invented something that didn't need fixing.
 
From a engineering point of view the washers are a bad idea in many ways. Sorry but I think you have invented something that didn't need fixing.

You're probably right. In my restoration project I'm just so tired of scraping: caulk, butyl, silicone, the list goes on. My goal is to own a boat that will never require scraping again - I know, unlikely - but the washers are one way this might work.

Also, I am a mechanical engineer - so please enlighten!
 
Apart from the washers deteriorating due to the pressure been applied then causing movement you have also created a fulcrum point between the timber and foot plate and any movement will be multiplied at the hand rail . Id expect excessive movement at the hand rail with boat movement and vibration. I'm about to remove my hand rails as my timber needs re varnishing or oiling all I will use is a tea spoon of linseed putty to take up any air gaps this should last till next time varnish needs attention .
 
I think the epoxied in heli-coils are a great idea: Well done!

But I agree with others about the void space should be filled.

I just think if it can't be properly cleaned, it will be filled over time regardless. Better to be filled with butyl tape or sikaflex rather than dirt, moss, fungi, and rotten wood.
 
Greetings,
Mr. W. Mr. AC raises a good point regarding grunge build up in the space created by the washers. How about...a thin nylon or starboard plate instead of the washers? No space. No stanchion base dinging up the teak AND you might even put a layer of butyl tape between the base and the plastic plate or not.


no:)
 
Bolting to implants in the capping is impressive. Like dental implants. But I don`t get spacing the plate with washers so it sits above, rather than flush with the capping. I`d follow convention with a bedding material. Sika if I had to,but tough to remove, so something less permanent if available. Not silicone, of course.
 
I think I might have eliminated the washers and put a thin layer of epoxy under the entire footprint of the base plate....tighten it down while the epoxy was still wet....wipe off whatever oozed out, and figure the epoxy will outlast the teak.... ( and me!)

However, kudos to the OP for trying something new and offering it up here for judgement.
 
"I think I might have eliminated the washers and put a thin layer of epoxy under the entire footprint of the base plate....tighten it down while the epoxy was still wet....wipe off whatever oozed out, and figure the epoxy will outlast the teak.... ( and me!)"


Perhaps but nothing is "forever".


It would be pretty inexpensive to use a couple of layers of aluminum foil as a barrier when creating the epoxy spacer , removed before final assembly.
 
It doesn't have to be "forever".....in 25 years my teeth will be in a jar next to my bed in the Shady Acres Nursing Home. I won't be worried about my teak rails and stanchions.
 
A quick update on this 1-year later.
The mounting works great. I just took the rails off after a big rain, screw holes were dry.
The best part is that I'm varnishing right now, and I took my rails completely off in about 10 minutes with no butyl or caulk cleanup required. Minimal taping or brushing around stanchions. Plus you get a complete varnish coat with nowhere for water to start to get under.
I'll put new washers in there this year when I put them back on, but that's about it. It's legit. I'll probably do it to my upper rails too, which I had butyl'd last year.
 
Westiculo,
I love things like this.
It’s not perfect as the stanchion plate is weakened a little re bending under stanchion side loads. May not be an issue depending on the strength of the mounting plate and other variables.

My cap rail and FG hull flanges (under the cap rail) are tapped for the long machine screws that hold the stanchion flanges. I use SikaFlex 291 bedding compound under and as far as I know all is well.
 
Back
Top Bottom