Roof support rebuild

The friendliest place on the web for anyone who enjoys boating.
If you have answers, please help by responding to the unanswered posts.

Pack Mule

TF Site Team
Joined
Jan 24, 2013
Messages
3,749
Location
USA
Vessel Name
Slo-Poke
Vessel Make
Jorgensen custom 44
I'm not sure if this is what they are called but I'm thinking about building some new ones . These are really plain and not real strong .They both have slight bow in them . I'm also wanting to add a radius to each corner to make them better looking .
If anyone wants to share pictures of their own to give me some ideas , I would appreciate it .
 

Attachments

  • IMG_3392.jpg
    IMG_3392.jpg
    101.6 KB · Views: 169
If they are fiberglass, it might be possible just to modify them to be stronger, and even take on a different profile.
I see screw heads on the inside, take off that panel and have a look, and post pics.
Ceiling fans in an open cockpit?? I like the idea, but those would not survive a day in my part of the ocean!
 
Here's a pic from my boat. Looks a little thinner than yours. I'm at Pickwick and would be glad to meet you there if you wanted to have a close up look.
Harry
 

Attachments

  • strut.jpg
    strut.jpg
    107.7 KB · Views: 168
If they are fiberglass, it might be possible just to modify them to be stronger, and even take on a different profile.
I see screw heads on the inside, take off that panel and have a look, and post pics.
Ceiling fans in an open cockpit?? I like the idea, but those would not survive a day in my part of the ocean!
They are fiberglass skin with foam core I've thought about beefing them up some and adding a radius to the corners, but I'm not so hot at fiberglass work . I'm thinking it would be easier for me to build new ones from laminated plywood , epoxy coat,prime and paint.
Getting the shape right is going to be my biggest challenge.
As far as ceiling fan goes , we do some pretty lightweight boating here on the Tennessee River.
 
Here's a pic from my boat. Looks a little thinner than yours. I'm at Pickwick and would be glad to meet you there if you wanted to have a close up look.
Harry
Thanks
 
Marty,
Couldn't you change to aluminum tubes? Perhaps gold anodized? Would look better and not be as noticeable. Pipe and flanges is the easiest, cheapest and least restrictive of visability but many won't like the look. You could, however paint them any color in the world. Speaking of looks your idea of wood is probably a good one. Because you're so good w wood it will/would turn out best. You could varnish it and it would look like it belonged and not be very noticeable either. I'd vote for that.
 
I call ours 'wings'.

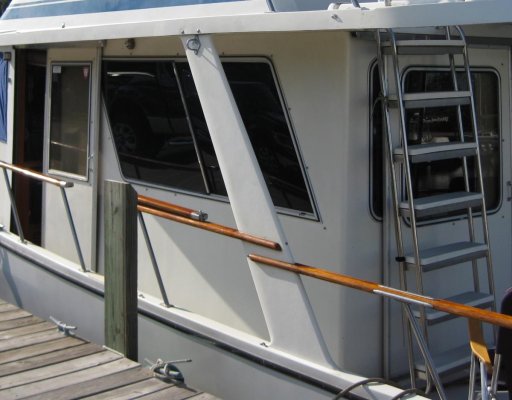
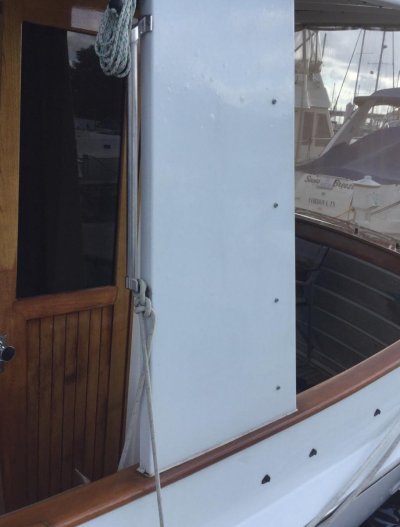
Pack, ours are effectively about 1 1/8" thick. They have 'raised panels' inside and out. I presume they're wood cored 'glass. I have no idea how they're held in but they do accept water from within or perhaps simply around the edge of the flybridge. They have been freeze-damaged and cracked. A PO drilled weep holes at the bottom, and they do weep. Unlike yours and Harry's, ours have Teak trim top and bottom, but nothing about the way the Teak looks, including the bungs, tells me how they're mounted. Both your's and Harry's look as though they're through-bolted to the edge structure of the flybridge. Your's look as though they'll come off readily at the bottom, too.

As for restyling, I don't like the shape of ours either. None of the angles relate to anything. I'm quite sure sloth will put my restyling to a far back, remote burner. As built, the 'raised panels' on the wings and the sheer stripe were gelcoated blue. We prefer our all white look.

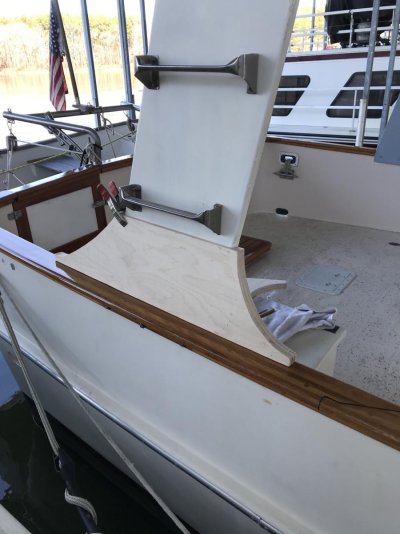
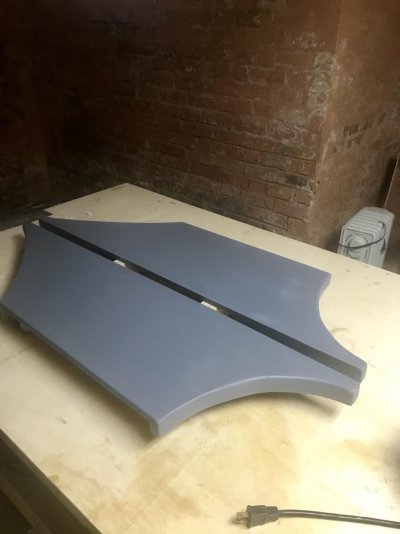
Pack, I suggest you acquire some cheepie underlayment and make full scale models of what you think will please you. Easy to do, and you could make alternatives. Paint 'em white (or varnish 'em if you're tempted to make wood replacements; I'd surely be!) so that the color won't distract you. Leave 'em up and see how they wear on you.

There are many examples of wings from which to draw inspiration. There are some really ugly ones (like ours).
 

Attachments

  • IMG_1878.jpg
    IMG_1878.jpg
    106.6 KB · Views: 136
  • 2016-05-23 SLH_Revel C.jpg
    2016-05-23 SLH_Revel C.jpg
    123.8 KB · Views: 126
Fashion plates are what Krogen calls ours and are not structural suports for the upper deck. A PO added the grab rails. They work great for boarding plus it’s like having an extra cleat to tie off another bumper. You could add for some bling?

Marty: Are you running out of projects? Come on over. ;)
 

Attachments

  • 11442EF4-7194-4266-A25B-CE115E742402.jpg
    11442EF4-7194-4266-A25B-CE115E742402.jpg
    80.5 KB · Views: 124
  • 4025D1F6-D81D-4B1D-86D3-AF310530D35A.jpg
    4025D1F6-D81D-4B1D-86D3-AF310530D35A.jpg
    75 KB · Views: 125
My starboard side has rungs for climbing up on top. Mine need a little something done to the shape but not to much . I'm never good at design . I can make it ok but not much on design .They do play a significant role in the look .
 

Attachments

  • IMG_2459.JPG
    IMG_2459.JPG
    127 KB · Views: 110
We have always like the shape of Rochepoints supports........:thumb:
 

Attachments

  • Rochepoint.jpg
    Rochepoint.jpg
    166.9 KB · Views: 122
I believe the proper name is "pilasters", at least that's what they are called on my sundeck trawler.
 
I've heard them called both fashion plates and decorator bars...

pilaster (n.)

a square column, 1570s, from Middle French pilastre (1540s), from Italian pilastro, from Medieval Latin pilastrum (mid-14c.), from pila, "buttress, pile" (from Latin pila,

Nope.
 
Last edited:
you might consider adding some conduit for wiring from the lazarette to the upper deck to make future projects easier. Perhaps a set of flush mount speakers if you listen to much music, or a mount for a ram mike for your VHF?

Or

What boat wouldn't benefit from one of these ???
 

Attachments

  • Jack and Coke.jpg
    Jack and Coke.jpg
    37.4 KB · Views: 121
I'm pretty sure that our roof over the aft deck was an addition to the original work boat build. We don't have any cabin aft of the wheelhouse to support the roof, these and a beam are the only the support the roof has. I've even thought about adding two more but I think that would get too busy .
 
For those wondering if the 'wings', fashion plates, decorator bars, whatever are structural or not; have a look at your flybridge edge. If the edge appears to be drooping over the wing, it's probably doing something good. Two of the above posts' pics look like they're drooping. Mine do not appear to be drooping but that might be that the flybridge is stiff enough and the wings are doing their job.

I would say that any projection over, say, 18" needs some sort of support. There's a biggish (45-50'?) yacht in our marina whose horizontal flybridge lines are pretty obviously distorted over its wings. Remember, fiberglass creeps under load, and few things are as relentless as gravity.

I think FF's quoted definition for pilaster is a little off. Pilasters are column-styled things, sometimes, but seldom, structural. They're 'engaged' columns, usually pasted on for architectural effect. See, but note that modern usage includes short length thickened pieces of wall done for structural reasons: https://en.wikipedia.org/wiki/Pilaster
 
Last edited:
Jack Daniels and Coke? I bet that will take the barnacles off your prop. Holy crap!
 
They are called fashion plates, and are structual in larger yachts, some smaller yachts they are somewhat decorative.
 
Got back on these this weekend. They still need a lot of work before install.
 

Attachments

  • 17C7FB87-2818-444B-8858-E815E812F6AA.jpg
    17C7FB87-2818-444B-8858-E815E812F6AA.jpg
    100.9 KB · Views: 90
  • BE065EFC-F55A-40A2-A323-40D08AADA5D6.jpg
    BE065EFC-F55A-40A2-A323-40D08AADA5D6.jpg
    107.4 KB · Views: 91
  • 2A9EE138-147C-41DF-84E1-0032A72994FE.jpg
    2A9EE138-147C-41DF-84E1-0032A72994FE.jpg
    87.8 KB · Views: 90
Last edited:
Marty: What are you making them out of? I may be replacing ours. I like the look!
I’m just building the radius pieces for the bottom. I’m using 1/2 “ thick nine ply Baltic birch. It’s very stiff. I had some pieces left over from another project, 3 layers total in the radius area. I’ll epoxy coat them when done then prime and paint the whole uprite. I need to do the upper pieces but that’s other time.
 

Attachments

  • C047438A-53BE-4F58-A4F8-94A925FBC1E3.jpg
    C047438A-53BE-4F58-A4F8-94A925FBC1E3.jpg
    64.8 KB · Views: 91
Last edited:
Epoxy coated these with some thinned West Systems, then sanded with 80 grit. This morning filled in with Total Fair fairing compound. Its easy to mix , just mix equal part a and part b . Blue and yellow make green. It’s sandable in three hours. I hope to get them primed this weekend.
 

Attachments

  • C0621CCF-8E16-44F4-A360-EBAF815242D2.jpg
    C0621CCF-8E16-44F4-A360-EBAF815242D2.jpg
    106.2 KB · Views: 102
Last edited:
Plan B ?

Visit the local that welds up tuna towers , have him copy the angles and sizes , paint it white and forget it!
 
Plan B ?

Visit the local that welds up tuna towers , have him copy the angles and sizes , paint it white and forget it!
I need to change the title of this thread. I’m not really rebuilding these I’m just changing the look a little bit. If this turns out ok I’ll probably do the top part also. Just playing around in the shop with some scrap materials.
 

Attachments

  • 697DBAB3-73B4-4FF6-A256-67966A756AEF.jpg
    697DBAB3-73B4-4FF6-A256-67966A756AEF.jpg
    75.9 KB · Views: 80
Got back on these this weekend. They still need a lot of work before install.

I really like the shape of that. I think you might be better at design than you think, sir.
 
This was the first day in a few weeks because of high water that we could get to the boat. We got these dry fitted today and hope to get them installed permanent this week. Then we can paint.
 

Attachments

  • FDD01289-149A-4045-B995-757269185FD8.jpg
    FDD01289-149A-4045-B995-757269185FD8.jpg
    124.2 KB · Views: 78
First coat Hatteras off white. I don’t think I have one color on the boat anywhere that matches another:banghead: I’ll never try mixing colors again to get off white. From now on anything we paint will be off the shelf Hatteras off white. A couple more coats on these and we’ll done for this year with projects. Ready to relax.:D
 

Attachments

  • 85377F36-2009-42DD-BAD1-A465C854CBA4.jpg
    85377F36-2009-42DD-BAD1-A465C854CBA4.jpg
    110.8 KB · Views: 55
Joy put the last coat on today. We done !!
 

Attachments

  • 86A5C8F7-A2FB-4923-AB4E-078B3718B2C6.jpg
    86A5C8F7-A2FB-4923-AB4E-078B3718B2C6.jpg
    123.3 KB · Views: 46
  • 13D1783C-6798-47A7-A5D1-B10159220552.jpg
    13D1783C-6798-47A7-A5D1-B10159220552.jpg
    138.6 KB · Views: 42
Last edited:

Latest posts

Back
Top Bottom