Ford Lehman 120 Bad cylinder

The friendliest place on the web for anyone who enjoys boating.
If you have answers, please help by responding to the unanswered posts.
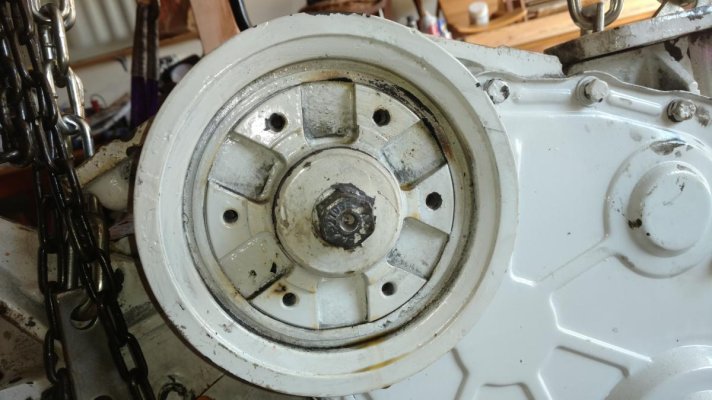
Or better yet have it professionally rebuilt as described in a great thread a year or so ago by Larry on Hobo.

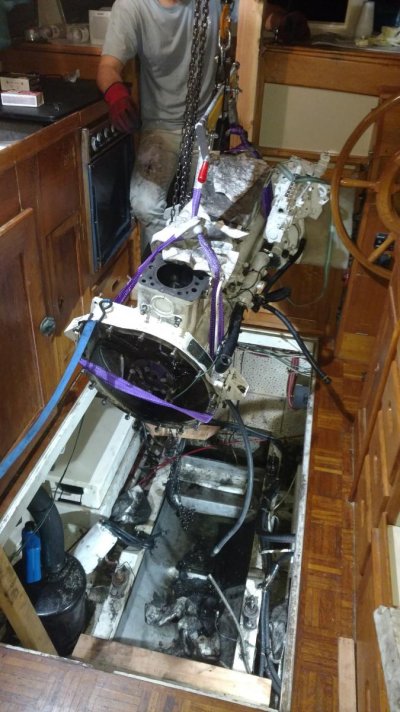
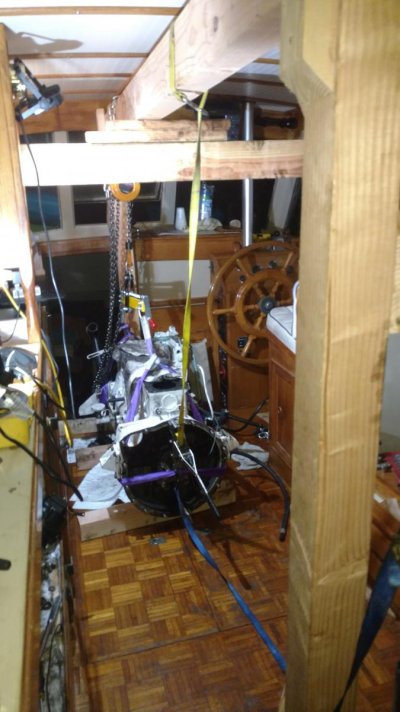
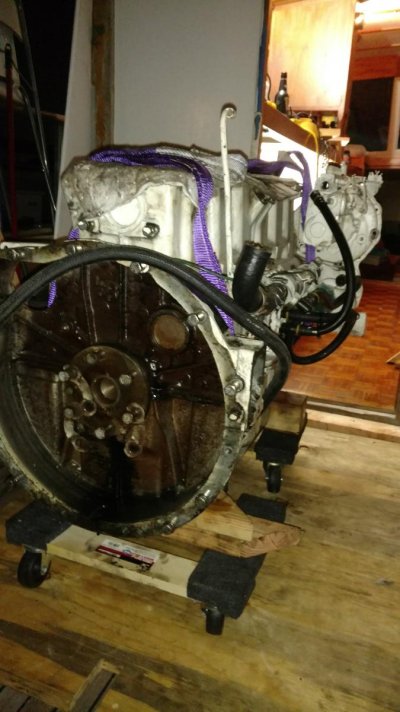
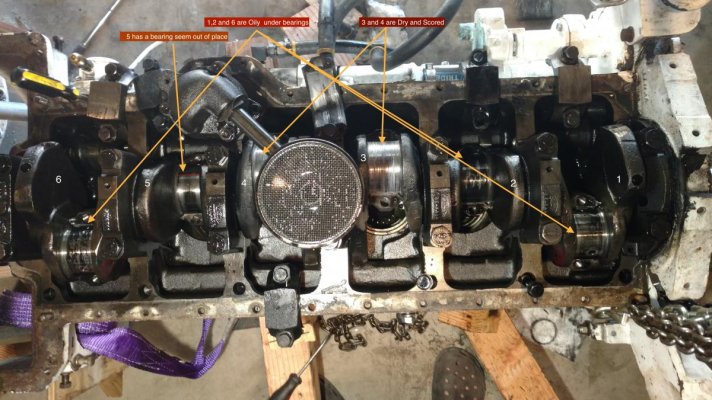
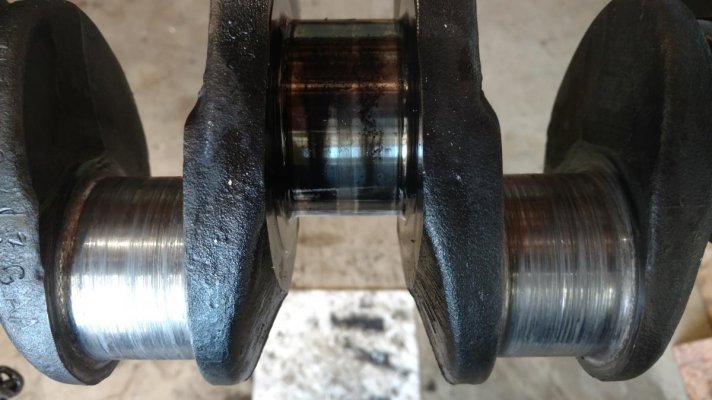
Which begs the question as to the completeness of the rebuild on MPL's Lehman 1,800 hours ago.
 
Here are a few photos for the engine removal process in case anyone is curious. It turned out to be an easier process than expected after getting our support built.

We also supported the cabin sole from underneath down to the stringers but I actually don't think we needed to do that as we already had four points of contact.

We are going to replace the engine mounts while we are at it. Does anyone have an opinion about mounts? Does it make a difference. I am looking forward to a well tuned, quiet engine with no vibrations. Not sure that is possible though with a Ford Lehman.
 

Attachments

  • Engine3.jpg
    Engine3.jpg
    134.7 KB · Views: 153
  • engine5.jpg
    engine5.jpg
    130 KB · Views: 165
  • engine8.jpg
    engine8.jpg
    97 KB · Views: 163
Last edited:
Engine came out relatively easy

Mike,

Yes, it looks like it came out relatively easily. Looks like you built an "A " frame over head to pull it out with.

Glad you got it out OK.

I was intending to assist you getting it out, but never got a call from you.

When I saw the pictures at how easy it was for you & then I could see you did not need my help.

Let us know what you find with the block & cylinders.

I still have that replacement engine for you.

So keep me in the loop.

Thanks.

Alfa Mike :thumb:
 
Personally speaking while the engine was out I'd clean the engine compartment and re-paint it.
If you wish to stop vibration you may wish to go the whole hog and put in a flexible drive and thrust mounting and softer engine mountings.
Check out GKN Aquadrive range.
Once it's done you'll be surprised at the difference, it'll sound like a mouse chawing tissue paper !
It's a big job but with winter approaching it will be a nice winter project with real benefits for the foreseeable future of the boat.
 
Last edited:
Great photos of the lift. I am interested to see how you got it from there to the ground ie out of the cabin then off the boat. Any photos?
 
Great photos of the lift. I am interested to see how you got it from there to the ground ie out of the cabin then off the boat. Any photos?

Yeh me too. I am just about ready to swap my lehman out with a cummins and am interested on how well it squeezes out the door.

By the way, it's probably a good thing you braced to the stringers. The 4x4 timbers that support the floor are connected together with notched out joints. The weight of the engine is definitely enough to cause the floor to sag and if it sags at all the notches are permanently enlarged and the floor will always sag unless you add bracing to hold it up (forever more).

One more thing, time the injection pump before the engine is installed. It is near impossible to see the flywheel timing marks otherwise.
 
It squeezed out the door pretty well. The only things I removed were

To reduce weight and for inspection/diagnostics:
Flywheel
Exhaust manifold
Head


To reduce width:
Engine mounts
CrankCase Vent tube/Cap
Oil Filter and other minor things

I did not remove the fuel injector pump.

With these things removed the width of my engine was roughly 19.5 inches and my door which I think is standard is about 22 inches. The thing is though flywheel (aft) end is offset to the port whereas the Injector pump end is offset to the starboard so you have to bring it to one side and then the other as you exit the doorway.

I had expected to build some sort of lift system to get it out of the door but once we had it on the $10 harbor fright! dollies we wheeled it to the door and went for it. My ramp was 3/4 ply. As you can see from the pictures I did not cover the door threshold. For that we used a racing jack which we put on the ramp and then lifted the flywheel housing, removed the front dolly and dragged it through the doorway. We then replaced the front dolly and moved the racing jack to the back and again moved the engine forward down the ramp until the racing jack hit the threshold. We put the dolly back and that was about it.

I have not removed it from the boat yet. Im thinking I'll let the boat yard do that since it would just be a matter of them craning it up into a truck.

Having said that though now the wheels are spinning and I'm thinking why not take it all the way:whistling:
 

Attachments

  • EngineInDoor.jpeg
    EngineInDoor.jpeg
    78.3 KB · Views: 163
  • EngineOnRamp.jpg
    EngineOnRamp.jpg
    101 KB · Views: 122
  • EngineOnRamp2.jpg
    EngineOnRamp2.jpg
    95.5 KB · Views: 122
  • EngineOnDeck1.jpg
    EngineOnDeck1.jpg
    102.3 KB · Views: 130
Replacement engine

The hard part is done.

Next - If you can get it off the boat & out to the parking lot & into a pick up truck bed & then bring in a replacement engine long block & reverse the procedure & get that again back on the boat, you can do this whole job yourself !

I think you can do this. I have a harbor freight collapsible engine lift Crain you can borrow to lift it in to a P/U truck in the parking lot over at a buddies house & it has wheels. That may help you make this an easier job than you thought it would be. Maybe a extra spare floor jack could help some too.

So this has shown that you can get the engine In or out with the head on or off -- so a replacement engine with the head on it could be done as well as that is only a height, not width measurement issue.

So with your new replacement engine, just take the fly wheel off & exhaust manifold off & leave the injection pump on & you could wheel in a new engine your self.

Save all that labor charges money.

Keep up the good work.

Alfa Mike
 
Well the engine is out of the boat and into my garage. I've opened it up and turned if over and still no sign of damage (at least to my untrained eye).

I thought before looking at all the various bearings I'd open the timing cover and take a look at the timing gear. The problem is how to remove the pulley.

I tried putting an impact wrench on the bolt but no luck.

On the other hand Im thinking is there really any chance that the timing gears are damaged and that is what is preventing it from turning over? I'd prefer to not to remove that pulley if I don't have to .
 

Attachments

  • pulley.jpg
    pulley.jpg
    108.6 KB · Views: 95
  • pulley_closeup.jpg
    pulley_closeup.jpg
    103.1 KB · Views: 95
Great photos of the lift. I am interested to see how you got it from there to the ground ie out of the cabin then off the boat. Any photos?
(Excuse the drift but)George, is that just academic interest or is there a Malagari engine issue. Hope not. Fortunately IGs have good access, 2 removable floor sections plus the ER hatch.
 
Greetings,
Mr. mp. Could it be that the bolt is reverse thread?

Well I went out and tried both ways and no luck. I don't think its reversed thread.

This is one part of the engine which does not seem to appear in my manual

As for this
RT Originally Posted by Brisyboy said:
Great photos of the lift. I am interested to see how you got it from there to the ground ie out of the cabin then off the boat. Any photos?

After moving the engine to the aft deck I had the boat yard lift it and put it on a trailer. It took them 20 mins and doing it myself seemed like a hassle.
 
3/4" breaker bar, socket, and extension pipe should get it. I think it is std rotation threads.
 
Also a 2x4 between the block and crank. If whatever is locking up the crank would break loose you won't get hurt.
 
(Excuse the drift but)George, is that just academic interest or is there a Malagari engine issue. Hope not. Fortunately IGs have good access, 2 removable floor sections plus the ER hatch.
Bruce, perish the thought - just academic interest
 
Well here is the bolt. (I did not include pictures of the wound on my forehead and scraped shin from getting this thing off. I can't believe how much force it took).

Next I'll need a pulley puller I guess.

One interesting thing is as I attempted to remove the bolt, even with all that force the crankshaft did not appear to budge a bit. Something is really seized up.
 

Attachments

  • Pulley_Bolt.jpg
    Pulley_Bolt.jpg
    105.1 KB · Views: 96
Last edited:
Ok. Well here it is. It looks to me like I have problems with the journals and bearings on cylinders 3,4 and 5. I noticed when I opened the crankcase the piston counterweights on 3,4 and 5 were dry compared to 1,2 and 6.

Another interesting thing is when I loosened the bolts on 5 it really stunk up the entire garage . I don't know if it was a burnt oil smell or what but I thought I was back in the Ohio river valley under neath a steel mill smokestack.

Any thoughts on what I need to do next? Also it does not appear to me there are any liners in this engine but from what I can see so far the cylinders do not look bad. One has a slight scoring. I guess I'll need to check the block for cracks but there was nothing obvious to me.
 

Attachments

  • CrankCase.jpg
    CrankCase.jpg
    153.6 KB · Views: 192
Mind you, this is arm chair diagnosing, but the center journals starved of oil and most likely seized the motor. #5 is just gunked up with burnt oil and of no real significance.

I would guess that either the oil pump lost pressure or you somehow spun a crank bearing (doubtful) or the main oil gallery got plugged (also doubtful).

I would take the oil pump apart and see if it broke the gears or possible the drive to it broke.

Either way, it may be that the crankshaft is toast. You need to get a machine shop to determine if the journals can be turned down enough to reuse it. If so, easy. If not well You really need to consider your options. The crank wont be cheap,

Sorry to see that happen.
 
That engine Alfamike has for sale is looking shiny, and just might be spinning its crank in your direction.
 
Looks like #5 spun the rod bearing that seized the crankshaft.
Crankshaft grinding can be tricky. If you go that way you should consult with ADC to make sure oversized bearings are available.
 
Yep....the first thing to do is to take the crankshaft to a machine shop that can do a magnaflux or ultrasonic test for cracks. If is toast, that may sway the rebuild/replace decision. I got lucky a few years ago with my dozer engine that spun a bearing and crank failed testing. ....got a used crank out of a trackhoe engine for $300 (common engine), had it turned down a hair, oversize bearings, and was pushing down trees again in a couple weeks. I'm doubtful the FORD crank was as prolific as my JD, so a replacement crank may be made of gold..... Good luck!
 
The journals are 2 1/2 inches in diameter. I don't know what the minimum specifications are but it would seem there is enough material there to grind and still maintain enough strength. I guess that is a wild guess though. How does one find the minimum specification for these anyway?


I'll call AD on monday to check into these questions and to see if they will have undersized bearings.

I sure hope the crankshaft is not completely shot that would be a real bummer.

What about spray welding if we need to add material? Has anyone ever done that to a crank? I figure I'll have three journals to fix.
 

Attachments

  • closeup1.jpg
    closeup1.jpg
    94.2 KB · Views: 89
  • closeup2.jpg
    closeup2.jpg
    92.3 KB · Views: 89
  • 3_and_4.jpg
    3_and_4.jpg
    96.5 KB · Views: 86
The journals are 2 1/2 inches in diameter. I don't know what the minimum specifications are but it would seem there is enough material there to grind and still maintain enough strength. I guess that is a wild guess though. How does one find the minimum specification for these anyway?


I'll call AD on monday to check into these questions and to see if they will have undersized bearings.

I sure hope the crankshaft is not completely shot that would be a real bummer.

What about spray welding if we need to add material? Has anyone ever done that to a crank? I figure I'll have three journals to fix.

The issue with grinding a journal is you need to make sure you don't break thru the heat treat zone. I will be deep enough in the center, but shallow on each end.
I have seen several Perkins crankshafts break after grinding with low hours because of the above.
 
Back
Top Bottom