78 MK1 Total redo documentary thread w/ pics!

The friendliest place on the web for anyone who enjoys boating.
If you have answers, please help by responding to the unanswered posts.

capeshore

Veteran Member
Joined
Jul 24, 2017
Messages
54
Location
United States
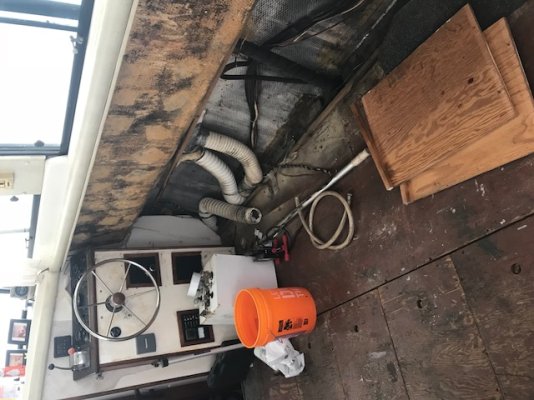
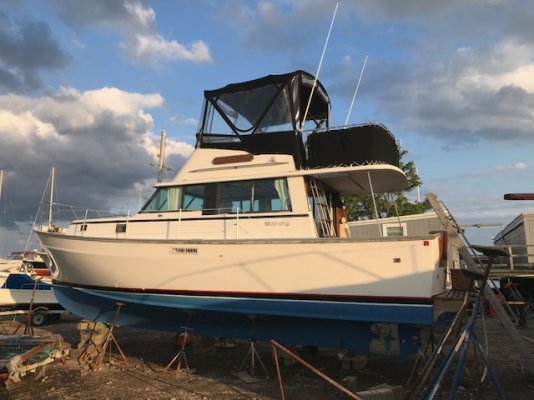
Hey Y'all, so the journey begins.New to the forum and we just purchased a 78 MK1 from a neighboring boat club (up in Boston area) and it's an upgrade from our 26 Sundancer style boat that was just not us but we had a good 8 years with her.

Going to make this a thread to show all the work that will be getting done in the next year (or more :confused:)

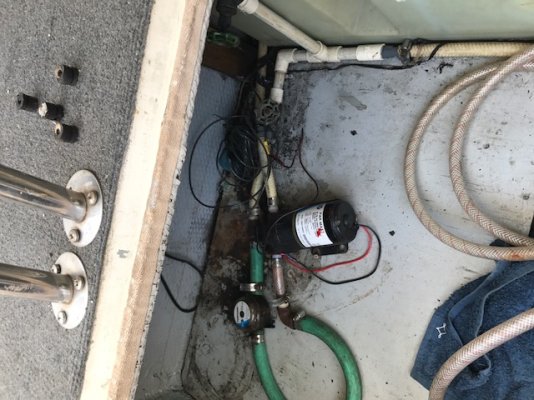
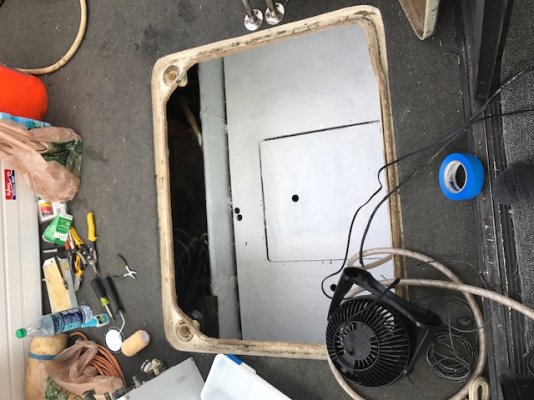
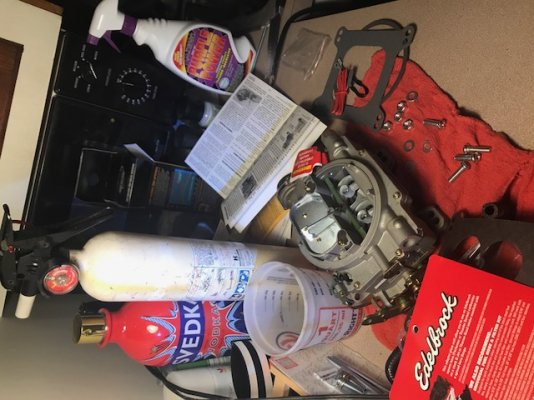
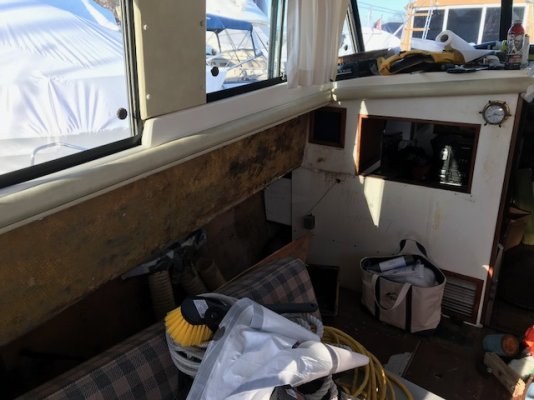
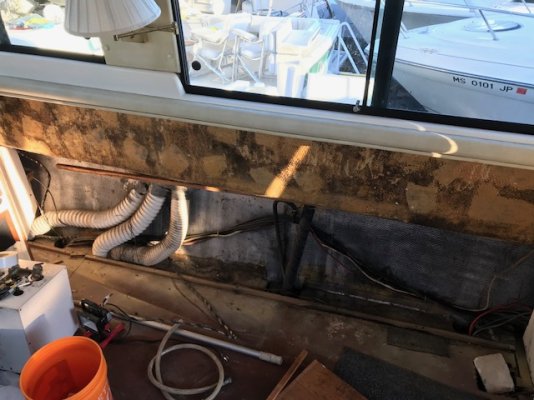
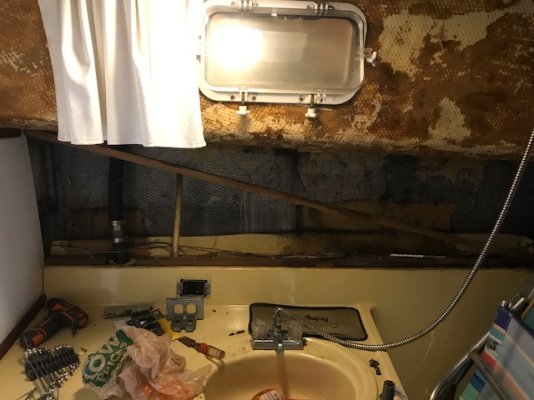
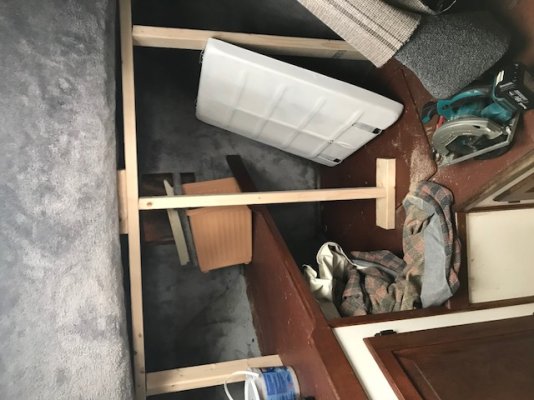
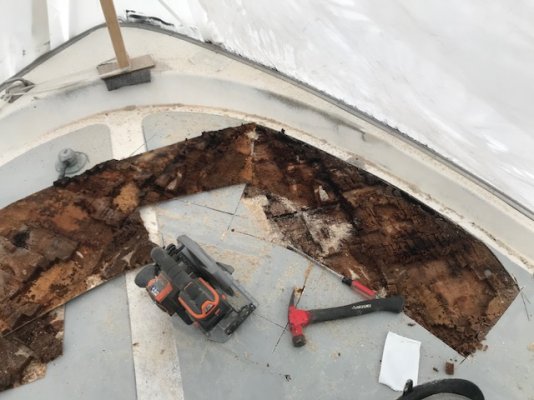
Tons of soft decks, rewiring, painting,plumbing, flooring, and gene/engine work ahead hopefully some can find it useful and the rest can get a kick out of my Tom Hanks money pit boat :)
We plan on keeping her for a long time..It's our second to last boat..maybe last! Love it and the potential she has. Anybody in the Boston area always welcome for a stop by to give advice I would happily trade for a beer. -Dave
 

Attachments

  • IMG_0224.JPG
    IMG_0224.JPG
    116.7 KB · Views: 281
Last edited:
start of plumbing..

Started pulling plumbing.. Had every possible type of fitting and hose in here!!
Redoing with Pex, new deck fill, everything. Old water heater was dead had an old spare 6 gallon I'm putting in. Also going to add on the port side a 20 gallon to add to the main tank.
Decided this was a good time to clean up and paint the inside. Mostly plywood so I primed with gripper and I'm trying a Ben Moore deck and patio paint I had. Interested how it holds up in the area where the rudder hatch is. Rest should be fine as its never getting stepped on etc.
 

Attachments

  • IMG_0444.JPG
    IMG_0444.JPG
    117.6 KB · Views: 226
  • IMG_0447.JPG
    IMG_0447.JPG
    99.9 KB · Views: 215
  • IMG_0450.JPG
    IMG_0450.JPG
    107.4 KB · Views: 221
Last edited:
Good start.

Good luck!
 
Welcome aboard. Congrats on the new boat. I'm already interested in reading about your redo adventures.
 
Dave,

Great boat. We had an '82, put a couple thousand hours on her from Delaware to Key West. If during the refit you need a pick me up (as I did), take a look at my last refit:
https://caribbeansealife.com/about-our-boat/refit/

It will make you feel better :)

Good luck and enjoy


OHHH.. that seacock and thru hull work is on my off season list just like you did..Your pictures got me worried. I'm dreaming that they will all just unscrew, rebed and new ones right back in..Thanks for the link! Aprreciate seeing it all.
 
New carb and distributor 454

Tackling a new carb and distributor tonight.. (Yes it was switched over to gas 454 years ago, will be switching back to diesel when the time comes.) Got the boat on the cheap so i can live with it for a few years.
Will update this post tonight with the likely boring photos of engine work. some carb drilling for PCV valve port etc.
 
Back after a long week or so. Hurricane Jose had our club locked down for a few days as we had some nasty NE winds for a couple days.

Got the new carb and distributor in..nothing exciting to report except I was heating up quick? Boat was fine before. Felt like I wasn't getting a lot of water out of exhaust. Temp read 155 and the temp gun was showing nothing over 160 on the engine. (Just one manifold was 160 rest was under)
I didn't like it still so I decided to go through the raw water system.
Inspected raw water pump and impeller. Took off raw water hoses off manifolds and started engine, water came rushing out (one side a bit less which I noted) but I would say circulating pump is working. Took off sides of heat exchanger.. some junk piled up but no actual clogged ports. Made a new gasket. sea water strainer does have a leak so I made a gasket for the top.
Ran engine..was better but still not loving it. I'd say the manifolds are risers are old. No clue when they were changed... So it's time. Might try a barnacle buster rinse to see if I can at least get her out for a little putt. Going on the hard 10/21 so trying to get things up to par so I know where I'm at for off season.

Decided to just pull the old Groco sea strainer out. Did a vinegar soak for only a few hours, tooth brushed it off. Seals were all shot going in so ordered some quick ship and hope I am also just sucking some air from all the leakiness it had.
 

Attachments

  • IMG_0580.JPG
    IMG_0580.JPG
    141.3 KB · Views: 171
  • FullSizeRender (4).jpg
    FullSizeRender (4).jpg
    124.5 KB · Views: 175
  • IMG_0654.JPG
    IMG_0654.JPG
    86.9 KB · Views: 160
  • IMG_0660.JPG
    IMG_0660.JPG
    105.8 KB · Views: 166
  • IMG_0661.JPG
    IMG_0661.JPG
    103.9 KB · Views: 167
Saturday break.. sail

Side note took a break on Saturday to go out on a buddies catboat. No wind but we putted along. Very unusual fog rolled up from the South Shore of Boston right into quincy,Boston area. Could cut it with a knife. (sorry photos are not showing rotated until uploaded?)
 

Attachments

  • IMG_0638.jpg
    IMG_0638.jpg
    116.9 KB · Views: 163
  • IMG_0640.jpg
    IMG_0640.jpg
    109 KB · Views: 161
  • IMG_0644.jpg
    IMG_0644.jpg
    106 KB · Views: 160
Picture update

Ok, so back after a long late fall of to little time to work on the boat..Got her covered ( shrinkwrap for this boat was heavy to carry up the ladder etc)

Started the gut job, since we had to take off the bow rail and stanchions it didn't bug me to rip out the old walls etc. Had to to get to the thru bolts..Took the cabinets home to template some of the funny cuts for the new ones I'm going to build in the off season. Lowes had 1/2 MDO so I didn't need to go to Boulter plywood in Medford,MA (they have everything specialty wood related,amazing place.) Will hit up Boulter for the rest later on.
Not sure you can see in one of the pictures but under the galley window (behind the cabinet) Miguel from 1977 signed the wall. One of the guys who built the boat! Kinda cool.
Also love the cleats. Been trying to find them to no avail. to add a couple more to the boat... and last a friends pup Ralphie stopping by to say hi :)
 

Attachments

  • IMG_0807.jpg
    IMG_0807.jpg
    106.4 KB · Views: 215
  • IMG_0794.jpg
    IMG_0794.jpg
    116.2 KB · Views: 159
  • IMG_0795.jpg
    IMG_0795.jpg
    103.7 KB · Views: 154
  • IMG_0802.jpg
    IMG_0802.jpg
    133 KB · Views: 154
  • IMG_0780.jpg
    IMG_0780.jpg
    86.6 KB · Views: 197
  • IMG_0779.jpg
    IMG_0779.jpg
    87.1 KB · Views: 159
  • IMG_0785.jpg
    IMG_0785.jpg
    106.7 KB · Views: 146
Fellow 78 MK1 owner here. I'm keeping a close eye on this.

Mine doesn't need nearly as much work but soft decks and topside gelcoat is fading.

I'll admit to injecting gorilla glue into some places(side deck)which actually works very very well as a band aid but is just that.

I did get the rear cockpit done though. The Flybridge is a bit more "complicated".
 
Last edited:
Fellow 78 MK1 owner here. I'm keeping a close eye on this.

Mine doesn't need nearly as much work but soft decks and topside gelcoat is fading.

I'll admit to injecting gorilla glue into some places(side deck)which actually works very very well as a band aid but is just that.

I did get the rear cockpit done though. The Flybridge is a bit more "complicated".

Thanks for the reply, funny you mention the gorilla glue as I see some in some spots on the boat. How did the cockpit go? Any tips? It’s on my list. Feel free to message me anything if I can help. I’ll basically have every inch of this boat open at some point so if I can help I’ll try!
 
Dave, a local fab shop should be ablle to duplicate those cleats real easy. Just pipe and ends.

If you get really bored, hete is a link to the pictures of mine when I was selling. Might see something you want to incorporate:

https://photos.google.com/album/AF1QipOT7_CjzmCZ9qqb3TNcHtop59Ol33oDqjD_51Kl
Hey Sealife, agreed and good point. I have a good buddy who works with stainless up in New Hampshire so likely the way to go.

Just a heads up the google picture link you added doesn't work? Would love to see the photos!
 
Thanks for the reply, funny you mention the gorilla glue as I see some in some spots on the boat. How did the cockpit go? Any tips? It’s on my list. Feel free to message me anything if I can help. I’ll basically have every inch of this boat open at some point so if I can help I’ll try!

Not sure I used the term correctly to clarify I mean the rear fiberglass deck outside.. :D
 
Not sure I used the term correctly to clarify I mean the rear fiberglass deck outside.. :D


Thanks, you were clear. :) I have to do that deck. Was considering putting a hatch in where the rudder post is? Curious how that deck work went for you, any tips etc. Thanks!
 
Thanks, you were clear. :) I have to do that deck. Was considering putting a hatch in where the rudder post is? Curious how that deck work went for you, any tips etc. Thanks!

Straight forward repair but I did it in the middle of florida summer so it was hot and kept raining on my handywork(even when not predicted). I planned on doing a spot repair so I cut out a 2'x2' square and that turned into the whole back deck.

Make sure no rain for a few days.

You can do the back deck in one swoop but keep in mind you wont be able to walk or support any of your weight on it after you remove the coring.. Plan accordingly(the bottom layer of glass is thin.. IMO too thin. Hack away at the top layer because it's too thin to reuse too.. YMMV Be very careful with the bottom layer because you'll be reusing that. Add another couple layers of fiberglass to it before you do the coring.. Much stronger.

It was difficult for me to get the shape just right(the curve) so I was forced to create the curve with sawdust/resin putty mix which worked okay. I tried to work with one large piece of coring material which I found out is totally unnecessary. Small chunks are easier to work with, will shape better and is strong.

Bring and air compressor and an air chisel to remove the rotted out core. I didn't but the job would have been quicker/easier.

Consider seacast pourable coring material made for decks. It's expensive but honestly you'll have alot of leftover, runs to the lumberyard, splinters, and work. Better yet it can't rot.

No matter how much resin you think you'll need double it(same goes for everything else). I'd buy 5 gallons because you will use it elsewhere. I didn't use that much though.

It's going to be more expensive than you think. Consider that the rear deck of the boat is larger than some center console's whole deck.

Buy a small 4" circular saw.. I got a black and decker one from walmart for under $90 and use it alot. You can set the depth so you don't cut through the bottom layer and work in tight spots vs a large circle saw.

Read about making your own peanut butter/thickened resin.. Also don't apply that stuff thinking you'll just sand it smooth later.. it's rock hard. Silica mix works well.

I'm very happy with the results.. I will say i've gotten some very very good results on smaller harder to reach places by drilling and injecting Gorilla Glue(works better than injecting resin). Waste of time and money in large areas though.

A hatch would work great but remember that you're weakening the deck by not carrying it all the way across so layup more fiberglass than others.
 
Got the new carb and distributor in..nothing exciting to report except I was heating up quick?

Ran engine..was better but still not loving it. I'd say the manifolds are risers are old. No clue when they were changed... So it's time.


??

Thought all the MS 34s (original, Mk II, and Mk III) were single diesels? Mostly Perkins, though our Mk III had a DD 8.2T.

??

-Chris
 
Straight forward repair but I did it in the middle of florida summer so it was hot and kept raining on my handywork(even when not predicted). I planned on doing a spot repair so I cut out a 2'x2' square and that turned into the whole back deck.

Make sure no rain for a few days.

You can do the back deck in one swoop but keep in mind you wont be able to walk or support any of your weight on it after you remove the coring.. Plan accordingly(the bottom layer of glass is thin.. IMO too thin. Hack away at the top layer because it's too thin to reuse too.. YMMV Be very careful with the bottom layer because you'll be reusing that. Add another couple layers of fiberglass to it before you do the coring.. Much stronger.

It was difficult for me to get the shape just right(the curve) so I was forced to create the curve with sawdust/resin putty mix which worked okay. I tried to work with one large piece of coring material which I found out is totally unnecessary. Small chunks are easier to work with, will shape better and is strong.

Bring and air compressor and an air chisel to remove the rotted out core. I didn't but the job would have been quicker/easier.

Consider seacast pourable coring material made for decks. It's expensive but honestly you'll have alot of leftover, runs to the lumberyard, splinters, and work. Better yet it can't rot.

No matter how much resin you think you'll need double it(same goes for everything else). I'd buy 5 gallons because you will use it elsewhere. I didn't use that much though.

It's going to be more expensive than you think. Consider that the rear deck of the boat is larger than some center console's whole deck.

Buy a small 4" circular saw.. I got a black and decker one from walmart for under $90 and use it alot. You can set the depth so you don't cut through the bottom layer and work in tight spots vs a large circle saw.

Read about making your own peanut butter/thickened resin.. Also don't apply that stuff thinking you'll just sand it smooth later.. it's rock hard. Silica mix works well.

I'm very happy with the results.. I will say i've gotten some very very good results on smaller harder to reach places by drilling and injecting Gorilla Glue(works better than injecting resin). Waste of time and money in large areas though.

A hatch would work great but remember that you're weakening the deck by not carrying it all the way across so layup more fiberglass than others.

As I get some of this is "general" deck redoing info (which I appreciate greatly) thank you so much for the MK mainship specific details as well. Glad you mentioned the small 4inch circular. It was something I was thinking of doing to get into those tight spaces... All fantastic info I will be saving. Thanks a lot!
 
??

Thought all the MS 34s (original, Mk II, and Mk III) were single diesels? Mostly Perkins, though our Mk III had a DD 8.2T.

??

-Chris


You are correct.. this one had a refit with a 454 :hide::ermm:
Will certainly do for now as we got the boat for short money with engine being gas and the deck issues. Runs about 11-12 at about 3000rpm. I have to say we are ok with it for a few years for our short weekend and overnights around the Boston islands etc. Already on our radar for a diesel in the coming years as we plan to keep her for a long while.
 
We're going to tackle the soft spots in our decks this coming spring now that the major job of recoring the bridge is behind us. Luckily, the cockpit is in good condition so that's one less thing that was on our to-do list. We're quite happy with the boat as a small cruiser for a couple.
 
Since you are now gas not diesel, don't know how pertinent this is, but if your planning to go back to diesel in the future, this would be an EXCELLENT opportunity to replace your fuel tanks.. if in the future one starts to leak, you will be ripping apart your boat once again.....
 
Since you are now gas not diesel, don't know how pertinent this is, but if your planning to go back to diesel in the future, this would be an EXCELLENT opportunity to replace your fuel tanks.. if in the future one starts to leak, you will be ripping apart your boat once again.....

%100 agree, Will go for a full cleanout and bilge coat as well. Do it once do it right.
 
Capeshore,

Your boats the spitting image of mine, - do you know your hull number? I would be curious to know just how close in the lineage they are.

I have some info from the projects we have done, mostly pictures now but sometimes that can be of help. Might be a few nuggets you can use.

Mainship 34 Type I - Seanair - Repower, Recore and Rehab Projects

Good luck with the project and look forward to your updates.

Appreciate it, I need all I can get..Will grab the hull number tomorrow and send over to you..
This sub zero weather we've been having has kept me out of the boat for awhile. I have snuck in a couple days here and there. Will post updates now and tomorrow night as we have had 40-50 degrees this weekend. Hope everyone in lands of cold are getting some indoor winter boat projects done!
 
Last edited:
misc work Jan 27-18

Hi everyone, finally a couple days with working weather. So unsure what order the photos upload but should be obvious as to the descriptions.Not my favorite thing to do in regards to working on 3-5 projects at once but temperature dictates sometimes what I can do and just want to stay productive. I don't mind a little cold but some of the work does. I found this will be the best way to stay moving forward throughout the winter as always will be something I can do.

-80 grit orbital sanded the salon walls and put some mold killer primer as a test. Let dry for 4-5 days and sprayed a spot with 3M trim adhesive, stuck a sample vinyl piece up. It dried and no issues! I pulled like heck and ripped the backing and some primer off.. passed the test. I will proceed with full mold kill primer (even down on lower wall even though a face panel will be put up.) I'm really trying to pull the 1978 out of the boat as far as old mold and smells, dirt, age. I've got 15 samples coming from sailrite.com for headliners, couch fabric, berth cushions etc. I'm sure most of you know the company but was new to me and had a really great list of products and how too's. Big fan of them so far.

-Next I built a quick frame to support the top forward deck. ( All rotted core.) This is a in process shot. I added some shim supports in the empty spaces. I went with just one for now as the anchor locker bulkhead is doing bracing in that location. Won't be cutting aft of temporary brace so good on that. I do have all the gunnels to rip out as they are all rotted as well.

-After that I started the deck :hide: I knew what I was getting into when I bought the boat but the time finally came.. I was sawing away. Glad I got it going as now the tools are there, system is in place and I'll just chip away on any day over freezing I can sneak down for an hour or two. Mostly will have to wait for weekends.

Boy it's tough having the whole boat ripped apart and such huge projects at the same time..(Still need to make new cabinets and berth cushions in my garage) HEAD: I had an idea in the head that I also started and what I think is going to work out great for the walls etc. It had wallpaper. I'll take some pictures of that tomorrow (Sunday) and discuss.

Side note: look at those temps! No heater on!
 

Attachments

  • IMG_1020.jpg
    IMG_1020.jpg
    86.8 KB · Views: 76
  • IMG_1018.jpg
    IMG_1018.jpg
    85.9 KB · Views: 78
  • IMG_1038.jpg
    IMG_1038.jpg
    95 KB · Views: 74
  • IMG_1041.jpg
    IMG_1041.jpg
    93.5 KB · Views: 91
  • IMG_1022.jpg
    IMG_1022.jpg
    54.4 KB · Views: 86
Last edited:
2 Questions

Does anybody have any strong feelings against this coring material for the decks?

https://greatlakesskipper.com/airce...t-marine-boat-foam-core-material-single-sheet


Also does anybody in New England know of a plastics place that can make new "windshield" for the fly bridge helm? I have the old ones they are just very..well old and crazed etc.

Thanks everyone! Appreciate and enjoying all the comments and discussion here!
 
Back
Top Bottom