Trim Removal Help

The friendliest place on the web for anyone who enjoys boating.
If you have answers, please help by responding to the unanswered posts.

KneeDeep

Senior Member
Joined
Jan 2, 2014
Messages
113
Location
USA
Vessel Name
Betsy Lee
Vessel Make
37 Atlantic Double Cabin
I'm stuck -

What is the best way to remove trim that has a plug inserted over the nail or screw head? These are completely flush- do they have to be drilled out?

This piece of trim is fine and I plan to reinstall so don't want to damage it - thanks!
 

Attachments

  • IMG_0484.jpg
    IMG_0484.jpg
    87.2 KB · Views: 95
I have successfully removed plugs to get at the screws in trim.
Using a very narrow chisel or a sharpened screwdriver, smaller than the diameter of the plug, poke at it until it comes out, clean up the hole once the screw is out, using a drill or countersink bit of exactly the right diameter and you are ready to insert a new plug when the trim goes back on. Use white glue on the new plug, as it will allow removal if you need to in later years. Using epoxy will not.
 
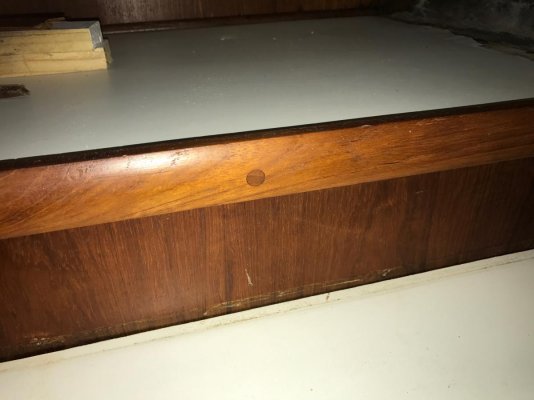
Take a sharp scraper and gently remove all the finish over the plug/bung. Then take a small screwdriver or ice pick and push it into the bung (a hammer can be helpful). Chip/pry out small pieces of the bung without damaging the area surrounding the circumference of the bung. Patience.

Hopefully the bung was held in place with varnish or or the like. If glue or epoxy, damage getting it out may be inevitable.

Usually, there is a screw under the bung.You may have to use a screwdriver/ice pick and hammer, gently, to clear out whatever is in the screw slot before you can attempt to remove the screw.

Repeat for all bungs.

Upon reinstalling the trim, think of the next poor soul and do not use glue/epoxy to reset new bungs. Use polyurethane or varnish.

Then use a chisel, carefully, to trim the new bungs down almost, but now quite, to level. Then gently sandpaper the bung flush. Then sand all the trim and recoat with whatever is whatever is compatible with the previous finish.
 
If you start to drive a screw into the plug, the plug may start spinning.....in which case you can pry it out....or the screw will start to go into the plug...then you pull on the screw and the plug should come out....assuming the installer didn't epoxy it in.
 
I always turn a small wood screw into it and then use a pair of pliers to pull it out. These are designed to be removed, discarded and replaced. You can buy many sizes in any hardware store and then stain and varnish to match. Though frankly I have seen many installatons where the plugs seems to be a different color to the surrounding wood on purpose.
 
Thanks for all the feedback - I'll make sure to limit the damage to the plug and will find some new ones! :)
 
I use the small blade on a Swiss Army knife. Did my entire teak deck with it.

Forgot to add, all my window surrounds too.
 
Why bother! going thru that agony, just get them out by destroying them and replace with new plugs readily available at most marine stores in small packaging,

When re gluing be sure to align the wood grain with the grain in the base material and use clear drying wood glue

Cheers Steve
 
I think it is important to remove the coating over the trim and plug before anything.

If the coating is thick and strong, it can lift slivers off the trim around the plug as it is being removed. It might leave a jagged edged hole.

If the holes do get buggered up, you can always go up a size in plugs so not tbe end of the world.
 
A dip in varnish will hold the new plug in place , and is easier to overpower when next removal is required than glue.

The screw in the center usually works well for removal..

Not having a woodworking gimlet , tapping an ice pick will usually be enough to start the screw
 
Last edited:
You can not save the plug, you will not be reusing the plug.
You don't want to damage the trim.

I have whacked a small screw driver in them and dug them out, they split and compress and you can chip them out.
I have also drilled a small center hole and dug them out, working with a small screwdriver to eat away from the center to the outside edge carefully.
 
Screw into the center works best for me, most of the time.

Simple quick, start slow to see it is lifting evenly with no lifting of the trim face.

If it is, an exacto knife or razor can help frwe that part.
 
yes, screw can work ok. I have also seen a screw chip the trim on the edge of the plug. Pulling the plug, the plug may have been glued into the trim. so the screw pulls the plug and the hole in the trim is glued to the plug and it cracks. Varnish is decent idea to secure a plug, it is also going to act like a glue.
 
I removed several of these to remove the trim. I just drilled them out. I used a bit smaller than the plug but large enough for a screwdriver to remove the screw underneath. Backing out the screw brought out any remaining plug.
 
A Forstner bit, slightly smaller diameter than the plug, will remove most of the old plug, then clean up and remains of the plug still in the hole.
 
A forstner bit works well but be sure to center it, and the tip of the bit can mangle the screw head sometimes.
 
A forstner bit works well but be sure to center it, and the tip of the bit can mangle the screw head sometimes.

And the screw head will mangle your Forstner bit. An ordinary twist bit works fine. Punch a hole in the center with an awl if you need to to start it centered.
 
For replacment plugs, if you have scrap pieces that match the trim, buy a plug cutter tool. Not expensive, but it helps to have a drill press to keep the cutter from walking all over the piece. More options for matching wood.
 
I vote for the Forster bit with a piece of blue tape so you don't go too deep, followed by the pick/screwdriver method. That way you get a clean outer edge on the hole. I've always epoxied new back in and sanded flush.
 
Ok, ok, point taken. I blame the iPad auto correct....
 
Sometimes the plug hole gets damaged no matter how carefull you are.

A sacrificial plug pushed in will allow your bit to be centered as you drill for the next size up.

A good reason to have a set of plug cutters , not just one size.
 

Latest posts

Back
Top Bottom