DIY Canvas Tips, Tricks, Recommendations

The friendliest place on the web for anyone who enjoys boating.
If you have answers, please help by responding to the unanswered posts.
WE did the jump and bought a Sailrite last month, we did all ready some project, but today was funny my wife finished on project cover for your sofa but at sea during navigation

Happy solid machine simple and strong but heavy ...

148514103794747.jpg
 
It's an awesome little machine. Carry it anywhere. So far I have paid for the cost of the machine with the projects I've done. New flybridge cushions, cockpit bolsters, and a Phifertex front windshield cover. Starting on new sundeck encloser in a few weeks. Then the flybridge after that.
 
Encouraging to see others venturing into fabricating their canvas! And practice does result in better outcomes. I suggest watching some Sailrite videos on pattern making!
 
I got into canvas knowing nothing a few years ago. I have the Sailrite LSZ with all the goodies. Major projects so far have been two bimini tops and a winter cover for our previous 37 foot sailboat. Oh, and a sun top for a dune buggy.

If I were to buy another machine knowing what I do now, I would go online to ebay and pick up a walking foot Chinese machine. These machines are the same ones sold by Sailrite for a fraction of the cost. The difference is more attention is paid to the quality of the Sailrite machines and they are gone thru and checked out by Sailrite before you get them. Some of the Chinese parts are a little under par on quality and are replaced before you get them by Sailrite. Sailrite sells all the parts needed for these Chinese machines at their site as they are the same machines.

If you use your LS or LSZ machine long enough you'll sooner or later crash it but good. (they're very powerful and you won't stall them) So you'll be buying new parts. Fortunately the parts are reasonable at Sailrite. Their manuals on the machines are pretty much essential and available. They go to great lengths to show you how to repair your machine if it messes up or you crash it. (and you will)...

Its pretty amazing what you can do with these machines including huge projects like a winter cover. You have to be a bit patient and think things thru beforehand as it gets pretty tough to pass ten feet of canvas under the arm. You can do it though.

As stated by previous posters, if you are not going to sew sails, you really don't need a zig zag stitch so the LS machine would be cheaper, considerably simpler and easier to repair and maintain.

I buy most of my supplies from Sailrite as they are such a good company to do business with. Their videos and live support by knowledgeable people is well worth the minor extra cost. They have some good books that are essential reading if you are a do it yourselfer. If you call them they'll tell you what are their best books.

One last thing. Go slow and be patient. Sewing takes practice. All my projects have turned out decent, but practice is needed to turn out professional results on bigger jobs. Start with some simple small items to get a feel for sewing. Port covers and ditty bags are great projects to get started. A decent sewing machine is one of the few things in boating that will pay for itself if you use it. You'll make a lot of friends at the dock with it too...lol...

Yeah, I sometimes purchase from Sailrite :banghead::banghead:

Recently I purchased 5 yards of a material and 40 yards of another material. The clowns wrapped the 40 yards on top of the the 5 yards. So to get at the 5 yards I had to unroll 40 yards--- 120 feet! I bitched, demanded to speak to a manager......told I was speaking to the manager. They did offer to accept a return...I pay for it. Because I needed the material then, not later I unrolled and re-rolled the stuff. SOMETIMES THEY ARE NOT VERY PROFESSIONAL!

YKK zippers! Try Rochfords, at least the give a good discount when purchasing larger quantities. So yes, Sailrite is the place to shop....sometimes! My suggestion is to shop around.

Sewing machines... I purchased a Juki 1541S new on Ebay later a servo motor. The junk servo motor went west after about a year. I use the clutch motor that came with the machine. Trully exciting to go from 0 to FULL SPEED AHEAD, DAMN THE STICHES :D.

I did find though that connecting the motor wiring for 220vac and running it on 120vac plus changing the motor pulley to the smallest size possible that I can now get by with a clutch motor.

And expensive Juki's have their issues also. I have gotten to be an expert timing that %^&*$. If I were to purchase another machine.....maybe Juki, maybe not.... I would search out something with a 17" minimum throat. In any case, I do agree with TEDTED to look elsewhere besides Sailrite for a machine. And Ebay is not the only "other" place to look. Consider Google. There are thousands of great deals out there for used machines.

Sooooo......happy sewing:thumb:
 
Last edited:
yeah, everyone that's sewn bigger items dreams of a machine with a deep throat. All you need to do is get off a couple grand or so because the people with those machines ain't letting them go...
 
yeah, everyone that's sewn bigger items dreams of a machine with a deep throat. All you need to do is get off a couple grand or so because the people with those machines ain't letting them go...


Right on. That is why I have an old boat and an old car but a new sewing machine :flowers:
 
Last edited:
Step up from LSZ

I made a step up from the Sailrite LSZ that I had and sold. I made up what I call a luggable. It consists of a true industrial Juki LU562 compound feed that has a DC motor attached directly to the machine head. Like many people, I don’t have room for a permanent sewing table. The sewing head has an oversized flywheel and a 5:1 cog belt reduction. Motor drive is variable speed foot control, make a single stitch through anything I have sewn or zip along at 15 feet per minute. I have since made a fitted sewing board to go around the machine head to support material. See photos.

Sewing is not my profession, but I included 2 photos of my projects completed with the luggable. 1) fitted helm cover 2) chair covers, rear drop curtain, aft deck sun shade Sailrite supplied the materials (on sale) – vinyl coated Sunbrella Plus sewn with PTFE thread (I watched Sailrite video on patterning many times!!
 

Attachments

  • DSCN0156.jpg
    DSCN0156.jpg
    139.9 KB · Views: 71
  • DSCN0157.jpg
    DSCN0157.jpg
    140.7 KB · Views: 66
  • DSCN0158.jpg
    DSCN0158.jpg
    138.1 KB · Views: 69
  • DSCN0394.jpg
    DSCN0394.jpg
    142.6 KB · Views: 78
  • DSCN0396.jpg
    DSCN0396.jpg
    151.9 KB · Views: 79
Alabama--- GOOD FOR YOU! I believe your boat could even look nicer with new curtains around your rear deck's hardtop.....of course only if summers are not too hot where you are.
 
Foggy ... When I made up the rear sun shade, I left a 1 1/2" zipper edge all around so I had option of enclosure. Summer of 2016 saw lots of cruising day heat. Getting "cooked" waiting many hours for lockage and to keep the better half happy, I added the unthinkable ... a 16K roof AC/heat. What can I say!!
 

Attachments

  • DSCN0403.jpg
    DSCN0403.jpg
    142 KB · Views: 121
Foggy ... When I made up the rear sun shade, I left a 1 1/2" zipper edge all around so I had option of enclosure. Summer of 2016 saw lots of cruising day heat. Getting "cooked" waiting many hours for lockage and to keep the better half happy, I added the unthinkable ... a 16K roof AC/heat. What can I say!!


I say enjoy every minute being on your boat! Life is short so make the most of it :thumb:
 
Getting Started in DIY Boat Canvas

Fellow TF Stitch Meisters...

Water is hard up here in the NE and that leaves some spare time to fill

I had some interest in DIY Boat Canvas from members of my local Power Squadron members so I put together a short seminar on what it takes to get started.
Some of this is stuff I already posted in this thread but there are some new info & video links

Topics include: (Links & Videos included)
• Sewing Machines – features & options
• Work Area Set-up
• Useful Attachments & Tools
• Zipper Basics & options
• Sources – machines, fabrics, accessories
• Resources – Learning aids

If interested you can access the seminar with pictures, informative links and videos from my Bacchus website - Projects - DIY Boat Canvas

Let me know if this is useful and possibly something that is worth posting in the TF Library Section
 
Nice.
My first lesson was, household sizzers are really not good enough to be used on canvas and Sunbrella.

My second lesson was, those new $45 shears I bought are incredibility sharp, they come with a holster for a reason and removing blood drops from white Sunbrella is a pain.:whistling:
 
Nice.
My first lesson was, household sizzers are really not good enough to be used on canvas and Sunbrella.

My second lesson was, those new $45 shears I bought are incredibility sharp, they come with a holster for a reason and removing blood drops from white Sunbrella is a pain.:whistling:

Try Peroxide for blood (and red wine) stains - works wonders
 
I have a few of of general comments based on my recent years of sewing for my boat along with doing a close friend's for barter. My opinion and yes.......... I sometimes am opinionated are below and not necessarily in preference order.

*) I avoid basting!!!! It is a BPITA to use especially around corners. And yes I do have the basting attachment for my Juki 1541S sewing machine.

*) A 3/8" single turn folder is one of my very handy tools. This is great fold raw edges.

*) Have a decent work table for sewing. AND COVER IT with a good quality towel! If you try to sew vinyl without a soft cover on your table, you run a very high risk of scratching it. Know this one from experience.

*) I burned out my servo motor purchased on Ebay and went back to the 1/2HP that came with my machine. I found that it works better with the smallest pully I could find for the motor. I also wired the motor to operate on 220vac even though I operate it on 110vac. This trick helps control starting surges where sewing begins at 200 MPH.

*) Always use lubed thread. MY preference is 90-92 polyester rated for sun. There are other threads that are better for sun exposure but I find that when the thread starts to fail, the canvas will usually need work anyway and that is a good time to just do a general resew. It doesn't take long to do.

*) LEARN HOW TO MAKE PATTERNS!!! A good pattern is indispensable for all sewing projects.

*) I overlap my panels and use velcro. This minimized water intrusion.

*) a good pair of nips helps! Most sold are junk so look around.

MOre later
 
Nice.
My first lesson was, household sizzers are really not good enough to be used on canvas and Sunbrella.

My second lesson was, those new $45 shears I bought are incredibility sharp, they come with a holster for a reason and removing blood drops from white Sunbrella is a pain.:whistling:

That is TOO funny and also too true!
 
Foggy....
Just to clarify for others...
I think you are referring to "binding" and recall a previous discussion. I don't disagree w your rationale I just haven't opted to change my ways and usually doing an addition or replacement for others and want to match what they have.
Havent done much for myself... other than sunscreens on windows... as I'm now free of any canvas

Absolutely agree w the benefits of patterns.
Where do you buy your lubed thread?
 
Last edited:
Foggy....
Just to clarify for others...
I think you are referring to "binding" and recall a previous discussion. I don't disagree w your rationale I just haven't opted to change my ways and usually doing an addition or replacement for others and want to match what they have.
Havent done much for myself... other than sunscreens on windows... as I'm now free of any canvas

Absolutely agree w the benefits of patterns.
Where do you buy your lubed thread?

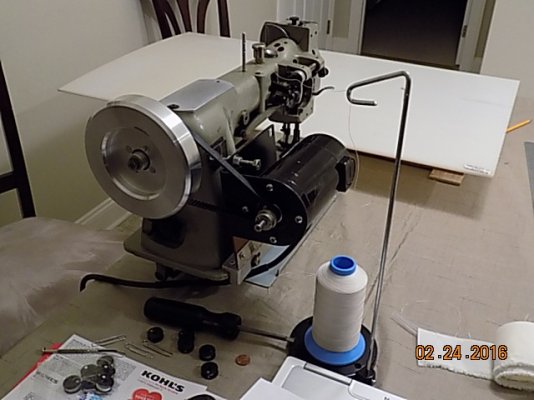
Bacchus- I have purchased many 1# rolls in the past from Rochford. Lately, I was given about 4#s so itr will be awhile before I make another purchase unless of course I need a color different than black. While I am at it, I highly suggest that IF your machine can wind bobbins while you sew to purchase thread rolls in pairs. Next, always fill bobbins while sewing. Makes life a lot easier.

I wrap panel edges with a 7" strip. I use my 3/8" single fold adapter to bind the edges with a single 3/8" flap. Next I fold the strip in half and then sew it to a panel's edge. Now sure, this uses a little more fabric than binding BUT it provides a greater fabric layers for sewing zippers. I also sew my vinyl .... if a window is required... to this same folded strip.

I think doing what I described above gives a better appearance to the job. Now on the other hand if you want to save time and fabric cost, you could use 2-3" binder instead for framing the windows. But personally, I rarely use binder. Even with the proper tool, the stuff never seems to lay right and it is horrible going around a curved surface.

HELPFUL HINT for curved edges and note, I got this idea from Sailrite.

Use your pattern to mark the canvas with about a 3-3 1/2" strip around the curved edge. Cut two pieces of the marked curve fabric. Use the 3/8" single layer folder I described earlier to sew the edges of the two pieces. Next, sew the outer edges of the curved pieces together. Next, just sew the piece to a matching fabric cut and you will have a nicely fabricated curved edge.

There are many helpful hints on canvas sewing on YouTube especially those from Sailrite. So guys---- do some reading then try doing some sewing :D
 
I tried posting a picture attachment in my above post. So... another try
 

Attachments

  • finished.jpg
    finished.jpg
    147.7 KB · Views: 88
A couple of questions from a beginner.

1. I just wasn't ready to blow $1,000 on a sailrite machine, so I did some looking around and bought a singer 4411 heavy duty. Great reviews on amazon and youtube. Under $200. I really don't see myself sewing a bimini or something complicated like that, but we need new phifertex window covers and were quoted well over $1,000 to replace them. I bought the materials for $185. My new machine easily punches through 8 layers of phifertex, and the covers are turning out great so far. It also punched through 6 layers of nauga-soft with no issues. What am I missing here, machine wise? Is it going to die in a few months?

2. My next project is going to be a basic sun cover that we can tie up across the back of our cockpit for when we are anchored out and the sun blasts in in the afternoons. We have a Stamoid bimini rather than sunbrella and I personally prefer the look of stamoid over sunbrella, so I plan to build the shade from Stamoid light. All of the posts here have been about sewing Sunbrella. Any thing different I need to keep in mind for stamoid?

Thanks
 
Those sewing heavy fabrics along with canvas recommend that the machine have a walking foot. A walking foot machine pushes the fabric as the machine stitches. I don’t know if your machine has one but all that matters is that you are happy.

I believe that more folks should try doing their own canvas and general sewing but to each his own.
 
I searched for a Singer 4411, it`s a no "walking foot" model. But, readily available here,and one site says it can sew the hem on a pair of jeans,which gives an idea of material thickness ability, so two or three layers of Sunbrella should be ok.
Is having to pull the material through a problem? A w/f machine would cost maybe 1.5x more, a consideration if only doing an occasional job.
 
GIVE IT A TRY!!!! Too many times guys get hung up over “people say.....”

Remember, it’s just a tool. If it works to your satisfaction that is all and I do mean all that is important


EDIT: I remember seeing walking foot attachments someplace. There may be one available for your machine IF NEEDED
 
Last edited:
It depends on what you are sewing and also how much. If you are just sewing Pfifertex, almost any machine will sew it. If you are doing small jobs you can get by without a walking foot. If you are doing larger jobs, a walking foot does a better job and does it much easier on you.
 
Thanks for the reply guys, I already have a walking foot for it, it came as an accessory that I ordered after I got the machine. It pulls the fabric through really well, I don't have to pull it. Here is a link: https://www.google.com/shopping/pro...EVVfZh5wxyD0V684B0Dq_FW3aQbRLWOwaAsZqEALw_wcB
There is a 4411 Singer and a 4411 Heavy Duty, I got the Heavy Duty. Not sure what the difference is between them.

The six layers of Nauga didn't bother it a bit.

There is not a ton of space between the deck of the machine and the bottom of the foot, so that could be a drawback.

Anyway, I figure I'll try it and use it at least to learn, if it fails or won't do the job I can always move up.

Any board knowledge on sewing Stamoid?

Thanks
 
First sewing job I did was Phifertex window covers. Like you they wanted over $1000 for the job. Pad for the machine in short period of time with all of my projects. Stamoid is a really good product. As far as sewing it I have learned to use the smallest needle you can to do covers. Less prone to leaking that way.

You will enjoy the projects. Always something to sew on a boat!
 
I have sewn some Stamoid with the same setup that I use for Sunbrella. I use Tenara thread. It worked fine on the Stamoid. But keep in mind I have not sewn nearly as much Stamoin as I have Sunbrella.
 
Back
Top Bottom