Teak Cap Rail Split

The friendliest place on the web for anyone who enjoys boating.
If you have answers, please help by responding to the unanswered posts.

Bustlebomb

Senior Member
Joined
Feb 2, 2014
Messages
147
Location
USA
Vessel Name
Snooker (for now.....)
Vessel Make
1981 34 Californian LRC
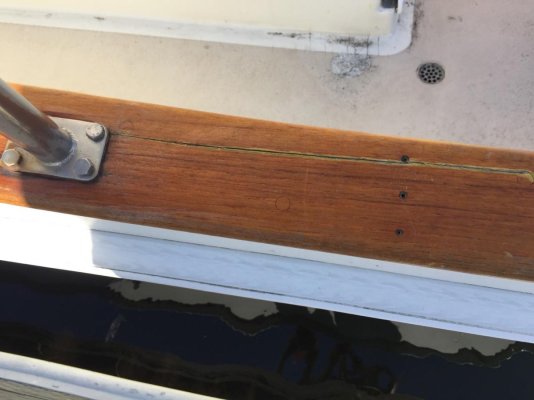
While coming in to the dock, it appears as if one of my "helpers" may have decided to use the rail instead of the cleat or line to muscle the boat into the dock. This provided a large lever arm on a smaller contact patch. The result is that I have what appears to be a split in the cap rail that will now open slightly when lateral pressure is applied to the rail.

I'm not even remotely a wood worker and don't have the first clue how to fix it. Wood glue? Epoxy (I've never worked with the stuff)? Duct tape?

I'm hoping someone else has been faced with a similar problem and can provide.some guidance.

Thanks!

Matt

IMG_1481172655.130018.jpgIMG_1481172673.612068.jpg
 
If you don't want to replace the cap, squeegee some thin epoxy into the crack after masking it off and get some pipe clamps to pull it tight squeezing most but not all of the epoxy out. Than sand and refinish. If you don't trust that alone, then run some long small diameter screws wherever possible to add strength, then bung with teak plugs.
 
Epoxy glue and clamps.

Flow multiple passes of low viscosity epoxy in the crack before you clamp it together.

Put the epoxy in a syringe or squeeze bottle to apply it with.
 
Consider also a slow hardening epoxy to give it time to progress further into the crack.
And pop it open while you get the glue into the crack.
 
Have a look at West Systems epoxy they have a very low viscosity product that will go deep into the crack . This crack need a mechanical fix as well as glue otherwise it will just open up in time. I would drill several holes and bolt the cap rail together recess the nut and bolt head and use epoxy and sawdust as a filler.
 
Last edited:
Stainless Steel screws would be fine to hold this together.
Drill one side of board so the screw is free to pull into the other side of crack drilled with smaller hole.

I would just epoxy first and if it fails, then re-epoxy and use screws,

If I used screws, I would countersink and plug.

Seeing this is such a long crack, a slow epoxy is a good idea, you don't want the epoxy setting up while your still filling the other end of the crack. Some of these epoxies go off in a few minutes and they all start to thicken first. Used to be able to buy 2 hour epoxy, but I see most are 5 minutes at a store.

This one says 30 minutes.
https://www.amazon.com/Devcon-31345...481194505&sr=1-1&keywords=devcon+2+hour+epoxy
 
Last edited:
Can't see the pics well enough but if I am not mistaken, the second photo with the three holes makes it look like it was previously glued or epoxied and then screws inserted.
 
I agree with Donsan, previously weakened and a water into core intrusion source.

I'd recommend replacing that few feet of cap rail with a properly placed new section. This permanent fix re-establishes structural integrity and seals the FRP to prevent water migration.

I've seen several nicely done by patient owner (or pro) cap rail section replacements over the years. Whether electrical, wood or FRP there have been some wonderful professional looking repairs done by TF members, well beyond a patch job.

:thumb:
 
Also, I can't tell if the three holes are actually holes or screw tops. If they are holes, they should have been sealed or they would be a source of leaks. If they are hex screws, they look like ordinary wood deck screws and probably shouldn't be on a boat. Even the proper screws should be sealed.
 
I don't believe those holes have anything to do with a previous relate. But if not used I would drill the out a bit and plug them.

West Epoxy makes slow cure hardeners to mix with their resin.
 
Seems to me that the hull-deck joint should be /will be watertight independent of the cap. Lots of ways those joints can be made: I'd hope that the hull edge turns in and the deck/bulwark edge turns out; the joint would be made with polyester putty and bolted. Holes to mount the cap and stanchions that go through the hull-deck joint can be made to leak if their bedding has failed.

I'd remove the stanchion screws and the three 'repair' screws, and other screws adjacent to the split.

I'd repair the crack with epoxy dribbled into it for as long as I could - low viscosity and slow cure. The crack has to be dry. Clamp the crack tight before the epoxy cures; it can be getting stiffer, though. I'd consider doweling the crack with Teak dowels from the inside edge, transverse the crack. Screws and bungs would work too. That crack does not look bad but it has to be watertight for the sake of the varnish. The coamings on our LeComte were cracked because they were unsupported and easy to stand on when the boat heeled. I sawed the cracks out with a hacksaw blade to get a clean joint, filled the joint with stiffened epoxy and reinforced the coamings.

I'd ensure that the stanchion screws anchored the stanchion to the 'glass beneath so that deflecting the stanchion did not stress the cap. I'd leave the 'repair' screws out, fill the holes in the 'glass w/epoxy, bung the holes. I'd reseal the adjacent cap anchoring screws and bung.

Really! Who does not grab the rail for pulling the boat to the dock or helping yourself to board? It's got to take that use.
 
What's curious is how the split intersects the stanchion fastener as though it's not through bolted, but instead lagged to only to the cap rail, that top photo looks like the split runs and appears it would intersect the fasteners on the next stanchion aft.

I would look into that as well or any fix could possibly fail
 
While coming in to the dock, it appears as if one of my "helpers" may have decided to use the rail instead of the cleat or line to muscle the boat into the dock. This provided a large lever arm on a smaller contact patch. The result is that I have what appears to be a split in the cap rail that will now open slightly when lateral pressure is applied to the rail.

I'm not even remotely a wood worker and don't have the first clue how to fix it. Wood glue? Epoxy (I've never worked with the stuff)? Duct tape?

I'm hoping someone else has been faced with a similar problem and can provide.some guidance.

Thanks!

Matt

View attachment 59404View attachment 59405


The yellowed edges of the varnish atop the crack in the teak say that crack has been open for a while, likely over a year. I would also suspect that the teak is only 3/4" thick, so hasn't the structural integrity to stand up to the torque forces generated by coming against a piling or other fixed object (my take on the cause of the crack in the first place, as unlikely a person pulling on it could do the damage)

Others have covered the best fixes, though I also doubt that you want to do this yourself, as a self-confessed "non-woodworker". You should get a pro to look at it and follow his/her advice.
 
Greetings,
Mr. ko. Good catch on the yellowed edges. Indeed an old crack.

It doesn't take that long for that kind of yellowing to show up.

When the wood cracks it's not uncommon for the finish to lift at the edges of the crack and end up looking like that.
 
Thanks for all the great suggestions. Sorry about the late reply...I've spent the last week getting ready for the Christmas boat parade.

Donsan, the three holes are for a three small half-round pieces of teak that provide a grip surface on the cap where you can step on it while getting onto the boat. I took them off for the refinishing project.

The yellowing is recent as I had completely refinished the rails just a year ago (no comment on the lack of follow-up maintenance and the now required re-varnish job). I'm not sure what caused the crack. I assumed that someone had grabbed it but, as pointed out, everyone does that and it should be able to take that abuse. It is immediately adjacent to a dock piling. I don't remember striking it but I guess it is a possibility.

koliver, you are right. It is about 3/4" thick. Any mechanical fastener would have to be small enough to be effective in lumber of that thickness.

I need to pull one of the bolts from the stanchion to see how long it is and how long it should be. Tthe hex heads were on the boat when i bought it, but not in all locations. The original fasteners that still remain are slotted head screws. I have no idea how long they originally were or how long the replaced ones are. if they are too short, that could very well be the reason for the split as it would not be solidly connected to the substrate, only to the 3/4" piece of teak.

i'll look a little deeper into it after i get the lights and decorations off.
 
You're not going out in the parade with that crack, are you? Hope the Grand Marshall doesn't see that! :eek: :facepalm: :D

Seriously, my port caprail took a beating in 2015. Two raftups with TFers (who shall remain nameless) turned sour and caused 2 popped cleats! Neither was thrubolted. If my 1977 34 LRC didn't have thrubolted cleats, I seriously doubt it has thrubolted rail stantions. YMMV

Those 2 popped cleats caused significant damage to my caprail, one requiring a sloppy field repair to return the cleat to service once back in the home slip. Eventually I'll need to either cut it out and replace it or take it all down to bare wood, repair with epoxy like the pros did last year when my bow pulpit stopped a drifting 60 Hatt like a pickle on a fork.

Hmmmm....now that I think of it, that sounds like a REALLY BAD year of boating, but in all honesty, they were 3 of my most memorable and fun trips.

In the process of the allision repair, my rubrail was removed and replaced exposing the overlap of the hull with the deck/house. I also had the chance to dig extensively in the process of thrubolting the 2 port cleats. These Californians are VERY solid with thick fiberglass hulls and caps and no fillers but lots of sharp edges. My 1977 is the first hull # for the 34 and I was told by Gil Marshall (with Jule listening in on the speaker phone) that they were grossly overbuilt due to the company's and industry's inexperience with F/G. I wouldn't worry about any leaks in the interim. The caprails are just screwed into the top edge of the F/G.

TBH, I don't mind if my boat isn't cosmetically perfect but that's not common for everyone. Maybe that's why I have artist's renditions of my boat as an avatar. I spend 50% of my time fishing from the boat and even cover the aft rails to prevent damage, but try not to stress over dings. If it's not perfect, the next scar isn't so painful. I like to use my boat and do my best to keep her in top shape mechanically. But when it comes to using my boat or polishing/varnishing my boat, I'd much rather take her for a spin.

Hope you're able to have fun at the Christmas Light Parade without worrying about that nasty caprail!
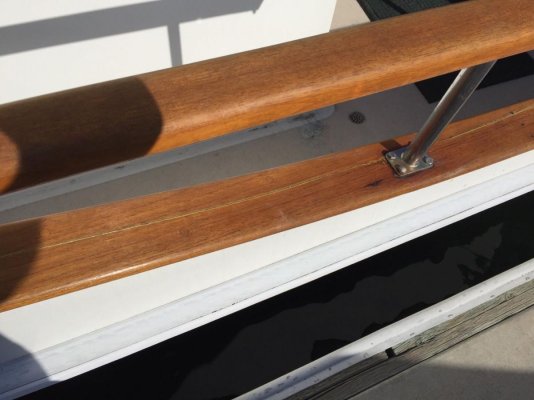
 
Remove the station screws, block up station so you can get under it and epoxy. I've done this on split wood with a slow cure epoxy that I heat with a heat gun to make the epoxy watery. Use a syringe to apply the epoxy-much cleaner. Mask each side of the crack to minimize sanding and then clamp with wood clamps (I use aa old credit card to wipe excess). Remove the tape after wiping excess and wipe down remaining epoxy with denatured alcohol. Then leave for a day or two. It can be done with 30 minute epoxy but I like the 205 west system epoxy. Much stronger, longer working time and sands better. If done carefully you will not even have to sand and refinish.
 
My rail stanchions on my vessel are only screwed in.
 

Latest posts

Back
Top Bottom