Taiwanese Trawler Teak Deck Repair Qestions

The friendliest place on the web for anyone who enjoys boating.
If you have answers, please help by responding to the unanswered posts.

stanfromhell

Senior Member
Joined
Oct 1, 2013
Messages
102
Location
Canada
Vessel Name
Summer Wind
Vessel Make
Bayliner 4788
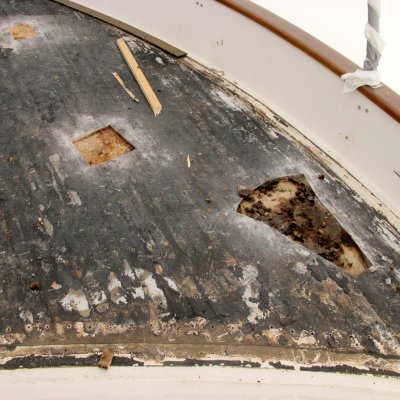
I have a 1981 Cheerman PT38 Europa which like most other Taiwan built trawlers, has water leaking thru the teak deck screw holes and into the wood core. The problem is bad in the area of the sampson post and seems to get better heading along the sidewalks to the steps near the front of the cabin where they are covered by the upper deck. The aft deck of the boat is also covered by the upper deck and appears to be OK.
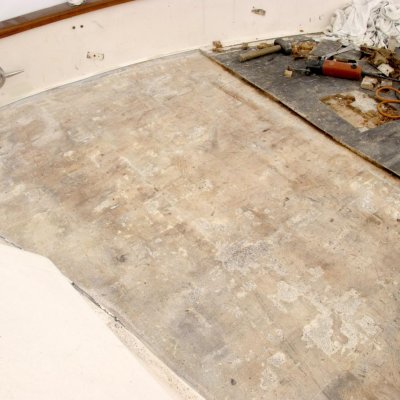
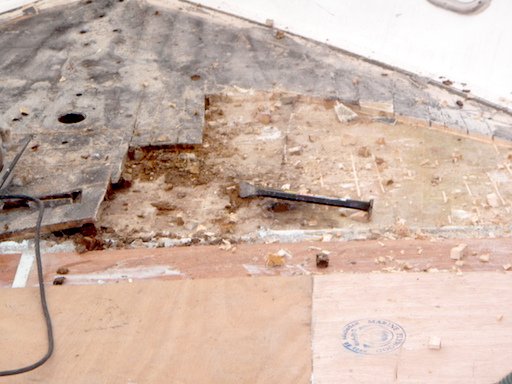
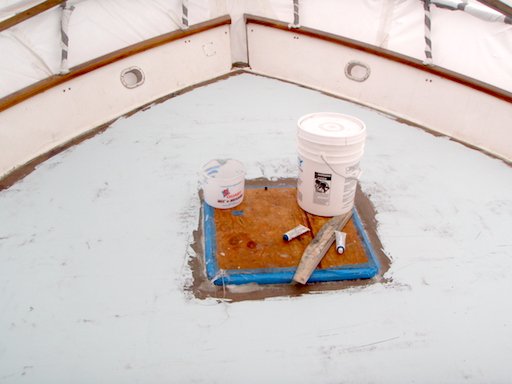
i had planned to remove the teak on the foredeck, then cut away 12-18 inch wide strips out of the deck from the port to the starboard side, remove the wet core, install end grain balsa, cover, it with layers of matt so that it would have structural integrity then repeat the process moving aft untill no more wet core was found. I then planned to have a tradesman install the final layers of glass, gelcoat and nonskid for a professional looking job.
I spoke to three boat repair businesess who have done this type of work.
One said they would do the finishing for me as i requested and will be veiwing the boat within a week to rpovide an estimate.
Another said I had to do the work from the inside and should not do it from the outside but did not elaborate on why. I thought it was a strange way to do it and moved on with my search for someone else.
The next person (who has thirty years experiece doing fiberglass boat repairs) told me that if I removed strips as I described he would not do the finishing for me because I would be ruining the structural integrity of the boat and he didn't want his name associated with it.
His explanation was:
The hull and deck of this boat evidently is moulded, not screwed together. When it was built, the deck and cabin was placed upside down, the hull was placed on top of it and the two were glassed together. The assembly was then turned right side up and the build was continued. In effect my boat is made like a unibody car or van and if i were to cut a 1 foot strip of metal from one side of a cars roof to the other, then weld a new strip in, the doors would never close properly and the windows would leak becuase the body warped as soon as the strip was removed.
He is adamant that the same will happen to my boat.
His suggestion is to remove the teak strips and screws, plug the holes in the deck and tarp it very, very welll to keep the Vancouver winter rain out. Then remove the headliner and cabinetry, use a 3-4 inch holesaw to cut many holes thru the inner fiberglas deck but not into the core and keep moving back untill I no longer find moist core. If areas of totaly rotten core is found it must be replaced of course. Next l should place heaters in the cabin and run them for a few months untill the core is dry. Then do the necessary finishing and nonskid application.
This, he says, is the proper way to do it and he would not cut strips in the outside deck even if I offered him 10 K to do the job.
It doesn't make sense to me, but two out of three people want do fix the leaks from the inside of the boat so my question is....
How was your leaky trawler deck repaired?
 
While I don't completely agree with bid number three's assessment of how the boat was built or that cutting the deck will destroy the shape of the boat (though it might if a lot is done incorrectly)....

I reglassed my decks and didn't worry about a few wet spots as the underside of the deck had so many had openings below, I let them dry out on their own. 5 years later and no issues.

Had I not been living aboard and couldn't see under a lot of my deck areas, then drilling 5 inch or so holes from the bottom to dry things out sounds like a plan that I might have used to. Applying as much heat and vacuum on some of those holes too.
 
Last edited:
I think if you shored the interior to take your weight on the deck my choice would be to remove all of the teak back to some natural break, remove all of the top layer of Fiberglas, remove all of the soggy stuff that's in there and make sure what is left is bone dry. I would make sure the rot has not gotten into the house walls, windows etc. If it has, you will have to do that now too, getting the soggy stuff out and drying thoroughly. A few gallons of CPES would probably help along the edges or parts you can't get to. Then I would use a good quality plywood laid in the lower glass layer, if necessary in the wall of the house, soaked in CPES, then glass over the top and finish. The decorative panelling in the interior is most likely damaged and if it has been attacked by mold spores, will need to come out. If you try and coat it with something you will never get the smell out.

PM Stretch Head, or read his posts, his boat is wood but he removed and glassed his deck and he will have lots of good advice.
 
I hear all the time of soggy material...it might be there, it might not.


I pulled several 5 gallon buckets of teak block out of a section of y flybridge deck that were wet, sitting in water.


They weren't soggy or the least bit rotten. I let a lot of it dry and have used it in subsequent repairs as it was very nice teak.


There are teak logs recovered from the bottom of rivers that are dried and sawn into lumber.


Make sure your "wet" deck is actually soggy or rotten before you go through too much work...or at least more than you need to. Even most of the "wet" plywood in my house under my leaky windows was not rotten...just small parts of it that could be repaired with patches epoxied in.
 
The core is plywood around the samson post and it is soggy wet but I drilled from the interior into the core in a few places and it is definetly not rotten, only moist.
What on earth is CEPS ??
 
Clear Penetrating Epoxy Sealer. It replaces moisture with epoxy then sets up.
 
To the OP. I think your method is sound and similar to what I did. But we used 4' wide ply, so much wider strips than you describe. My symptoms were similar to yours: rotten at anchor winch, but other soft spots as well.

If your core is balsa and it is wet I think you should remove it. Balsa does not dry out easily and if it remains wet it will rot. Any deck penetration is likely allowed water ingress, not just your sampson post

I had my foredeck replaced about 2 years ago, although I removed all the deck hardware and the teak itself. Previously the PO had someone lift the teak and then re-bed with some black stuff that doesn't harden unless exposed to air. But either it didn't keep out the water or the balsa core was already wet and continued to rot. The only good thing about that was they used square drive screws, and although they had to be cleaned out they came out fairly easy. All 960 of them. I salvaged most of the decking and am recycling into various items.

We cut the top GRP layer off in sections a little over 4' wide, stripped the balsa core out then ground the lower GRP skin smooth. There were no holes in it, so no leaks into cabin. Then we laid 1.5 oz CSM in vinylester resin, followed by bedding two layers of 6mm marine ply. Using thin ply it readily bent into the deck camber, and with a second layer the joints were all overlapped. We glassed over the top of the ply with 1.5 oz CSM, 2 x 24 oz woven roving and 2 layers of 1.5 oz matte. This provided a deck of the same thickness as the balsa cored one, enabling us to leave some of the upper GRP layer next to the bulwarks to slot the new deck ply and layup into. It was all faired with vinylester products and then painted with awlgrip with micro-balloon non-slip.

Some pics: after teak removed:
1 rotten balsa core is dark colour in cutouts
2 first 4' strip prepped (down to lower GRP layer)
3 first strip completed with overlapped double ply layer
4 ply glassed and fairing compound spread
5 awlgrip finish
 

Attachments

  • Foredeck balsa 1 sml.jpg
    Foredeck balsa 1 sml.jpg
    193 KB · Views: 149
  • Foredeck balsa removed 1.jpg
    Foredeck balsa removed 1.jpg
    143.8 KB · Views: 151
  • Foredeck new 7 sml.jpg
    Foredeck new 7 sml.jpg
    105.1 KB · Views: 155
  • foredeck new 12.JPG
    foredeck new 12.JPG
    96.7 KB · Views: 142
  • Foredeck new 1.jpg
    Foredeck new 1.jpg
    112.5 KB · Views: 205
Ok, well, just so it's out there, let me be the devil's advocate by saying you could do any or all of the above, (some of which sounds rather bizarre, I must say, especially puncturing the deckhead (internal) layer of the fibreglass sandwich that is giving the structural and water intrusion integrity to the whole structure), and it will cost an arm and a leg - truly - and at the end of the day, all that will be different is that you will be able to say your core is dry, right...?

Or, you could be realistic, and ask yourself, what is the function of the core? It is not part of the water-proofing system. That comes from the upper and lower layers between which, is the 'core'. In other words the layers others have been talking about boring into or stripping off to replace the core. Certainly the teak deck screwing process used (superceded by gluing the teak down, or no teak deck now being the fashion), has compromised the integrity of the upper layer, but that can be remedied, and the core is just to give a certain stiffness by the lamination effect. Actually, the fact it is damp does not actually remove that stiffening effect very much. Maybe a bit more springy, or picked up by a meter, but you'd never put a foot through it. It is these glass layers that give the waterproof integrity. So, as long as the internals are not too damp-damaged, then a more limited and less expensive fix can be done. Water-stained interior teak can be cleaned up and revarnished or replaced if too bad, quite easily. I did the entire front cabin myself.

So, you could do what the previous owner did to my boat, which is a smaller version of yours, but not by much, and being a bit shallow in the pockets, he had a shipwright just remove the old teak, epoxy down a new layer of marine ply over the whole deck, and then place several layers of new fibreglass over it all finished in non-skid. I'm not sure I would have been game to ignore all the pundits who advocate ripping the damp core out, but he did. To be honest, apart from the fact my deck is about an inch thicker (and therefore an inch higher), it absolutely works, and that solution has presented absolutely no problem in the 14 years we've owned the boat. Just sayin' :socool:

PS. You might need some strengthening around the Samson Post, however, but that could be quite limited to just that area.
 
Last edited:
I would tarp the whole area and let it dry out and then evaluate. Just because the wood is wet moist does not mean it needs to be replaced. If the teak wood strips are still good, might want to just refasten and recaulk. Which is what I did. As long as the deck and teak strips are still strong enough that they don't flex and can hold the weight. 18 years and the decks are still ok.

Refasten and recalk is time consuming but not difficult or expensive. Teak decks do require some yearly maintenance and they do give early warnimg signs. Every year I refasten recaulk some areas, reseal and tarp over the front deck. 19 years and still solid and rain water proof.

Also if you dry out the deck will not get any worse so it's not like it has to be done right away. :flowers:
 
Screws penetrating fiberglass into the core are similar to screws in wood boats. Eventually the screw will leak. Natural movement from hot, cold and boat movement works on the screws. Even faster leaks from stanchions, masts and other fittings under stress.
The only way I found in 50+ years of boats is to use a syringe and squirt epoxy down the pilot hole before driving the screw. That way, as the screw tightens, the epoxy is forced into the fg & core and forms a permanent seal. Bedding compounds eventually get thick or stiff and allow water in.
A couple ways to dry core - dry air forced into the core in a dry area pushes moisture out the leaking holes. Or a small vacuum pump drawing from the leaking holes will pull moisture if you have an opening in a dry area. Best if drawing dry inside air from a area with a dehumidifier in the PNW.
 
When refastening and caulking I fill the holes and grooves with epoxy, so the black caulking is for show. So if the screw or caulkingdoes not adhere the epoxy does not.
 
Well, I certainly do have a lot to think about regarding the best way to proceed.
I know step one is removing the teak and screws then plugging the holes.
But after that????
 
This sure is an interesting topic that I will follow. I am on a 41' President of similar vintage. I do have a few leaky windows of poor design. They are located adjacent to walkways and the foot weight has caused some weakening and leakage. My repair I will do from the inside as the out gelcoat is still in good shape.
Just a comment about shooting epoxy into a screw hole and then driving the screw in. How do you tighten or remove the screw after years "if" it loosens up ?
I ask because I have some stantions where this technique was used and now they are loose. I am unable to loosen to remove or tighten to secure.
I know the process sounds good.
 
My understanding is that working from the bottom is done to maintain the topsides cosmetics. However, once you remove the teak decking there won't be any cosmetics to worry about. If it was my project I would do it from the top in sections. I would completely remove the old core and vacuum bag down new FOAM core. In places where I was going to put hardware I would leave the core out and build up the thickness with solid glass. The final step is then to reglass the top of the deck. The time consuming part is getting a good cosmetic finish on the new glass - lots of sanding. If you are going to put teak down again I would suggest you do what high quality yacht builders do. Make up panels and glue them down. The only screws are generally in the surround/edge boards. That greatly reduces the chance of future leaks.

Frankly I doubt very much that the hull was put upside down onto the deck structure. Why do I say that? Simple, the interior is generally built in the hull and things like tanks and engines are installed before the deck goes on. No one in their right mind would lift and invert the hull since the deck is much easier to put onto the deck. Many builders glass the hull/deck joint, normally by putting a layer of wetted out mat on the hull flange and then putting the deck down on top of that. However, almost all builders also screw the deck to the hull even if it is glassed. Low end builders use wood screws, but better builders through bolt the deck to the hull flange.
 
Thanks for the info on hull / deck fastening TDunn.
It has always seemed logical to me to work from the top in small sections but this one boat repair person with many years of experience was so adamant about the need to work from the inside so that the hull would not be deformed and cause the doors and cabinetry to not fit properly that I thought I would ask everyone for their opinions before proceeding. I learned a lot about what needs to be done and I sincerly thank everyone who responded to my questions.
I am going to remove and replace the soaking wet plywood from the winch and sampson post area by cutting away the deck and working from above. Then I have to somehow decide if the core is so wet that I must do the same with it or if It can be dryed out from below.
Another question.....
When the teak strips are removed, can I expect that wet core is easily detected by tapping the deck with a small hammer or is the the hammer method only good for finding disasters?
 
If you try to take the teak strips off, you will break or crack them. That is why I elected to re fasten caulk as the teak strips where still in good shape. Taking a teak deck off is not easy.
 
There's a lot of good and some not so good advice here.

Do you want to sort of slow down the decay and somewhat improve the look, or do you want to do it right?

I have seen boats with wet cores inside a heated (74º) shed for YEARS and when it was finally decided to do it right and remove the top glass layer the core (balsa) was still wet!!!! And when it's wet it WILL rot and lose it's bond with the glass layers.

The core is not just there for stiffness. The two layers of glass glued to the core are a structural panel. The core, while adding little weight, greatly increases the strength of the panel.

So, you can goop and poop the teak deck and slow down water intrusion. The rot, and resulting reduction in strength, of the deck WILL continue.

You can cut some holes in the bottom and put a space heater in there until the cows come home, you will NOT dry out the core. You will also NOT restore any lost structural strength.

Removing the teak is a job, but it's not hard. If it were me I would use a combination of a stiff putty knife, flat bar, an oscillating cutter with an offset metal blade and whatever else my hands would go for. My guess you can do a 40 foot boat in two or three days. Maybe save the back deck under the overhang and put a nice edge treatment on it, depending on condition of the core there.

Then you can, as described above, ignore the core and put an inch of glass over it. Now you don't need the core anymore for strength. You have, however added a lot of weight, and you still have a bunch of encapsulated moisture and the associated rot which may find it's way into the interior.

If it was me, I would remove the teak as described above, and then in sections, one at a time, remove the top glass, remove the wet core, dry the exposed surfaces, then glass in new balsa or foam and plywood in high load areas, then beveling and glassing back in the top layer pieces. When it's all back together apply a thin layer of glass all over and fill, fair and paint.

Yes, I have done this kind of work.
 
Last edited:
Some repairs are assuming you plan on completely restoring an old falling apart boat to original or better than new condition and taking it out is weather that it has probably never seen or ever will.


That is the million dollar decision and only one person can make it.


Make the boat new again...or good enough for the next 20 years and even a subsequent owner....as most of these boats were sold with similar issues hat owners have lived with for years and enjoyed the boat and cruising despite wet cores and spongy decks.


There is no one answer and even no one correct repair. What has or has not worked in one case may have worked or not worked in another....roll the dice and pay the price.....
 
Thank you everyone for your input, every post helped me to make my decision on how to proceed with my deck repairs.
I'm going to stick with my original plan, which by the way, Oscar recommended a few posts previously. I will permanently remove the teak strips, plug the screw holes, remove small sections of the deck at a time and replace the wet core and first few layers of fiberglass. Finally I will have professional apply the last fiberglass deck layers , gelcoat and nonskid. The "experts opinion" which I mentioned in my original post still has me wondering where he was coming from?
 
North Sea 34 ,TWO BEES.Seattle Wa

How about keeping your boat under cover or boat house,it seams with the cost on of deck repairs it would pay for it’s self Toby Huyber
 
Welcome aboard Toby. Keeping it under cover from the start may help stop the core from getting wet. But once it is wet the only good way to fix it is to open it up and remove the wet core and build it back up with new glass.
 
Removing the old plywood or balsa may help remove the rotten wood aroma inside the boat , but just makes the deck repair harder.

Toss the teak overlay , remove all the hardware sticking thru the deck , grind the surface to show 85% or better clean glass and lay down new layers of glass.

If just using glass it will need to be close to 1/2 thick, if your plans are liveaboard or near ocean work the boat will be warmer and quieter and much, much stronger with a foam core with 1/4 glass on top and bottom.

Same weight but the price will be higher. Epoxy would be nice but yinelester will do just fine.

The hardest part is creating a good bond between the layer of foam and the lower layer of GRP

Lots of sandbags does a reasonable job as its way too much effort to vacuum down the foam, tho it has been done.
 
Last edited:
Any of the ways discussed will work. You should do what works best for you. If it doesn't look good, do it again next year. Boating is like baseball, there is always next season.


I would suggest you do it under shrinkwrap and that you have your boat shrinkwrapped each year at the end of the season. Warm rain runs off a teak deck but the freeze thaw cycle of winter snow and rain destroys them. Hate to see all your good work go in vain. Budget at least $1000 annually for the shrinkwrap and stop the two steps forward one step back dance. You'll find it's worth it.
 
My surveyor saw that the front deck had been glassed over, but didn't say anything and I never asked (and never met) the prior owner. I have since sleuthed out what was done (I think). There was extensive water damage to the fore deck where the windlass chain went through the deck. That could be determined by tapping on the underside of the deck in the anchor locker. I could see that the original through deck had been moved and the newer one had not been properly sealed.

I'm not sure what was injected into the area (appears to be CPES and thickened epoxy), but the exterior fix was glassing over the original teak decking. Best I can tell, the glass used is 6 inch wide 10 ounce "tape." Two layers on bias. It would have been a little fussy to lay down, though not as bad as using big sheets of fiberglass. The "print through" from the tape edges is basically hidden by Awlgrip. I stared at it a long time to figure out what was done.

The edges were very professionally sealed with Thiokol. Done in the 90's and still perfect without covered moorage. So the fore deck is now using the original teak strips as filler rather than relying on the original chunks of plywood. Maybe the deck isn't as strong, but it is strong enough. And it would have saved a lot of time and money.
 

Latest posts

Back
Top Bottom