Prop Nuts

The friendliest place on the web for anyone who enjoys boating.
If you have answers, please help by responding to the unanswered posts.

MurrayM

Guru
Joined
Jul 22, 2012
Messages
5,946
Location
Canada
Vessel Name
Badger
Vessel Make
30' Sundowner Tug
Thought this might be of interest to others...

Propeller Nut Myth Busting | | PassageMaker

Seems Badger's prop nuts were put on wrong by the PO and I've not touched them in the two times we've been on the hard. Hoping, since the nuts appear to be stainless steel, that the dreaded galling has not occurred.

How are your nuts?
 

Attachments

  • Badger Prop Nuts 2016.jpg
    Badger Prop Nuts 2016.jpg
    64.3 KB · Views: 86
Sure, my PO never pulled the prop in the 10 years he had the boat. Nuts on as in your pic. I pulled the prop last year. The threads on the shaft and nuts were still perfectly normal. I did re-install the nuts full last as in the article but I would not lose any sleep worrying about it until you get on the hard.
 
Last edited:
Sure, my PO never pulled the prop in the 10 years he had the boat. Nuts on as in your pic. I pulled the prop last year. The threads on the shaft and nuts were still perfectly normal.

Thanks. Here's hoping it goes the same for me!
 
While it's generally accepted that the smaller nut goes on first it is done the opposite way quite often. I wouldn't worry about it. When it comes time to take the prop off for some real reason, put them back on the other way.

Ken
 
"that the dreaded galling has not occurred."

Galling comes from SS flaking off while sliding under heavy load.

Tightening a fore stay turnbuckle , lots of turns under high load.

THe prop nuts get pretty tight with 1/4 turn after meeting high resistance.

Galling is not a problem , esp since a hammer is frequently used to loosen it.
 
Much ado about nothing IMO.

Prop nuts have been put on in either order forever and you never seem to hear of any problems due to the order of the nuts alone.
 
Much ado about nothing IMO.

Prop nuts have been put on in either order forever and you never seem to hear of any problems due to the order of the nuts alone.

Agree w/ others which nut first probably not a big deal.

I do prefer to eliminate the cotter pins and "seize" the nuts on w/ SS seizing wire per the attached photo (from a Seaboard article on prop installation)

"As for cotter pins, all they do is catch monofilament line as they will not stop a prop nut from coming loose, unless of course, they’re used with a properly fitted castellated nut. A much better trick to ensure the security of the rear prop nut mechanically is to cross drill it thru a hex corner, and properly safety wire it through the cotter keyhole ala “aircraft style.”

The rationale is that if the nuts come loose the nuts can shear the cotter pin if there is a gap. Proper seizing prevents the nuts from rotating much at all.

If the outer nut isn't drilled already it's easy to add 1 or 2 holes across the points.
I have seen one shaft break at the prop / key / shaft interface and lost the prop - root cause not sure but slop & working of the prop on the shaft could be a problem.
 

Attachments

  • NS_Propeller-Install_300.jpg
    NS_Propeller-Install_300.jpg
    35.8 KB · Views: 350
I choose to put the thin nut on the outside because I do not have a thin enough wrench to fit between the prop hub and the thick nut.
And with a Lehman 120 I am not too worried about "torqueing the nut off".
 
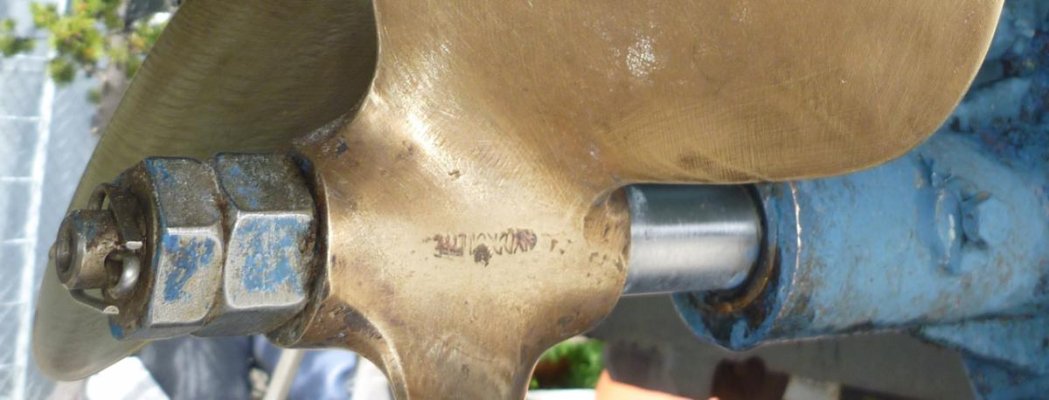
It's not about torquing the nut off. It's about maintaining adequate stress on the hub to seat it on the shaft taper, particularly when powering astern. The key and keyways take up the torque.

FWIW. I have a castellated nut and cotter on mine because I use a bullet prop zinc. I also lapped and blued my shaft to hub fit.

If you are going to use lock wire, be sure to use the right tool, and maybe read up about proper orientation.

Here is a copy and paste of what I posted to the TandT list in 2010:

The thin nut goes on first…

I spent 11 years wrenching on submarines. When I reflect back, I am still amazed at the amount of useful technical training that the Navy provided me. One of my favourite technical manuals to this day is NavShipsTechManualChapter 75, Fasteners. Use it all the time.

To quote:

075-5.3.4 JAM NUTS (LOCK NUTS). Jam nuts are an older variation of the prevailing torque concept. They are not usually recommended for new installations due to the tendency to use an improper thickness for the jam nut and to install them in the wrong relative positions.

075-5.3.4.1 Jam Nut Assembly. The jam nut assembly requires a regular or main nut and a thin jam nut, as shown in Figure 075-5-5. The assembly is installed with the thinner nut between the thick nut and the bearing surface. The main nut has to be as thick as if no jam nut were being used, because the main nut carries all the working load. The jam nut is usually about 2/3 as thick as the main nut. If the jam nut is too thin, however, the threads in the jam nut area will be damaged as the main nut will pull the bolt threads partially through the jam nut. Conversely, if the jam nut is too thick, the main nut cannot distort the threads enough.

075-5.3.4.2 Tightening the Jam Nut. At assembly, first tighten the jam nut to the same or slightly less percentage of the preload torque specified for the main nut, based on the relation the jam nut thickness bears to the thickness of the main nut. Then hold it in position with a wrench while you tighten the main nut. For example, if the jam nut is 2/3 as thick as the nut, tighten the jam nut to 1/2 to 2/3 of the torque used for the main nut. Then, when the main nut. is tightened to the preload torque specified for the bolt, it stretches the bolt (stud), thereby tending to pull it through the jam nut. Any vibration or load that tends to loosen the bolted joint will allow the bolt to shrink back to its original length, leaving the jam nut tight against the main nut. This creates the necessary prevailing torque to prevent the jam or main nut assembly from rotating on the bolt.


Chapter 75 can be downloaded here: www.hnsa.org/doc/nstm/ch075.pdf
 
Last edited:
Murray,
I see you have no shaft zinc or "bullet" zinc w companion prop nut. How do you address electrolysis? I hate the Bullit prop nuts as the cotter is very difficult to get on right ... at least in my experience. But they do provide electrolysis protection.

On my previous boat I tied a copper wire (stripped of insulation) to the prop shaft and put the other end over the side in the seawater w a zinc attached. Obviously had no protection underway.
 
And, you'll worry less about galling if you slather the stainless with some sort of (handy) parting agent - lubrication. There are magic potions sold in small tubes for that job. Riggers use lanolin. I use Teflon pipe dope.
 
And, you'll worry less about galling if you slather the stainless with some sort of (handy) parting agent - lubrication. There are magic potions sold in small tubes for that job. Riggers use lanolin. I use Teflon pipe dope.

A word of caution here..... Most fasteners I've had the privilege to touch with a torque wrench, have a different FTV (final torque value) for dry vs. lubricated threads.... Wouldn't want to do damage to threads of shaft or nuts...:eek:
 
Well, D'Antonio did say it was a contentious topic ;)

Murray,
I see you have no shaft zinc or "bullet" zinc w companion prop nut. How do you address electrolysis?

Hadn't put the shaft zinc on before the photo was taken, plus see photo below;
 

Attachments

  • Badger shaft brush.jpg
    Badger shaft brush.jpg
    89.1 KB · Views: 52

Latest posts

Back
Top Bottom