You are using an out of date browser. It may not display this or other websites correctly.
You should upgrade or use an alternative browser.
You should upgrade or use an alternative browser.
Prairie 36 Improvements
- Thread starter FOG
- Start date
The friendliest place on the web for anyone who enjoys boating.
If you have answers, please help by responding to the unanswered posts.
If you have answers, please help by responding to the unanswered posts.

OP
OP
FOG
Guru
Back to the Improvements
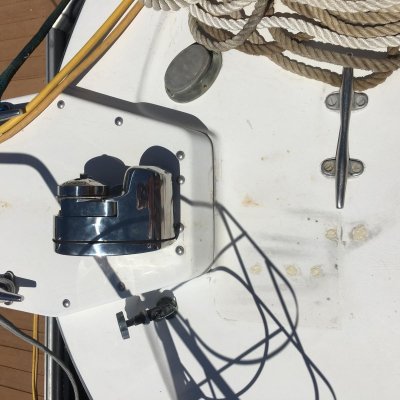
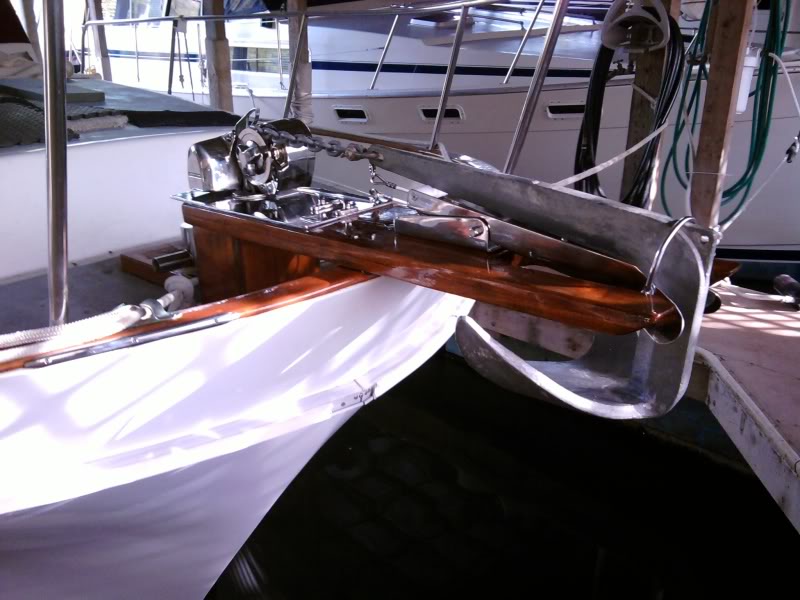
[/QUOTE]After getting the new fuel tank installed, moving the boat to a new marina, a trip to California for a wedding and a visit with family and friends I was finally able to get the new windlass mounted.
Now I'm trying to figure out how much chain I want to buy. I want to use an all chain rode for most of my anchoring.
It appears that 90% or more of the anchorages along the Great Loop are in 20 feet or less water. So using a safe 7:1 scope and 6 foot of freeboard to my anchor roller, around 200 feet should be sufficient.
Attachments
Last edited:
Todd R
Senior Member
- Joined
- Jan 26, 2016
- Messages
- 195
- Location
- Wrightsville Beach, NC
- Vessel Name
- Time & Tide
- Vessel Make
- 2005 34T Mainship
Nicely done!
- Joined
- Apr 15, 2008
- Messages
- 13,731
- Location
- California Delta
- Vessel Name
- FlyWright
- Vessel Make
- 1977 Marshall Californian 34 LRC
Is that a Lewmar 1000? I have that and anchor in similar conditions on a regular basis with the infamous Lewmar Claw. (insert applause here) I found 120 ft (36.5M for you metric guys) of chain and 240 ft (73M) rode to be a good compromise. Most of my anchoring in 20 ft (6M) or less is easily accomplished with this combination rode.
OP
OP
FOG
Guru
Thanks Todd.
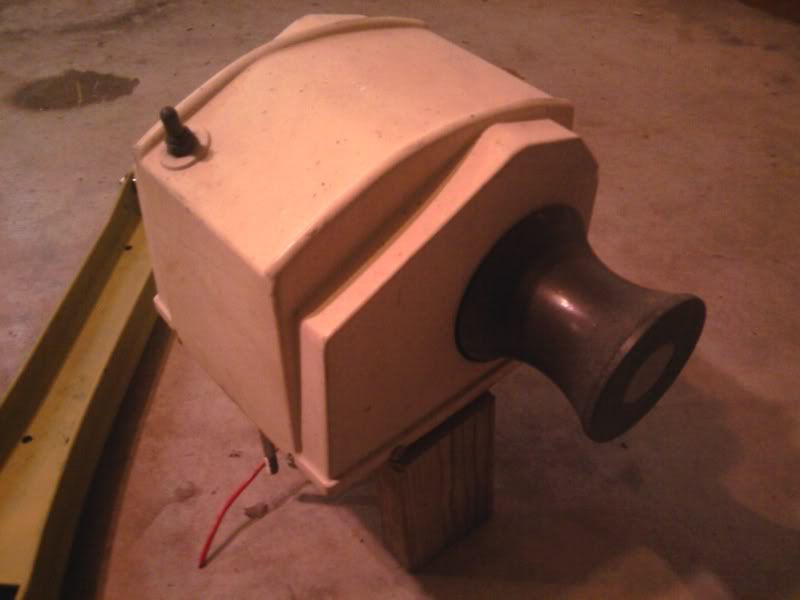
FlyWright - Yes it is the Lewmar 1,000 Pro Fish. Thanks for the feedback on the amount of chain. Are you using the 5/16" G4 High Test that Lewmar recommends?
BTW my anchor is 55 lbs. (insert applause for NOT mentioning brand name)
FlyWright - Yes it is the Lewmar 1,000 Pro Fish. Thanks for the feedback on the amount of chain. Are you using the 5/16" G4 High Test that Lewmar recommends?
BTW my anchor is 55 lbs. (insert applause for NOT mentioning brand name)
tallswede
Senior Member
There is a Simpson Lawrence windlass on my boat. I hate it. It has a plastic base and the guide has cracked off where the gypsy runs. That has actually made things better as it is less likely to jam and I can easily see it and clear it if it does. I currently have a 30' chain/150' rope rode that I need to at least re-splice. My biggest gripe is just feeding the rope back down the hole into the locker. My windlass has a rope drum on it so I have begun using it to haul in the rope until I get the chain on the gypsy and then I feed the rope down. The chain falls in just fine though. I am seriously considering going to at least 200' chain before we leave on the Loop trip.
Kevin
Kevin
- Joined
- Apr 15, 2008
- Messages
- 13,731
- Location
- California Delta
- Vessel Name
- FlyWright
- Vessel Make
- 1977 Marshall Californian 34 LRC
Thanks Todd.
FlyWright - Are you using the 5/16" G4 High Test that Lewmar recommends?
Yes, 5/16 G4. This is my rode with 90 ft of chain added and 30 ft of Brait lost off the other end. (It's a long story...)
- Joined
- Apr 15, 2008
- Messages
- 13,731
- Location
- California Delta
- Vessel Name
- FlyWright
- Vessel Make
- 1977 Marshall Californian 34 LRC
Tallswede, I had a setup like yours when I bought my boat. Mine was a Powerwinch.
It was a lot of work and left a muddy mess on the decks without a washdown. Like you, I had to manually feed the line and chain into the anchor locker pipe.
Once I installed the new Lewmar windlass, I found anchoring to be an simple task...not one to be dreaded. Once I had the windlass working well, I added the 90 ft of chain to complete the system and have been very pleased with the results.
healhustler
Guru
- Joined
- Oct 2, 2009
- Messages
- 5,198
- Location
- USA
- Vessel Name
- Bucky
- Vessel Make
- Krogen Manatee 36 North Sea
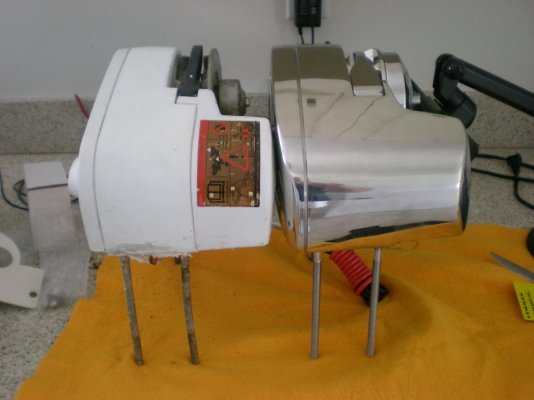
There is a Simpson Lawrence windlass on my boat. I hate it. It has a plastic base and the guide has cracked off where the gypsy runs. That has actually made things better as it is less likely to jam and I can easily see it and clear it if it does. Kevin
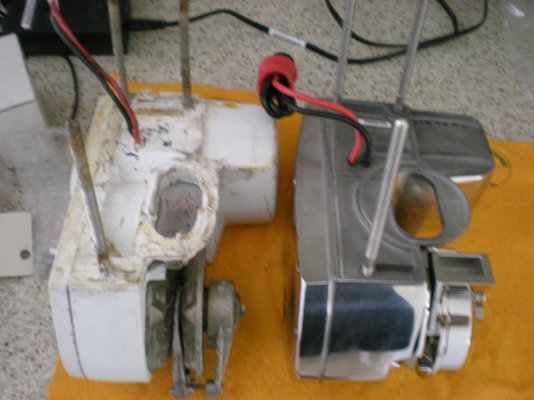
Kevin: We also had a Simpson Lawrence on our boat when we bought it. I started looking around for one to replace it and discovered that the Lewmar 1000 Sport Fish was the same unit with a Stainless Steel case. I use the 5/16" all the way on one side (300 ft.) and about 15' of the same chain on the other side with 300' of rode. The windlass works well with 45 lb. anchors. Here's a couple of shots of the old Simpson Lawrence side by side with the SS Lewmar. If you decide to switch, just wire it to the old relay. The Lewmar relay is about half the capacity and a real POS.
Attachments
tallswede
Senior Member
I have a different style windlass. Mine is a vertical type where the rode goes horizontally around the gypsy and then makes a turn down into the chain/rope locker. The same things you folks have mentioned apply, I just have more of a pita installation for rope running down the hole than on most horizontal style windlass installations. I'm wondering if the brait rope would help with this. If I had mostly chain, this wouldn't be a problem but I'm not crazy about that much weight in the nose of my boat.
Kevin
Kevin
- Joined
- Apr 15, 2008
- Messages
- 13,731
- Location
- California Delta
- Vessel Name
- FlyWright
- Vessel Make
- 1977 Marshall Californian 34 LRC
The Brait is very soft and flexible. It lays flat like chain, just not AS flat. I think it'd be a good candidate for a vertical windlass as long as you have a combo gypsy.
OP
OP
FOG
Guru
My main reason for the new windlass was the same as both of yours. I just couldn't see myself feeding the rode up or down the hawse pipe off to the right every time I wanted to anchor.
The old (larger) windlass would not properly fit on the bow sprit where the new one is now mounted. The windlass needs to be there to get a straight drop into the chain locker.
I did think about keeping the old windlass where it was and cutting a hole there. But then I would have had to have an "S" type hawse pipe fabricated to guide the chain down and forward into the locker. Also thought about moving the chain locker bulkhead aft, but both ideas had other potential problems.
OP
OP
FOG
Guru
FlyWright - I've been re-thinking my idea of using an all chain rode since your post. Have you ever had any issues with your Lewmar windlass and the Brait to chain splice or the chain link to add the additional 90 feet of chain?
- Joined
- Apr 15, 2008
- Messages
- 13,731
- Location
- California Delta
- Vessel Name
- FlyWright
- Vessel Make
- 1977 Marshall Californian 34 LRC
I redid the rope-to-chain splice about a year ago. For me with frequent anchoring, it lasted about 6 years. The connecting link has performed flawlessly for 5 years or more...no issues at all, but it gets checked regularly when passing the 90 ft mark on my rode. If I was to do it again, I'd go with the 120 ft of chain from the get-go and eliminate the need for the connecting link...or I'd go with 200 ft of chain with another 200 of Brait. In essence, except for the very deepest anchorages, it'd be like having all chain rode.
Since I've respliced, occasionally, the splice will skip a little as it transitions through the gypsy...especially if there is a little load on it. Once I slacken the rode it usually works through just fine.
Since I've respliced, occasionally, the splice will skip a little as it transitions through the gypsy...especially if there is a little load on it. Once I slacken the rode it usually works through just fine.
OP
OP
FOG
Guru
I redid the rope-to-chain splice about a year ago. For me with frequent anchoring, it lasted about 6 years. The connecting link has performed flawlessly for 5 years or more...no issues at all, but it gets checked regularly when passing the 90 ft mark on my rode. If I was to do it again, I'd go with the 120 ft of chain from the get-go and eliminate the need for the connecting link...or I'd go with 200 ft of chain with another 200 of Brait. In essence, except for the very deepest anchorages, it'd be like having all chain rode.
Since I've respliced, occasionally, the splice will skip a little as it transitions through the gypsy...especially if there is a little load on it. Once I slacken the rode it usually works through just fine.
Thanks, I appreciate your honest and battle tested feedback.

OP
OP
FOG
Guru
Bitter End Loop
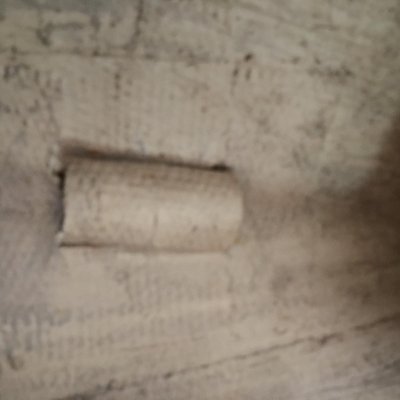
I have this FRP loop in my chain locker. It's there to tie off the bitter end of the anchor rode. Do other Prairie 36's have this? Or some other method to tie it off?
It interfered with the chain drop from the new hole I cut for the new windlass. Sometimes it would drop inside of the loop and sometimes outside. I figured the chain or line could get fouled on it, so I cut it out. They just used a small piece of cardboard tube and glassed over it, about 1/8" thick.
Attachments

OP
OP
FOG
Guru
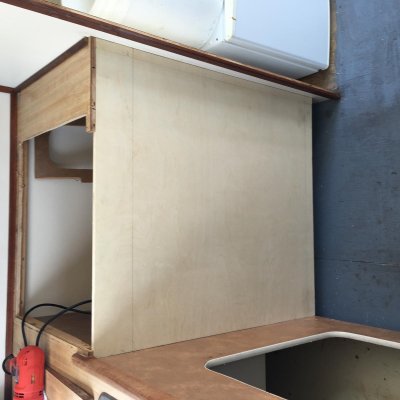
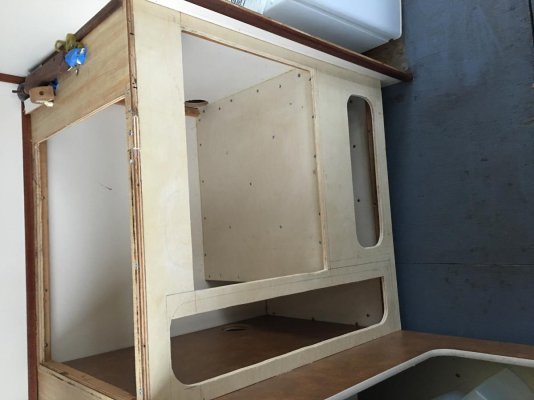
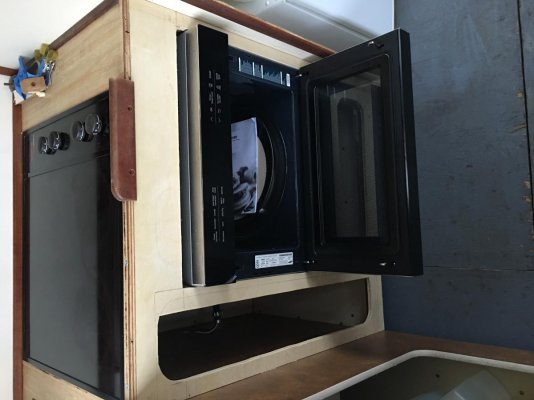
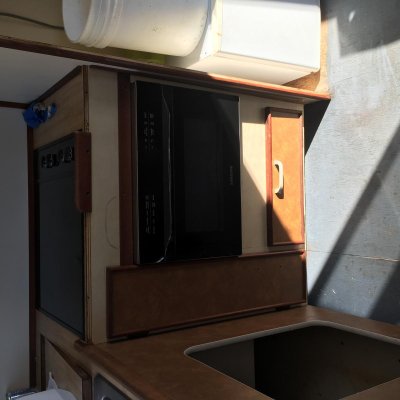
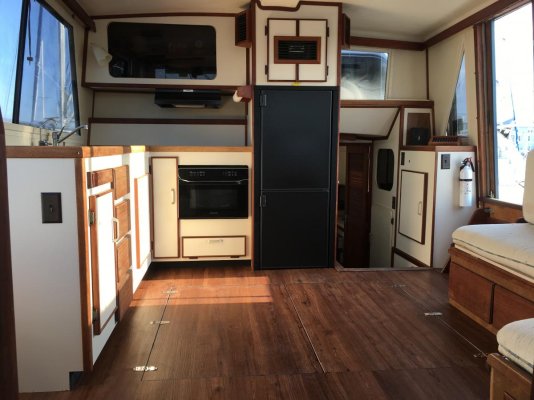
Galley changes - Cooktop & Microwave
In addition to a new refrigerator the Admiral wanted a respectable sized microwave but didn't want to give up the limited countertop space. Note the microwave in the upper left corner of the first pic.
So we found a combination microware/convection oven that would fit in the cabinet if we removed the Princess range/oven. We had a cooktop from our last boat that we used.
Of course this would require some cabinetry modifications. The cooktop was easy, I just had to basically cut a bigger hole.
The new microwave/convection oven is a countertop model with feet that are about an inch high. So I built a shelf inside the cabinet for it to sit on and plan to secure it with some aluminum angle up against the sides that will screw into the shelf. I flipped the cabinet doors around so the microwave/convection oven will have side to side clearance as the door opens down.
I rewired the AC circuit behind the refrigerator to split the two outlets. The lower one is the refrigerator circuit & breaker. The top is now on the STBD outlets circuit & breaker, which the microwave/convection oven will plug into. The STBD outlets circuit & breaker will also get connected to an inverter in another project.
Before
Attachments

Wow, nice work! Thanks for posting the pics.
One "feature" of the Princess range was that you could only run the cooktop OR the oven; not both at the same time. And the three cooktop elements were low-wattage, especially the rear one, which was for "warming only." This kept the overall current draw on that side of the breaker panel down below 30A total.
Obviously it's not too difficult to simply keep that maximum draw in mind, and manage your loads accordingly. But they build boats (and houses) for dummies who try to turn everything on at once.
I assume you're going to add a new breaker for the cooktop. The oven (at least, the microwave part) could be run from an inverter. Although technically possible, I'd try to avoid running the resistance elements of the oven through the inverter.
What is the amperage rating on the cooktop?
OP
OP
FOG
Guru
Thanks Tom. Hope you don't have a sore neck. Don't know why my IPhone pics are posting sideways.
I still have to do some trim work and paint. Also plan to paint the Formica of the cabinet lower section to match white upper Formica.
We did notice the switch on the Princess for the range OR oven operation. Even though I have wired the cooktop on a separate circuit from the microwave/convection oven, at times we will still have a similar limitation as with the Princess.
The cooktop is on the 30A Range circuit and the breaker pops with all 4 burners on. Each burner is about a 10A draw. It wouldn't surprise me if the breaker popped with 3 burners on depending on when they sequence.
The microwave/convection oven is 1600 watts and will be on the STBD outlet circuit which I think is 15 or 20 amps. So doable at a little over 13 amps at full power.
So if she has a couple of burners on and decides to use the microwave at full power the individual breakers should be fine, but the 30A main will probably pop.
You're right, I don't expect to run the convection oven part much on the 2,000 watt inverter, but you never know it might work to reheat a slice of pizza, which would be better than a microwave.
My plan for the inverter was mainly the microwave, coffee maker, TV, curling iron, etc., not the whole boat.
Last edited:
tallswede
Senior Member
Well, my Norcold and ice maker have bit the dust at the same time so I have yanked them out to be replaced with a new Ice maker and Magic Chef 4.9 cuft fridge from Home Despot. I can replace them both and install an inverter for less than the price of the Norcold. I'll have an inverter to run them while on 12v. I'll just need to install a 3 way switch to replace my original Ship/off/Shore switch in my panel. I'll probably feed the inverter with the breaker that was for the fridge (15 amp). Has anyone done this and how well did it work for you? Thanks.
Kevin
Kevin
Funny thing, I replaced the cheap-o home fridge the PO had installed with a Norcold - mostly because it fit the existing opening, right down to the screw holes - where the original had been removed. Not saying you shouldn't do it, just that I'm very happy with the new fridge. Keeps everything cool, the ice cream hard, and uses a lot less power, which was my main concern.
Anyway, to your question, if you don't have an inverter already, then consider wiring it up the way mine was. The inverter and shore power go to a switch which feeds just three circuit breakers; outlets (port), outlets (stbd) and fridge.
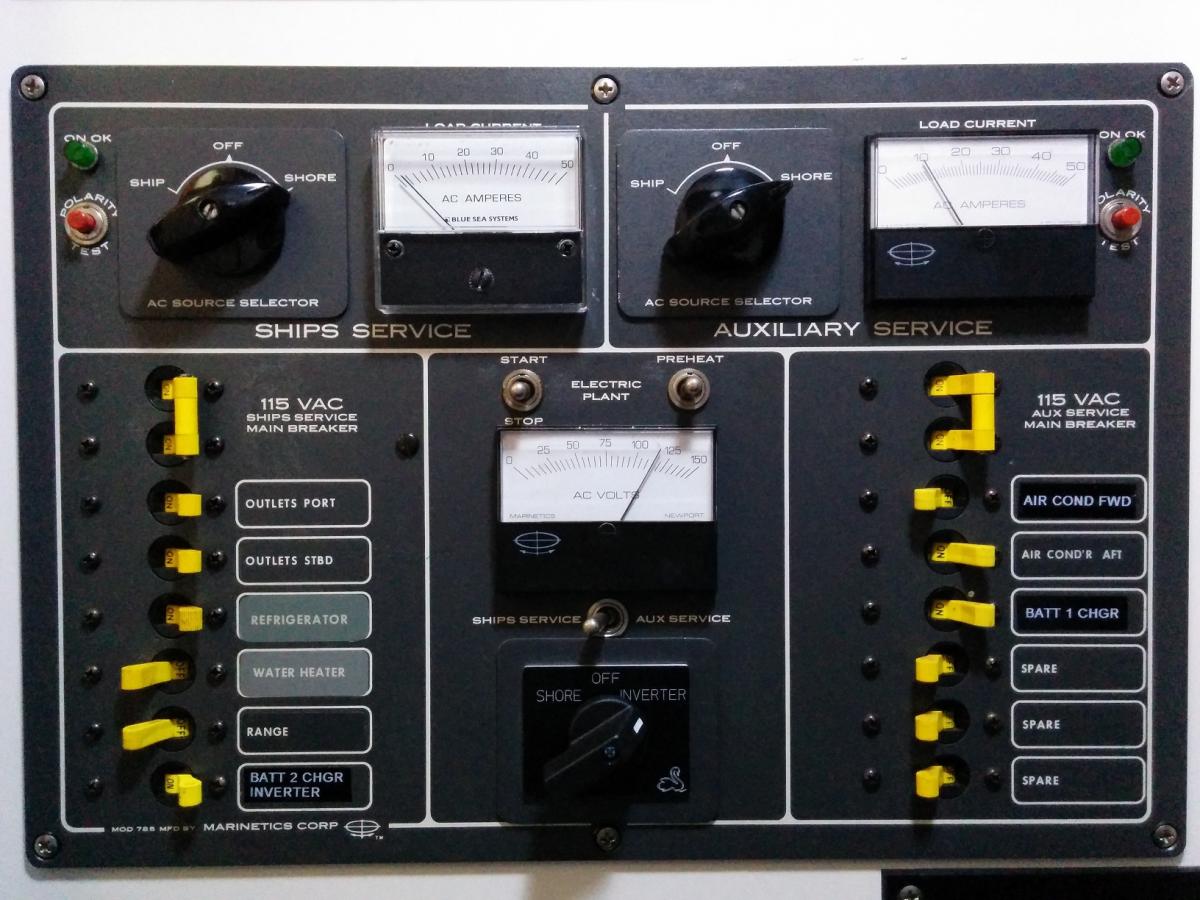
The switch is bottom center in this image.
Anyway, to your question, if you don't have an inverter already, then consider wiring it up the way mine was. The inverter and shore power go to a switch which feeds just three circuit breakers; outlets (port), outlets (stbd) and fridge.
The switch is bottom center in this image.
tallswede
Senior Member
Thanks for the ideas CaptTom. Does your boat have a generator? Mine has two switches like yours. Mine are labeled Ship (generator)/off/Shore. One for each bank of breakers. Basically I have one bank of breakers for house loads and another for HVAC with a couple spares on that bank. I'll replace the switch for the house side with a 3-way so I'll have a position for the inverter too. I'm glad to hear your Norcold is working well and other than price, most of the reviews I've read on these have been bad for the new Norcolds. Mostly complaints of cheap build and noisy operation and not cooling well in hot weather. I guess I need to actually look at one of the new ones because I would rather put another back in. In fact they make a 3-way that uses propane. Might go for that.
Kevin
Kevin
tallswede
Senior Member
Looking closer at your panel I see it is very similar to mine, However I don't really want to separate out curcuits that only run on the inverter other than I do not want to feed HVAC with the inverter. I may also move the battery charger to the HVAC side like yours.
Kevin
Kevin
No problems yet with the Norcold. I've heard the same reports about newer models. Personally, I don't find it too loud. That said, years of living next door to rowdy neighbors has mellowed me, and I'm not easily annoyed by sounds.
I would not originally have chosen to connect the inverter to just these three circuits. My house has a whole-panel generator transfer switch, and I like the flexibility. BUT, there's never a time I'd want to run the water heater, range, battery chargers or air conditioners off the inverter.
Powering just the remaining three breakers via the inverter, through the switch, was actually a good idea. I did upgrade the switch to be able to handle the full load of all three circuits. The PO had put in a cheap toggle switch which wasn't up to the task and nearly melted when I ran a couple of space heaters while on shore power.
The charger on the "Aux" (air conditioner) side is a 2nd charger for the starting and Genset banks. The House bank charger/inverter is still on the "Ships" side.
My last mod to the panel is my favorite. A switch to power the water heater from either the "Ships" (left) or "Aux" (right) side of the panel. When on shore or generator power, if I'm running the range and/or oven, or have large loads plugged into the outlets, I can power the water heater from the mostly unused "Aux" side. If I'm running the air conditioners I can power it from the "Ships" side. Not shown in the older picture above is that one of the "Spare" breakers on the right side is now labelled "Water Heater."
kokopelliTim
Senior Member
So, FOG, it has been a few weeks since your last update on the great improvements. Am curious to what you are up to in the work on your vessel.
As I wait for opportunity in my life to own a boat again, I enjoy reading of what you and others on this forum are doing.
Thanks.
As I wait for opportunity in my life to own a boat again, I enjoy reading of what you and others on this forum are doing.
Thanks.
OP
OP
FOG
Guru
So, FOG, it has been a few weeks since your last update on the great improvements. Am curious to what you are up to in the work on your vessel.
As I wait for opportunity in my life to own a boat again, I enjoy reading of what you and others on this forum are doing.
Thanks.
Good luck on your search. I do like the Prairie layout and construction, but with any boat there is always a compromise.
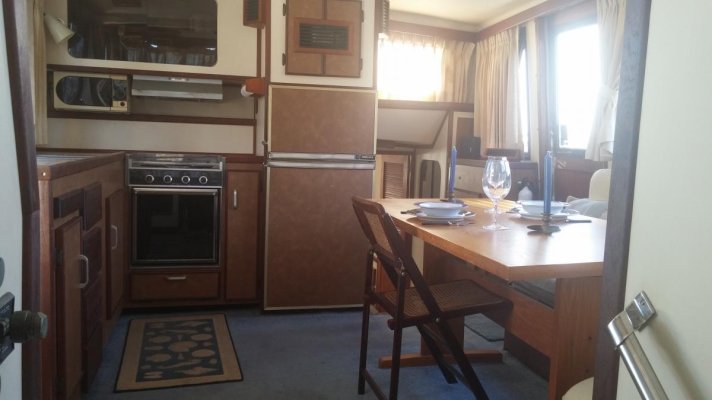
I have almost completed the galley & salon improvements. Just a little bit of trim work left to do. Here are some before and after pictures.
Next up will be installing a holding tank. I think I have a good game plan for it, but I just need to pull the trigger on the holding tank purchase from Ronco.
Attachments
kokopelliTim
Senior Member
FOG
Thank you for the update. You are making her look so very good and usable. I really like what you are doing.
Was this work expected when you bought the boat? Or upgrades you wanted as you used the boat?
I notice you are prepping for the Loop. When might you begin?
After the holding tank, anything else planned?
You do have exceedingly great praise for a Prairie 36. Are there any issues, generally, in a Prairie that surprised you and caused you to take a step back or wonder if some other model might have been better.
I am looking, learning, planning; but helping elderly parents takes time and effort at this stage.
Thanks for your input.
OP
OP
FOG
Guru
FOG
Thank you for the update. You are making her look so very good and usable. I really like what you are doing.
Was this work expected when you bought the boat? Or upgrades you wanted as you used the boat?
I notice you are prepping for the Loop. When might you begin?
After the holding tank, anything else planned?
You do have exceedingly great praise for a Prairie 36. Are there any issues, generally, in a Prairie that surprised you and caused you to take a step back or wonder if some other model might have been better.
I am looking, learning, planning; but helping elderly parents takes time and effort at this stage.
Thanks for your input.
Thanks for the compliment.
All of the upgrades to date were planned as part of our purchase.
The only new one so far from using the boat will be new dinghy davits for the stern. The boat came with dinghy chocks on the port side of the aft cabin. But after purchasing a dinghy & outboard and rigging a sling to hoist it aboard with the mast & boom, two things started to bother me.
During lifting aboard the mast would bend to port slightly. I rigged a line from the top of the mast to a starboard side cleat and that helped. But the more important reason was with the dink in the chocks you couldn't fully open the aft cabin overhead hatch. I saw that as a safety issue for an alternate escape route. The added bonus will be more room on the aft cabin deck.
We had originally planned to start the Great Loop this Spring. But as with you, an elderly parent will delay us until the Spring of 2018.
No real surprises with the Prairie. Especially compared to our last boat, a 50 foot Motorsailor. I'm not sure if most of those issues were from being a Taiwan made boat or it being hull #1. Of course with any boat there are going to be compromises. But for us the Prairie fit our criteria and budget for this adventure.
This is our first power boat after several sailboats. The Prairie 36 has almost as much room as our Motorsailor. I don't think we could go smaller, for example, a Prairie 29 or ??? And if we decide to live aboard after the loop, we would probably get a larger boat.
Hope this has given you a little insight on your search. Good luck.
Are there any issues, generally, in a Prairie that surprised you and caused you to take a step back or wonder if some other model might have been better.
You didn't ask, but I'm another converted Prairie fan, so I'll take a stab at this too.
I think the biggest drawback to this boat is its age. A lot can happen in 37 years. Problems you find in a Prairie are going to be more a function of how well it was (or wasn't) maintained than original design.
Like any old boat, you'll want to check for port light and hatch leaks, engine condition, tank condition, hull damage, condition of running gear, etc.
As for the design itself, very few complaints. I think I'd like a hard top over the flybridge, and maybe even over the aft trunk ("sundeck" area.) I'd have accepted a few less gallons of water in exchange for a few more inches of headroom on the centerline berth. My own boat was over-powered by the original owner; I'd have gone with the stock engines.
The big flaw, and my biggest fear, is that the fuel tanks were completely bedded in foam. The foam will hold any moisture against the tanks, and they can rust. Replacing them would be a very major project which may not be justifiable cost-wise.
Another thing to consider with this style boat, regardless of manufacturer, is your agility. There are a lot of steps to get from any part of the boat to any other, and without a transom door and cockpit, even boarding can be a challenge to some.
Finally, soft chines on a shallow hull do allow this boat to develop quite a roll if seas or wakes are coming on the beam. Again, this is not unique to the Prairie, but more of a generic issue.
Similar threads
- Replies
- 4
- Views
- 919
Latest posts
-
-

-
-

-

-
-

-

-
 Best Android Tablet to Run Navionics App?
- Latest: Portage_Bay
-