Chasing Teak Deck Leaks

The friendliest place on the web for anyone who enjoys boating.
If you have answers, please help by responding to the unanswered posts.
Forgot to add, "good luck!"

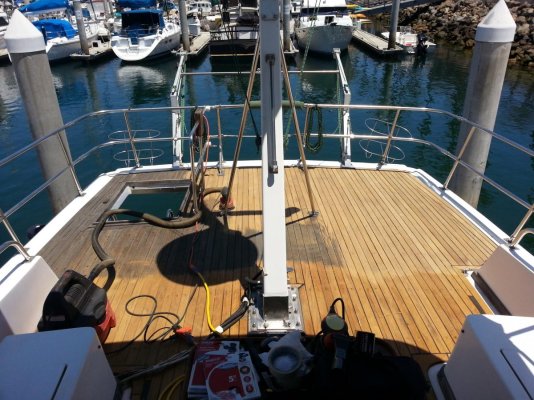
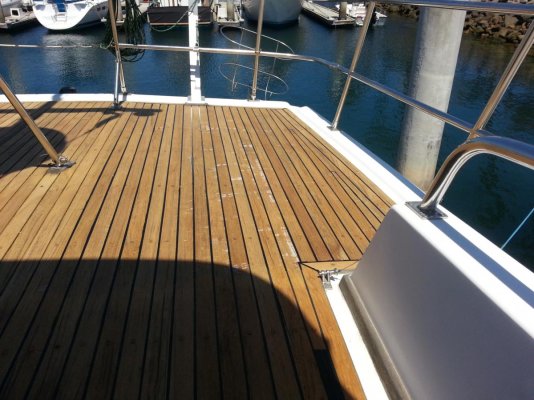
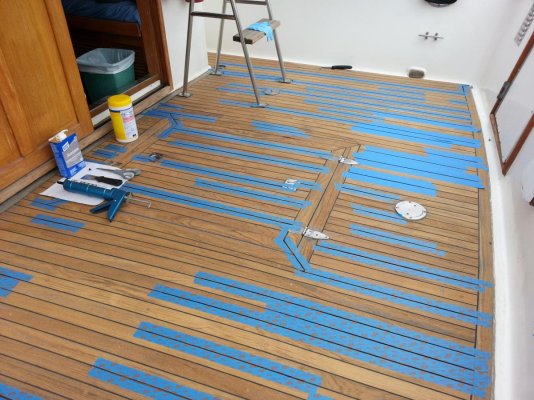
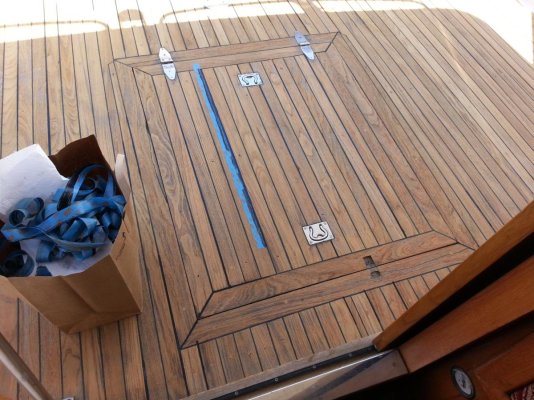
On my teak decks I masked all the seams I wished to repair, caulked, pulled the tape when cured, cut the top of the caulk by sliding a hard-backed razor blade along the caulk so I would not need to sand and make the wood thinner.

Concur... hence after I deduced that no-tape-and-tooling was spreading a lot of caulk across beautiful and valuable wood - to heck with that - switched to the standing seam method...

Will razor the excess caulk off the standing seam and then hit it with the 120-grit sanding (planned to do the 120-grit all along so no loss there).

Anyway - to all - I do appreciate the feedback - Trawler Forum is very helpful.

Carl
 
A bit more progress today...

At the bow I sanded the smeared caulk off the wood. Not the solution... took a lot of wood off. Wont be doing that again.

Trimed the caulk that I laid in without tooling flat - left gaps. That wont work either - going with tape and tooling for the next go-round.

Sanded all the way aft across the cockpit. Beautiful. Lots of worn caulking to remove... (Xs - check out that 5-years worth of teak captured in the vacuum cleaner - sad)

With the amount of work involved I am considering not bothering with teak-triage on the flybridge - just go straight to teak removal. Tough call as the refinished teak is beautiful.
 

Attachments

  • 2016-06-04 12.27.10.jpg
    2016-06-04 12.27.10.jpg
    155.2 KB · Views: 78
  • 2016-06-04 12.58.25.jpg
    2016-06-04 12.58.25.jpg
    152 KB · Views: 83
  • 2016-06-04 17.04.53.jpg
    2016-06-04 17.04.53.jpg
    165.6 KB · Views: 83
Last edited:
Our '84 Fu Hwa does not appear (yet) to have leaks caused by failed Teak decking. There is plenty of cracked sealant in seams. Some of this sealant is brittle; some is still soft. There is just a very small percentage of missing bungs. There are many bungs that appear to have been replaced with a colored resinous filler. There are precious few bungs over the area of the decking. The highest 'bungs per square foot' of decking is on shorter pieces of Teak. My lazarette hatch had no screws at all in the Teak, but no fiberglass either. The structural hatch was scrap plywood. The sealant in the seams is generally tenacious, as is whatever the glue is that holds the Teak down to the fiberglass.

I therefore conclude that if I deal with the screws and bungs, as well as the bedded fittings, I will have no problems with the Teak. I don't think that failed sealant joints over fiberglass can be a source of leaks. Since the Teak is firmly bonded to the 'glass, I think that: 1, the wholesale removal of bungs and fastenings, 2, the cleaning up (countersink or boring out to clean 'glass) the holes in the fiberglass, 3, and patching the holes with epoxy and either replacing the bung or accepting the appearance of the 'filled' epoxy will be the end of potential problems over the area of the Teak. I don't think that sanding the Teak is good for anything but appearance, maybe comfort under bare feet, but removes years of future lifetime. I don't think that raking out the seams and resealing is good for anything but appearance.
 
I was sick today... could not go to work...

What do they say? starve a cold feed a fever and work on the boat every chance you get... so I convalesced caulking the cockpit deck.

Went with tape for the third method of doing the re-caulk. Tape takes longer but the instant clean edges are better.

From the first shot you get a sense of the size of the problem... not that bad... perhaps 20% of the seams required recaulk.

Apply the caulk.

Tool the bead flat.

And peel the tape.

Pretty cool.
 

Attachments

  • 2016-06-07 10.20.19.jpg
    2016-06-07 10.20.19.jpg
    180 KB · Views: 170
  • 2016-06-07 11.04.24.jpg
    2016-06-07 11.04.24.jpg
    168.9 KB · Views: 180
  • 2016-06-07 11.06.55.jpg
    2016-06-07 11.06.55.jpg
    164.8 KB · Views: 195
  • 2016-06-07 11.07.06.jpg
    2016-06-07 11.07.06.jpg
    178.2 KB · Views: 176
  • 2016-06-07 12.35.28.jpg
    2016-06-07 12.35.28.jpg
    175.6 KB · Views: 109
Ok, now lets talk about the flybridge...

The flybridge teak appears far worse than the deck level.

Sanding would be pretty agressive to flatten that out.

And of course with agressive sanding you have less of a sealant grove to work with. Presumably that means cutting the grove deeper. Lots of work.

Perhaps rather than starting to sand - just get started removing the teak and prep for filling those 900 screw holes... that and the rotted core and having to work around all the rail mounting points which need to be at the same elevation they are as the sit on the teak.

What to do?
 

Attachments

  • 2016-06-07 14.35.39.jpg
    2016-06-07 14.35.39.jpg
    133.7 KB · Views: 184
Last edited:
Only a divergence - not a hijac:)
When we talk of teak decks there is often talk of recutting the groove......... my question is how is this done - any particular tool and or tecnique?
Cheers
 
Only a divergence - not a hijack:)
When we talk of teak decks there is often talk of recutting the groove......... my question is how is this done - any particular tool and or technique?
Cheers
I think it needs a router, but there is the issue of creating a guide to control it. Dremel might make an attachment.
Carlin, you are doing a great salvage job and if it keeps the existing teak(FB excluded) alive for some more years it is a major achievement. Most of mine was like your FB, after preparing to do the repair job you have done I concluded mine needed what you realised your FB needed. The shipwright put down 2 layers of glass where we went with a painted finish.
 
Thanks again XS...

Sad, sad, sad...


Such wonderful, useful, affordable, and good looking vessels have a time-bomb built into them. Thankfully the problem is not fatal... imagine how much marketplace money would have been lost over the years if these soft deck problems were terminal.

While I was boat shopping back in January I looked at an Endeavour catamaran down in San Diego... and I could not help but notice the quality of the fiberglass layup when peering into one of the foredeck lockers... perfectly smooth woven mat. Loved it. The Fu Hwa? Not so much.

Anyway - yep, I have two major soft spots. When I did the re-bed of the starboard water tank fill the core was mushed and wet - all I could do was to pack a little epoxy putty in there to hold it together until some other solution comes along.

Its a bit of a paradox... the only structural contribution without the core is a mere quarter inch of fiberglass and the teak decking strips - and if you remove the teak decking strips - you are forced to go all the way in and replace the core - to replace the strength lost when you pull the teak decking.

Signs of leaks????? Ha!!!!! Got caught in a big storm on one of the first overnight stays on the boat... Water water everywhere...

Hence the mission to stop the leaks now. Thankfully it stays dry in LA for a few months giving me time to attack these issues.

Carl
Oh my goodness! I hate it when that happens! I guess I was pretty lucky all in all, with the recent purchase of the 78 CHB. It had been under cover for some good time, thankfully. On the day we did sea trials and haulout in Bellingham, WA it poured all freaking day! All I could think of was the rainforest down below! As luck would have it, and I don't get much of it, the only leaks found were around the holding tank fill, the fwd skylight and the aft cabin doors at the top. Both had their canvas on too! All were relatively easy fixes. On the skylight I removed and replaced the two glass panels and re bedded. Aft, I dug some old caulk out of the seams around the aft door jambs, poured epoxy into a gap until it started pushing water in to the inside, let cure, then re caulked. The deck fill had to come up and be re bedded, which turned into a bit more of a PITA than hoped for but its done. I do know there is some softness on the aft deck right at..you guessed it. The water fill, port side only so far. Not gonna worry about it too much for now. I don't think my poor old knees are up to doing what you are doing though. Too many years working on them in shipyards.
 
Get a panel saw and put two or more blades in it to get the correct width of the kerf. Drill a hole in the saw plate behind the blade (closer to you) and tap it for a machine screw the width of the kerf. This will (help) guide the saw as you cut the new slots. If you can add a vacuum hose to it to keep the area clean it will be easier to see.

Panel saws are usually found in garage sales, although I've seen battery powered ones in Home Depot, some makes come in left or right hand models. Some have little headlights.

:thumb: 
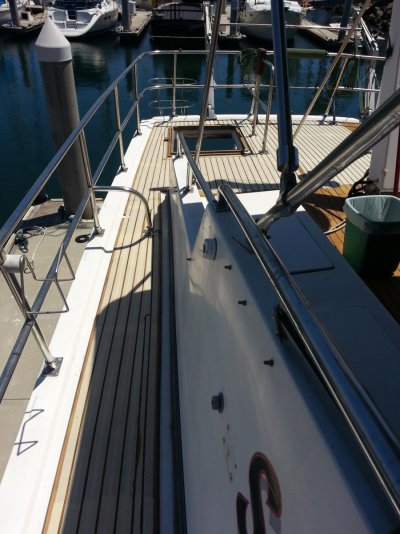
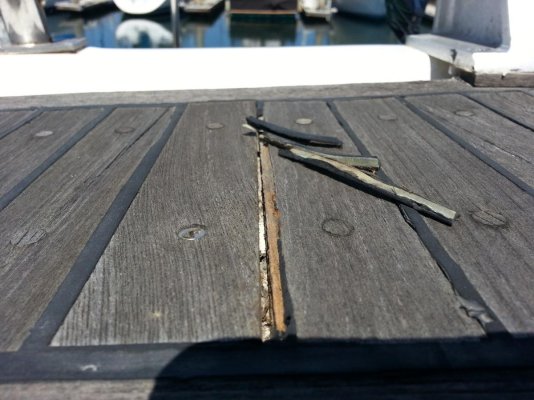
We used a 3 3/8" circular saw and made our own dado blade by adding 2 blades together. Control was surprisingly easy. A chisel was used for the sharp radiuses and ends. The guy who taught me how to do it, said you needed 3/8" of teak to be considered serviceable. Less than that, you couldn't effectively secured the planks via screws and bungs or have enough depth for the caulk.
 
This is a great thread filled with lots of good info, thanks to everyone who posted. I also see a teak job in my future :banghead:
 
The deck level work is rounding the corner...

Larry M mentioned a sealer so I thought I would give it a try also (with all due respect to the capitalistic system - the price of that stuff is just wrong).

I like the outcome ok, but when the surface was wet - I noticed that some of the seams that looked ok dry looked cracked. Will have to back track to recaulk.

Also... some spots are a bit smooth - may not do final sanding with 120-grit on the flybridge.

Results with the sealer are spectacular.
 

Attachments

  • 2016-06-10 15.46.32.jpg
    2016-06-10 15.46.32.jpg
    139.2 KB · Views: 154
  • 2016-06-10 19.27.17.jpg
    2016-06-10 19.27.17.jpg
    121.8 KB · Views: 173
Ok, time to move to the fly bridge.

Seems the total square feet on the fly bridge is greater than at deck level. Fly bridge may take six of my work days to complete.

Refining the process too... it seems harder to sand down the caulking than the teak - so up here the caulk is being cut out first. The constricted areas between the settees and console are hard to muscle the old caulk out... for that matter the caulk is slightly easier to remove when both sides are cut with a razor knife.

Sanding is being done with 40 or 60-grit material depending on availability.

The transformation from aged material to a gorgeous fresh surface is an absolute miracle. What a wonderful natural sustainable material teak is.
 

Attachments

  • 2016-07-01 13.23.57.jpg
    2016-07-01 13.23.57.jpg
    170.2 KB · Views: 226
  • 2016-07-01 15.56.09.jpg
    2016-07-01 15.56.09.jpg
    160.1 KB · Views: 172
Last edited:
A slight correction, teak is nearly extinct as a wild tree, there are really only plantations to get teak from. Wild Burmese teak is a wonderful wood, but very elusive.

Also, not to be too curmudgeonly about this but failed seams allow the water to get under the planks and eventually find its way into a screw hole. Then it gets into the substrate which will turn to mush and totally shed any structural strength. Wet wood inside the boat breeds mould and mildew which are (apart from the stink) serious health hazards. Sadly, lots of the Taiwanese boats have crap wood, old pallets and other junk inside the fibreglass so getting that "structure" wet will result in decks and cabin walls being full of mush. A wet deck can migrate into the walls as the woodrot spreads resulting in major surgery to get it all out and provide needed strength. The good news is the hulls are very good. The bad news is that once the rot gets into the decks you will untimately need to remove the decks, cut off the fibreglass, reinstall plywood to provide strength and reglass the decks for waterproofness.

A lot of the interior woodwork, as beautiful as it is, is made with veneers which are impossible to save if they are damaged by water stains. If you are ever looking for a Taiwanese boat and you find one that has been painted inside, unless the owner shows you a loooong bill to prove remediation, run away.

Think of the flaw in this concept - make a nice waterproof deck then drill 2000 holes in it then expect ALL the holes to be successfully plugged...

Right.
 
Last edited:
One more comment, teak sealer may make the deck slippery with certain shoes, beware that you have removed one of the best characteristics of teak decks, their excellent non-skid properties.

Only ever wash your teak decks with salt water and maybe a bit of very mild soap, (you dont want to dissolve the natural oils in the wood) use a very soft brush and only scrub across the grain. This seems counter-intuitive as most marine grime needs scrubbing but strong scrubbing removes the soft wood between the grain and then you will find that the decks are not level and you will be tempted to sand them again.

Navy ships and cruise ships used an abrasive (holystone) on their decks, largely to remove the tar that dripped off the rigging; when the decks got too thin they went into the yards and the company/taxpayer bought new decks.
 
"Went with tape for the third method of doing the re-caulk. Tape takes longer but the instant clean edges are better."

This is the way to go. You'll get better and faster applying the tape the more you do it.
 
Refining the process too... it seems harder to sand down the caulking than the teak - so up here the caulk is being cut out first. The constricted areas between the settees and console are hard to muscle the old caulk out... for that matter the caulk is slightly easier to remove when both sides are cut with a razor knife.

I use a smal hand plane to remove the caulking. Goes very fast once you get the plane set up right.
 
Yep, I'm all over that taping method.

Love it.

"Went with tape for the third method of doing the re-caulk. Tape takes longer but the instant clean edges are better."

This is the way to go. You'll get better and faster applying the tape the more you do it.
 

Attachments

  • 2016-07-02 11.51.04.jpg
    2016-07-02 11.51.04.jpg
    136.5 KB · Views: 169
Another Day and more progress...

Work on the flybridge continues.

Now on those narrow side decks...

Normal stuff now... getting into a rhythm of the work:

razor knife the old caulk, use Teak Decking Systems tool to remove old caulk;
use 60-grit paper on orbital sander with vacuum cleaner attached - remove down to clean fresh wood;
sweep and clean remaining old caulk now easily visible in clean deck surface;
tape edges of grooves with masking tape;
squeeze in TDS 440 caulk, tool flat, remove tape;
backtrack (lightly) sand with 60-grit to clean areas of caulk not friendly to fast taping;
coat with sealer.

Take Tylenol and aspirin.

Did the Port side today... Starboard on the next visit...

BTW - that curious white splotchy stuff on the freshly caulked photo is the adhesive from the tape... did not use painters tape - none in stock at the store I went to... had to use regular masking tape - the adhesive is a little aggressive... hope it sands off on the final sanding... (it should)...
 

Attachments

  • 2016-07-15 09.14.50.jpg
    2016-07-15 09.14.50.jpg
    195.5 KB · Views: 75
  • 2016-07-15 13.13.34.jpg
    2016-07-15 13.13.34.jpg
    194 KB · Views: 62
  • 2016-07-16 10.54.35.jpg
    2016-07-16 10.54.35.jpg
    148.3 KB · Views: 81
  • 2016-07-16 14.36.31.jpg
    2016-07-16 14.36.31.jpg
    156.3 KB · Views: 78
Last edited:
I did learn something...

That nasty TDS 440 caulk that gets on your hands when peeling tape comes off like (weird) magic with a Lysol wet-wipe...
 

Attachments

  • 2016-07-16 14.54.23.jpg
    2016-07-16 14.54.23.jpg
    93.7 KB · Views: 60
Interesting. Our Fu Hwa does not have those large tapered areas of deck sealant; ours are tapered Teak or even 'nibbed' into the edging board (not the correct name, on a real planked deck, it's the covering board {I think[!]}). Some of your teak is 'nibbed' while some others are not...why, I wonder?

The tape goo can be cleaned with any of: lacquer thinner, goo gone, paint thinner, sanding off. Very annoying to find that you did not get it all; after a year the stuff might be found to be collecting dirt.

Also interesting, our flybridge Teak is not nearly so neatly done as the main deck.
 
Last edited:
You see, once the water is in the core, slamming the door behind it won't stop the rot. Because it won't dry out. And, if you can FEEL it it's bad. The rot is usually spread well beyond that. The good news is that it won't sink the boat, so as long as you don't get potholes in the deck to trip over and the cabin is dry......

FWIW, a temporary/permanent repair that works for small areas of rot is to use CPES slow-cure and let it wick down and replace the water and moisture in the wood. You can then comeback and reseal with more epoxy and or your favorite seam sealer. If you are really concerned about stopping the dry-rot add some anti-fungicide to the CPES. Many transoms and decks have been successfully repaired using this approach.
 
Sorry D... should have explained... those tapered areas are actually teak pieces... i was just too lazy to cut the masking tape to fit... so when I tooled the caulk into the adjacent grooves - the excess smeared across the unprotected teak.

When I do the final sanding those areas will be sanded clean and look normal.


Interesting. Our Fu Hwa does not have those large tapered areas of deck sealant; ours are tapered Teak or even 'nibbed' into the edging board (not the correct name, on a real planked deck, it's the covering board {I think[!]}). Some of your teak is 'nibbed' while some others are not...why, I wonder?
 
Ahhh Carlin, can't get lazy on this Forum.
 
And the chase continues - but beginning to see the light at the end of the tunnel so to speak...

Friday was spent taping and caulking the remaining third of the flybridge deck and Saturday was for re-sanding and sealing.

The next step - and likely the final step for me is to run a bead of white caulk around the perimeter of the teak decking... particularly at the "notches" where the aft end of the fly bridge fiberglass sides terminate. I`ll take a pic to better show those locations when they are caulked next week
.

There were a few smaller cracks in the wood... the larger of the cracks I simply caulked as if they were a seam. The smaller of the small cracks I filled with epoxy - not sure how effective the epoxy will be keeping out the water...

The mass of teak decking up top looks great freshly sanded, caulked, and coated with sealer.

Every situation is different... some people can afford to have this kind of work done for them, some people would work at a more leisurly pace, but for me - working alone on days off from work - I felt it was a fairly demanding job. Several doses of tylenol were taken for sore hands over the weeks this job took. If the boat would have been a foot longer I probably would have had to hire help.
 

Attachments

  • 2016-07-22 11.58.45.jpg
    2016-07-22 11.58.45.jpg
    142.6 KB · Views: 143
  • 2016-07-22 17.20.43.jpg
    2016-07-22 17.20.43.jpg
    179 KB · Views: 141
  • 2016-07-23 11.08.00.jpg
    2016-07-23 11.08.00.jpg
    179.1 KB · Views: 162
  • 2016-07-23 11.29.20.jpg
    2016-07-23 11.29.20.jpg
    182.7 KB · Views: 162
  • 2016-07-23 14.55.50.jpg
    2016-07-23 14.55.50.jpg
    153.4 KB · Views: 162
  • 2016-07-23 14.56.21.jpg
    2016-07-23 14.56.21.jpg
    156.4 KB · Views: 149
  • 2016-07-23 14.56.48.jpg
    2016-07-23 14.56.48.jpg
    161.6 KB · Views: 173
A question for you guys working on teak decks. Can you detect possible problems under the teak deck by taping with a hammer? Or does the teak mask the sound that a soft core would make? Thanks
 
Finishing up on top...

I ran a bead of white TDS 440 around the entire edge of the teak deck.

To me - this completes the "membrane" effect...

It was so obvious that in the previous condition the water would run aft along the side of the fiberglass flybridge wing as aft is downhill - and as it pooled at the back end of the fwing - it would then flow under the teak decking.

Hopefully the bead of caulk around the edge will stop that.

Of course the upper deck has many other holes in it due to mounting of stantion rails, grab rails, devices, etc.. - but this is about as good as I can do... hope it keeps the water out.

Freshly sanded, caulked, and sealed teak is gorgeous.

I re-read many of the comments by others and it seems that dealing with your teak decks is something of a "right-of-passage"... everybody else did it too...

Guess I'm in.

Best to all...

Carl
 

Attachments

  • 2016-07-29 13.55.28.jpg
    2016-07-29 13.55.28.jpg
    116.3 KB · Views: 45
  • 2016-07-29 12.01.33.jpg
    2016-07-29 12.01.33.jpg
    178.5 KB · Views: 47
I am appreciating this thread too...I am just about to re-seam my foredeck, including deepening the caulk lines and re-seating screws (some will be removed and the holes filled with epoxy with glued bungs on top).


Two questions: did you have to deepen any caulk grooves...if yes, how did you do it?


And: what is your thinking behind using the SEMCO sealer? I have a dock neighbour who uses it and loves it. Are you using it because you want to preserve the freshly-sanded look (for 6 months or so before re-applying) or do you think it contributes to water-proofing the deck?


(OK, more than 2 questions there, but you know where I'm coming from!)
 
Hello Aquabelle...

Yes, I had to deepen several linear feet of the grooves - which is not that much. I used a razor knife along each side of the groove and then used the (sharp) caulk removal tool to carve out the wood.

While ugly and porous, Satori's decks were in decent condition. Did not have to replace any bungs - but I have them in stock and would happily replace any that did need replacing.

SEMCO was a reference from another thread here on the forum. I understand that using the sealer make the deck more slippery. I used the sealer to somewhat preserve the fresh look of the recently sanded surface - the amount of work to get those decks in good shape warranted using "something" to preserve the effort. So even though it is more slippery, I can live with the trade-off in exchange for a longer life of the beautiful finished surface.

Beyond preserving the look - I just have a fundamental belief that any wood exposed to the elements deserves some protection - sealer seemed the minimumally invasive product to that end.

Does SEMCO make the wood more impervious? Perhaps - but to me, the half inch thick wood is plenty impervious on its own.

I'm liking that SEMCO so much I'm going to go ahead and use it on all the other wood that needs to be refinished.


I am appreciating this thread too...I am just about to re-seam my foredeck, including deepening the caulk lines and re-seating screws (some will be removed and the holes filled with epoxy with glued bungs on top).

Two questions: did you have to deepen any caulk grooves...if yes, how did you do it?

And: what is your thinking behind using the SEMCO sealer? I have a dock neighbour who uses it and loves it. Are you using it because you want to preserve the freshly-sanded look (for 6 months or so before re-applying) or do you think it contributes to water-proofing the deck?

(OK, more than 2 questions there, but you know where I'm coming from!)
 
Back
Top Bottom