Prairie 36 Improvements

The friendliest place on the web for anyone who enjoys boating.
If you have answers, please help by responding to the unanswered posts.

FOG

Guru
Joined
Jan 24, 2016
Messages
550
Location
USA
Vessel Name
DreamQuest
Vessel Make
Prairie 36
We recently purchased a 1981 Prairie 36 to do the Great Loop in 2017 and other East Coast cruising. In addition to our first improvement, a mattress for the Aft State Room, which you can read about in this thread http://www.trawlerforum.com/forums/s34/prairie-36-offer-24354.html

We have a laundry list of other ideas.
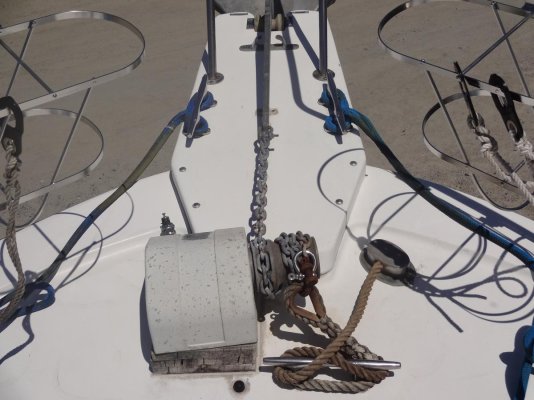
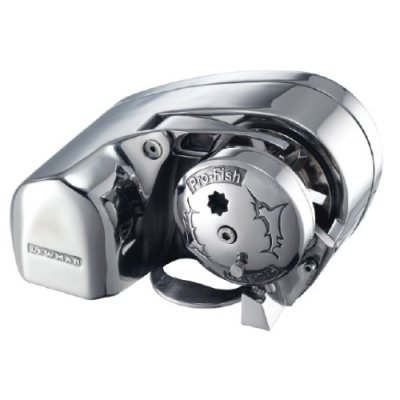
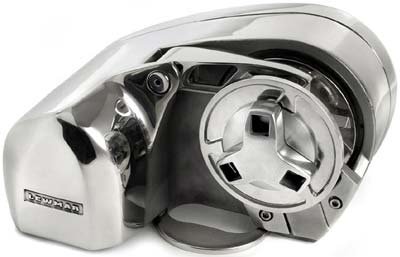
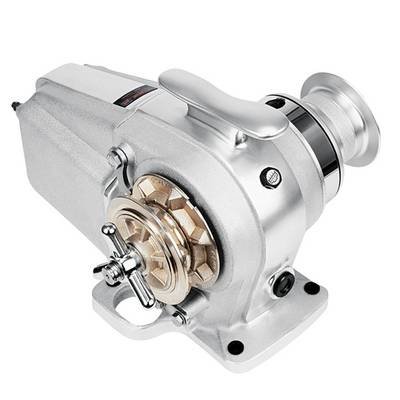
First up is a better anchoring system. So our first big purchase was a new windlass and a used anchor. The old anchor was too small and the windlass works but will only bring the anchor up. I also want to be able to remotely operate the windlass from either helm position. Dropping the anchor must be done manually by hand, no motor down or free fall on the old windlass. Even raising the anchor requires hand feeding the chain/rode down the hawse pipe, see the picture.

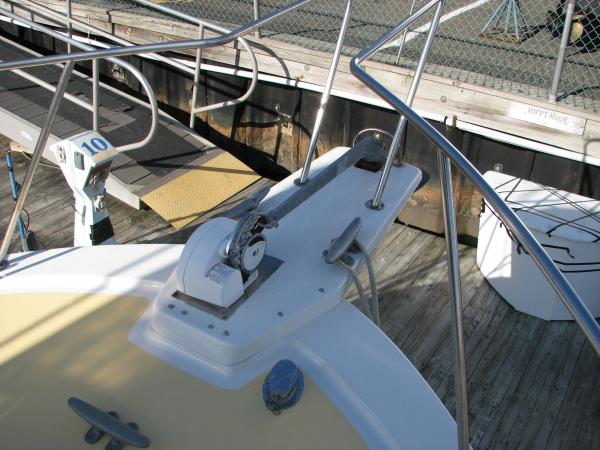
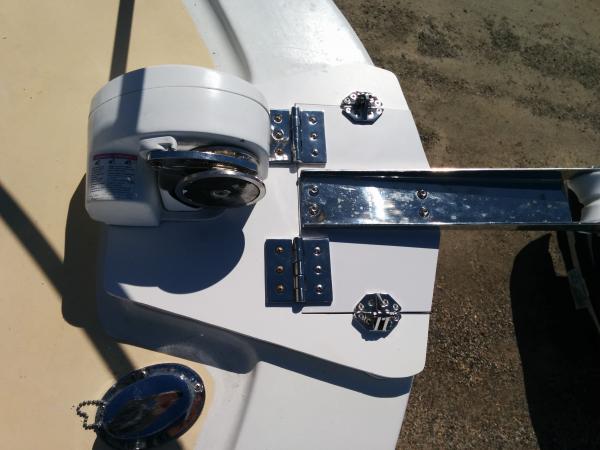
My current thought is to mount the new windlass on top of the bowsprit/pulpit so there will be a straight drop to the bottom of the chain locker creating a nice pile.


I'd like some feedback on this idea and thoughts on how your windlass and anchoring systems are set up. What anchoring system works best for you?
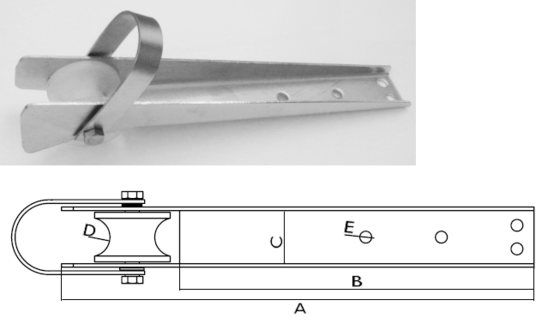
 

Attachments

  • DSC02493.jpg
    DSC02493.jpg
    121.8 KB · Views: 375
Last edited:
Have you considered installing a reversing solenoid on your existing windlass?
 
Mine was mounded on the pulpit, with a straight drop into the rode locker. Works great, never any problems retrieving.

I have a PowerWinch 45 free-fall windlass. I hate the free fall, would much prefer to let it out slowly. A new windlass is on the wish list, but as long as the old one keeps working it's hard to justify.

I have windlass switches at both helms, but never use them any more. I installed one of these and connected it to the winch relay:
4339-albums492-picture2852.jpg


One of my favorite mods, and at under $15, probably the cheapest.
 
Tom, would you have a picture of your windlass mounted on the pulpit?

Also thanks for the tip on the wireless remote.
 
Tom, would you have a picture of your windlass mounted on the pulpit?

This is what it looked like the day I bought it:
4339-albums483-picture2857.jpg


Since then, I had a temporary arrangement made of PVC board. I'm fabricating a more permanent solution now.
 
Thanks Tom. That's the same location I want to put my new windlass. If I was to put it in the same location as my old windlass the hole would be over part of the bulkhead below. Then I would have to fab an angled hawse pipe which could be problematic verses a straight drop.

I also see that you have a hawse hole off to the starboard side like mine. I don't understand why that is there. It doesn't seem very useful. Possibly a second anchor, but that locker is pretty small and I doubt there is sufficient room in it for 2 anchor rodes of any worthy length.

A pic of the new windlass.
 

Attachments

  • 7933302.jpg
    7933302.jpg
    28.5 KB · Views: 274
I also see that you have a hawse hole off to the starboard side like mine. I don't understand why that is there. It doesn't seem very useful. Possibly a second anchor, but that locker is pretty small and I doubt there is sufficient room in it for 2 anchor rodes of any worthy length.

Yeah, I don't use it. I figure it might be good for a lunch hook or something.

A pic of the new windlass.

Drool!
 
A pic of the new windlass.

We installed a Lewmar Pro-Series 1000H a couple of years ago (I believe FlyWright may have one too).

Love the power down vs our old similar Simpson Lawrence Horizon that only had free fall down. Been very happy with it. You should be as well.

But I still lust after a Lofrans Tigres. Almost bought one to replace the Simpson Lawrence as the rope drum would have lined up perfectly with our second pulpit anchor roller used by our spare Fortress, but the Lewmar was a direct (almost) drop in replacement and significantly less expensive.
 

Attachments

  • Windlass.jpg
    Windlass.jpg
    14.6 KB · Views: 2,324
  • Tigres.jpg
    Tigres.jpg
    15.6 KB · Views: 2,321
Thanks for your feedback on the Lewmar windlass. I also bought the 1000.
The Tigres seems like a great windlass to lust over.
 
We installed a Lewmar Pro-Series 1000H a couple of years ago (I believe FlyWright may have one too).

Yes, that's the windlass I installed 6 years ago. It's been a great piece of equipment for my purposes and budget.

I probably drop the anchor over 100 times per year with my sturgeon fishing and cruising.
 
Last edited:
The refrigerator/freezer is not working. A tech tried to get it going, I tried to get it going, but no joy so off to the dumpster.
I have an older Norcold that would work fine, but it makes a little noise so the Admiral gave the order to purchase this Isotherm.
I like it because it has 2 compressors, one for the fridge and one for the freezer. She likes it because the freezer is on the bottom, just like the one at home.
 

Attachments

  • 14995336_2_LRG.jpg
    14995336_2_LRG.jpg
    29.1 KB · Views: 244
  • iwm-refrigerator-CRUISE-195-620_02.jpg
    iwm-refrigerator-CRUISE-195-620_02.jpg
    93.6 KB · Views: 252
Last edited:
My Norcold seems to be on it's last legs. I may go with the new replacement Norcold (6.3 cu. ft.). It fits right where the old one went and looks to use much less power than my old one. Tom, I like your windlass setup, mine is a vertical type with no power down or freefall. I have to take my rode off the gypsy to drop anchor.

Kevin
 
Kevin, I went with a direct replacement Norcold. Even the screw holes lined up. Admittedly it's only been one season, but I'm happy with my decision to take the easy way out rather than try an upgrade to a "better" unit.

As mentioned in other posts, I had to remove my pulpit and replace it with a hinged anchor roller in order to fit into my slip. The final (I hope) result is here:
4339-albums483-picture2866.jpg


The hinged part is 1/2" solid aluminum. The hinges and hold-down clips (also a form of hinge) are through-bolted with backing plates and/or large fender washers. The deck at this point is more than 1/2" solid GRP, plus the two 1/2" layers of PVC board.
 
I would have been happy with the Norcold I have on my porch for the boat. No modifications required. But ........... "Happy Wife, Happy Life."

So now I get to sell the Norcold and use the cash for beer money. :thumb:

Tom, Very clever modification.
Will the anchor remain on the bow roller when the hinge goes up?
 
Tom, Very clever modification.
Will the anchor remain on the bow roller when the hinge goes up?

In theory, it could, but it would have to be held there somehow. And I have a couple of over-size anchors that probably wouldn't work that way.
 
I've seen some bow rollers with a bail on top, like the picture.
The bail with the hook of the anchor resting on the roller should hold it while tied up in your slip.
If your bow roller doesn't have one, you might be able to buy or fab one inexpensively.
 

Attachments

  • yhst-17525248830734_2268_34776296.gif
    yhst-17525248830734_2268_34776296.gif
    47.5 KB · Views: 224
Yes it has the bail. Just that the best picture I had cut it off.

I originally made a plastic mock-up of my final configuration, to be sure it worked OK. It cleared the bow rail so it could go "up and over", or be lashed in the "up" position. I used that for three years of occasional anchoring with my Danforth.

The next big test will be to see if it'll hold my 45lb Manson. The roller is bolted to the 1/2" aluminum plate with the biggest bolts I could fit, into holes drilled and tapped into the aluminum. I'm a little unsure of the strength of these threads, and thinking I might get some longer bolts and add nuts. I'd have to drill out some room under the roller for the nuts so the whole thing still sits flush.
 
Last edited:
Capt Tom: I missed that remote control. Is it wired to the deck switch? Or does it totally replace the deck switch? That seems like the best 17 bucks I could spend.
 
Capt Tom: I missed that remote control. Is it wired to the deck switch? Or does it totally replace the deck switch? That seems like the best 17 bucks I could spend.

It's wired in parallel to the two helm switches; I don't have a deck switch. Any of the three can power the relay to make it go up or free-fall down.

I used the remote again today to test out the new bow roller. I had the 45lb anchor on the ground, about 10-12 feet below the roller. I was able to stand next to the anchor and run it all the way up to the roller. I love that remote!
 
I sprung a leak and have had a little set back to my improvement plans.

The day before I planned to move the boat to a new marina I discovered a leak in the starboard aft fuel tank. For those of you that own or have owned a Prairie 36 know that this is a very labor intensive task.
First I was able to transfer all of the fuel that remained in the tank, about 80 gallons, to the other 3 tanks using a diesel fuel pump and hose that I purchased at an auto parts store.
Next was the clean up of the fuel that had leaked into the engine room and bilge. It had only been about 5 days since my last visit to the boat, so from a gallon stand point not so bad, maybe 10 gallons.
That was about it for me personally, as the remaining tasks of hauling the boat, moving the starboard engine into the main salon, removing the tank, building a new tank, then reinstalling the new tank and motor was done mostly by the local boat yard.
A little over 2 months later and we're up and running with the boat in the new marina.

By the way, North Carolina charges 7% sales tax on labor. :nonono:
 

Attachments

  • DSC02495.jpg
    DSC02495.jpg
    104.1 KB · Views: 252
We had a leak from the port forward tank. Much easier to replace as it did not require removing engines. The rear tanks are the ones I lose a bit of sleep over......
 
I have 3 tanks. One under the forward V-berth deck that leaked and was de-commissioned before I bought the boat. It was about 45 gallons I believe and I'm trying to figure how to get it out without tearing up the deck and v-berths. I have two side tanks of 125 gallons each. The port side leaked before I bought the boat and it was pulled by cutting out the decking next to the engine under the settee. They cut about 1.5 inch off the bottom and then welding a new bottom on. I'm dreading when the starboard tank leaks. LOL. All the tanks are aluminum.

Kevin
 
I have four aluminum tanks, and finding one leaking is my nightmare scenario. I also assume it'll happen some day.

I read (was it here?) about a place where they cut a large access hole in the side of the tank, go in and seal it up with some sort of coating, then bolt a cover over the access hole, which itself has a removable access port in it to allow the bolts to be tightened, and presumably future inspections.

Sounds like a better solution than removing tanks and engines, unless you want to do a rebuild anyway. A project to replace tanks and rebuild engines might end up being more than the boat is worth, I'm afraid.
 
I also have four tanks, two starboard and two port, outboard of the engines. They are mirror images of each other with the aft tanks being about 30% longer than the forward ones.
When I first discovered the leak I called my broker to see if the PO had replaced any of the tanks since they had owned the boat for over the last 30 years. The answer was yes, but they couldn't remember which one or when.
I guessed it was the port aft tank as it had been coated black. But then the port forward tank also had a green coating. While both starboard tanks were bare aluminum.
I later found that a number of tank fabricators coat the exterior of the tank with a black coal tar epoxy, as was recommended by the fabricator that made my tank. So I bought some Rust-Oleum coal tar epoxy and coated the new tank before it was installed. It now looks very similar to the port aft tank that was coated black.
I'm now fairly confident that the black coated port aft tank was the one the PO replaced. However, that doesn't explain why the port forward tank has a green coating. I'm going to be optimistic and think that tank was also replaced but the PO forgot about it.

Rick - On my boat the generator sits next to the port forward tank, so I would think it would have to be moved out of the way to get the tank out. However, that would be much easier than moving the engine.

Kevin - Once the tank was out and the pin hole leak was found at the bottom I asked a couple of fabricators if they could cut off the bottom and weld on a new one. One replied with, "the USCG doesn't allow it." The other did cut the bottom off and after further inspection was not comfortable putting a new bottom on because he saw some additional corrosion and the material was very thin. So I opted for a new tank. Break Out Another Thousand - BOAT.

Tom - I have also read about the interior coating, but don't know who does it. I would think that 3 access ports would have to be cut into the bigger aft tanks due to the 2 internal baffles. But I don't know the process on coating the tank interior, just guessing.
 
One of the Mainships we looked at had a tank recently replaced and it had something that looked like Tyvek on the bottom and coming up the sides about 6". Not sure if that will solve these problems but has anyone done this?
 
Here's what I learned when replacing the tank back in Spring of 2012:

The leak started right after we launched the boat in the spring of 2011. Fortunately, not enough went into the bilge to activate the bilge pump, but cleaning up the mess was no fun! I turned off the pump and closed all the thru-hulls while I contacted the insurance company (Boat US). They sent a surveyor and covered the cost of pumping out the fuel, reimbursed market value of the fuel (I used a waste oil company that measures how much they take), and paid for the removal of the old tank. I promised not to use that tank and carried on with the season using only the rears, planning to address the project after haul-out.

If I remember correctly, the reason the tank leaked is due to the way it's installed. As I'm sure you Prairie owners know, between the two tanks and behind them is filled in with foam and therein lies the problem. Aluminum corrodes due to moisture AND a lack of air, so the foam right up against the tank is the perfect recipe.

The good news: RDS Aluminum, which manufactured the original tanks, is still in business and were fantastic. They needed a couple of days to find the drawings in their archives, but came through. Tank cost $932 + $140 for shipping and I had it within a couple of weeks. A heads up, because I missed it on the drawing, the original tank had an 1 1/2" fill, the new one had a 2", so I had to buy a new fill plate and grind out a bit of FRP, no big deal. but double check ALL the measurements ;). It comes with a high quality Moeller Reed style send unit.

The generator is directly in front of the tank so I had to move it and it's muffler. Years ago we replaced the original Onan anchor with a 4.5Kw Northern lights, so it was a 2 person job to slide it over onto a temporary platform. I also had to remove to the two 2x4 supports at the front of the ER opening for the tank to fit through, but removal was not too bad. Fortunately most of the foam stayed in place, so I cut out 4 sections and made templates for new supports made out of starboard. Once they were perfectly sized, and locations marked, I removed the foam and fiberglassed in the new supports (see photos). I also made several 1x1" strips to under the tank, so that any water that got underneath would not get trapped. Once the tank was test fitted, we loaded up the supports and bottom strips with appropriate adhesive (boat-life I think) and put the new tank in. As you can see, not all the supports touch everywhere, but I don't think it's going anywhere.... I did not put any coating on the new tank, because the old one lasted 30 years and I don't see myself owning a 60+ year old boat! The tanks walls are not thin and as long as they are kept dry, they should be fine

While I was at it, I replaced all the soundproofing on the front wall of the ER since I don't plan on ever moving any of that stuff again!!
 

Attachments

  • IMG_0027.jpg
    IMG_0027.jpg
    141.6 KB · Views: 130
  • IMG_0028.jpg
    IMG_0028.jpg
    116 KB · Views: 144
  • IMG_0029.jpg
    IMG_0029.jpg
    169.4 KB · Views: 123
  • IMG_0032.jpg
    IMG_0032.jpg
    35.5 KB · Views: 146
  • IMG_0026.jpg
    IMG_0026.jpg
    154.5 KB · Views: 139
I think if either one of my forward tanks fail, I'll just de-commission them.
Or maybe I'll cut the front panels off, change them to doors and use the tanks for storage. :D
 
Thought about that too, but a total of 200 gallon fuel capacity, even with the Prairie's miserly consumption is on the low side, might take a harder hit on resale value that what it costs to replace, especially if you're handy.

If either of my rear tanks fail (fingers crossed they don't!), I would seriously consider replacing both at the same time, one less thing to worry about.
 
I burn just under 4 gallons per hour at 8 knots cruise with both engines. That's a range of 400 nautical miles at that speed. Not sure where I would go to exceed that distance. I know others may want to go further in a 35 year old boat, but not the FOG.
I agree with you Rick that resale may be an issue. But additional storage is also a plus.
I was half joking about using the tanks for storage and I hope I never have to get serious about it, but I have seen stranger things on boats.

I hear you on the rear tanks. As I stated in an earlier post about my confidence going up regarding the PO replacing the port rear tank when I saw the coal tar epoxy coating on it. I'm not 100% convinced, but I'll be able to sleep at night.

Just had another thought, possibly a crazy one. Raise the tank up and slide a piece of 1/4" aluminum coated with epoxy under it cut to the size of the tank bottom. Drop the tank back down on to the aluminum and let the epoxy cure. :facepalm: or :thumb: ???
 
well, in my case, the pinhole was about 1/3 of the way up the outboard side, so an added bottom wouldn't have helped. Seems like too much trouble anyway. But, I'm a little OCD, either do it perfect, or don't do it at all :)
 

Latest posts

Back
Top Bottom