Replaced fuel tanks

The friendliest place on the web for anyone who enjoys boating.
If you have answers, please help by responding to the unanswered posts.

Giggitoni

Guru
Joined
Jun 21, 2008
Messages
2,092
Location
United States
Vessel Name
Mahalo Moi
Vessel Make
1986 Grand Banks 42 Classic
The topic of fuel tank replacement comes up on the forum from time to time. Now it's my turn.

Last October, I detected a small amount of fuel in the bilge of my GB42. I use red-dyed diesel so it's easy to see! I looked at every possible angle, nook and cranny where the fuel might be leaking. I tried to talk myself into the notion that it could be a bad fitting, leaking sight tube, leaking fuel filter, fuel pump, etc. I tried to ignore the fact the tanks were 29 year old black iron! The journey took my troubleshooting full circle. It had to be the port fuel tank.

My GB was built with two 300-gallon fuel tanks; one port and one starboard. It was time for the tanks to be replaced.

I'm the fifth owner of this boat. The previous four owners escaped the inevitable! I was the one holding the bag. I was the one left standing when all the others were sitting!

I called a local company in the San Francisco Bay Area to meet me at the boat and give me a cost estimate. Long story short, that company was reluctant to do the work for the price that a company in La Mesa, California was quoting. So I called "Vince" at American Tanks in La Mesa, Califonia for advice.

I've read about the reputation of American Tanks through the years on the GB Owners Forum (Grand Banks Owner's Resources). I had no idea that he would be willing to come to Vallejo (about 425 miles from my boat) to replace my tanks. In fact, he said that he would reduce the price by $2,000 if I would bring the boat to him! Side note: It would cost me at least that much in fuel to get the boat down there and back. Besides, the Coast Guard could easily find me with the diesel slick I'd be pumping out in the Pacific Ocean all the way the California coast.

Vince drove up to Vallejo and pumped the fuel from the leaking tank into 55-gallon drums placed on my cockpit. This was a big relief to me because I wouldn't have to visit the boat every two to three days to change the absorbent pads in the bilge (the last thing I needed was to pump fuel into the marina with the bilge pump). He also took copious measurements of the tanks, opening through my sole to the engine room, width of the saloon doors, etc.

He returned recently with six aluminum tanks; three on each side. I lost about 50 gallons of fuel capacity total (25 gallons on each side). So now I have about 275 gallons on each side for a total fuel volume of about 550 gallons. Fine with me. And since the fuel tanks are placed about midships, I don't have a forward-to-aft trim problem.

The old tanks were cut out quickly by a 22-year-old dude with a reciprocating saw and a bunch of blades! Join me when I sing the praises of the younger generation that's willing to put in an honest day's work! It's no problem cutting out old diesel tanks with an electric saw. No fires or explosions! No need to fill with inert gas, etc. Gasoline tanks would be a different story!

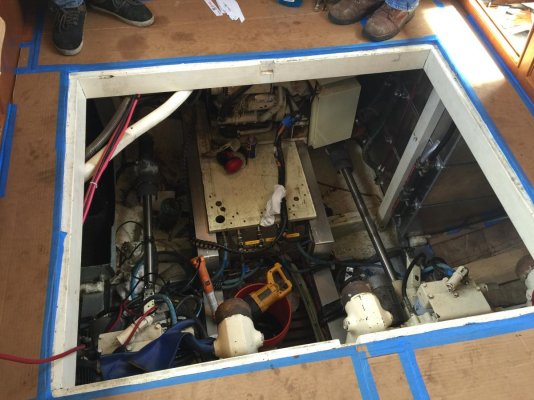
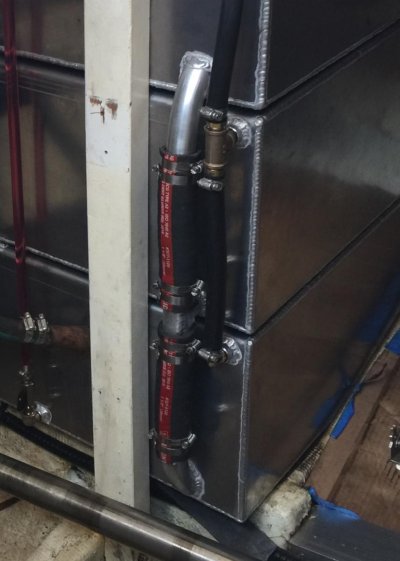
The new tanks were installed and joined together with connections which make them work as "one tank" on each side. Sight tubes, cross over line, fuel intake and return lines, and generator lines were installed. I also had American Tanks install a separate valve and connection for my diesel heater.

The install went well. I know you're wondering....how much? The total bill was just shy of $19,000. But worth every penny!


ImageUploadedByTrawler Forum1464753548.945420.jpg
Port side tanks installed

ImageUploadedByTrawler Forum1464753600.565673.jpg
Cutting out starboard tank

ImageUploadedByTrawler Forum1464753672.570214.jpg
Connecting starboard tank lines

ImageUploadedByTrawler Forum1464753710.497063.jpg
Removed tank pieces in back of pickup truck

ImageUploadedByTrawler Forum1464753763.482013.jpg
Thickness of original tanks

ImageUploadedByTrawler Forum1464753807.935931.jpg
Bottom section of port tank that was leaking. The rectangular rust shape is a result of water being trapped under a neoprene pad under that corner of the tank. Notice the three holes (about 1-1.5mm in diameter). I poked those holes through the rust with my truck ignition key! The steel was "paper" thin. I'm fortunate that the slow leak didn't let go all at once!
 
Last edited:
Ray

Thanks for sharing. Based upon your first hand look, what original install techniques could have been used to prolong tank life?
 
Job well done, congrats. I am guessing that the new tanks are bedded on nitrile rubber?
 
Hey, Tom!

A couple of design and install changes come to mind.

My old tanks rusted through from the "outside in". I always assumed that I would get water inside the tanks, thus causing the tanks to rust from the inside. However, I was diligent with watching for water in the filters and checking the drain fittings on the tank bottoms. The times I had the fuel polished we never found any water.

My tanks were designed and built with rounded bottom edges which allows the water on the outside of the tanks to run to the bottom rather than dripping into the bilge. I would eliminate the rounded edges and bring the steel plate down past the bottom to from a "drip" edge.

The old tanks were placed on neoprene pads on the stringers in the engine room. Any water present would collect between the neoprene and the steel tank bottom. I would eliminate the neoprene, and instead, weld a steel foot where the tanks sit on the stringers, thus reducing the amount of moisture against the tanks.

And, as always, we need to keep our engine rooms as dry as possible. Install fans and passive oil heaters to guard against condensation. Keep our decks sealed so water can't run down fill lines to the tanks and neighboring equipment.
 
Last edited by a moderator:
Job well done, congrats. I am guessing that the new tanks are bedded on nitrile rubber?

The new tanks have aluminum feet welded to the tank bottoms where they make contact with the stringers. Wood cribbing frames the tanks in place and is attached to the stringers and cabin sole.
 
Wow-big job, Ray. But looks like a truly first class job was done. Now the next 4 owners of "Mahalo Moi" are set up!
 
one question... three tanks each side installed on top of each other... did you ever consider three taller tanks installed beside each other?
 
one question... three tanks each side installed on top of each other... did you ever consider three taller tanks installed beside each other?

Good question. The local bid (San Francisco area company) called for two side-by-side vertical tanks. It could have worked. However, the bottom of each tank would have a funky angle to match the bottom of the hull. You'll notice in the first photograph that only the bottom tank has the weird angle to match the hull. The middle and top tank are rectangular in construction. Cheaper!

Also, the new tanks are baffled vertically. The baffles are welded from top to bottom. It would be difficult to weld the bottom of the baffle and still have communication with the adjacent tank. The three horizontal tanks communicate with each other well.

Another reason I chose not to have taller tanks is because I want to see the top of the top tank for water intrusion which was difficult to impossible on the original black tanks installed by GB. I can see the top of the tank, now.

The dimensions of the sole opening and saloon entry door is limited in size. So to get close to original gallonage, I chose to have three tanks constructed.
 

Attachments

  • image.jpg
    image.jpg
    140.4 KB · Views: 309
Last edited:
Makes sense... We have isolated our leaking port tank and emptied it. For now we are using only the starboard tank and balancing the list by only filling the port side water tank. We will plan to cut up the leaking fuel tank in the fall and then decide about fabricating new tanks. Your thread is very helpful!
 
First class job Ray, matches the rest of that well kept GB. :thumb::thumb:
Yes, excellent work and thanks for sharing with all the anxious steel tank owners.

Can you please describe how they are interconnected, top to bottom and how they fill on refueling.
 
'... The total bill was just shy of $19,000. But worth every penny! ..!

And the US economy and workers thank you. Leastwise, that's how I view my boat maintenance expenses.
 
PHP:
Yes, excellent work and thanks for sharing with all the anxious steel tank owners.

Can you please describe how they are interconnected, top to bottom and how they fill on refueling.

The tanks are interconnected with welded aluminum pipe and hose (about 1.25", I think) as shown in the photo. All tanks act as one tank and fill from a deck fitting on each side of the boat. No different than the original tanks.

The smaller interconnected hose to the right is for tank venting.
 

Attachments

  • image.jpg
    image.jpg
    85 KB · Views: 407
The good ship Mahalo Moi:


With the new fuel tanks, what's her range?
 
Mark,

I think my range should be about 700 nm with a 10% reserve. That's based on about 500 gallons at about 6 gph (83 hours) with an average speed of approximately 8.5 kts. (1,650 rpm). I'd feel better about looking for fuel after 650 nm...! Let's see, I could make it about 1/3 of the way to Hawaii.
 
Last edited:
Ray, I can beat you on the range with 300 gallons at six knots using less than two gallons per hour, but can't make it to Hawaii either. Could make it to Seattle, but I don't believe I'd enjoy the voyage. Half tankage works for me in local waters.
 
Is there anything besides that wooden beam holding them in place? Do the tanks lock together so they do not shift? Looks very nice and easy to tell if you have any leaks between the tanks in the future. Should last a good long time.

Kevin
 
Speaking of fuel vents, what's the best method to fix a clogged fuel vent? Currently have that problem for one of my tanks.
 
Speaking of fuel vents, what's the best method to fix a clogged fuel vent? Currently have that problem for one of my tanks.

Have you considered sucking on it? :whistling: :facepalm: :hide:

OK, if not, how about a little pressurized air after checking the vent opening. Spiders can be a problem in our area.

I gotta say that those are some very sweet tanks!! I got a chance to see the port side completed while they were still cutting on the stbd tank. When Ray mentioned something about a free lunch, that was it...we were gone before he changed his mind. (Thanks again for the lunch, Ray!)

The tanks are nested in a way so they don't shift. They're an engineering and manufacturing marvel when seen close, if you like that kind of thing...
 
... Spiders can be a problem in our area....


Spiders?!! Talk about spiders! Feel they are overtaking the world. Am constantly (every time visiting the boat) destroying their webs. Still, their poop is winning. One good thing: they remain on the exterior.
 
Kevin,

The photo was taken before the installation was complete. Additional wood frame was installed to further secure the tanks. I'll post a finished photo in a couple of weeks.
 
Giggitoni

Nice reporting on the job. Several GBs have gone through a tank replacement. Nothing beats eyes on the issue. Did some GBs have a forever repeated design that trapped water, leaky teak decks, low use meaning old stale fuel, flat tank bottoms sitting on rotting keepers or ???

Is there a hint on what you've seen for those looking at older boats and specific areas to look at carefully to lessen chances of tank problems?
 
Thanks Gig, I thought that might be the case. I'm just waiting for my Starboard side tank to spring a leak this gives me some good ideas for when it happens. I know it's just a matter of time as two other tanks have leaked before. One was repaired by cutting off 2 inches from the bottom of the tank and welding a new bottom on. Mine are aluminum.


Kevin,

The photo was taken before the installation was complete. Additional wood frame was installed to further secure the tanks. I'll post a finished photo in a couple of weeks.
 
Giggitoni

Nice reporting on the job. Several GBs have gone through a tank replacement. Nothing beats eyes on the issue. Did some GBs have a forever repeated design that trapped water, leaky teak decks, low use meaning old stale fuel, flat tank bottoms sitting on rotting keepers or ???

Is there a hint on what you've seen for those looking at older boats and specific areas to look at carefully to lessen chances of tank problems?

We were well aware of the potential problems with GB fuel tanks when hunting for our boat. Our tanks checked out well during the survey; dry rust-free tops and no obvious deep rust on the outside.

I was always expecting the tanks to fail from the "inside out" due to old fuel with water condensation. I had my fuel polished a couple of times and didn't find any evidence of water. The old tanks had a bottom drain which I would carefully open from time to time. Never found any water. Never any water in my dual Racors. Kept the tanks full to minimize space for water condensation. Also, I have always kept the engine room dry by using a passive electric oil heater along with dehumidifier fans.

As it turns out, over the course of 29 years, water would collect between the black tank bottom and a strip of neoprene at each corner. It wouldn't dry out! Water would come from various sources; poorly sealed deck filler, fresh water line leak behind the tanks out of view, wet exhaust risers and piping near the tanks.... The tanks rusted from the "outside in" at those spots under the corners.

If I had known this years ago (crystal ball time!), I would have jacked the tanks up enough to remove the strip of neoprene and replaced it with a "foot" of black iron. The tanks don't need to be dampened and stray water wouldn't have a place to collect and rot away at the tanks.

It's probably a good idea to make sure the deck fuel fills are bedded properly. And, in the case of a GB with teak decks, make sure the bungs and seams are in good shape to minimize water intrusion.
 
Well Ray, we will certainly be investigating working with American Tanks or a similar company here in the east. Just a few weeks after out first tank started leaking and its subsequent pump out, our second fuel tank started leaking as well. We had to pump out all the rest of the fuel while at the dock to avoid a big spill. So what to do when sitting at a dock with both tanks empty of diesel and not removable/replaceable without cutting them out in place as you did?

We added a 19 gallon auxiliary tank in the lazarette... an easy connection to the fuel manifold in the engine room and we are back on the water for short cruises until haulout in October. Tank removal and replacement can happen over the winter.... assuming we can afford it....

Thanks again Ray for all the info in your posts and look forward to any additional pix and technical info about the design and install.
 

Attachments

  • DSC_0406.jpg
    DSC_0406.jpg
    83.5 KB · Views: 149
  • DSC_0407.jpg
    DSC_0407.jpg
    110.3 KB · Views: 148
Al if I recall you changed tanks 20+ years ago and mentioned a couple years back the possibility of doing it again. Or do I have you confused with someone else?

I think you have me confused with someone else.

I hope you have me confused with someone else.

You better have me confused with someone else.

I feel bad for that someone else.
 

Latest posts

Back
Top Bottom