To paint or not to paint, that is the question

The friendliest place on the web for anyone who enjoys boating.
If you have answers, please help by responding to the unanswered posts.
Joined
Oct 2, 2009
Messages
5,198
Location
USA
Vessel Name
Bucky
Vessel Make
Krogen Manatee 36 North Sea
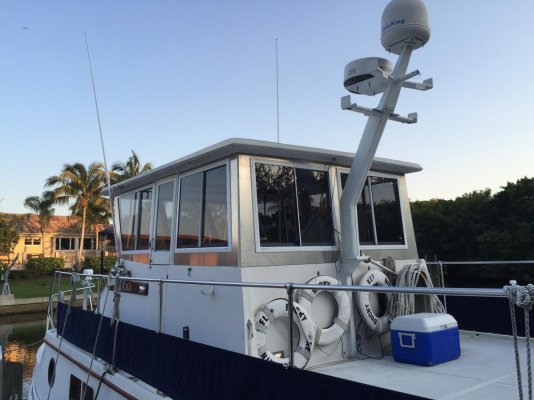
I finished the cut and fit of new 5052 sheet aluminum to fill the void left by the installation of new, but reduced-size pilothouse windows. I sent photos to Cardude and OCdiver for their opinions on whether to paint the new aluminum or leave it bare. So far it's one vote for and one against. What do you guys think?
 

Attachments

  • IMG_2098.jpg
    IMG_2098.jpg
    113.7 KB · Views: 386
Larry
That looks very nice as is. Surely you can find something else to spurce up:)
 
Looks good. Give it a year or two and it will be a flat grey. Are you able to send it off to have it anodized? Otherwise, I'd hit it with some Sharkhide to keep it lookin purrdy.
 
Unless you can properly prepare and prime in a controlled environment, paint on aluminum will not last.
 
It looks great, Larry! I vote leave it for now. Paint it later if necessary.
 
Vinyl wrap it ? ::ermm:
 
Think it looks fine know. The oxidation grey doesn't look bad if the whole area is the same color. Think the grey will look a little odd with white windows and white below it.

Ted
 
Vinyl wrap it ? ::ermm:

Actually, Marty, you're not far from the other option we discussed. If I leave it as is, later I could slap on some boot-stripe vinyl tape in any color.
 
Last edited:
If they are easy enough to remove you can have 'em powder coated a nice white to math the rest of the boat.

Marty..................
 
If they are easy enough to remove you can have 'em powder coated a nice white to math the rest of the boat.
Marty..................

Yeah, I'm making sure it will stay easy with butyl rubber, just in case. My local powder coater says he's 6 weeks out though.
 
I'd paint but what ever you decide, WOW. What a great job. Any more pictures?

Yeah, when I finish the instalation I'll put the other pics in the "Project" thread right here on TF.

Bill, I'll have to look into that ceramic clear coat. Sounds nice.
 
Photoshop it blue and see how it looks!!! Just curious.

BUT...I love the look of it as is!!! If you can preserve that without the oxidation that would be awesome. No clue what American Airlines used to preserve their aluminum finished aircraft but you may look into that.

Related but not very useful trivia: AMerican started painting their airplanes because the 787 is carbon fiber and not aluminum.
 
Whatever you choose Larry do yourself a favor and do it this weekend. Florida weather is going to make your choice for you if you wait too long. Prep is king.
 
Yeah, when I finish the instalation I'll put the other pics in the "Project" thread right here on TF.

Bill, I'll have to look into that ceramic clear coat. Sounds nice.

On the last Broward I ran we had the aluminum rub rails and cleats polished out and then clear coated. They came out looking a lot like polished like SS.
 
On the last Broward I ran we had the aluminum rub rails and cleats polished out and then clear coated. They came out looking a lot like polished like SS.

How long did it last?
 
On the last Broward I ran we had the aluminum rub rails and cleats polished out and then clear coated. They came out looking a lot like polished like SS.

The clear coating can make them retain the beautiful polish. I'd either clear coat or paint it. Leaving as is will only be a losing proposition.
 
Whatever you choose Larry do yourself a favor and do it this weekend. Florida weather is going to make your choice for you if you wait too long. Prep is king.

Hmm. Good point. :ermm:
 
It looks cool as it is, but I'd make it white somehow, personally.
 
Aluminum painting guy here. Do you know how you spell "PAINT" when it comes to aluminum? Omit the letter "T" a the end of the word. PAIN!

I cannot stress how important following correct prep procedure is when painting aluminum. Failure to do so will result in a blistered, failed paint system in less than a month or two.

1.) Sand the entire surface with 100 grit. Preferably sand blast.

2.) Using a new paint brush, wet the entire surface with diluted ALUMIPREP NO. 33 from Aircraft Spruce. Once every inch of the surface has been etched it should be gleaming white clean aluminum. This is what real aluminum looks like. Rinse off the Alumiprep and *keep the substrait wet until done with the next step*. If you allow any area to dry aluminum oxide starts to appear immediately.

3.) Using a new paint brush, wet the entire surface with diluted ALODINE 1001 from Aircraft Spruce. Rinse all alodine off and allow to air dry. *Do not dry with a rag or any fabric!* Small fibers will stick to the aluminum and become "wicks" when you paint causing the paint to fail.

4.) Apply a good chromate containing epoxy primer. I prefer Alexseal Cor Spec Primer 135 | Alexseal Yacht Coatings

5.) Apply a good finish primer. I prefer Alexseal Finish Primer 442 | Alexseal Yacht Coatings

6.) Paint it. This is the step that people think you are doing when you tell them you are painting your boat. In actuality you are doing steps 1 through 5 for 99% of the time.
 
Last edited:
Another option is to take the panels to shop that powder coats and have them sand blast and powder coat each panel.

Another tip is any time you screw a stainless steel fastener into aluminum use Tef-Gel: TEF-GEL - Ultra safety systems - Home page This stuff is magic.
 
Another option is to take the panels to shop that powder coats and have them sand blast and powder coat each panel.

Another tip is any time you screw a stainless steel fastener into aluminum use Tef-Gel: TEF-GEL - Ultra safety systems - Home page This stuff is magic.

Very good info. Thank you. I decided on the alum since it was the same material as the original framing it is attached to. Yes, I knew about the extra ordinary prep part of the paint job but it looks more like I'll at least "try" to maintain it natural with rouge, polish and a buffer.
 
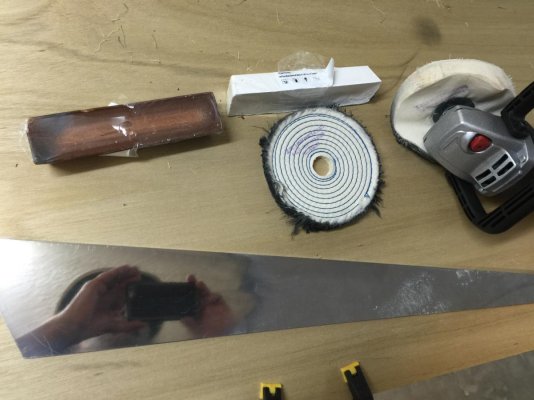
This afternoon, I thought I would take a piece of scrap 5052 aluminum from the project, take the buffer and a bit of rouge and see how much work it would be to polish it up. This was about a 5 minute investment here in the photo with my reflection in the polished area to the left and the mill finish to the right. The mistake was letting the Admiral see it. Now it looks like I've got quite a bit of polishing to do.
 

Attachments

  • image.jpg
    image.jpg
    113.3 KB · Views: 54
Last edited:
Back
Top Bottom