Chasing Teak Deck Leaks

The friendliest place on the web for anyone who enjoys boating.
If you have answers, please help by responding to the unanswered posts.

CarlinLA

Senior Member
Joined
Jan 20, 2016
Messages
159
Location
USA
Vessel Name
Boatless
Vessel Make
Dreamer
Ok...

Let's chase teak deck leaks...

The playing field... a well kept and clean 1985 Fu Hwa "Golden Star" sedan trawler - with the oversize flybridge.

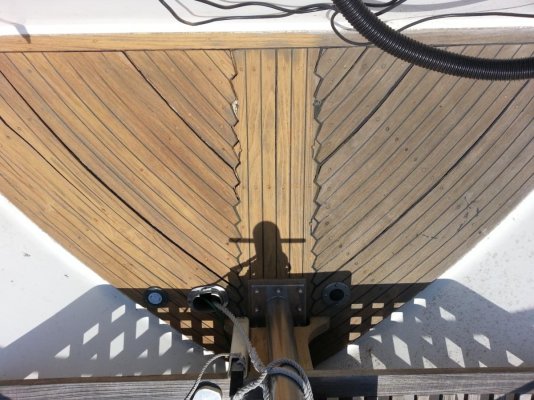
Having only had the vessel for a few months I am still learning about the boat. In general terms - it is in very good condition... but it does have a "soft spot" in at least one spot on the flybridge (near the ladder).

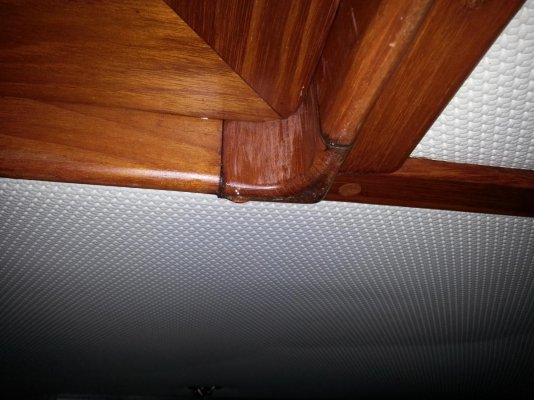
Recent observations in the lazarette imply that water is getting into the cockpit deck.

So this exercise will be to stop as many of these obvious leaks until a longer term solution (and core repairs) can be implemented - and that could be forever - a non-leaking teak deck is good enough for me.

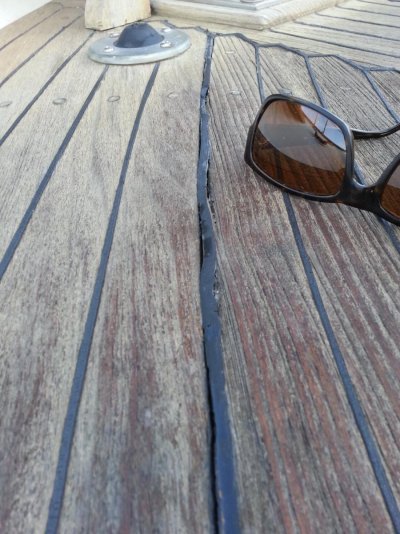
To start - lets look to the obvious... pretty big gaps in the calk between the boards up on the foredeck...

Thankfully the previous owner provided quality tools to use in clearing out the old failed caulk - that will be a big help.

More to follow on the repairs...
 

Attachments

  • 2016-05-08 07.06.19.jpg
    2016-05-08 07.06.19.jpg
    160.8 KB · Views: 236
  • 2016-05-08 07.06.53.jpg
    2016-05-08 07.06.53.jpg
    163 KB · Views: 260
Ok...

Let's chase teak deck leaks...

Thankfully the previous owner provided quality tools to use in clearing out the old failed caulk - that will be a big help.
My preferred tool for teak. :hide:

DSCN0880.jpg

Ted
 
I'll be following along as I have the same thing going on. lol.

Kevin
 
The eagle's decks where in the same shape. So the out teak was re fastened and seal and a tarp to covered the deck. Took 2+ years to re fasten and seal. The tools I used was a carpet knife, narrow sharpen square head screw driver to ream out the old calk. A electrician screw driver to grip and pull out the stripped screws.

Every September, I chase down loose fasteners and calking. In the summer the deck dry out and shrinks causing fasteners and calk to fail. Each winter I tarp over the deck.
 
Seriously using an electric planer to remove teak?? Why not cut them into little chunks and pull them up? Set the depth on a circular saw, have at it for a while then pull up the chunks, repeat.
 
Greetings,
Mr. CLA. Somehow, just by the tone of your question, I suspect you do NOT want to address your deck leaks like Mr. OCD.

Having had 2 vessels thus far, one with the original teak, leaks and all and the current which has had the teak decking removed with no leaks at all, I would still prefer the former. Teak, in good condition, is the ultimate deck material IMO. Keep the ones you have as long as possible. They actually don't look too bad at all.
 
Seriously using an electric planer to remove teak?? Why not cut them into little chunks and pull them up? Set the depth on a circular saw, have at it for a while then pull up the chunks, repeat.
The adhesive was tenacious. The planner was faster and easier with less effort.

Ted
 
I dho-know Ted... You were onto something but not sure if that little machine is where the vision goes... perhaps something that would look at home in a Terminator movie... something that gets under the wood layer and chomps its way across - ?

My preferred tool for teak. :hide:

View attachment 51719

Ted
 
Phil...

Triage repairs must happen right away... i'm not even comfortable washing the boat till the water ingress can be halted.

Your approach seems reasonable... stabilize and maintain.


The eagle's decks where in the same shape. So the out teak was re fastened and seal and a tarp to covered the deck. Took 2+ years to re fasten and seal. The tools I used was a carpet knife, narrow sharpen square head screw driver to ream out the old calk. A electrician screw driver to grip and pull out the stripped screws.

Every September, I chase down loose fasteners and calking. In the summer the deck dry out and shrinks causing fasteners and calk to fail. Each winter I tarp over the deck.
 
I dho-know Ted... You were onto something but not sure if that little machine is where the vision goes... perhaps something that would look at home in a Terminator movie... something that gets under the wood layer and chomps its way across - ?
You may not have seen my Refit thread. This is how I took care of my teak deck.

Teak Deck

Ted
 
Failed caulking is allowing water under the teak and it is then going down screw hols into the core. A modern teak-to-deck bedding (adhesive sealant) will be sufficient for many years IF not too much water has already got into the core.

I would do some tests. Firstly, see how easy or hard it is to remove the screws and lift off the teak. If it comes off easily, then use a 5/16th drill to map out areas of core that are wet or rotten. Once you are there you can decide on whether or not you need to replace the core. The drill holes you make are easily filled in with thickened epoxy.

On my foredeck it was difficult as the deck had been removed and refastened by the PO with a non-setting bedding, which was very sticky and messy to deal with, but not overly adhesive. Only about 80% of the teak would have been re-useable. Many screws were not holding either. Over 75% of the core was wet or rotten so I replaced the core on the whole area, new FRP on top with non-slip to finish. Something like 95 sq ft area, cost $17,000 in a yard with good labor rates and me doing some of the work.

On my Portuguese Bridge decking the original bedding was still there. Dried and not adhering. All of the teak was removed and able to be re-used. It was easy to clean the old bedding off both the deck and the underside of the teak. We limited our attention to those areas where caulking had failed and screws weren't holding. Luckily most of the core was in good shape. I made a call that there was not enough compromised core area to worry about. Stopping water getting in will greatly reduce core degradation rate and it might not need replacing for a very long time. So we drilled out screw holes to be much oversize, injected thickened epoxy into them then re-laid the teak using sikaflex. After putting all the screws back we loaded up the deck area with lots of weight for a few days to effectively 'clamp' the teak to the deck while the sika cured. Then it was recaulking and light sanding to finish.
 
Last edited:
Yup... stopping water ingress will buy time to assess.

The clue as to how much water is moving through the decks is the tea-colored stain... tea colored stains are numerous.

So stopping ingress is a must. Then decide if the only long term solution is to go nuclear with full remove and cap.

Not lost in this process is that there is already water in there... and a soft spot.

If you successfully stop new water from geting in - do you just shrug about the water that is already in there - melting the wood into mush?

How about this as a solution for the soft spot without removal of the teak...drill in 3/8 diameter holes every few inches in the damaged area and pump in something like urethane caulk that has some structural capacity - then plug the holes??? It seems that if you have to get to the core for the repair your decision is made - you are removing the teak decking to get to the core and not likely replacing with teak.

Anyway - step one seems obvious... cut out and re-caulk where obviously seperated... and go after the other ingress points such as the deck drain, tank fills, ladder mounts...

Must stabilize to the point of not cringing as the forecast calls for rain.

Carl


Greetings,
Mr. CLA. Somehow, just by the tone of your question, I suspect you do NOT want to address your deck leaks like Mr. OCD.

Having had 2 vessels thus far, one with the original teak, leaks and all and the current which has had the teak decking removed with no leaks at all, I would still prefer the former. Teak, in good condition, is the ultimate deck material IMO. Keep the ones you have as long as possible. They actually don't look too bad at all.
 
These are all I used when I re-caulked the fly bridge deck and part of the walk around deck.
 

Attachments

  • IMG_7723.jpg
    IMG_7723.jpg
    149.4 KB · Views: 250
Replacing the goop between teak pieces will usually not stop a leak.

The deck fastenings of the teak overlay to the boat and the many items like deck boxes , ladders and cleats are frequently the source.
 
Greetings,
Mr. CLA. There are at least two schools of thought on this situation. One, rip all the teak off and rebuild. Another is address the caulk and leaks (As Mr. FF points out you will NOT be able to find them all) as best you can and live with what you've got.
Yes, the water that's already in there is not going to go away and will probably continue to eat away at the subdeck BUT if you can live with the sponginess best to leave it until such time you're prepared to do it "right".
I really don't think injecting any caulk through 3/8" holes is going to do very much and may cause problems down the road when re-build is undertaken. Extra pointless work IMO.
Tough call in any case...
 
I second FF comments:
Replacing the goop between teak pieces will usually not stop a leak.

The deck fastenings of the teak overlay to the boat and the many items like deck boxes , ladders and cleats are frequently the source.
 
I just finished re-caulking the raised forward deck. The base seemed ok & solid. The forward deck & side decks are going to receive a painting of deck paint from HD. Not the ideal solution. It's what I'm going to do. Later, the teak is coming off. It is thin after, what I guess is many sandings from PO's.

As for tools for the re-caulking, I used a Fein, grout diamond tipped cutters (a hand held tool) and best of all, a small counter edging router. The router with the right bit, makes fast straight grout lines.
 
There were some soft void spots. I vacuum dried the area and then injected west system epoxy to fill the void. Soft wood absorbs epoxy. Two holes are required on to inject and one for the air epoxy to come out of. Also I inject epoxy first before the calking, the calking is mostly for show. If screw holes are stripped fill them with epoxy. However its still a yearly project.

In the winter the front desk is covered with a 20 x 24 heavy white tarp. The support is 1 inch pbc plastic pipe, held down by bungee cords. Keeps rain and snow of the deck and boat, plus a dry storage area and project area during the winter. You can find and fix all leaks if you look and know the signs.
 
Last edited:
On it... went after the water tank deck fills, deck drain, and the base of the ladder this weekend...

The ply core around the water tank deck fill was fully rotted - went back in with a bit of JB Waterweld putty around the hole just to close the gap. Not pretty in there.

Still, on the road to recovery.


Replacing the goop between teak pieces will usually not stop a leak.

The deck fastenings of the teak overlay to the boat and the many items like deck boxes , ladders and cleats are frequently the source.
 

Attachments

  • 2016-05-14 16.39.44.jpg
    2016-05-14 16.39.44.jpg
    81.2 KB · Views: 209
  • 2016-05-15 07.56.27.jpg
    2016-05-15 07.56.27.jpg
    142.1 KB · Views: 201
  • 2016-05-28 11.03.33.jpg
    2016-05-28 11.03.33.jpg
    139.5 KB · Views: 197
And went up front to start on deck-triage...

Decided to sand ahead of removing obviously bad caulking... There were two types of caulk in the seems leading me to believe the deck had been serviced in the past - plus - when I pulled the "silicone" product that had failed - there was the little bond-breaker strip of paper in the bottom.

It took a lot of sanding with an orbital Skil sander to make the surface flat... Used 60-grit for the first go-round... sadly - some of the worn areas were so deep it made no sense to chase it all the way to the bottom for perfectly flat re-sand.

I purchased a case of Teak Decking System 440 caulk in black and a half case in white. Considering the caulking alternatives - that were half the price - it "seemed" there was no better alternative.

Upon very close inspection - most of the seams appear to be in good shape. Happy about that.

The idea is that mass sanding with the 40-60 grit to knock down the wood back to truly flat then caulk without taping the edges, then go back across with a 120-grit to provide the smooth finish and clean off the excess caulking. We shall see if that plan will hold.

At the rate of productivity experienced - just the foredeck sanding only - four hours... redoing the 34-foot boat would take six full working days... that would be equivalent of a month of Sundays at my availability...

Hope it doesn't rain in LA for couple of months.

And... for a few hours - the scent of teak made me have visions of being in a wooden ship boat yard... that was a real plus.
 

Attachments

  • 2016-05-28 17.06.55.jpg
    2016-05-28 17.06.55.jpg
    85.3 KB · Views: 222
  • 2016-05-28 14.10.25.jpg
    2016-05-28 14.10.25.jpg
    163.8 KB · Views: 226
Alrighty,

Where is the Advil? Need it for all the work dealing with these decks... lots of labor grinding and caulking.

Sanded the side decks which are under the shade of the europa overhangs... wood seemed "harder"... sander labored to cut the worn wood.

Started the recaulk on the foredeck. On the starboard side I did the fill and tool flat as recommended by the TDS instructions... recognizing that cutting all that smeared caulk would be a lot of work, on the port side I just filled the seam with caulk without the smear - assuming it will be easier to sand away the excess caulk with the 120-grit.

I reiterate, condition of the teak and old caulk is generally good. Happy about that.
 

Attachments

  • 2016-05-30 15.02.22.jpg
    2016-05-30 15.02.22.jpg
    157.6 KB · Views: 99
Last edited:
Sorry about your leaks but that teak sure is pretty!
 
I had some small areas re-bedded recently. The Shipwright put masking tape on the teak before caulking and smearing. Then he sanded the tape off, with any raised caulking. He feels its the best way, but each to his own method.
 
The sanding looks good but you probably just ground off, oh, 5 years of your deck's life.

Once you get the decks more or less remediated, wet the decks and watch how they dry - the areas that leak will stay wet a lot longer than the rest, mark the leaking area with masking tape.

Taiwanese trawlers were made in many yards and a famous trick was to drill the hole for the screw and not install it, just glue in the bung. The screws would be sold in the market. If you plan to keep your decks, you might also need to pop out the bungs to fill those holes with a screw or epoxy. Another favourite trick was to use any old scrap wood, packing cases, pallets as the "structure" under the Fiberglas. This stuff turns to mush as soon as it's wet and so you should investigate wet areas in case you have this stuff in there, epoxy will not give it sufficient structural strength.

Check inside the boat for discoloured panelling, signs of a leak. If you have any it's a sign that the structural wood is saturated and a serious source of mold. For your own longevity you need to address this.
 
Forgot to add, "good luck!"

On my teak decks I masked all the seams I wished to repair, caulked, pulled the tape when cured, cut the top of the caulk by sliding a hard-backed razor blade along the caulk so I would not need to sand and make the wood thinner.
 
Last edited:
You see, once the water is in the core, slamming the door behind it won't stop the rot. Because it won't dry out. And, if you can FEEL it it's bad. The rot is usually spread well beyond that. The good news is that it won't sink the boat, so as long as you don't get potholes in the deck to trip over and the cabin is dry......
 
Sorry about your leaks but that teak sure is pretty!

Thanks a bunch - I like it tan like this and when it is that silver/gray too... as soon as its sealed I'm pouring gallons of sea water on it to start the transition.

Carl
 
I had some small areas re-bedded recently. The Shipwright put masking tape on the teak before caulking and smearing. Then he sanded the tape off, with any raised caulking. He feels its the best way, but each to his own method.


Yep... after smearing that first side I decided to back off and not put so much on the rest of the board.

Removing tape is fine as addressed in the next post about removing wood...

Carl
 
The sanding looks good but you probably just ground off, oh, 5 years of your deck's life.

Bummer - but I read a post from several years ago from Boatsmith - and there was something in there that noted that uneven teak surfaces harbor dirt and dust - and I thought that made sense - and as I am anti-dirt in the wrong place - like my teak decking - out came the sander.

At the rate of degradation over the thirty years of the boats life - I bet you're right - about five years came off through sanding...

Carl
 
Thanks again XS...

Sad, sad, sad...


Taiwanese trawlers were made in many yards and a famous trick was to drill the hole for the screw and not install it, just glue in the bung. The screws would be sold in the market. If you plan to keep your decks, you might also need to pop out the bungs to fill those holes with a screw or epoxy. Another favourite trick was to use any old scrap wood, packing cases, pallets as the "structure" under the Fiberglas. This stuff turns to mush as soon as it's wet and so you should investigate wet areas in case you have this stuff in there, epoxy will not give it sufficient structural strength.

Check inside the boat for discoloured panelling, signs of a leak. If you have any it's a sign that the structural wood is saturated and a serious source of mold. For your own longevity you need to address this.


Such wonderful, useful, affordable, and good looking vessels have a time-bomb built into them. Thankfully the problem is not fatal... imagine how much marketplace money would have been lost over the years if these soft deck problems were terminal.

While I was boat shopping back in January I looked at an Endeavour catamaran down in San Diego... and I could not help but notice the quality of the fiberglass layup when peering into one of the foredeck lockers... perfectly smooth woven mat. Loved it. The Fu Hwa? Not so much.

Anyway - yep, I have two major soft spots. When I did the re-bed of the starboard water tank fill the core was mushed and wet - all I could do was to pack a little epoxy putty in there to hold it together until some other solution comes along.

Its a bit of a paradox... the only structural contribution without the core is a mere quarter inch of fiberglass and the teak decking strips - and if you remove the teak decking strips - you are forced to go all the way in and replace the core - to replace the strength lost when you pull the teak decking.

Signs of leaks????? Ha!!!!! Got caught in a big storm on one of the first overnight stays on the boat... Water water everywhere...

Hence the mission to stop the leaks now. Thankfully it stays dry in LA for a few months giving me time to attack these issues.

Carl
 

Attachments

  • 2016-03-07 06.58.31.jpg
    2016-03-07 06.58.31.jpg
    138.9 KB · Views: 103
  • 2016-03-07 02.41.40 - Copy.jpg
    2016-03-07 02.41.40 - Copy.jpg
    86.9 KB · Views: 96
  • 2016-03-07 02.38.26.jpg
    2016-03-07 02.38.26.jpg
    127.2 KB · Views: 97
  • 2016-03-07 02.34.22.jpg
    2016-03-07 02.34.22.jpg
    195.7 KB · Views: 103
Back
Top Bottom