Perkins multicooler project

The friendliest place on the web for anyone who enjoys boating.
If you have answers, please help by responding to the unanswered posts.

Duvie

Senior Member
Joined
Nov 5, 2011
Messages
341
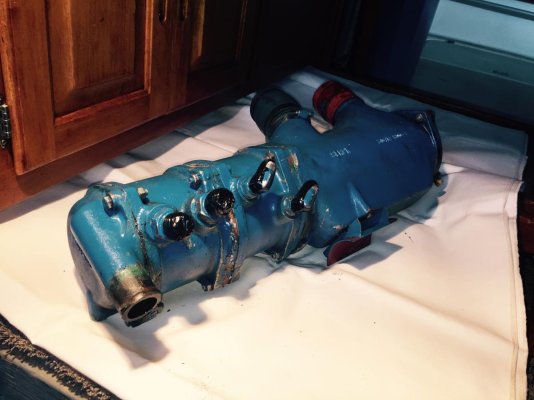
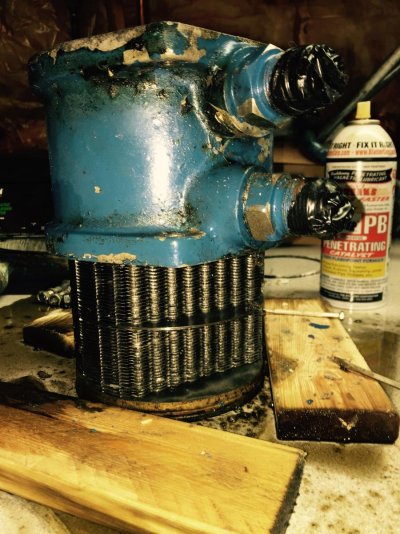
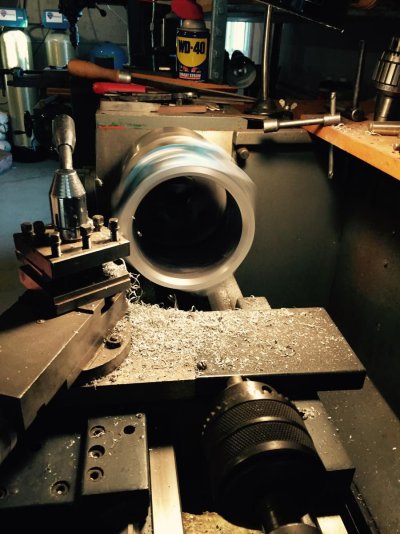
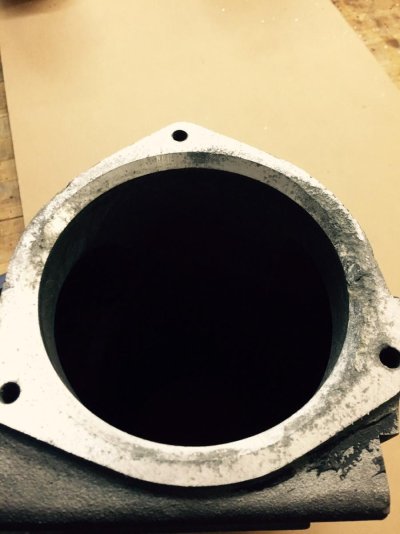
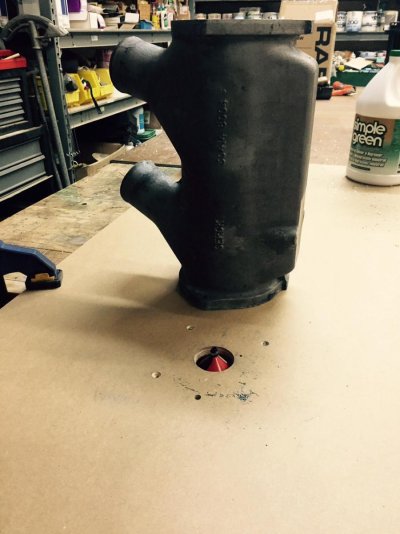
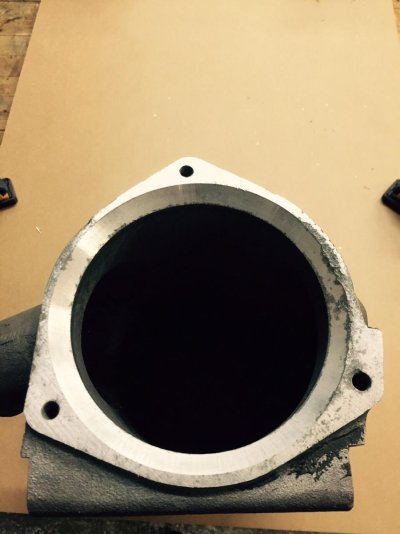
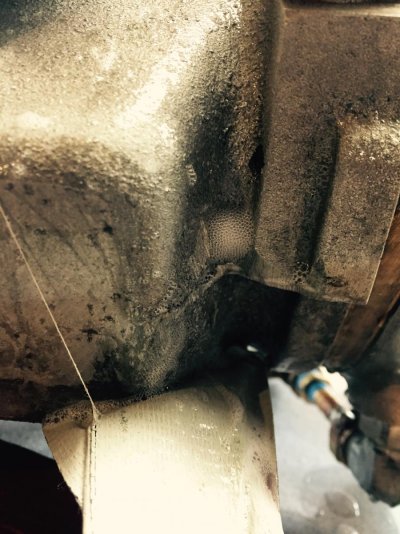
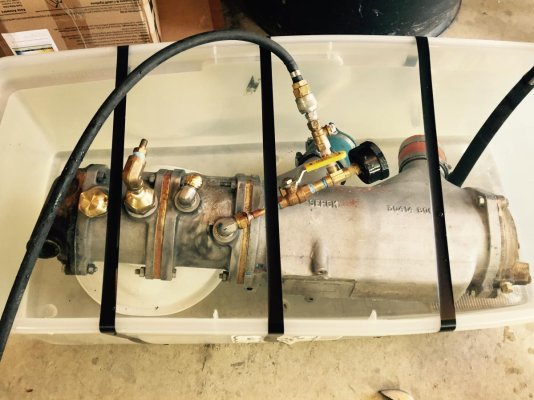
One of my boat projects this Winter is to go through the multicoolers and manicoolers on my twin Perkins ST6.3544M. Pulled the multicolor off the starboard engine a few weeks back. You could see where there were some crystals forming at the seems where the different sections bolted together. A sign that the o-ring seals were failing and letting some seawater out. Each section had to be soaked with PB blaster for about a week before the tubes stacks could be pushed out without damage. I noted after disassembly that one side of each section had corrosion issues at the o-ring seal face that had been "repaired" by the previous owner with something like JB weld. I decided to take the transmission section next door to my father. He chucked it up in his lathe and took about 100 thousandths off the o-ring sealing face. The same amount had to be removed from the flat face to keep all the relationships the same. Since we shortened the shell by .100 inch I had to do the same to the tube stack. I did this with 100 grit wet and dry sandpaper glued to a flat surface and ground some off each end of the tube stack by hand. This only took about 5 minutes and avoided any damage to the tube stack. I am very happy with the results and everything should go back together like new when completed. The aftercooler section will take a little more work to set up in the lathe because it will need additional support due to it's lenght. No "before" pictures attached as they really didn't show the corrosion issue.
 

Attachments

  • IMG_2653.jpg
    IMG_2653.jpg
    98.7 KB · Views: 317
  • IMG_2673.jpg
    IMG_2673.jpg
    177.9 KB · Views: 253
  • IMG_2719.jpg
    IMG_2719.jpg
    139.2 KB · Views: 260
  • IMG_2736.jpg
    IMG_2736.jpg
    152.3 KB · Views: 247
Nice work! You should get some more years out of that. When we used to fool around with British sports cars, we used to say "give an Englishman a piece of metal and a hammer, he will do something stupid with it." The guys who invented the manicooler, sorta like that. Make a really complex metal thing then immerse it in water...
 
what kind of metal is that, and how did you get it so clean?
 
Good job Duvie. Doing things the right way on those old Perkins will pay great dividends.
 
Aluminum

R_P_Ryan the shell is made of aluminum. End faces were machined and the outer shell was scraped and wire brushed.
 
WOW !!, a beaut
have you ever used KANO Kroil? when i had a real job i got it by the gallon and mixed it 50/50 w/ ATF in an oil can. I use PB more often now that i have more time than $$ and hoard my kroil for the tuffest jobs. i currently am annointing two seacocks to heads flushers that are seized and hoping the corrosion is on the shaft not the ball
 
Nice job. I think your timely PM is going to save you big time money down the road. I think the theory was that there should be clearance between the aluminum housing and the cu-ni tube stack so no galvanic corrosion takes place. That distance is maintained by the fat Oring at each end which, sliding down the chamfers on the housings, centers the stack, and keeps it away from hard contact with the aluminum. Is there clearance on yours, you mentioned trouble getting them apart?
 
If it's not already to late then take a look at a very heavy grease called
Alco Metalube

Coat the seal area that the O rings seat against and the O rings themselves. This is a very similar application to the strong recommendation of Tony Athens, of Seaboard Marine.
He uses it on the Cummins aftercoolers for similar corrosion prevention, bronze and aluminum.

Aftercooler Maintenance - Cummins

As he points out there are other greases that can be used. This is just the best he has found.
 
I ordered seals for my Perkins/Bowman air charge cooler from a marine supply and they were the wrong thickness. From looking at your assembly it's a similar dimension as mine. I got the correct O-ring from McMaster-Carr for about $2, slathered it in plumber's PTFE paste and set it. So far it's been good, at least a couple of sea trails since anyway.
Here's the link to the o-rings: http://www.mcmaster.com/#9452k407/=10gyl5i
 
Last edited:
Lots of good information

I will have to try Kroil to get the 2nd multicooler apart and I will use the Alco metal lube during assembly. After the shell and tube stack are cleaned up the fit is still pretty tight. These parts will touch at some point along their length.

R_p_Ryan the Perkins o-rings that were spares on the boat were 1/8th and it looks like that was the size that came out of the assembly. I bought 1/8th at Mcmaster Carr but I was thinking of going up in size after "dry" fitting the assembly.
 
I After the shell and tube stack are cleaned up the fit is still pretty tight. These parts will touch at some point along their length.

Would you consider, since you have access to machine shop, opening up the housings .030-.040 to make sure the stacks don't touch the aluminum, maybe even adding a plastic/Viton spacer to be sure it stays centered?
The grease is a good idea but will soon be washed away on this application at least where the hot fluids are in contact with it.
 
Machining the after cooler

The after cooler was too big for the lathe to swing so I had to come up with another way to machine the bevel the o ring sits in. After much thinking I came up with the idea to use a router with a 45 degree chamfer bit. Before I committed to this I looked around on line and it seemed like a doable method. I mounted the router under a piece of plywood and machined the face using about 7 passes. I took a picture after two passes and took a picture after the last pass. It could probably use a few more passes but you can only take so much and have the tube stack still work. The next step is to put the piece on the milling machine and take off about 125 thousandths off the flat surface to get the surface relationships back in order. It was a scary idea but worked out very well and was super easy.
 

Attachments

  • image.jpg
    image.jpg
    81 KB · Views: 100
More pictures

I could only get one picture to load
 

Attachments

  • image.jpg
    image.jpg
    106.6 KB · Views: 97
One more picture. Last pass

This is a picture of the last pass
 

Attachments

  • image.jpg
    image.jpg
    76.9 KB · Views: 96
With a little??? ingenuity one can accomplish a lot.

Good idea with the router. I've done that with alum. before but not on a cooler.

Nicely done.

When you reassemble give the whole interface area, O ring, tube stack, housing a heavy coating of ALco Metalube.

After reading about it many times from Tony Athens, Seaboard Marine, I bought some from him. Use it now all the time. It is a very heavy bodied, highly water resistant grease and if your cooler is serviced every few years you likely will stop any further corrosion problems.
 
Last edited:
oil tube adapters on multicooler

I want to replace the seals where the fittings for the oil lines screw into the multicolor housings. I am not sure if they are a washer with an o-ring or if they are a bonded washer. There current rubber portion is hard and stuck to the washer and it is hard to tell which it is.
 

Attachments

  • IMG_2793.jpg
    IMG_2793.jpg
    80 KB · Views: 85
Should be able to get those at McMaster too. I would consider using a dab of Hylomar on the threads.
 
Figured our sealing arrangement

I had a similar new fitting in the shop. Just smaller. It has a washer and an o-ring. I had the o-rings right on the shelf.
 

Attachments

  • FullSizeRender.jpg
    FullSizeRender.jpg
    72.5 KB · Views: 91
Leaks

Performed 30psi leak test on the raw water side of the multicooler and all was tight. Tested the tranny oil cooler at 60 psi and it was good too. When I pressurized the engine oil cooler I was getting a pea sized bubble out of the water side about every 30 seconds. The leak was on one of the factory joints on the end cap. I disassembled and I noted that the squish for the "o" ring was only about 10 thousandths. I installed an "O" ring backer to create a little more squish and re-assebled the assembly. This cured the leak. When I tested the aftercooler section I found a leak in the casting. Looks like it was probably a small void or contamination when they originally made the casting. You can see the grouping of bubbles in the photograph. This I am repairing with ceramic epoxy as it is not a critical problem. The water side was tested filled with water on the bench and pressurized. The other three tests were performed with the entire assembly submerged in a water bath and pressurized with air.

I wonder how many shops would leak test one of these assemblies properly as I did? The leak I found in the oil cooler section was small enough that it would probably go unnoticed but would be the beginning of the cooler failing and corroding.

It is important to note that the cooling water never touches any aluminum in the assembly except when an "O" ring seal begins to fail. The end caps and dividers are all bronze and those seal directly with the tube stack. The aluminum chamfer at the joint provides the push that seals the bronze parts together. The aluminum will only see the oil or the charge air if the seal is 100 percent. When the "O" rings start to fail it allows sea water to touch the aluminum and it will quickly start to corrode. This is why maintenance on these multicolored is so important.
 

Attachments

  • IMG_2848.jpg
    IMG_2848.jpg
    156.9 KB · Views: 96
  • IMG_2822.jpg
    IMG_2822.jpg
    124.1 KB · Views: 118
Update: reduced oil consumption!

I have put about 25 hours on the Engines since I rebuilt the multicoolers. Prior to the rebuild I was using about a quart of oil in the starboard engine every 4 or 5 hours and about 1/2 that in the port engine. In the 25 hours since the rebuild the oil level has not moved on the dip stick on either engine! Before I noticed that running the engines harder increased the oil usage significantly probably due to increased pressure and reduced viscosity and it must have been leaking by into the raw water.
 
Good news! What hp Perkins engines do you have?
 
That's great news! You do the work yourself? How bad was it? ie: tube stack/fittings/etc?
 
200 hp @ 2400 rpms Perkins

I had to machine 3 of the shells and shorten the tube stacks a few hundred thousandths as a result. Tube stacks were fine and my father and I completed all the work.
 
I'm glad you have the capability of doing that. I lost the multicooler and the manicooler on my port engine. Sent them both to Trans Atlantic Diesel. They are able to rebuild the manicooler, however I had to purchase a new multicooler. I was able to find a brand new one (possibly the last in existence) at a Marine Supply store in Suffolk England.........had it shipped here, and Trans Atlantic has completed the rebuild of my manicooler and has shipped it back to Texas for me...should arrive next week.
 
Duvie,sir you are my new hero! You found away to get a problem solved. These coolers are a nightmare ,and I have been working on keeping mine in good shape. Have also used a heavy duty waterproof grease on the aluminium parts,o rings and bundles. Service mine every two years as I sit at the dock in marathon most of the time now that we live aboard full time. Thanks for you post. The Perkin nation thanks you.
 
I have put about 25 hours on the Engines since I rebuilt the multicoolers. Prior to the rebuild I was using about a quart of oil in the starboard engine every 4 or 5 hours and about 1/2 that in the port engine. In the 25 hours since the rebuild the oil level has not moved on the dip stick on either engine! Before I noticed that running the engines harder increased the oil usage significantly probably due to increased pressure and reduced viscosity and it must have been leaking by into the raw water.

I had the same experience with my Perkins horizontal. I replaced the in-tank oil cooler with an external oil cooler. The in-tank cooler was not fully immersed in the oil when the dipstick showed full. Crazy design?
After installing a proper external cooler, my consumption, which was as high as 1 gal / 100 gal fuel if I ran hard, fell to "not measurable".
 
Ok, so now that I've spent a fortune rebuilding/purchasing new multicooler and manicooler on the port engine, what preventative procedures do you knowledgeable fold recommend for the starboard engine so I don't have to do this again?
 
Ok, so now that I've spent a fortune rebuilding/purchasing new multicooler and manicooler on the port engine, what preventative procedures do you knowledgeable fold recommend for the starboard engine so I don't have to do this again?

You must keep the copper/brass from touching the aluminum and keep the zincs fresh
 
Ok, I understand the zincs, etc. What I'm wondering is since the starboard engine has the same hours as the port engine, although shows no signs of diminished exhaust water flow, should I flush it out with something to possibly clean it out to delay a catastrophic loss as happened in the port engine?
 

Latest posts

Back
Top Bottom