DIY Canvas Tips, Tricks, Recommendations

The friendliest place on the web for anyone who enjoys boating.
If you have answers, please help by responding to the unanswered posts.
Thanks Larry- that's good to know. Well- she's out...
ImageUploadedByTrawler Forum1442813044.403647.jpg
ImageUploadedByTrawler Forum1442813061.523541.jpgImageUploadedByTrawler Forum1442813075.138829.jpg
And she spins with the driver motor and the pointy thing runs up and down- smooth as silk :).
Not sure about this....ImageUploadedByTrawler Forum1442813161.396371.jpg


Forky
1983 Present 42 Sundeck
Twin Lehman 135's
✌️
 
Steve
Take a look at the Sailrite - How to Set Up Your Machine video - thay are basically the same set up as the Singer and some of the parts are interchangeable so don't deep six your Singer when you do get a Sailrite.
 
Don that looks like the perfect place to start. Don't know if you have glanced at the transom shower thread I started- but as soon as I finish the sewing shall start- more or less?
I get 3 days to a week once or twice a month on a yard pass to the boat in Gulfport. I feel like the most blessed guy alive. Piddlin's what I do best!
Unfortunately during my layover I will have a self imposed totally unrealistic list of must do's the "next trip to the boat" :).
Then I settle into my island time, can't even find my phone~ groove and in the end, lots of Piddlin' DOES get done.
Anyway, here is the current state of my transom shower.

ImageUploadedByTrawler Forum1442889305.626690.jpg

I could have finished it today, but that wouldn't have left time for catching pin fish for bait or the three hour tour at West Marine Biloxi today- finding all of those little orange stickers and adding up in my mind the price with the additional 40% off "taken at the register" ;). Boy am I in HUGE trouble.
I gotta pull up tomorrow afternoon so it looks like next trip for sewing. Thinking I want to leave the transom shower hose off when not in use and sew me up a 4 snap cover to protect those pretty knobs!


Forky
1983 Present 42 Sundeck
Twin Lehman 135's
✌️
 
Don that looks like the perfect place to start. Don't know if you have glanced at the transom shower thread I started-
✌️

Steve
Yes I've been following that project. Looks like a nice job. I only recently put the connection to the sewing thread together!
I was one of the ones that offered a few shower options but it looks like HopCar did his magic and you ended up with a solution that was almost a duplicate of the original.
I'm sure that with your attention to detail you will do just fine with the sewing...approach it like you would do other DIY projects.
Start w a plan & consider what order to do the steps.

At least you can now shower off if the sewing gets too intense!

Good luck

Don
'08 MS 34HT
"Bacchus"
 
Ha! You're right Don about the transom shower. I forgot :).
I gotta focus here.. Transom shower, transom show....
Was that a big trout that jumped???


Forky
1983 Present 42 Sundeck
Twin Lehman 135's
✌️
 
Hi All,

Anyone have any advice on how to get a stuck needle out of the shaft? I broke a needle sewing some thick material and the shank must have got jammed up there (maybe I needed to tighten the screw more?) I tried to use some pliers to persuade the needle out and it snapped almost flush with the shaft =( I have an email in to sailrite but I figured I would ask here too.
 
Anyone have any advice on how to get a stuck needle out of the shaft?

RI
I haven't had the problem - only thing I can think of is to remove the screw holding the needle and the thread guide just above the needle - the shaft has a hole completely through it at the top of the needle - you may be able to slide... tap...? something pointed into the hole to release the broken piece.
See diagram attached

Good Luck and Let us know how you make out!
 

Attachments

  • Needle instln..pdf
    24.8 KB · Views: 23
My wife does all the canvas work on our PNW boat. She has three machines-- a smaller Pfaff that she keeps on the boat for stuff that comes up on the spot, a similar Pfaff at home and a huge commercial Brother that she bought used at a now-defunct marine consignment store in Seattle. The thing is monstrous--- the motor weighs some 80 pounds and I think the machine can probably sew two sheets of plywood together. I'm afraid to get near it.:)

She uses Tenara thread exclusively. When canvas goes, it's usually not the fabric but the thread, which then allows the canvas to flap around and tear. Tenara is resistant to just about everything on the planet except a knife. She says it's very tricky to work with, particularly getting the tension correct, but the longevity of the stuff makes it well worth the effort.
 
Last edited:
When canvas goes, it's usually not the fabric but the thread, which then allows the canvas to flap around and tear. Tenara is resistant to just about everything on the planet except a knife.

So . . . does that possibly mean that just resewing canvas with Tenara might give it a few more years? Assuming that the canvas itself is not rotten, of course.
 
She does a lot of this to preserve the oldest pieces of canvas that came wirh the boat when the seams start to go. Obviously canvas has a finite life and it will also reach the point where a seam simply can't be resewn anymore. When this happens she puts on new matwrial.
 
She does a lot of this to preserve the oldest pieces of canvas that came wirh the boat when the seams start to go. Obviously canvas has a finite life and it will also reach the point where a seam simply can't be resewn anymore. When this happens she puts on new matwrial.

OK, thanks. I think that I am going to mull over perhaps resewing with Tenra before it ever reaches the stage of the seams starting to go. A certain amount of trouble, but the old saying that "a stitch in time saves nine" may be appropriate.
 
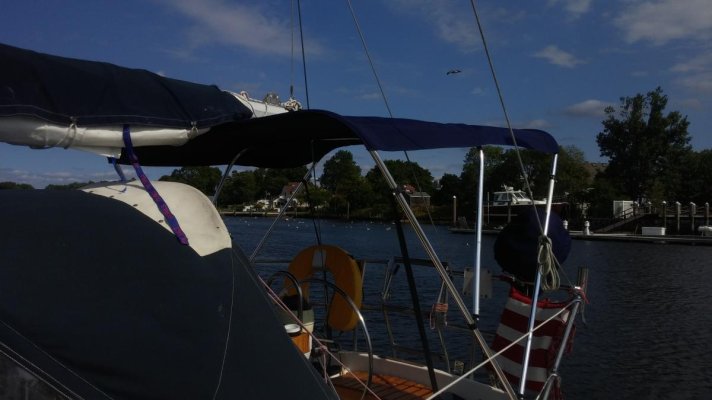
We watched a brand new Sunbrella full boat cover on a 40' Cheoy Lee sailboat completely destroy itself during its first winter. The boat shared our slip and the owner lived and worked in SoCal. We get some pretty nasty storms marching through the bay where we keep our boat with gusts that have been clocked as high as 80mph by the weather station on top of the cold storage facility in our harbor.

The problem started with a single seam that let go along less than six inches of its length. We immediately reported this to the port and they contacted the owner but he apparently didn't want to do anything about it.

The constant flapping soon tore the seam out along its entire length and as the flapping got worse more seams began to tear out. The port continued to contact the owner who continued to not want to do anything about it despite his son living in the same town as the boat.

Within about two months or so the cover was a total wreck with half of it trailing off the boat into the water. At that point the port removed the whole thing as a hazard and threw it all in a dumpster.

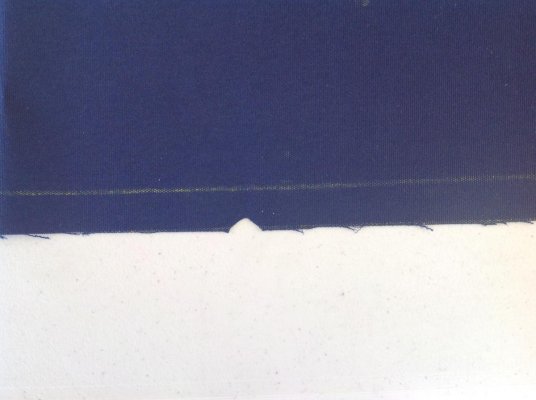
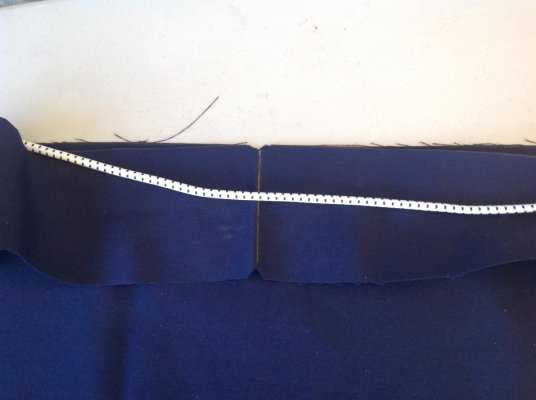
This all started with the thread letting go along a tiny section of seam.

I have no idea of the quality of the cover. It certainly looked nice when the guys who brought the boat over from its previous slip put it on. But it obviously was made with inferior materials, workmanship, or both as our ancient, two-part full flying bridge cover, which was old when we bought the boat 17 years ago, has continued to hold through winter after winter, due totally to my wife's efforts at re-sewing seams, installing patches, and so on. If it lasts this winter we'll be amazed, and my wife is already contemplating the process of making a brand new one next year.

If you can get the seams to hold, it's surprising how long the canvas itself will hold up.
 
I've studied this a little myself. A product like Sunbrella aisaffected very little by the sun go figure. It's weakness is wear from abrasion.
BTW- my recent second attempt at sealing my 10 yo Bimini was a success- this time I purchased a gallon of 303, brought the top home and used a pump up garden sprayer to apply two thorough coats on top. One on the bottom. Re sealing is suggested every few years by the manufacturer.


Forky
1983 Present 42 Sundeck
Twin Lehman 135's
✌️
 
Sunbrella care

Forky...

Attached is a sumary I put together re: Sunbrella cleaning & care... including re-treatment w/ 303. FYI I also just posted it to the Misc Library
I have spoken to the 303 tech rep and found out I was doing it all wrong!

Suspended - not laying on a surface...High temp (80's min 90's better)... in direct sunlight... light coats (2) better than soaking
After making the recommended adjustments I had MUCH BETTER results... water beading & rolling off
 

Attachments

  • Sunbrella Care - Cleaning & Retreatment.pdf
    460.8 KB · Views: 61
Sounds like I nailed it on accident Don:). I draped it across our industrial strength clothes line yes- we still have one!!
I finished my transom shower finally and added snaps on the corners. I plan on sewing a cover for my first "big" job!!ImageUploadedByTrawler Forum1443054448.963685.jpg


Forky
1983 Present 42 Sundeck
Twin Lehman 135's
✌️
 
A query about Tenra. I've mulled over the idea of resewing the existing canvas with Tenra before the current thread (three years old) weakens, and decided that I will take down one panel at a time, clean it good, resew along the existing thread, and then spray good with 303 Fabric Guard and put it back up. Should be able to do one at a time I would think, starting with the easy ones.

So, took out a second mortage on the house and now have enough money to buy a thread of Tenra. :) Went to Sailrite to order, but notice that they offer two different types, both of which cost the same. One says "Tenra lifetime thread lubricated" and the other says "Tenra thread lubricated." Seems that if they are the same price, that one would want lifetime, no? What is the difference?
 
Reply from Sailrite:

[FONT=&quot]John,[/FONT]
[FONT=&quot]We need to fix that on our website. They are one in the same thread, Tenara is a lifetime thread period. [/FONT]

[FONT=&quot]Best Regards,[/FONT]
[FONT=&quot]Eric Grant[/FONT]

[FONT=&quot]
[/FONT][FONT=&quot]
[/FONT]
[FONT=&quot]Sailrite.com [/FONT]
 
And just an FYI. Ordered the Weller 8200PKS soldering gun kit from Amazon, and it came in this morning. $31.97 from Amazon, including shipping, and has several tips. One of the tips is a cutting knife.

 
Hi All,

Anyone have any advice on how to get a stuck needle out of the shaft? I broke a needle sewing some thick material and the shank must have got jammed up there (maybe I needed to tighten the screw more?) I tried to use some pliers to persuade the needle out and it snapped almost flush with the shaft =( I have an email in to sailrite but I figured I would ask here too.

Update: Apparently the needle bar will need to be replaced. Its under warranty so they offered to either have me ship the machine back and they will fix, or ship me the bar and I can replace it. I asked if they will be sending some general directions with it =) If they do, I think that is the easier/faster option. Has anyone ever had to do this? Any insight is welcome!
 
That also reminds me =)

Here are a couple of pictures of the bimini. I was in a rush so they are not very good lol. I will get more detailed ones this weekend if its not a rain out. Stoopid Joaquin is trying to ruin one of the last weekends for us this season =(
 

Attachments

  • 0920151110.jpg
    0920151110.jpg
    46.4 KB · Views: 76
  • 0920151112.jpg
    0920151112.jpg
    78.2 KB · Views: 89
R&R of the needle bar is fairly simple, they should provide instructions for setting the new needle bar. The simple way is when the needle bar is all the way down, with the needle in the bar, the sewing hook, ( this rotates around the bobbin) should be slightly above the eye of the needle, but still in the scarf. The scarf of the needle should be on the right side with the thread guide of the needle on the left.
On my LZ1 the needle bar has a mark on it that you can see, a horizontal line, try and measure the distance prior to removal to get you started when installing the new bar.
Hope that makes sense.
 
That also reminds me =)


Here are a couple of pictures of the bimini. I was in a rush so they are not very good lol. I will get more detailed ones this weekend if its not a rain out. Stoopid Joaquin is trying to ruin one of the last weekends for us this season =(


Nice work SFR!
 
Subscribed - thanks for the great ideas!
 
Hatch covers

I promised a while back to show a basic hatch cover. I got back on the boat almost a week ago and am working on the list! Damn, my lists have lists!
Anyway, it wasent raining yesterday so did some small canvas projects, one was the front Hatch cover.
Below, I picked through my scrap bag for a piece big enuff to do the front hatch, and you can see where I marked the corners. Since its square, you just need to mark the corners.

In the second picture you can see where I joined up the marks I made with a straight edge. I also layer out a 3/4 inch seam next to the original lines. I don't normally do the seam line, but did so you could maybe understand the process..
 

Attachments

  • image.jpg
    image.jpg
    61.3 KB · Views: 74
Hatch cover

Second pic
 

Attachments

  • image.jpg
    image.jpg
    65.3 KB · Views: 77
Hatch cover

Here it's cut out.
 

Attachments

  • image.jpg
    image.jpg
    52.5 KB · Views: 77
Hatch cover

Something that I do to help me keep stuff lined up, is cut a V notch. This is done by folding in half and just a little snip on the corner, now you have the middle of the project.
 

Attachments

  • image.jpg
    image.jpg
    107.4 KB · Views: 77
Hatch cover

Here you see where the gusset piece is also v notched on both sides. On this hatch my gusset was 6" by 110" , I just sewed a few pieces to get the length, no sense wasting the material, it is after all a Hatch cover.
 

Attachments

  • image.jpg
    image.jpg
    89.5 KB · Views: 69

Latest posts

Back
Top Bottom