Removing solar panels on Greenline 39?

The friendliest place on the web for anyone who enjoys boating.
If you have answers, please help by responding to the unanswered posts.

C. Monaghan

Member
Joined
Sep 19, 2022
Messages
19
Vessel Name
Electra
Vessel Make
2019 Greenline 39, #40
Our 2019 Greenline 39 has a leak coming from the roof which is destroying the beautiful cabinetry on the starboard side of the boat. We’ve resealed everything on the starboard side except beneath the solar panels. Rainwater has been getting inside and running down the inside of the pillar aft of the helm door and runs onto the fiberglass pan behind the cabinetry. The base of the wood, where it meets the pan near the hull side, is so wet that I can stick my finger right through it. We are repairing the cabinetry but that won’t do much good without stopping the leak.

Has anyone removed the solar panels? We don’t see any fasteners, so not sure how they are attached.
 
I had the 6 solar panels on my GL33 removed and replaced with higher output panels. I had SVP Yachts factory people come from Slovenia to do the job for me in Sweden. It was apparent that the ONLY way to get these panels off is to tape heavy paper or cardboard all the way around the panel and then take a sledge hammer to it. They shatter into a million bits like safety glass. Once this is done, then it's possible to roll up the remains with the paper trapping the bits. It was a nasty job and I'm glad I was not the one doing the work. I will look to see if I have any pictures to post.
But - I am quite amazed that you can't stop the leak from below. At least on my GL33, there was only ONE hole under each panel for the wire to come inside the cabin. I made the workers water test for leaks when they were finished and everything was -- and still is -- good. Have you tried to caulk under the wire that comes through the roof from the offending panel?


If you've caulked around the wire, then I find myself wondering if it could be a structural joint nearby that's the source of the ingress???
 
Apologies. Now that I found the picture, I see that they covered the ENTIRE PANEL in masking tape before taking the sledge hammer to it.
CLICK ON PHOTO TO ENLARGE.
 

Attachments

  • IMG_0567.jpg
    IMG_0567.jpg
    123.2 KB · Views: 47
Removing interior ceiling panels??

How do you remove the interior ceiling panels? Again, no visible fasteners. And how do you re-install them?
 
If it's like on my GL33 -- and I strongly believe it is -- the panels are held up by industrial-strength Velcro.

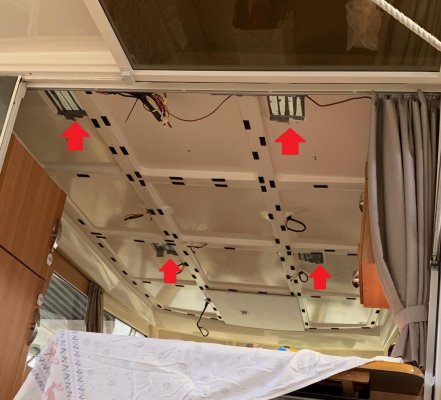
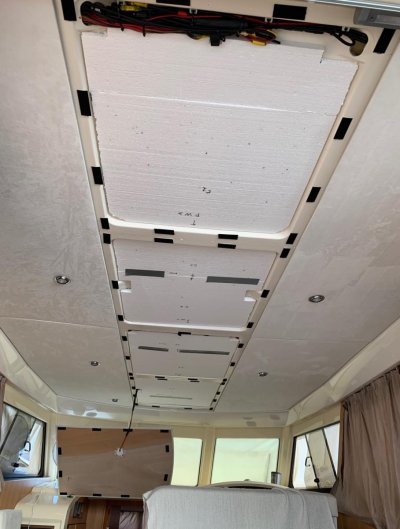
To remove them, wear some disposable vinyl gloves so you don't get dirt on the white material, then find an exposed end where you can get a grip to pull down. Most likely this will be all the way aft where the entry door is. At the corner of one of the panels, pull down gently, but firmly, until it gives way. Continue to work your way around the panel. Each panel will probably have 6-8 Velcro attachments. If some panels have overhead lights in them, you will need to take care to disconnect or cut the wires. Mark the light wires with tape, if necessary, to ensure correct re-connection/polarity. I used crimp plugs when re-installing the lighting wires. Also, make sure you have the solar charging entirely shut down before you disconnect the power wires for the solar panels. Take great care to get the polarity correct again, when reconnecting them by marking the wires with tape, if necessary. It may disrupt your statistics and battery charge status when you do this, but after a couple of charge sessions/days they should sort themselves out again. At least this is how it was in my case.

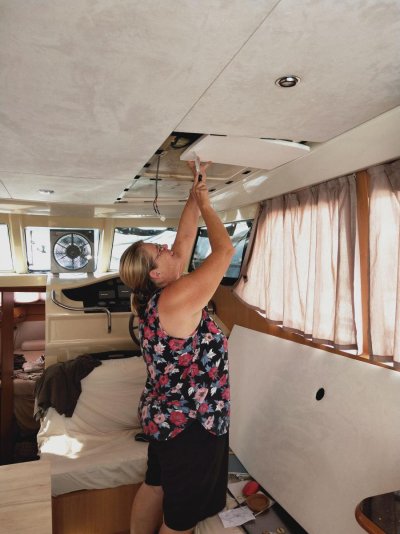
The greater challenge is re-installing the panels with the exact correct alignment. For re-installation, I would recommend starting on the interior of the boat and working your way aft, because I think there are some millimeters of space there to absorb any variance in position. If you start aft and work forward, you may find you will have to remove everything and do it again if there's not enough room to seat the panel against a non-removed panel. Hope this makes some sense! Finally, when you press a panel up to lock the Velcro in place, once you think it has seated, press again hard -- even hitting it with the side of your fist. You will likely find it will seat one step further.
 
Last edited:
I found a picture. And it reminds me that at least on the GL33, the holes are larger than just for a wire to pass. The holes are square and accommodate the panel control/wire box. Look at the red arrows in the picture. Click on the picture to enlarge.

Also, while you have the panels down, consider installing some adhesive-backed insulation in the recesses. I wish I had done this at the time, now that I am cruising in the Mediterranean climate. The heat is a BIG challenge for us, even with air conditioning. And a major source of the unwanted heat in the cabin is from the ceiling -- in the mid to late afternoon.

We will arrive at our boat in about a week's time to continue our travels this year and if all critical things are in order and I have no other time-consuming surprises, I may take a day to do a ceiling insulation project.
 

Attachments

  • Ceiling.jpg
    Ceiling.jpg
    125.2 KB · Views: 32
Last edited:
Ceiling insulation

From memory, we used 30mm polystyrene foam. The more you move forward, the less room there is. Definitely made a difference.
 

Attachments

  • IMG20190729161500.jpg
    IMG20190729161500.jpg
    120 KB · Views: 26
From memory, we used 30mm polystyrene foam. The more you move forward, the less room there is. Definitely made a difference.

You just used the foam boards or did you use the silver backed boards?
 
From memory, we used 30mm polystyrene foam. The more you move forward, the less room there is. Definitely made a difference.


Thank you, Marty! Great to know that it makes a difference. It gives me a lot more incentive to just do it! How did you fasten the panels to the ceiling? I'm not sure just any kind of adhesive will stand up to the heat ???
 
You may want to consider blowing in cellulose insulation. It's more effective and 1000 times easier. The hardest part will be going to the store to rent the blower.
 
You may want to consider blowing in cellulose insulation. It's more effective and 1000 times easier. The hardest part will be going to the store to rent the blower.

The hardest part might be cleaning up after you have to pull down a ceiling panel the next time.
 
True......but it's easy to clean up, and how often do you take down a ceiling panel ?

TEASE: why not fill the overhead with those plastic peanuts. That will give a real challenge to clean up.

Maybe if you put the cellulose in bags, install the bags in the overhead?

I still think the best way is the insulating boards.
 
I'm hoping to find adhesive backed foam or similar that has good insulating properties. I have to surf the internet tonight to look for options. It needs to be something I can hope to buy in Malta, as I can't schlepp it from Sweden to Malta later this week...
 
TEASE: why not fill the overhead with those plastic peanuts. That will give a real challenge to clean up.

Maybe if you put the cellulose in bags, install the bags in the overhead?

I still think the best way is the insulating boards.

The advantage to cellulose is that you don't have to remove all the panels, and it will fill every nook and cranny. It is also greener than styrofoam, which a Greenline owner might appreciate.
 
The advantage to cellulose is that you don't have to remove all the panels, and it will fill every nook and cranny. It is also greener than styrofoam, which a Greenline owner might appreciate.


Unfortunately, it would not be possible for the insulation to flow from one section to the next with the ceiling panels in place -- at least on the GL33
 
Foam Insulation

Thank you, Marty! Great to know that it makes a difference. It gives me a lot more incentive to just do it! How did you fasten the panels to the ceiling? I'm not sure just any kind of adhesive will stand up to the heat ???

From memory it was a building supply store in Izola and we paid (not much) for a pack of 10 x 30mm x 1000mm polystyrene foam panels that were pretty hard to balance on the bicycle going home.

Cut holes as appropriate to make room for the wiring for the lights and use masking tape to hold it in place while you get the ceiling panel back up. Originally we used some sikaflex and some tape to hold it in place while the sika dried however we've now seen that the sika ate thru the foam.

Now we just use the masking tape to hold it while we fit the panels.
 
I finally bit the bullet and did it. It was a one-day project. Tedious. The insulation has not been in place long enough -- and the weather not hot enough -- for me to evaluate the results yet.

I found 20mm thick "styrofoam" building insulation to fit best for most of the spaces. Easy to trim and cut to shape. For the rest (the extreme forward portion) I used 8mm thick styrofoam insulation (actually, they were some sort of "decor" panels). 10mm might work, if available. I used small squares of Gorilla double-sided tape to hold the panels to the roof. The Gorilla tape, surprisingly, has an in-use rating of nearly 250 degrees (F).


CLICK ON PICTURES TO ENLARGE
 

Attachments

  • GL33_Insulation1.jpg
    GL33_Insulation1.jpg
    127.4 KB · Views: 17
  • GL33_Insulation2.jpg
    GL33_Insulation2.jpg
    110.8 KB · Views: 13
  • GL33_Insulation3.jpg
    GL33_Insulation3.jpg
    104.1 KB · Views: 17
A preliminary report back on the effectiveness of the ceiling insulation installation on my GL33...
It's only been a little over a week, but it seems that it is making a significant difference. Before, on a sunny 30-33 degree C day, the best we could hope for was to slow the inevitable increase of the inside temperature. Our "best" strategy was to get the boat uncomfortably cool inside early in the day, but it could still get up to 29 degrees inside even with the A/C on.

Now, on a sunny 30-33 degree C day, we can turn the A/C on when the inside has reached 30 degrees and the temperature will come down to 23! We have not yet encountered a day the A/C can't keep us comfortable inside. Eventually, we will discover the point at which, even with insulation, the A/C will struggle to keep us at least below 26. My guess is that this will be when the outside temp is 37+.

Blocking the sun from entering the windows is critical. In both examples cited above, the boat was berthed pointing due east, with the front exterior window cover on (100% opaque beige). Eventually, we will be berthed in hot weather with the sun hitting mega-amount of glass on the sides of the boat. Then we shall see. We will be trying new outside window covers (50% opaque beige weave) that we had made while in Malta. These still allow good visibility and will hopefully block a sufficient amount of sun from getting inside. Before, curtains alone did not do the job, as the heat was coming in. Now we hope to prevent the heat from coming in.

For reference, we have a single 16,000 BTU Dometic A/C system with an outlet in the forward cabin and an outlet in the main cabin
 
Last edited:
Window shade

See links from Amazon for a 10m roll of the same stuff your car windscreen shade is made from + the suction cups. 10m was enough for the entire boat which we did just before winter last year. Pulled the front ones out a couple of days ago here in Strasbourg.

The sides (and around the back as well) is a custom made by Belinda using 70% shade from Bunnings in Australia.Stiil get the breeze down the back and it makes a dramatic difference in keeping the glass cool.

https://photos.app.goo.gl/NmYRHZTA4fKKtMFG8


https://www.amazon.de/dp/B098DKMM92?psc=1&ref=ppx_yo2ov_dt_b_product_details

https://www.amazon.de/gp/product/B082Y1ZNVJ/ref=ppx_yo_dt_b_asin_title_o02_s00?ie=UTF8&psc=1
 
Back
Top Bottom