Classic Mainship 34' Cockpit Deck Repair

The friendliest place on the web for anyone who enjoys boating.
If you have answers, please help by responding to the unanswered posts.

Gdavid

Guru
Joined
Jan 4, 2016
Messages
1,384
Location
US
Vessel Name
Graceland
Vessel Make
Mainship 34 MK1
I try to tackle at least one significant repair or upgrade to my old boat each spring, hopefully this will keep it in a safe and enjoyable condition without burning myself out by ripping too much apart at once.

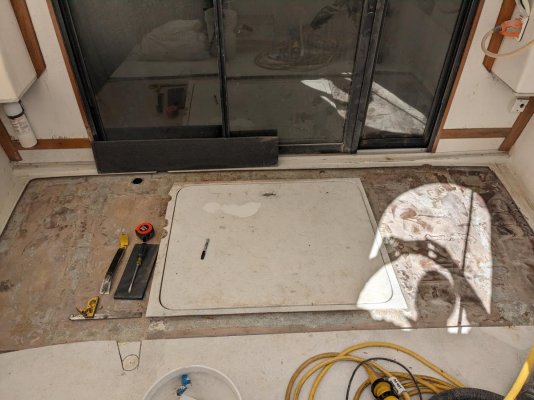
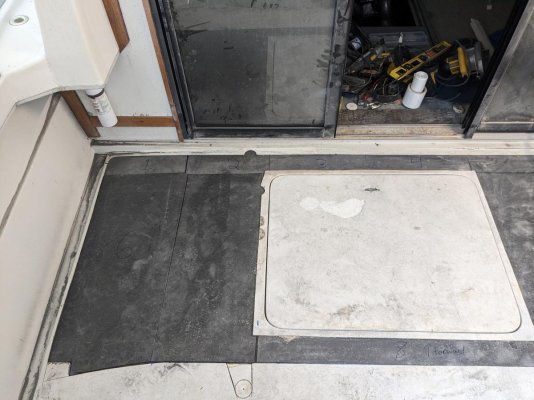
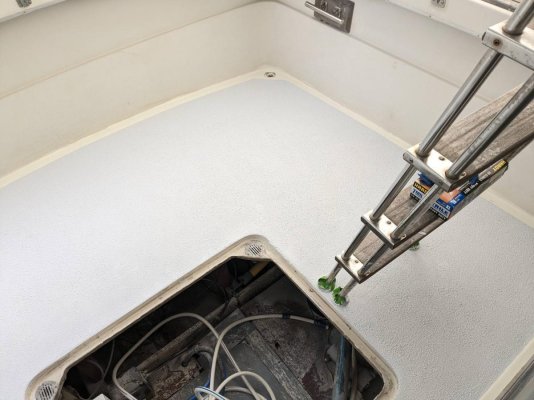
This spring's project is re-coring the cockpit deck. It had a couple of soft spots and I suspected the damage to be a bit more widespread than the symptoms revealed, but it still exceeded my expectations.

I could feel a soft spot on the port side at the base of the ladder to the fly bridge, pretty typical of poorly bedded hardware. There was also a lot of flex and creaking between the hatch and the sliding door to the salon. The starboard side felt firm but there was "tea" seeping up through a crack in the gelcoat. A halfhearted attempt to repair the gelcoat and hide the condition for the rest of the season failed, and it just came right through.

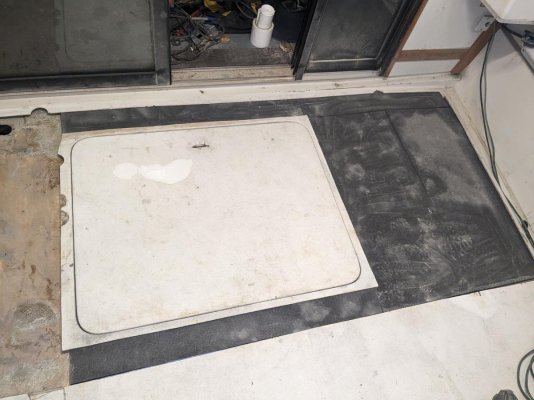
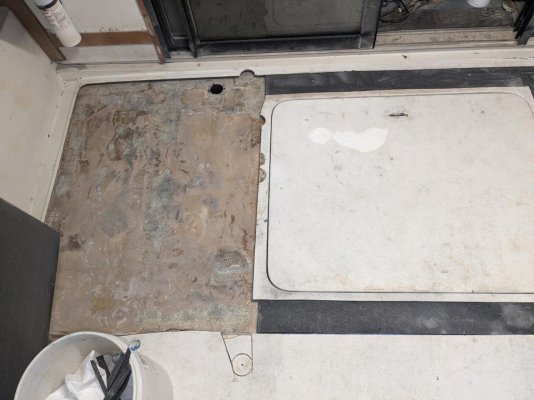
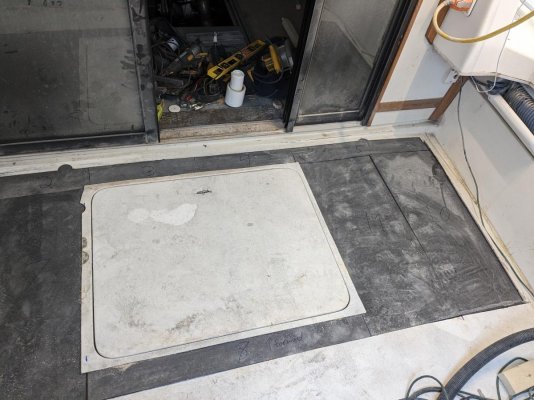
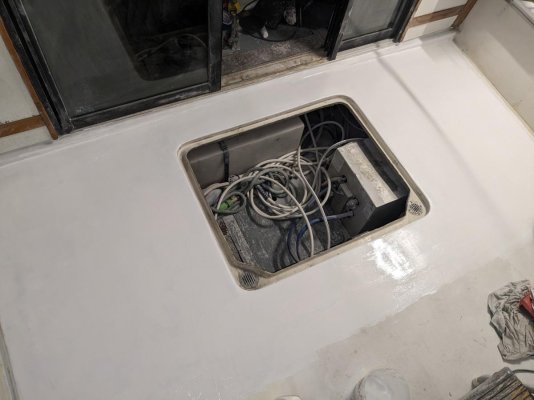
I have the coring all removed now, I left a 1" lip all the way at und and will section the panels to slide into the recesses. I will be using coosa board for the new coring.

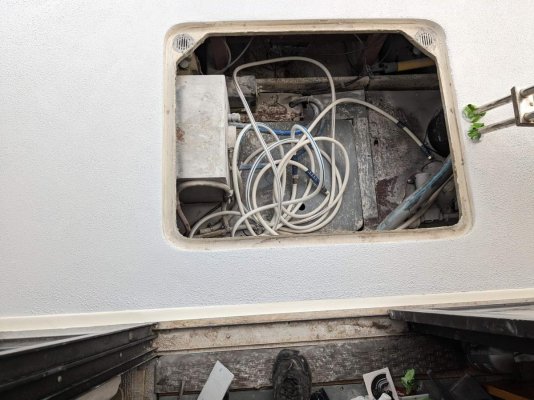
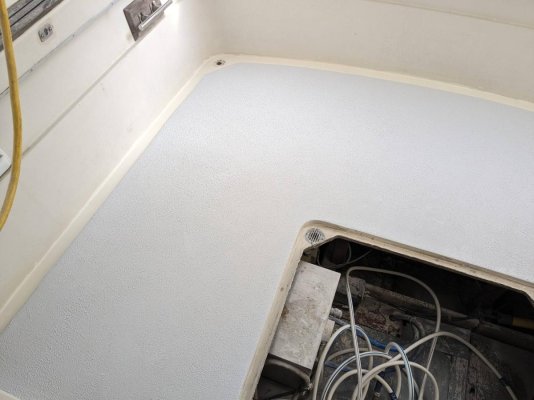
It appears that the deck has been recorded at least twice, there is sections of foam coring material in some places, 3/4" in the majority of the deck and most oddly the last 1.5" of the deck, all the way across has been replaced with a solid white 3/4" material, possible expanded pvc and glassed over, refinishing the entire cockpit to match. The bottom section of fiberglass has been removed in this area and the white board is visible from below. Additional supports were added to the stringers and it feels very solid. I am surprised how well the fiberglass adhered to it. I am leaving it in place and will just bevel the fiberglass and transition the new top laminate into it, then resurface the whole cockpit deck. Finally I will hide all of the finish imperfections under kiwigrip.
 

Attachments

  • PXL_20230322_190256314.jpg
    PXL_20230322_190256314.jpg
    138.6 KB · Views: 39
Keep posting photos and updates. You will love working with Kiwigrip.
 
We had the pleasure of repairing the salon door threshold on our 34, too. The entire thing was rotten allowing the door to sag. Mainship really goofed on that design. The door and bulkhead was 6-8" behind the structural engine room bulkhead so the entire salon bulkhead & heavy glass door/window assembly was literally hanging with no support from below. I dug out the rotted wood, thru-bolted & epoxied a new sub-threshold athwartships support, reglassed the repair and then added 2 vertical supports directly underneath, sitting on the port and starboard stringers. It was definitely as solid as any 34 had ever been when I was done with it, the vertical ,under-cockpit supports being one of the best modifications I made. The downside was the water tank butted up against the supports ,rather than being pushed all the way forward against the backside of the engine room bulkhead like it was originally. It wasn't that big of a deal, but wasted storage is wasted storage, especially on a 34' boat.
 
This boat had a similar repair under the previous owner but they didn't extend it as far aft to support the deck. They also either ignored the saturated corning and deck or the owner told them not to do the work. The previous owners spent a ridiculous amount on a number of misguided or strangely constructed repairs and mods.
 
Progress

6 of the 9 sections trimmed and dry fit.
 

Attachments

  • PXL_20230323_232816347.jpg
    PXL_20230323_232816347.jpg
    134.3 KB · Views: 19
  • PXL_20230323_232820181.jpg
    PXL_20230323_232820181.jpg
    136.3 KB · Views: 14
Are you under cover or do you need to cover up your work each day to keep everything dry? That was the piggest pita for our side decks and bridge deck projects , covering and uncovering.
You were given an extra curveball having to come behind the previous repair attempts. The part where the underside layer of glass was removed would've proved to be a real head scratcher to me , with nothing to support the new coring and no way to follow the crown of the cockpit deck.
It appears that you're leaving the water fill where it was originally? I always hated it there on ours and it was the one place where water had ingressed into the balsa coring several inches all around the hole. I dug out the rot , filled with epoxy and glassed over the hole because I wanted to use that realestate for a propane locker anyway.
I can appreciate the way you keep plucking at your projects and making a correct repair as opposed to a patch job. It's more work but when it's done, you can stand back and know that's one more improvement you can check off of your to-do list.
 
Are you under cover or do you need to cover up your work each day to keep everything dry? That was the piggest pita for our side decks and bridge deck projects , covering and uncovering.

The boat is shrink wrapped with a zippered door above the transom so keeping the work area dry as well as containing the dust has been straightforward. I need to get the work completed soon before it gets really hot working in this enclosure. Between this protection and working with a full face, integrated respirator, the logistics are greatly simplified. The boatyard enforces a restriction on open sanding/grinding, so this is the way to go.

You were given an extra curveball having to come behind the previous repair attempts.The part where the underside layer of glass was removed would've proved to be a real head scratcher to me , with nothing to support the new coring and no way to follow the crown of the cockpit deck.

I'm not going to change this, whatever synthetic board was used, it is holding up well, the fiberglass has adhered to it (which makes me wonder what it is) and I have no reason to change it out, despite not being the way I would have made the repair. I'll sand off the gelcoat above it but leave the fiberglass above it in place, bevel the forward edge and transition right into this with my top laminate.

It appears that you're leaving the water fill where it was originally? I always hated it there on ours and it was the one place where water had ingressed into the balsa coring several inches all around the hole. I dug out the rot , filled with epoxy and glassed over the hole because I wanted to use that realestate for a propane locker anyway.

I'm pretty sure I'm leaving the water deck fill right there, I could do away with it and fill it directly at the tank, just have to open the lazarette hatch for access. By going with the coosa board, I won't have any organic material to rot, I've dug all of the coring out that extended forward towards the door. If I keep the boat long enough, I would replace my fuel tanks with significantly smaller tanks and use the space for water tanks. This is a low priority plan unless I have a tank failure.

I can appreciate the way you keep plucking at your projects and making a correct repair as opposed to a patch job. It's more work but when it's done, you can stand back and know that's one more improvement you can check off of your to-do list.

I appreciate the feedback, it is nice that these boats have retained a following and you can easily find someone to discuss them with. They are a very sensible design, they were just pretty cheaply constructed. They are pretty straightforward to work on as most everything can be accessed easier than many newer designs but they will pretty much always be works in progress. My goal is to keep it in a safe and mechanically condition for my family to enjoy, sufficiently presentable that I'm not run out of the marina and sound enough to survey well so I could get sell it quickly, if I ever need to.
 
It good to see people restoring these old Mainships. They were not really cheaply constructed. the water ingress problems were mostly caused by dealers not assembling the boats properly.
They were shipped with nothing on the flybridge. Dealers assembling the seats and helm didn't use caulk, or they didn't use it properly, and the flybridges got water in them.
Bridge ladders and water fills were not properly caulked at the factory.
Same with side deck rails/stantions. And access to those were difficult, but doable from underneath.
I was lucky on that the cockpit in mine was still sound, but I had to replace most of the flybridge core, and much of both side decks.
Regardless, good on ya for rebuilding the old classic.
 
Progress

Progress continues, I finished fitting the coring section triming and fitting. I was chatting boating projects with a good friend via texts, (he is planning a mast step repair) and was lucky enough to borrow his help for a few hours while I started glassing my cockpit back together.

Work went fast and all sections are laminated to remaining fiberglass lower skin of the deck and tucked under the lip of the top layer I left in place all around the perimeter.

This pic is the dry fit. I may need to head back over and run a heater for a while unless the sun finally comes out.

I should be able to start on the top skin tomorrow.
 

Attachments

  • PXL_20230325_122607192.jpg
    PXL_20230325_122607192.jpg
    159.7 KB · Views: 17
  • PXL_20230325_122603339.jpg
    PXL_20230325_122603339.jpg
    146.9 KB · Views: 12
Slow but steady progress
 

Attachments

  • PXL_20230331_221510102.jpg
    PXL_20230331_221510102.jpg
    168 KB · Views: 13
Keep up the good work. It may take a while but it will be worth it in the end.
 
Almost done, need to gelcoat the aft end of the cockpit and apply the kiwi grip. I didn't get the perimeter gelcoat to match the cockpit walls as well as I would like, I may try again with an additional layer but overall it is a big improvement. Need to wrap it up and get this thing cleaned up and launched.
 

Attachments

  • PXL_20230411_000831797_YPkFK8Yr9D.jpg
    PXL_20230411_000831797_YPkFK8Yr9D.jpg
    90.2 KB · Views: 13
Have you used Kiwigrip before? It is pretty easy to use but a couple of tips. Make a plan on where you will start and lay the tape out with your plan in mind so you can pull each piece of tap as you go. I put a “flag” on the end of eash piece of tape , fold the end under, so they are easy to pull. Don’t use long strips of tape they will be tough to pull off. Keep a 5 gallon bucket handy to throw the pieces of tape into.
 
Have you used Kiwigrip before? It is pretty easy to use but a couple of tips. Make a plan on where you will start and lay the tape out with your plan in mind so you can pull each piece of tap as you go. I put a “flag” on the end of eash piece of tape , fold the end under, so they are easy to pull. Don’t use long strips of tape they will be tough to pull off. Keep a 5 gallon bucket handy to throw the pieces of tape into.

No, I haven't used it before. I have heard good things about it and watched several videos. I'm planning to do the hatch first, which I have already refinished with gelcoat. It is obviously in a prominent location which is not advisable, but it is a nice size to start with.
 
How aggressive a nonskid do you want? You get a pretty aggressive nonskid with their texture roller. In places I painted where I didn’t want an aggressive nonskid I used a regular 3/8” nap roller. If you want a really aggressive nonskid let it dry a bit and reroll it with the texture roller and it will get really deep. Much harder to clean. I used a cooking ladle to scoop the paint out. Then used a small plastic notched trowel to spread it evenly. Then roll it to make the final texture. For any nooks and crannies I cut up a texture roller and glued it on the end of a chip brush after cutting off the bristles. I used Woody Wax on the cured paint to make it easier to keep clean. It isn’t slippery after it dries but it sure helps keeping bird poop from sticking as badly.
 
How aggressive a nonskid do you want? You get a pretty aggressive nonskid with their texture roller. In places I painted where I didn’t want an aggressive nonskid I used a regular 3/8” nap roller. If you want a really aggressive nonskid let it dry a bit and reroll it with the texture roller and it will get really deep. Much harder to clean. I used a cooking ladle to scoop the paint out. Then used a small plastic notched trowel to spread it evenly. Then roll it to make the final texture. For any nooks and crannies I cut up a texture roller and glued it on the end of a chip brush after cutting off the bristles. I used Woody Wax on the cured paint to make it easier to keep clean. It isn’t slippery after it dries but it sure helps keeping bird poop from sticking as badly.

I don't want a very aggressive texture, just enough to improve traction compared to a smooth surface (and mask my imperfect work). My boat is primarily used during the summer and we are frequently barefoot so an aggressive finish would not be welcomed. I have sailed on some boats with an aggressive kiwigrip finish know that doesn't fit my intended use. I was planning to use the textured roller and then go over it lightly with a nap roller to ensure the peaks are flattened down.

Thank you for the tips, they are much appreciated.
 
I would do some testing and see what roller works best for you.
 
You might also consider using a wide putty knife like the ones they use for sheet rock/joint compound. That would flatten the peaks easily.
That's how they do "knock down" finish on ceilings and walls.

Good luck!
 
I got my kiwigrip applied, overall I'm quite pleased. I should have waited for drier weather, it took forever to dry on a cool, rainy and humid weekend.

I still have the shrink wrap on my boat, it has been helpful to contain all the dust this project has made but there are a couple small holes that have developed over the winter. They managed to allow water to drip onto the deck in four spots before it finish drying. I knew it was going to rain yesterday (Sunday) and thought that getting it applied on Saturday would go give it enough to start "tack up. I just didn't account for how cool and humid it was on the only day it wasn't raining this weekend. Should be easy enough to and I did save a pouch of kiwigrip. This week should be dry, I should have just waited but I was anxious to get things crossed off to-do list.

I brought the hatch home and applied the kiwigrip to it in my garage a couple hours before doing the rest of the deck, I found foolishly stuck my finger in it before it dried so I have already touched up a spot, easy to do. It also gave me a gauge on how slow it was drying so I wasn't surprised that the leaks got to the deck before it was dry. Lesson learned.
 

Attachments

  • PXL_20230429_213723989_eSUTvxsX7R.jpg
    PXL_20230429_213723989_eSUTvxsX7R.jpg
    190.4 KB · Views: 6
  • PXL_20230429_213716332_o4ite75J9E.jpg
    PXL_20230429_213716332_o4ite75J9E.jpg
    129.2 KB · Views: 6
  • PXL_20230429_213720529_PLxxCpuQ3t.jpg
    PXL_20230429_213720529_PLxxCpuQ3t.jpg
    137.7 KB · Views: 8
  • PXL_20230430_193742382_telz21bf0X.jpg
    PXL_20230430_193742382_telz21bf0X.jpg
    176.8 KB · Views: 6
  • PXL_20230430_193747399_0hbOoqlu8K.jpg
    PXL_20230430_193747399_0hbOoqlu8K.jpg
    145.8 KB · Views: 4
Last edited:
Back
Top Bottom