Stuck with removing flywheel from Yanmar 6LY

The friendliest place on the web for anyone who enjoys boating.
If you have answers, please help by responding to the unanswered posts.

Waterant

Senior Member
Joined
Oct 3, 2018
Messages
269
Location
Canada
Vessel Name
DORA
Vessel Make
2002 Mainship 430
Hi guys,

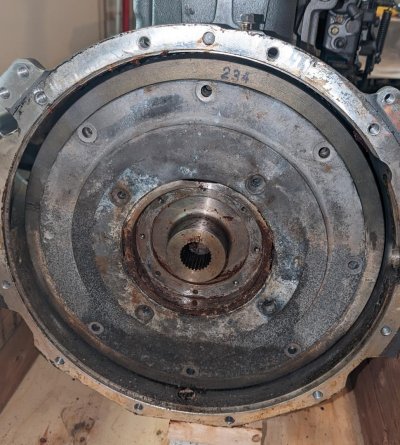
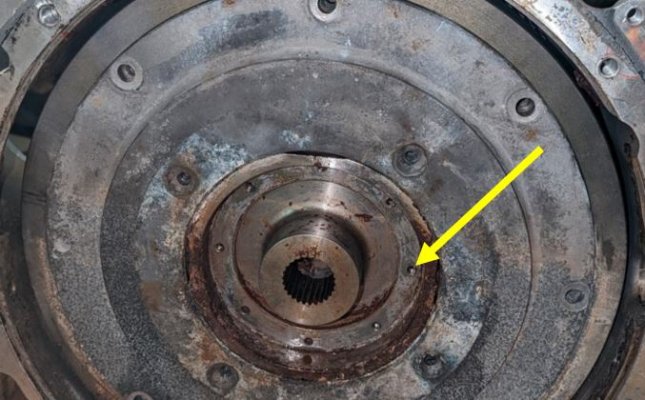
I'm trying to remove a flywheel from Yanmar 6LY2A-STP, and there is a weird-looking dumper plate (or i think it is) in front of the flywheel (see photo).
it's recessed inside the wheel and i can not figure out how to remove it to get to the bolts attaching the flywheel to the crankshaft.

everything i could find online shows the flywheel without the dumper plate or a different kind of the dumper plate bolted on top of the flywheel. this one is recessed inside, and i do not see any obvious ways to get it out of there :banghead:

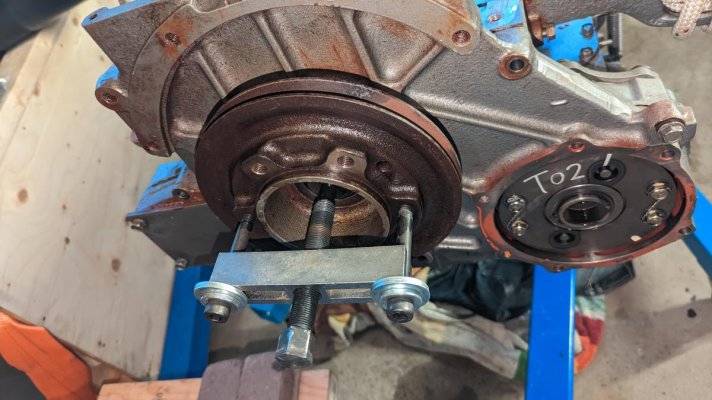
any suggestion on how to do this is appreciated.
 

Attachments

  • Flywheel 2.jpg
    Flywheel 2.jpg
    199.7 KB · Views: 132
Last edited:
Don't the eight bolts around the rim hold it on? I think the damper (with an "a") is that whole piece, not just the part in the center. The piece with 234 stamped on it is the flywheel. At least that's what my Kubotas look like, they're the only engines I've had apart there.
 
Don't the eight bolts around the rim hold it on?

most likely and those bolts are off but the plate is sitting deep inside the flywheel (not on top of it as I had on previous Yanmars i worked with) and it's pretty snagged there. i do not see any way to push it out.
 
There appears to be a Phillips head screw in place. Could that be holding it together?


If those 8 holes are threaded, you could possibly put longer that original bolts in them that bottom on the flywheel face and press the damper out.
 
There appears to be a Phillips head screw in place. Could that be holding it together?

all screws are out

If those 8 holes are threaded, you could possibly put longer that original bolts in them that bottom on the flywheel face and press the damper out.

that may work if those wholes are going thru.
I'll try, thanks.
 

Attachments

  • Flywheel 2.jpg
    Flywheel 2.jpg
    199.7 KB · Views: 55
This sure make the damper plates I put in our Lehmans in our last boat look easy.
 
Greetings,
Mr W. I suggest soaking the "seams" with your favorite penetrant combined with gentle tapping about the face and perimeter of the plate with a plastic mallet. Disruption and shock to the corrosion may loosen something up. Try the most genteel methods first.
 
Greetings,
Mr W. I suggest soaking the "seams" with your favorite penetrant combined with gentle tapping about the face and perimeter of the plate with a plastic mallet. Disruption and shock to the corrosion may loosen something up. Try the most genteel methods first.

And then if it doesn’t come off, don’t force it, get a bigger hammer…
 
I don't have much to contribute here, other than to say that it may be worth the 25 bucks to join boatdiesel.com for this type of project. Good luck with it.
 
From my vantage point some 3000 miles from Woodbridge Va. it looks like from the corrosion marks on the damper plate that this assembly has been under water, to about half way up. If so and the plate itself is iron then rust is likely holding it in place, tight to the flywheel.

I would try this prior to soaking it in some kind of magic elixir.

Cut a piece of 1/2 drywall shaped like a doughnut to fit tight inside the bore of the damper plate and after burning off the paper, push it into place. This is just a heat shield as you will likely have to add a fair amount of heat at the bore area of the damper plate.

Secure the damper plate to the flywheel with at least one bolt very loosely, just so it does not fall.

Cover the wood that is under the flywheel with drywall as well.

Get a 5 lb. fire extinguisher at the ready, plus a charged water hose.

Using an Oxy. Acetylene torch heat the bore area and the bottom half of the damper plate to about 400º F. Do this as quickly as possible as the goal is to keep the flywheel cool while the damper plate gets hot. Two small Map gas or propane torches might work as well, but they will be slower.
Make sure the area next to the bore of the damper plate gets hot as it's likely stuck there.

Give the plate some not so gentle smacks with a 2 lb. dead blow hammer or a 2 lb. hammer on a piece of softwood around the outside perimeter, but not at the bolt holes.

You will know when it comes free from the change in the sound. Once you can wiggle it, go quickly get your bag lunch, come back and watch it cool down while you eat, then phone the wife and tell her how good your lunch was and how you freed up the damper plate. Have a cup of coffee.

By then it may be cool to the touch, if not wait until it is.

Hopefully it's still usable, but I doubt it.
 
It appears to me that the damper mounts to the flywheel with the 8 outermost bolts (now removed). The damper output to the transmission is the splined boss in the centre.

The solution may be to pull the boss and the damper will come with it.

It appears that the boss is mounted on a plate with 8 tapped holes in it (see arrow in picture). If this is so, make a "strongback" that can bear on the flywheel (at a diameter greater than the damper) and pull on these tapped holes.
 

Attachments

  • damper.JPG
    damper.JPG
    68 KB · Views: 45
Last edited:
I think a big piece of angle iron braced across the opening then use the bolt holes to gently screw the whole thing off.

It is definitely rusted on, but shot of penetrant will help. I would not use heat, you might damage the rear seal.

Compared to a Lehman, this is a bitch. I changed mine in an hour and forty five minutes.

Im not sure any of the threaded portions are on the dampner trying to be removed...but are on the flywheel or whatever is behind it. But its hard to tell without being there.

I would definitely be changing the real main seal at this point. It should be on order IMO. In my experience heat is usually the best option in this situation. I would probably opt for MAP gas. If you have an oxy/acetylene torch and are familiar with its use that's the best option as Luna stated. The rest of my experience and opinion on dealing with similar situations is just as Luna stated. Dead blow at the perimeter. Add a block of wood if you cant get a good swing on it. It will come off.
 
Greetings,
Mr W. I suggest soaking the "seams" with your favorite penetrant combined with gentle tapping about the face and perimeter of the plate with a plastic mallet. Disruption and shock to the corrosion may loosen something up. Try the most genteel methods first.

That is my thought as well.
Were you also trained by Red Green?
 
It is definitely rusted on, but shot of penetrant will help. I would not use heat, you might damage the rear seal.

I believe it is a foregone conclusion that the seal will be replaced. Typically you never want to beat on a flywheel/flexplate/harmonic damper (anything connected to the crankshaft) to avoid damaging the bearing material but I believe this engine is coming apart for a full overhaul, unless I am mistaken.
 
Im not sure any of the threaded portions are on the damper trying to be removed...but are on the flywheel or whatever is behind it.

.

The damper must (logically) be in the transmission train between the flywheel and the output spline. This means that the output spline is not fixed to the flywheel, but to the damper.
 
I doubt if any of the holes in the damper plate are threaded. The inner most 8 holes are likely used to mount the damper plate so you can easily mount the damper mechanism itself through the plate to the flywheel using the outermost 8 holes. If so, all the holes are smooth bore pilot holes. You have nothing to grab.

There does appear to be some drift/wedge marks on the edge of the damper plate that align with what looks like an opening in the bell housing at about the 3 o'clock position. Similar marks also occur at 9 o'clock.

The stated goal was to remove the flywheel. Once removed, a rear main seal replacement should be done anyway as you are now "in there."

Make a sharp, thin edged wedge from mild steel flat bar (1/4" x 3/4" ?) that will fit through the hole(s) in the bell housing and long enough so you can hit it with your hammer. The smoother the surface is on the flat side of the wedge, the less marking occurs on the flywheel.


Be able to spin the flywheel, preferably from the cold end of the engine.

The sequence would be heat the whole thing to 400º, tap the wedge, remove the wedge, spin 45º, then heat, tap, remove, spin, etc.
Removal of the wedge could be made easier if you drilled a 1/4" hole through the hammer end and installed a 1/4" x 3" long piece of all thread and a couple of nuts, making a T handle that you can use to lever the wedge out.


It should come easily if you get it hot quickly.
 
There does appear to be some drift/wedge marks on the edge of the damper plate that align with what looks like an opening in the bell housing at about the 3 o'clock position. Similar marks also occur at 9 o'clock.

.

Well spotted Waterant! This must be it.

These appear to me to be "slots" on the flywheel to allow one to get wedges (prybar, whatever) behind the damper to lever it out.

Wedges and penetrating oil . . .

Regards,
Nick
 
I looked at dampners for this engine online, and I think it is just jammed in there. A couple taps with a mallet should break it loose.

Try to get an exploded view to see how it works.

I would get a gear or pull puller in that hub and pull from there. Is is attached to the inside of the dampner and should break it loose.
 
Greetings,
Mr. DDW. Is a rolling wedge the name of a tool or a technique. Explanation, please. I'm always trying to learn. Thanks
 
Rebuilding engines and removing the pilot bushing we'd fill the hole with grease and find or whittle a perfectly sized dowel, stick it in there and give a good whack. Comes out every time. Don't forget a rag around it cause grease usually squirts out.
 
Rebuilding engines and removing the pilot bushing we'd fill the hole with grease and find or whittle a perfectly sized dowel, stick it in there and give a good whack. Comes out every time. Don't forget a rag around it cause grease usually squirts out.

Was that the hydraulic pressure that forced the part out?
 
pilot bearing

Was that the hydraulic pressure that forced the part out?

Yes, hydraulic pressure. We used to do that on Porsche pilot bearings.
 
Find a socket that's the right size, put an extension on it the wrong way around and that's your plug. Saves the whittling

Rebuilding engines and removing the pilot bushing we'd fill the hole with grease and find or whittle a perfectly sized dowel, stick it in there and give a good whack. Comes out every time. Don't forget a rag around it cause grease usually squirts out.
 
be sure to let us know what happens.. this is truly a cliffhanger. really
 
Thanks, guys.

I was able to pry it out via 3 small slots between the middle hub and the larger ring. Once it started moving a bit, I worked it out little by little using a L shape allen key and than a screw driver.

The last 4 days I spent trying to take the belt pulley from the other end of the crankshaft. This one is a beast. I tried everything from 3 ton manual 3-jaw pulley to 10-ton hydraulic jack, penetration oil, heating it by Map torch, more penetration oil, hitting it with a large hammer while trying to rotate the pulley remover screw. It just does not want to go even a bit.

I bought a bunch of cutting wheels for a grinder today to try cutting it out without damaging the crankshaft unless someone has other ideas on how to remove it.
 

Attachments

  • PXL_20221121_204444086.jpg
    PXL_20221121_204444086.jpg
    122.9 KB · Views: 145
Last edited:
No doubt the damper is recessed within the rim of the flywheel, very common construction technique and from the looks of it, plenty of corrosion holding the damper in place.

The eight bolts on the outer rim are the ones which held the damper to the flywheel, and the inner bolts hold the damper components together. Probably some of those components are rubber elements which will be destroyed if you put heat on the damper.

I think I would try soaking the damper/flywheel interface line with your favorite solvent and then try the tapping trick. Next thing would be to carefully measure the center distance between two adjacent outer rim holes and drill and tap a 3/8 or 1/2” hole there in the damper, but not into the flywheel. Then cross the flywheel 180* and drill and tap the damper on the opposite side of the crank. Then use those two threaded holes for jacking bolts and work the damper out of its recess. Worse case is you crack the damper but if that happens it’s probably already a goner.
 
Greetings,
Mr. W. Perseverance overcomes all obstacles. STOP!!!! Do NOT pass GO. Do NOT collect $200 and do NOT grind the pulley off! BIG mistake IMO.


Keep doing what you've been doing. Pressure, heat, tap,tap,tap. Do NOT pound on it, please. Leave your puller under pressure as tight as you can get it. Try to tighten the center bolt with an electric impact wrench.


IF you beat on the pulley or flange you run the risk of transmitting those impacts to the crank and bearings.


iu
 

Latest posts

Back
Top Bottom