Ford Lehman starter problems

The friendliest place on the web for anyone who enjoys boating.
If you have answers, please help by responding to the unanswered posts.
Joined
Jan 7, 2020
Messages
1,110
Location
United States
Vessel Name
CHiTON
Vessel Make
Tung Hwa Clipper 30
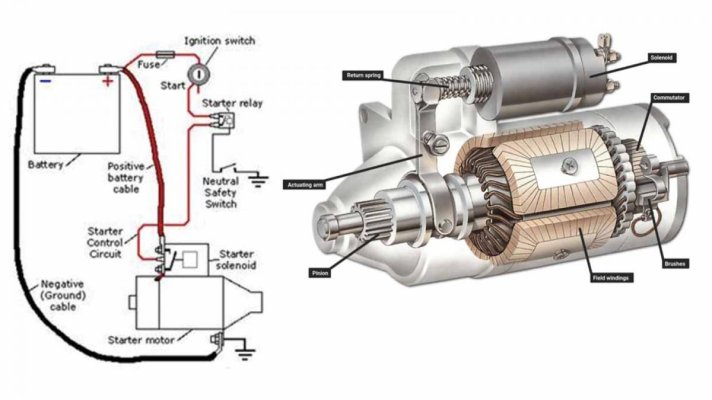
Went to start up yesterday and nothing. After lifting the engine hatch, I could tell it wasn't quite nothing. The starter would spin. I tried the shade tree mechanic "fix" of tapping the solenoid with a hammer. That seemed to make it "click" louder when the start button was pushed, but still didn't engage. I cleaned all the electrical contacts on the starter, the solenoid, and the relay. Checked for voltage (but not voltage drop) at the starter, etc. Since I could hear the starter spinning, I didn't think that voltage was the issue. Battery monitor showed 12.4V dropping into the high 11's when starter was spinning.

I would love to not have to take starter and solenoid out and still have a fix that left me confident that the issue would not arise in the future. Anybody have a "fix-in-place" solution?

From reading old posts here, one solution was to purchase a new starter/solenoid ($325) and simply replace, having the old one rebuilt as a spare. Although my problem seems to be just the solenoid, some claimed that replacing just the solenoid wasn't much of a cost/time savings over replacing the whole thing. Of course because it is a boat, a Ford Lehman starter/solenoid was $325 where an identical looking Ford was $250 and cross referencing to a generic identical looking starter was $185 at the local auto parts. Anybody replaced theirs with a generic starter?

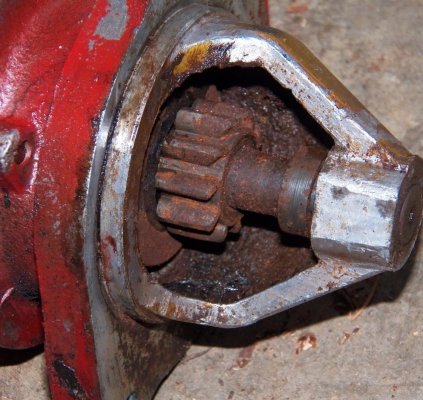
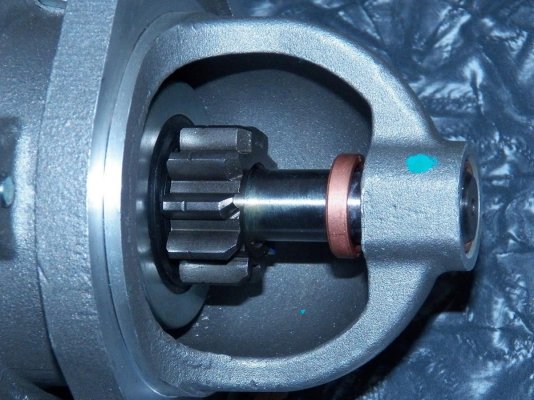
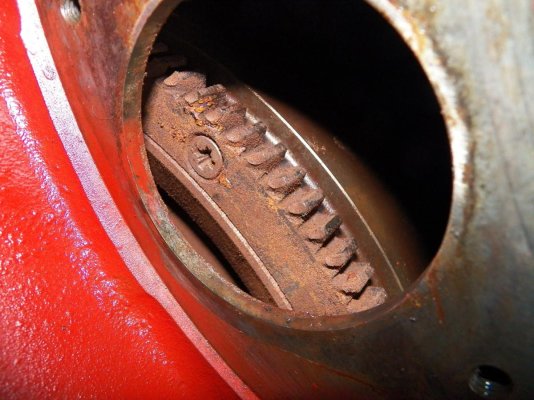
The pictures I found of the "official" Ford Lehman starter don't look quite right. Here is a picture of one that looks to me like it would fit on the starboard side of the engine (with the solenoid on top). Maybe it's just a generic picture? The gear housing also doesn't look like mine. And it is a Lucas part. Lucas may have been the original part supplier, but given my experience with Lucas I would just as soon have a Chinese Brand X.

All advice, experience, part numbers, warnings, etc. appreciated.
 
It isn't always as straightforward as a solenoid. Pinion shaft mechanism may be rusted so that it spins but doesn't move forward. I took my starter to parts store and they matched it with correct motor, rotation, number of teeth, etc. It was a generic starter but not cheap. The days of rebuilding starters seem to be long gone.

It was a simple repair, only 3 bolts holding the starter on.
 
Had my starter rebuilt for around $125 in 2015 or 2015 and it was perfect after another 2000+ engine hours and nearly 15000 mikes of cruising with mostly short days (more starts).

Any reputable shops around?

That place is still in South Jersey and there's a pretty good place here in Ft Pierce, Fl. Friend had his CAT starters rebuilt last winter.
 
Last edited:
Not sure what it is called, maybe the bendix, as referenced above maybe stuck. Had it happen on a Ford truck. It could be pushed in manually and it would engage. Does not sound like a solenoid to me if the starter motor is spinning.
 
If the starter actually spins, then
1) the motor works
2) the solenoid contacts work
3) the key, relay, etc. is ok
So the gear isn't moving to engage the flywheel.
It could be as SoWhat says: the mechanism is sticking or the electromagnet part of the solenoid is dead.
Remove the starter and try to move the gear back & forth. If it moves freely by hand, then it's the solenoid.
Most auto parts stores will bench test starters. Or you could do it on the boat with a set of jumper cables.
 
I meant to include this:
 

Attachments

  • starting-system-works.jpg
    starting-system-works.jpg
    74.2 KB · Views: 68
My understanding is that a starter with a Bendix uses the spin of the starter motor to throw the starter gear forward to engage the flywheel (no solenoid) and the type used on the Lehman uses a solenoid to push the gear forward. The picture in my old Lehman manual shows a thing shaped like a spur on a cowboy boot on the end of the solenoid to throw the gear forward. Either type can get stuck.

But I just spent the time since my first post cross referencing part numbers around and around and around. Finally ended up on a Ford tractor website that had a new compatible starter/solenoid that meets all the Lehman original equipment specifications for $142, including shipping. Reading through the many good reviews, I found a reviewer who said it worked great on their Ford Lehman marine diesel. We shall see.

I just thought about the electrical contacts that I cleaned. I only did positive as I thought that the starter would ground through the block. But there is a big black ground cable on the back of the starter. Maybe I didn't clean enough electrical contacts.


That sounds exactly like what was occurring on my Stb starter. I would get the sound of it spinning, occasionally engaging, but it would take a dozen or more tries to get enough rotation to fire a cylinder or 2. Luckily my engine would start with that, so I was able to postpone the starter removal until a convenient time.
Then I removed it, took it to the nearby auto parts store. They sent it on to a starter shop. When I got it back it had a new solenoid and pinion gear. I don't know about the pinion shaft, but I suspect it was fully disassembled, so if the shaft was worn it was probably replaced along with the gear.
 
Greetings,
Mr. MF. Yep. Ford tractor place. When our Lehman starter last went out I ran it over to a local generator/alternator rebuild shop. Fellow simply took a Ford Tractor starter he had rebuilt and in his stock, swapped out the "business end" and $125 (CF) and about 15 minutes later walked out with my "new" starter.
 
Just take it out and get it rebuilt. I did that rather than dick around. It’s an easy
r and r.
Then you are good for another 20 years.
However do a proper voltage drop test. You want to feed your starter with the right power
 
Peak in the hole and look how the flywheel teeth are just to be sure they are in tact and none are worn or broken while you got the starter pulled.
 
Peak in the hole and look how the flywheel teeth are just to be sure they are in tact and none are worn or broken while you got the starter pulled.


In the picture, kindly posted by Leake, the pivot bolt (labeled as “adjustment arm”) is on an eccentric. This can be adjusted to increase the amount of travel. It could be that it is out of adjustment and that the pinion is not travelling far enough to engage the flywheel. If pressed you could do it in place -if you can get access. Note the current position of the slot in the bolt for reference, back off the locking nut, and then turn the bolt, maybe a 1/4 of a turn and re-tighten the locking nut. If not successful try the opposite direction (hence noted the original position of the slot). I think the correct procedure is to remove the starter and apply a certain voltage that corresponds to a distance that the pinion moves. If I remember correctly it ensures both the correct pinion travel and the correct pressure on the contacts. I could find out more from an old salt I know if required.
 
Pulled the starter and spun the engine. No missing teeth. The teeth do have some deformation, as does the starter pinion. I would think that is normal on a 41 year old starter/flywheel. What is odd is the amount of rust on the gears. I would have thought that the teeth surfaces would at least have a shiny side from being started every week.

The adjustment arm noted by BeeJay is hidden under the solenoid. I would have had to remove the solenoid to even try it. Easier to just remove the entire unit and get it on the bench (not that I'm thinking of rebuilding). I have a new starter/solenoid/relay on the way. For $150 brand new, if the new setup works I'm not going to bother rebuilding. Just buy a new spare.

So far I've learned that I need a 9/16th socket on board.
 
I had an epiphany today. To quote my previous post: "What is odd is the amount of rust on the gears. I would have thought that the teeth surfaces would at least have a shiny side from being started every week." With my starter on the workbench, I noticed that the rod that the pinion slides out was also rusty and the housing had a lot of oily water drops.

So I did some internet searching for stuff like "rusty flywheel" etc. I found a post where somebody said that the starter on their boat had rust damage. Responders said that the boat must have sunk up to the height of the starter. One poster said that water only needed to reach the height of the flywheel casing. Then when the engine is started water is flung around inside the casing and into the starter.

So I'm thinking back to an incident I had almost a year ago. I was doing my first replacement of the zinc on the block heat exchanger. I pulled out the old one and didn't have a replacement onboard. The heat exchanger dribbled a little bit and I thought that it was above the waterline as I hadn't shut the raw water sea cock. And I didn't shut off the sea cock while I went to get a replacement (several hours). I was amazed when I got back that the large drip pan under the motor was completely full and overflowing into the bilge. There must have been some kind of vapor lock that made it only dribble for the first few minutes and then begin flowing when I was gone. I syphoned the water out of the pan into the bilge, pumped the bilge, and thought lesson learned and no harm done. But . . .

I now think that the flywheel housing may sit low enough in the drip pan such that when it filled saltwater leaked in. After removing the starter, I hand spun the engine to check for any missing teeth and I notice an odd spot that looked like oil. I'll have to check again and see it it was actually water. Saltwater may have seeped into the housing and formed a puddle that didn't drain back out. Every time I started the engine I was spraying saltwater all over the flywheel and starter. After months and many starts, things finally seized.

My new starter/solenoid showed up today. Appears to be identical. But I can't put it on until I drain out the flywheel housing. Is opening up to drain the flywheel cover going to be about the same project as starting to replace the damper plate? If so, should I just pull things back enough to check/replace the damper plate? Talk about project creep.
 
I think those parts just get and stay rusty for the most part.

Mine were always rusty and the dampner springs rusted through and failed one year even with 400 hours a year on the engine. They even had a decent amount of oil slung around from a leaky rear seal to fight the rust.
 
Go ahead and check the dampner plate while there. It is a cheap fix if needed. The dampner plate protects the transmission input shaft alignment.

My starter and engine sit very high on stringers. If it has gotten salt water on it spray down with salt neutralizer and after drying coat with LPS. WD40 will evaporate off with heat.
 
Here is a picture of the rusty flywheel and starter gear housing. I don't expect it to look like the new starter, but it is obvious why the old starter gear would no longer slide out the shaft. The picture is only five days after it was last started.

I have a suction tank for oil removal and will try to see if I can suck any water remaining in the housing out through the starter hole. I might also spray Salt Away around inside and suck that out.

I thought that the old starter gear was deformed from years of use, but it turns out the new one is milled that way to make it mesh better/faster with the flywheel. The original starter is a Lucas. First Lucas product I've ever heard of that lived over a decade and then I went and killed it.
 

Attachments

  • 102_0013 (2).jpg
    102_0013 (2).jpg
    198 KB · Views: 22
  • 102_0014 (2).jpg
    102_0014 (2).jpg
    187.6 KB · Views: 19
  • 102_0019.jpg
    102_0019.jpg
    163.8 KB · Views: 20
My flywheel housing had a drip/drain hole on the bottom.
 
I don't remember my port FL120 engine's flywheel looking quite that rusty when I swapped out the starter a long time back. Is it just me, or does a part of anybody looking at that want to spray it down with some clear Rust Reformer followed a day later by something like Corrosion X which will coat it?
 
Your starter drive (bendix brand name)is rusted on the shaft. That is why it did not engage into the flywheel. The starter solenoid tried to push it out. It is stuck on the armature shaft. The plunger in the solenoid was still able to send power to the motor and spin though. A little lubrication every once a while it would have lasted another 20 years. I can't believe I am saying that about a Lucas SMH. Get that one rebuilt if you can. That new China one you bought is that same English Apple. More lie a blood Orange. IMO
 
It’s not mine but if it were I would remove the bellhousing and inspect everything.
The damper plate must be rusty and I would change that.
Rust kills.
 
No drain hole in mine and not enough room to drill one. I loosened all the bolts on the housing yesterday and a rust colored thick cream oozed out. It had the feel of a little oil emulsified in water. Apparently everything had been whipped into a smooth goo. Kind of reminded me of stage makeup for somebody wanting to be rust colored. It didn't drain out fast enough to give me much confidence that it would all come out cleanly.

I sprayed Salt Away in the starter opening and rotated the flywheel. I think Salt Away simply loosens crusted on salt, it doesn't neutralize it. So the sludge in the bottom, if not completely drained out, would still be salty. I'm taking my endoscope tomorrow and will see if I can feed it down to the bottom of the housing. I haven't heard anybody say that the condition of the damper plate (broken springs) can be inspected with an endoscope.

I am preparing myself mentally for backing off the housing. I have the 80hp Lehman with the rear mounts on the tranny instead of the block, so it's a bit complicated. The prior owner left onboard a set of rear block mounts, apparently for just this problem. I have to attach them to the block, put some temporary cribbing under them, and keep the motor stable before I can remove the mounts on the tranny and move it back. I'm now looking through old threads on how to drop the tranny back far enough to open the housing and inspect/replace the damper plate.
 
Get some long bolts or allthread that fit in place of the current bolts holding the flywheel housing on. That way you can just slide the transmission back far enough to swap the damper plate without having to lift the transmission out and back in. If I remember correctly about 4” should be enough to swap it.
 
Marco, I bought a trolley, rail car, and micro block at Ace hardware for about $100. It lays on top of the engine on a moving blanket, and easily takes the tranny and bell housing load.

All you need is 6", heard that before? So slide the whole thing back as an assembly on the trolley, if you have room. I did. The hoist makes it very easy, one man show. It took me an hour and forty five minutes from walking on to walking off.

But, while doing that I would replace rear motor mounts. A little scope creep but you are there and it is cheap and easy to do. Then do fronts.

I have all this shown on my blog, grandbankschoices. PM me and I can talk you through it.

Doing mounts will make it a weekend job. Then you wait a week for mounts to settle and align the engine and prop shaft.

Two best things I have done to the boat. You can not feel the engine running at all, almost feels electric. The dampner plate failing sounds like rocker clatter, probably knocked 15 decibels off the noise, then another 15 with the mounts.

Bought it all from American Diesel.
About $300 plus trolley. You will make lots of friends with that trolley, 500# capacity.
 
I have not tried the all thread but I am sure it would work. Would need several to support the weight.

I have pulled that tranny three times now, so I am going to wingnuts.....
 
But, while doing that I would replace rear motor mounts. A little scope creep but you are there and it is cheap and easy to do. Then do fronts.

My motor mounts are R&D brand (local), so probably not original. Prior owner had the motor out for a complete rebuild 500 hours ago (three years). I would hope that the mounts and damper plate were examined then, but I don't know.

I looked at the pictures on your site (shown below). The housing bolts that I loosened in order to drain the saltwater are the larger outer bell housing, which I now see isn't necessary to remove for replacing the damper plate. In fact, if I removed the larger housing and slid the tranny back I'm not sure that I would have sufficient access to the damper plate. It does look like removing the smaller housing to access the damper plate might then give me access to really clean out the larger housing and spray with WD40 or T-9. Maybe even pull back the tranny as per damper replacement and then remove the larger housing and clean.
 
I worked as a metallurgist in a Purotator (prior Bendix) plant that made starters. That first picture is real bad and the pinion would contribute to the ring gear's poor shape. The ring gear shows a poor tooth profile and may present future problems. The new starter picture took me back to my days testing the heat treat quality of the pinions.
 

Latest posts

Back
Top Bottom