Engine room sound insulation

The friendliest place on the web for anyone who enjoys boating.
If you have answers, please help by responding to the unanswered posts.
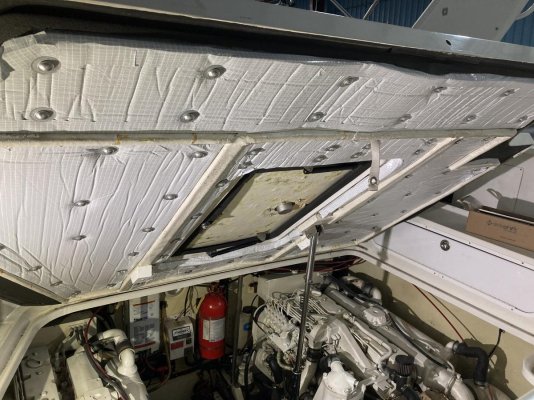
I agree that sealing small holes is beneficial but not before you insulate the main surfaces first. Start with the big areas and finish with the small ones.

I did the opposite. Went with the $50/one hour foam gun soundproofing. Dropped 5db. Not sure I'd get much more spending $1500 in a complex panel installation after having sealed up the trouble areas. Most of them would be very difficult to seal with panels and then would have been more difficult to seal the small leaks that panels can't cover.

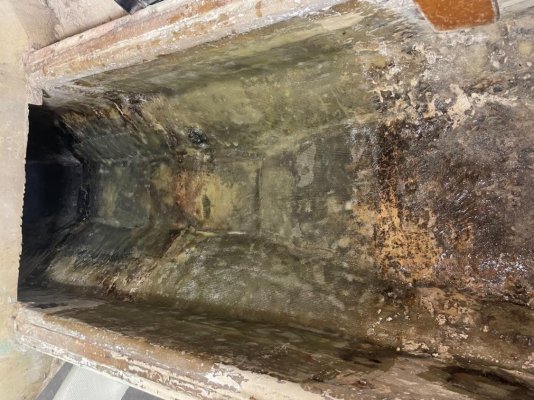
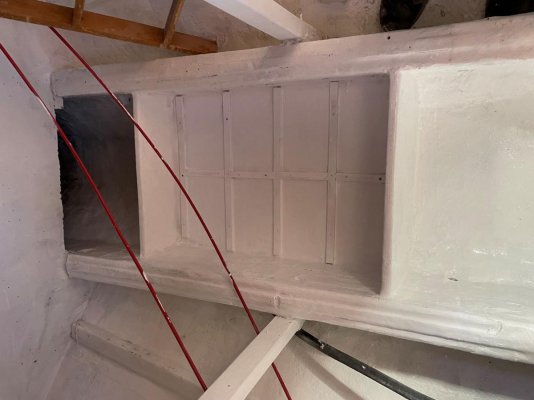
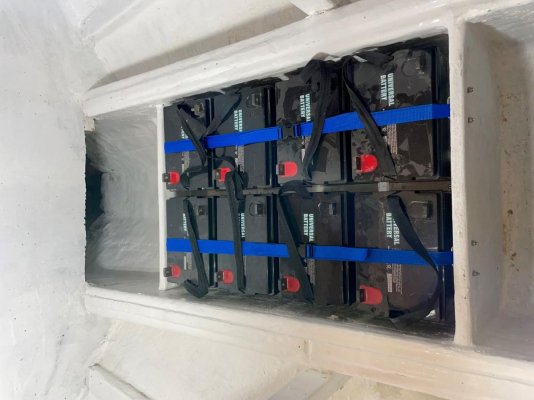
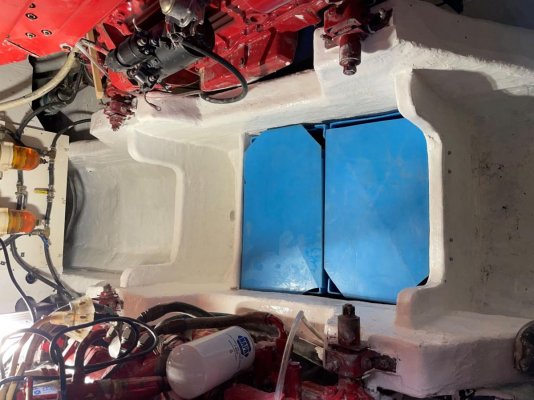
Get a decibel meter for your phone (free download) and really identify the areas where the engine noise is coming through. It generally isn't in a straight line from the engine to your ear. My "hottest" area was under the rear galley sink. The sink drain and FW had penetrations in the original soundproofing that went into the rear of the engine room in an inaccessible area to sound proof with panels. Another hot area was the forward head where the VacuFlush and FW penetrations went through the original soundproofing in to the engine room. The head was very noisy underway and, because of the vents in the head door, that noise was coming into the main area. I thought that the engine noise would be coming straight from the engine (easy to put panels between me and the engine), but most of the noise was travelling a circuitous path and coming from the front and rear of the main cabin.

Don't buy the orange canned foam. Doesn't look good.
 
I was replying more to the drum room scenario.

In my understanding you are correct in your main point, I believe the foam can act as a decoupler. However, MLV itself won’t absorb sound but rather redirects them. Sound absorption materials turn the waves into heat. Sound proofing like MLV redirects the waves (which decay over distance, hence why airspace between barriers is useful).

For an engine room walls from the cabin interior or other noise sensitive area , I think sound proofing would be great (with green glue or something that decouples it so it just doesn’t transfer to the fiberglass ) from the cabin, and absorbstive materials elsewhere in the engine room to try to absorb it.

It’s been said that even a small gap in soundproofing material will still pass half the noise through!

I’ve been immersed in this stuff lately, not for a boat but a house. Had six 15’ rolls of 2lb per sq ft MLV installed last week!

Speaking of gaps. What have folks used to fill gaps in engine room access doors on the floors?
 
Between the studs?

The information on Soundown has been very helpful. I have a studded ceiling in my engine room.

Question: Do I put the product between the studs and then cover everything with some product (a thin sheet of plywood??) to seal in the ceiling?

Or, do I close in the ceiling, and then put the product on the plywood?

Chris
 
The Sundown cuts down on noise transmission especially the lower frequencies. However in addition to that, the best treatment for your overhead in the engine room is a perforated panel, not solid. A solid surface will reflect sound waves. A perforated surface is preferred however because it allows sound waves to penetrate into the void above, where it bounces around and is dissipated.

Perforated metal panels are not too expensive either.
 
Last edited:
Speaking of gaps. What have folks used to fill gaps in engine room access doors on the floors?

I just got done using this self-stick stuff, which is really intended to seal between the canopy (called a cap in some places) on a pickup truck bed. It is also available in a self-stick one-sided version that costs more. I simply cut the double bubble stripping down the middle to get 40 feet of sound proofing.

It comes with alcohol wipes to clean the attaching surface. My engine hatches, like most Taiwan trawlers of the era, are a heavily soundproofed hatch that rests on a teak lip all the way around the opening. In the dark, I could see that my engine room lights were on. While the hatch was sound proofed, they were essentially opened a crack all the time. Not good. I attached the stripping, bubble side up, around the perimeter of the lip so that it was maybe 1/8th inch proud of the lip. The hatch is heavy enough that it pushes down, seals the engine room, and is still flush with the rest of the floor. A noticeable difference with a 30 minute installation and $30 in materials. If I accidentally pull it loose by sliding over the edge into the ER (in a drunken stupor?), I have enough to replace loose pieces for years.

This soundproofing, along with my $60 canned foaming of all ER perforations, has noticeably cut down on noise. I haven't taken another decibel reading yet, so I can't compare my $100 and 1 hour soundproofing to $4,000 worth of sound down and 10 days of work. And I don't think I'll need/add any complex/expensive soundproofing.

As anecdotal evidence of the effectiveness of my cheapo soundproofing, I'm now looking at purchasing a new tachometer. My tachometer, although new only 400 hours ago, has a mechanical hour meter. Every few seconds it ticks and a little indicator piece on the dial rotates. Maybe it ticks 10 times a minute and then a bigger tick when the .1 number on the gauge ticks forward as well. With my improved soundproofing, that tick has become irritating, like a grandfather clock in the library. I can't believe I put up with that so long, but I didn't used to notice it. I'm now looking to replace it with a tachometer that has a (silent) digital hour meter.
 
I just put 2” 2 pound per square foot insulation from Soundown. I used the PSA backing and also used the glue on perforated nails stuck on with thickened epoxy. I wanted to be sure it would not fall down. I used some plywood and ratcheting poles to hold the insulation in place while the epoxy and PSA glue setup. Soundown says the PSA gets full strength in about 24 hours.
 

Attachments

  • 1E178581-E658-474A-84D2-96C08B73CA87.jpg
    1E178581-E658-474A-84D2-96C08B73CA87.jpg
    147.6 KB · Views: 22
  • 0AFF1A7F-79C8-4312-8973-C9F026E20103.jpg
    0AFF1A7F-79C8-4312-8973-C9F026E20103.jpg
    101.8 KB · Views: 16
  • 13757A79-FF1B-4A24-B8EB-9177E591BCCF.jpg
    13757A79-FF1B-4A24-B8EB-9177E591BCCF.jpg
    168.2 KB · Views: 17
  • BB3A21E4-B3D0-40D9-8399-623D4DC377C1.jpg
    BB3A21E4-B3D0-40D9-8399-623D4DC377C1.jpg
    137.1 KB · Views: 17
  • 8E6BABB2-234C-4B89-A44B-0C42EFCAFE52.jpg
    8E6BABB2-234C-4B89-A44B-0C42EFCAFE52.jpg
    192.7 KB · Views: 17
Nice job Dave. It will be much harder now to hear the fuel rushing through the lines to feed those engines. Just kidding, seriously good looking job, I'm sure it should make a difference.
 
I couldn’t hear the fuel since the engines were so loud. Maybe now I can hear the fuel flowing through the lines…
 
I have been working on the project for a bit now. I ended up having to refiberglass the bilges. There was water, oil, and sludge under the bottom fiberglass in some areas. removed all the old fiberglass (down to the concrete that is in the keel) and laid 4 layers of 1708 biaxial cloth.

Funny, I tried to get someone to do the work (as I had never fiberglassed before), but everyone was booked out for months. So, with some advise from one of the guys, I set out to do it myself. It's not perfect by any means, but I am generally happy with the result. A coat of primer and BilgeKote and it looks like new.

Now for the ceiling. I put in Rockwool Safe and Sound in between the floor joists. Then I tried to put a length of 1lb per sq foot of MLV. This is really hard to do in long sheets. It's flimsy and heavy to hold up. I had my wife helping and would have needed maybe two others to try and get it up.

After a frustrating few hours of trying to get a long sheet up its time for plan B.

I have perforated aluminum sheets that I bought for the finishing layer on the ceiling. I decided that I am going to cut these into smaller more manageable pieces (say 3' by 4'), glue the MLV onto them, and then put them up in sections with screws.

Will be trying that a bit later today to see how it goes.

Included are some pictures of the project so far.

Cheers,

Chris
 

Attachments

  • IMG_1488.jpg
    IMG_1488.jpg
    196.6 KB · Views: 26
  • IMG_1502.jpg
    IMG_1502.jpg
    197.7 KB · Views: 25
  • IMG_1549.jpg
    IMG_1549.jpg
    169.7 KB · Views: 25
  • IMG_1552.jpg
    IMG_1552.jpg
    176.3 KB · Views: 25
  • IMG_1601.jpg
    IMG_1601.jpg
    115.1 KB · Views: 23
  • IMG_1602.jpg
    IMG_1602.jpg
    88.3 KB · Views: 25
  • IMG_1624.jpg
    IMG_1624.jpg
    105.3 KB · Views: 24
  • IMG_1625.jpg
    IMG_1625.jpg
    132 KB · Views: 26
  • IMG_1629.jpg
    IMG_1629.jpg
    198 KB · Views: 26
  • IMG_1633.jpg
    IMG_1633.jpg
    192.7 KB · Views: 23
And one more pic...
 

Attachments

  • IMG_1646.jpg
    IMG_1646.jpg
    132.7 KB · Views: 22
Looks like a Pro did it! Congrats! Just out of curiosity, why type of batteries are those,and did you make any provisions for venting?
 
Beautiful job. Thanks for posting the pictures.

And I agree that the easiest and cheapest noise fix is to plug all the little holes with foam first. Play loud music or white noise in the engine room, then go everywhere and anywhere listening for that sound/ music. Even the head.
 
Thanks!

They are Universal Battery UBGC2 (6v, 200AH) from the previous owner. They seem to work fine for now.
 
Then put a spoonful of thickened epoxy on each pin bracket. Then the fun part, carefully position the piece of insulation in place. You only get one chance as the PSA will quickly grab onto the substrate.

Thanks for the awesome information! I'm getting ready to install the 1.5" Soundown with PSA, along with hangers on the underside of my engine hatch. With my hatch being oddly shapped, I will be pre-installing the hangers. I've been looking at adhesives such as
3M Fast Cure 5200
http://multimedia.3m.com/mws/media/576967O/3mtm-marine-adhesive-sealant-fast-cure-5200.pdf

Boss 180
http://accumetricinc.com/uplimg/boss/TDS/BOSS%20180%20TDS-Cartridge.pdf

In regards to thickened epoxy, I'm having trouble finding a good choice. Do you remember what epoxy you used? Has it given you any issues? I would appreciate your input. Thanks. Ray
 

Latest posts

Back
Top Bottom