Windows weeping brown liquid

The friendliest place on the web for anyone who enjoys boating.
If you have answers, please help by responding to the unanswered posts.

albinalaska

Veteran Member
Joined
Jun 6, 2020
Messages
94
Location
USA
Vessel Name
Sea Gypsy
Vessel Make
1979 Albin Trawler 36'
Good day all!

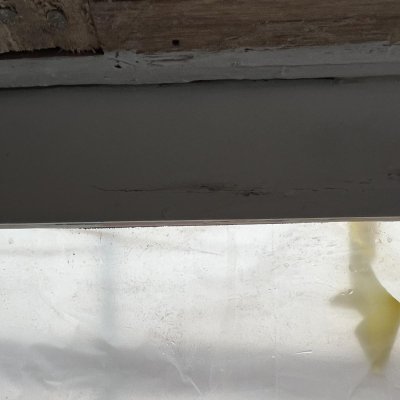
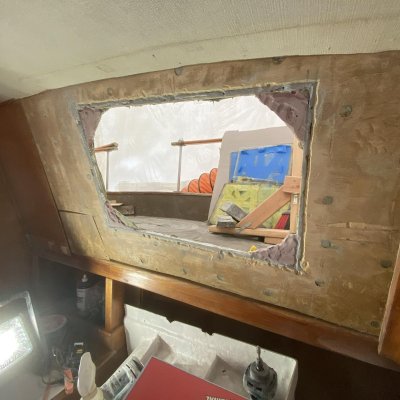
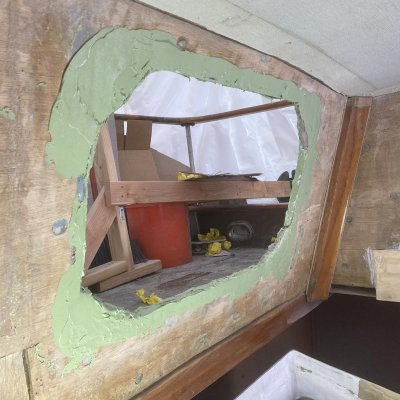
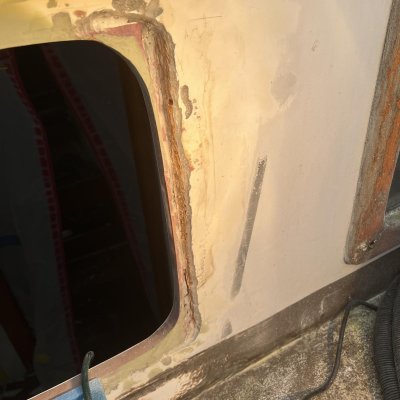
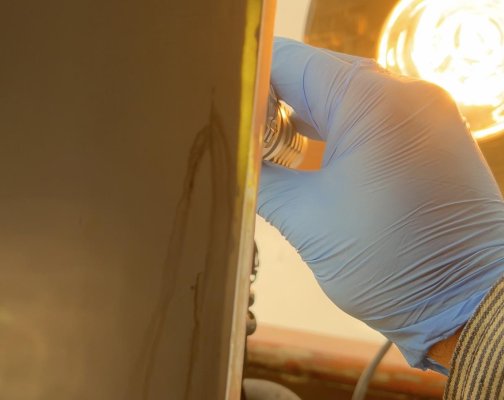
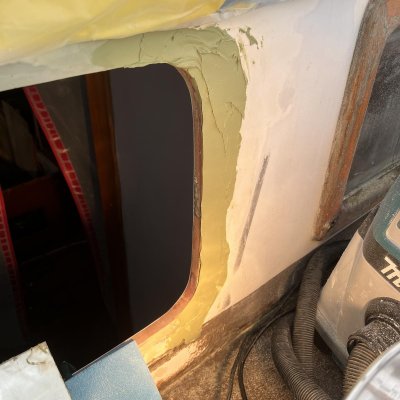
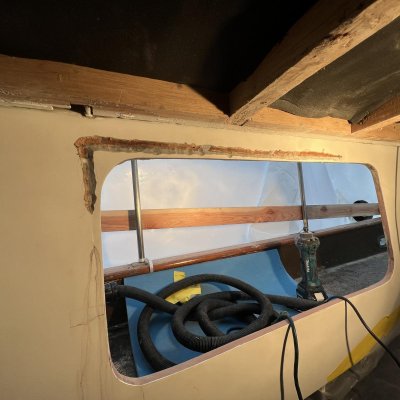
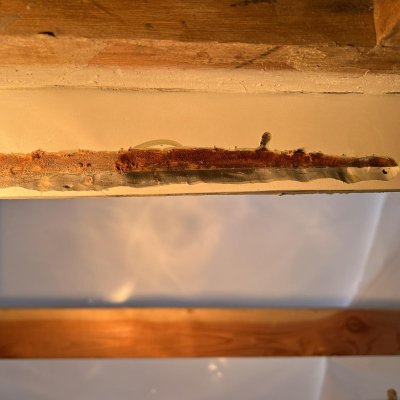
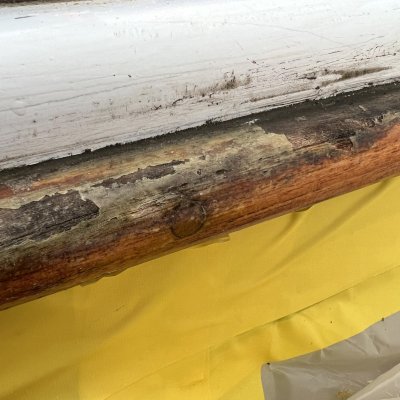
Been restoring our trawler and have been away for some time but returned to the vessel today to find some rather confusing issues with one of our newly sealed windows.

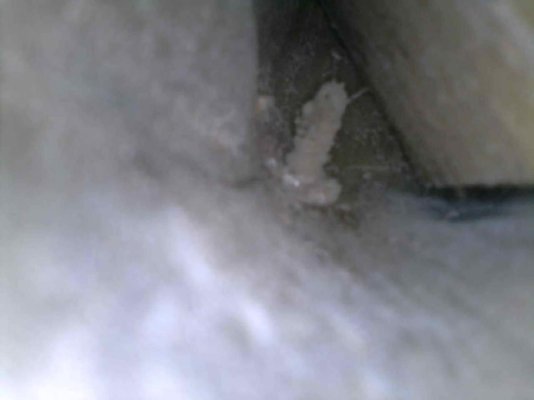
There is brown liquid residue that’s weeping out of a missed seam around the window. Obviously that means the windows aren’t sealed as though and I need to dig it out but I haven’t seen this except for on houses.

Anyone have any insight, experience or advice? There is a chain plate for a stanchion for the mast directly above the frame but there are weeping issues along the top edging of the frame as well.

@mv_seagypsy on IG for those who want more context.
 

Attachments

  • 3EA61195-7281-40F0-934F-260DF288B49B.jpg
    3EA61195-7281-40F0-934F-260DF288B49B.jpg
    78.8 KB · Views: 38
  • 27CE0052-FD7C-44A1-A4E2-BCA94A9B5C3D.jpg
    27CE0052-FD7C-44A1-A4E2-BCA94A9B5C3D.jpg
    128.2 KB · Views: 35
  • 4383DA25-BD52-43D3-80B6-7E63E283A213.jpg
    4383DA25-BD52-43D3-80B6-7E63E283A213.jpg
    100.7 KB · Views: 35
Just read an article on “surfactant leaching” which occurs when acrylic based paints are exposed to water and leaches out some of the water soluble components. It doesn’t explain the water intrusion but it explains the discoloration….
 
For what it’s worth, when I was rebuilding and reskinning the roof in my 1987 KK Manatee, there was a leaching of the same type of brown liquid around the window frames. I was sure there must be some wooden framing in the roof somewhere as the source of the brown liquid. When I finally got the top skin removed, I was surprised to find that it was simply water seepage through the traumatized top skin (years of accessoriy installations) that was soaking the old glue. There was no wood.

I ground out over 100 lbs of that old glue and reskinned the roof. No sign of the brown juice since.
 
A lot of times it is the old wood saturated with water and it turns brown.
 
True...wood juice.

Even a decade after pulling up all the teak decking, removing teak trim and replacing all windows (cabin theoretically water tight)..... brown water still oozed from weep holes in the cabin top, the ones drilled up through the walkway overhangs. Also had so brown from around windows where there was any caulking miss.
 
I had something similar coming from a port side vertical bulkhead at the most aft section. I noticed after a rain I would get wood juice that came out a thin crack on the trailing edge. I ground out the center of the trailing edge down to the bottom of the bulkhead and about a cup of water came out. Ground it out more to inspect and let it air out. Was still pretty solid except for the last inch of the trailing edge. Gouged out all the wood that would come out, let it air out for a week or two, drill holes on the sides about 1.25 inches back and pumped in some peanut butter until it oozed out every orifice. Then clamped some wood on either side and gently tightened until it was a consistent width on the bulkhead. Sanded down and painted. Very solid now and no more brown wood juice.

There is probably better ways to repair it but it's been 1.5 years and is still solid as a rock...because it essentially is a 2x20 inch rock at the trailing edge ?
 
Surveyors often refer to it as “mung” -sure sign of wet/rotting wood core.
 
Aka "teak tea".
 
Here are the photos of a separate window in the aft cabin where I used a die grinder to route out channels to fill with Totalfair fairing compound. I did not do that to the problem window as that was the first one and my methods were largely experimental and I didn’t think to cover those seams until later.

You can see the obvious seam where water is likely coming in. That’s my hope anyways? I’ll update on what ever comes of this.
 

Attachments

  • E484A0F0-0430-4263-A298-AA4A357A1833.jpg
    E484A0F0-0430-4263-A298-AA4A357A1833.jpg
    76.1 KB · Views: 22
  • BE54F06F-0B2B-4421-9735-D7415F1C5D27.jpg
    BE54F06F-0B2B-4421-9735-D7415F1C5D27.jpg
    153.5 KB · Views: 22
  • 25F8B0B0-4CC0-4ED7-BBE5-07BC8BA28BF9.jpg
    25F8B0B0-4CC0-4ED7-BBE5-07BC8BA28BF9.jpg
    173.7 KB · Views: 22
  • A1C2115E-F358-49A2-9217-1E1785D23056.jpg
    A1C2115E-F358-49A2-9217-1E1785D23056.jpg
    196.1 KB · Views: 21
The first thing to do is find and fix the leaks. Like triage in medicine, stop the bleeding. In this case the bleeding is the leak. Then repair the wet core or wood. But if the leak isn’t fixed the wood and/or core will just keep getting wet, and then more brown juice.
 
What are you doing to address them? Thanks!

A couple things I've done so far is remove everything for the flybridge deck, sanded the deck, applied epoxy resin to any holes or questionable areas and painted the Deck with a couple coats of non skid. Previous owner had attempted to build more seating up there and screwed threw the deck in numerous spots and covered with silicone.

Forward cabin I resealed around/under the hatch.

Aft cabin I sealed a hole/crack in the bottom of the rear wall lip on the exterior.

This summer I will work on the windows. I also plan on drilling few holes under the deck from inside the engine room and heads so any water that intrusion from the deck will drip into the bilge and not stay trapped or continue to migrate aft to the rear cabin. Someone has already addressed the teak decks but there is still water in there. So starting from the top and working our way down.

This is our learning boat. We are new to boat ownership. Oh boy the lessons we are getting:rofl::rofl:
 
Last edited:
UPDATE:

While investigating the water intrusion I ground out a channel around the forward part of the exterior of the window (Again, I've done this with three other window frames but failed to do it to this one as this was my learning window and my procedures evolved).

I did find some voids where I thought water would come in if it was an exterior issue but noticed that the surfactant streaks on the interior seemed more inset than the voids I observed when examining the area through the hull with a super bright flashlight.

It was my hope that if I could see through the hull in same area as the streaks it would indicate water intrusion from the exterior. So that information confirmed for me that it was seeping through the interior housing. I filled the exterior channel with Totalfair fairing compound and moved on.

On the inside I carved out a new channel along the top edge seal between the wood housing and whatever compound was put there by the original makers for a barrier for the window frame. There I began to observe wet wood. Wet wood was present along all of the areas of the top window frame that I exposed.

I knew from my previous work removing the headliner above this frame that there was no wood present in the cabin-top. It didn’t eliminate the possibility that water was running along the fiberglass cabin-top and getting into the wood housing but the headliner was bone dry and showed no presence of water, ever. So I concluded (to great relief) that this must be a more localized issue and not something far more grievous coming from some untraceable source somewhere else on the boat. So I had to trace the source.

Using an endoscope I forgot I owned; I explored a couple gaps in the wood frame above the window to try to see what was going on. Immediately I noticed a large screw coming through the fiberglass housing on a radius corner on the aft starboard quarter. (PHOTO: Look up towards cabin top from beneath screw) There appeared to be some sealant around the base of the screw but nonetheless I reached my hand up through the window to the outside to see if I could feel what the screw might be holding to the boat and I felt the mahogany trim that runs along the entirety of the window.

On the exterior I observed the quality of the trim and found it to be the most likely cause of the water intrusion into the starboard housing. I noticed bungs where screws were entering through the fiberglass and that there were enough screws to speak for the consistent wetness I had found all along the top of the window frame. The trim also looked to be in rough shape in some spots.

I’m not entirely sure what I’ll do yet but I’ll post updates as this work continues. I’m relieved to see signs that it might not be a leak running from 30 feet away. A little concerned how to fix this without destroying the trim work. It’s difficult to find mahogany wood and around here and even more difficult to cut it in to match.

Any thoughts? I could removed the bungs, try to get the screws out and just inject 5200 in and hope that helps? I could removed the entire trimming and seal the house and then add 5200? Has anyone else done this before?
 

Attachments

  • IMG_3101 2.jpg
    IMG_3101 2.jpg
    119.6 KB · Views: 17
  • Screen Shot 2022-05-14 at 8.32.31 AM.jpg
    Screen Shot 2022-05-14 at 8.32.31 AM.jpg
    66 KB · Views: 15
  • Screen Shot 2022-05-14 at 8.26.46 AM.jpg
    Screen Shot 2022-05-14 at 8.26.46 AM.jpg
    66 KB · Views: 15
  • IMG_3110 2.jpg
    IMG_3110 2.jpg
    137.6 KB · Views: 18
  • IMG_3143 2.jpg
    IMG_3143 2.jpg
    142 KB · Views: 16
  • IMG_3141.jpg
    IMG_3141.jpg
    120.3 KB · Views: 13
  • aft bath radius corner screw .jpg
    aft bath radius corner screw .jpg
    43.1 KB · Views: 12
  • IMG_3146.jpg
    IMG_3146.jpg
    153.6 KB · Views: 14
  • IMG_3148.jpg
    IMG_3148.jpg
    165.5 KB · Views: 16
Last edited:
Do not use 5200 for that. If you have any more issues if you use 5200 it will be VERY difficult to remove it. If you are working with just the trim use epoxy or thickened epoxy to repair it. Then install it with something more like Sika 291. Only use 5200 for things like transducers, etc that will never need to be removed or worked on again.
 
Condensation onto the window trough (edge of plywood) have produced wet wood stain trail. Cleaned up this wood and applied captain Tolley. It seems to be working. Once satisfied I will apply as skin of caulking.
I had already caulked around the window outside, so it had to be now from inside.
 
Greetings,
Mr. a. I would make every effort to carefully remove that trim and do a proper repair behind it. Deal with replacement and matching when and IF necessary. The trim looks due for a cleaning and refinishing, both outside and most probably inside (the surface that sits next to the cabin side). The whole trim piece should be rebedded IMO.
You're doing a nice job chasing leaks so far so why wimp out now?

Gobbing stuff at a leak seldom meets with long term success. As noted above, do NOT use 5200.
 
Do not use 5200 for that. If you have any more issues if you use 5200 it will be VERY difficult to remove it. If you are working with just the trim use epoxy or thickened epoxy to repair it. Then install it with something more like Sika 291. Only use 5200 for things like transducers, etc that will never need to be removed or worked on again.

I like the epoxy route more, assuming I can dry it out sufficiently (we’ve got time to cook it for weeks with a heat lamp if needed)

Is 291 an elastomeric sealant? I haven’t read up on it in a long time and forget the specifics. I have lots of Sudbury we were planning on using for the windows and if 291 is similar it may work just as well.

Thanks for the responses!
 
I usually use elastomeric caulk on plastics like HDPE.
 
Greetings,
Mr. a. I would make every effort to carefully remove that trim and do a proper repair behind it. Deal with replacement and matching when and IF necessary. The trim looks due for a cleaning and refinishing, both outside and most probably inside (the surface that sits next to the cabin side). The whole trim piece should be rebedded IMO.
You're doing a nice job chasing leaks so far so why wimp out now?

Gobbing stuff at a leak seldom meets with long term success. As noted above, do NOT use 5200.

Noted on the 5200. Appreciate the info. I feel like that’s the right approach with removing the trim work and sealing it properly. Any insight on how to cut it off? I’ve used a oscillating blade for other work but have broken a great amount of interior trim pieces ?
 
Either the oscillating tool or a sharpened putty knife, maybe.
 
Greetings,
Mr. a. Remove the teak plugs/bungs covering the mounting screws and attempt to take out the screws. Once you get all the screws out, carefully pry with a sharpened blade or the oscillating tool OT (ala Mr. C). You may have to use the OT to cut stubborn screws. PATIENCE and a gentle touch should get the job done. Re-bed and re-bung and WALLA!
 

Latest posts

Back
Top Bottom