Thoughts on the Mainship 350/390?

The friendliest place on the web for anyone who enjoys boating.
If you have answers, please help by responding to the unanswered posts.
I am hoping to get some thoughts from those of you who own Mainships, because my wife and I are going to look at a 350 tomorrow. ( It seems very similar to what is also called a 390.) It is a 1999 model.
From other threads you may have read that I have been looking for something in the 36' range, and hopefully a Monk, Island Gypsy or GB, but the pickings are slim to none these days, and those that come up seem to be sold before it is even possible to contact the broker, so we have broadened are search.
The one we will be looking at has a single CAT3206, which would not be my favorite, but I do prefer a single. It has about 4000 hours, the listing says it will cruise at around 8 knots, with consumption of around 1 gallon/nm, which seems high for this size and weight of boat with this size engine.
It has newer electronics and AGM's, canvas, etc.
Everyone on TF is always so helpful and knowledgeable, I am hoping to get some ideas about what to look for and what potential concerns are.
Thank you!

My wife and I are looking for something similar to this as well. Did you get a chance to see this one? Any thoughts on it - or is it now under contract? :) We looked at some older Hatteras's (1980's era) over in the Annapolis area but needed more work than we wanted to deal with. Thanks!
 
It sounds very similar to the one my wife and I looked at; maybe the same one! There is a lot we liked about it - the beam provides a lot of space, as does single cabin/head, single engine - but had concerns about the engine and generator, and because all the salon seating was "lounge chair" type there was much less storage than we would have liked. Also had interior carpet in bad shape. All fixable, but we are in our 70's and not looking for a project at this point. For someone younger, willing to make changes over a period of time could be a very nice boat, providing you do a thorough survey and sea trial. We have had the same experience in terms of very slim pickings! Good luck.
 
Thanks for your quick reply and all the details! I hope y'all are able to find your ideal boat too! I get torn about whether to wait and hope that inventory increases and prices drop - or just go for it! We are leaning towards just "go for it"! :D As they say: you only live once, and we're not promised tomorrow!! Thanks again!!
 
you can see by pictures in post 23 it is not that thick fiberglass both sides with a balsa sandwich in the middle I forgot one step when you remove stainless trim - there are then screws holding rub rail in - take a picture of location you remove them as there are a bunch of possibilities in the rub rail, then you will see narly joint. project well worth doing. It also helps with List issues

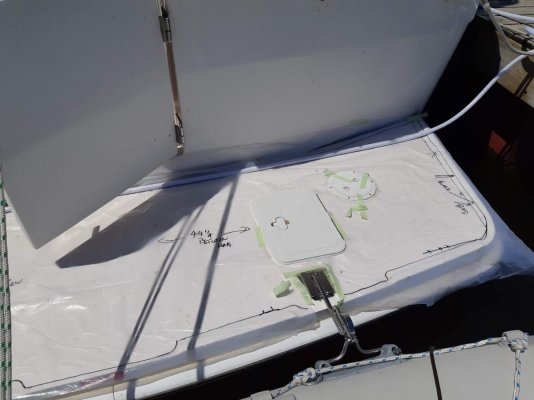
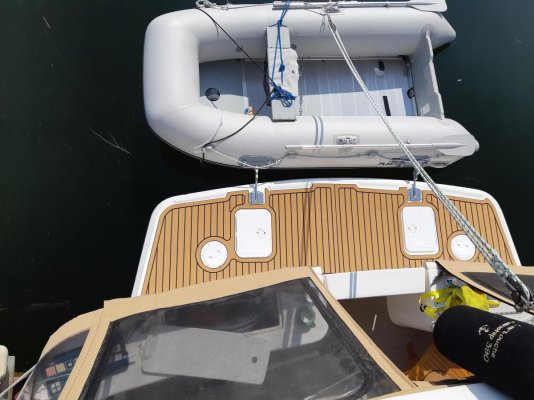
I want to install 2 cleats folding type close to the stern edge of the swim platform to tie off my inflatable dingy while shuttle back and forth from the boat to various site seeing locations. Is there enough deck to screw down the cleats? Should I use rivinuts or nutserts?
 
There is about 2-2.5 inches around the edge that is all glass, about 1/4in thick. Then you hit the core, 1/8in glass each side with 1/2 core. I would always put backing plates on any cleat, screws and even bolts with smaller washers tend to pull or at least cause stress fractures. Buy a piece of 3/8 aluminum plate, cut about 1/2 in bigger than the foot print, drill and thread. Then add lock nuts to finish the connection. You then have a cleat that will hold your dinghy and not fail if something bigger ends up there.
 
I want to install 2 cleats folding type close to the stern edge of the swim platform to tie off my inflatable dingy while shuttle back and forth from the boat to various site seeing locations. Is there enough deck to screw down the cleats? Should I use rivinuts or nutserts?

As you can see by the pictures attached the aft bolts are through bolted and are at the edge of the cavity, any further aft you are into solid fiberglass, and as a side note this is how i keep the dingy attached when not in use at an anchorage
 

Attachments

  • Template June 2.jpg
    Template June 2.jpg
    86.6 KB · Views: 15
  • 20190724_100256.jpg
    20190724_100256.jpg
    126.2 KB · Views: 15
There is about 2-2.5 inches around the edge that is all glass, about 1/4in thick. Then you hit the core, 1/8in glass each side with 1/2 core. I would always put backing plates on any cleat, screws and even bolts with smaller washers tend to pull or at least cause stress fractures. Buy a piece of 3/8 aluminum plate, cut about 1/2 in bigger than the foot print, drill and thread. Then add lock nuts to finish the connection. You then have a cleat that will hold your dinghy and not fail if something bigger ends up there.
How do you thru bolt it without removing the top?
 
Mine has an access hatch. As long as the cleat has a closed base, there is a tricky way the get a threaded plate behind the cleat by making a slot under the cleat. The slot only needs to be big enough to slide the narrow edge of the plate thru. Make the threaded backing plate. run a wire down thru one hole, up thru the slot, down thru the hole on the plate, up thru a hole on the other end, back down the slot and up the other hole in the deck. Then drop the plate thru the slot and pull up under the deck. Use long bolts to go thru the open holes and into the plate. Remove the wire and install the other bolts. seal everything and use lock tight. Not easy but I've done it a few times on other boats.
 
what do you think of drilling the hole oversized. With a bent nail in a drill to hog out the core around the hole. Fill with thickened epoxy and install a threaded screw-in type insert.
when fully cured bolt in my cleats. just thinking of ways to blind mount the cleats.
 
There is about 2-2.5 inches around the edge that is all glass, about 1/4in thick. Then you hit the core, 1/8in glass each side with 1/2 core. I would always put backing plates on any cleat, screws and even bolts with smaller washers tend to pull or at least cause stress fractures. Buy a piece of 3/8 aluminum plate, cut about 1/2 in bigger than the foot print, drill and thread. Then add lock nuts to finish the connection. You then have a cleat that will hold your dinghy and not fail if something bigger ends up there.

I like to butter the backing plate with thickened epoxy. That way the entire plate is in intimate contact with the deck. If there are any humps on the bottom of the deck the backing plate will bridge the humps and they will become stress points.
 
An observation.
Mainship 390 out of the water in a cradle (next to my boat) today.
Lots of underwater angles and curves. Reverse hard chine. Bustle with a pronounced curve downwards and inbuilt trim tabs in the underside. Bulbous belly. Small thruster tunnel.
Notable down angle on the prop shaft. Unprotected prop and rudder gear.
My overall impression was a design relying on tricks to achieve performance. Call me old fashion, but I like clean smooth underwater lines.
My 15m 23 ton motorsailer 220hp designed by a notable local (Australian) yacht designer about 20 years ago, no tricky bits, clean and neat 8.5 knots at 8 litres per hour, minimal wake.
I'm probably not comparing "apples with apples" however, a boat has to look right imho....
 
what do you think of drilling the hole oversized. With a bent nail in a drill to hog out the core around the hole. Fill with thickened epoxy and install a threaded screw-in type insert.
when fully cured bolt in my cleats. just thinking of ways to blind mount the cleats.
Cut in a Hatch then you will have proper access
 
I like to butter the backing plate with thickened epoxy. That way the entire plate is in intimate contact with the deck. If there are any humps on the bottom of the deck the backing plate will bridge the humps and they will become stress points.

Can’t use backing plate. No access.
 
Further info re M390. Observations of the boat being serviced next to mine in our local shipyard.
The boat yard staff changing the seacocks and skin fittings are very critical about the access to the fittings. Changing some has required cutting into furniture to access them. A potential purchaser may do well to look specifically at items like these that do need to be changed and see just how difficult this job is. Is it indicative of access to other tasks? for example maintaining the genset?
The bustle/pod to hull join is "very average". Pod has been bonded to the transom with something like a urethane sealant, and then a very thin layer of grp over the join. The fibreglass has cracked allowing water into the space between the pod and the transom.
Note my boat is not perfect, rot in the ply under the fibreglass on the roof, starting around fastenings.....boats!!!!
 
Hatches look terrible. I’ll use the action I described in post 378.
 
Last edited:
Hatches look terrible. I’ll use the action I described in post 378.
I guess to each his own. I personally like the look and love the extra storage and less weight with all the water that you are carrying around, enjoy
 
I'm not sure if the OP has stayed interested in a Mainship 390? To finish the story about "the boat next door"
The boat is a 2004 model 390.
The boat in the bay next to mine has several very significant and problematic issues.
The glass work around the rudder bearing area externally is full of voids.
The bustle join to the hull is by urethane sealant with a thin layer of grp over the join, (but only on the bottom sections). The join has been leaking for a long time. The sides are sealed by urethane only. (No glass over the join)
The fairing of the hull to bustle join is inadequate, particularly along the sides, with deep depressions evident at the join.
The bottom of the bustle has now been removed where it is adjacent to the rudder bearing. The balsa core is soft/wet, the glass is very thin and full of voids.
The engine has dropped/sagged on the mounts, wearing out the cutless bearing in the P bracket (a maintenance issue, probably not a construction issue)
OP: I suggest you check very very carefully: Access to skin fittings and valves. Access to all service items eg; generator maintenance, engine service items. Poke prod and tap the glass around the rudder bearing and the join bustle to hull. Look along the hull sides and bottom make sure you are happy with the hull form. Check the engine alignment, make sure where the shaft emerges from the aft face of the keel, that the shaft is in the centre of the bronze casting that forms part of the shaft/seal structure (for the PPS seal).
Caveat Emptor!
 
Get a phenolic hammer and tap out all the glass. It is easy to do and learn what sounds good and bad. A sharp tone is good a dull thud is bad. It doesn’t damage the gelcoat either since it is plastic and weighs a couple of ounces. It may save you the cost of a survey if the boat is really bad. I always carry mine when looking at boats.
 
Back
Top Bottom