Hydronic heating system install.

The friendliest place on the web for anyone who enjoys boating.
If you have answers, please help by responding to the unanswered posts.

Snapdragon III

Senior Member
Joined
Sep 1, 2016
Messages
415
Location
USA
Vessel Name
Snapdragon
Vessel Make
Custom 56' Skookum trawler
As I have posted elsewhere on this forum I bought a new, used boat last winter, and just finally got it home to Anacortes WA from Hawaii this July. One of the big projects I knew I would need to tackle upon getting it home was installing heat in the boat. It had apparently originally had a heating system, but it had been completely removed. It is a 56' boat with 3 bedrooms, 2 baths, den, dining room, kitchen, and pilot house. Given its size I looked at the options available and decided a hydronic system would be the best.

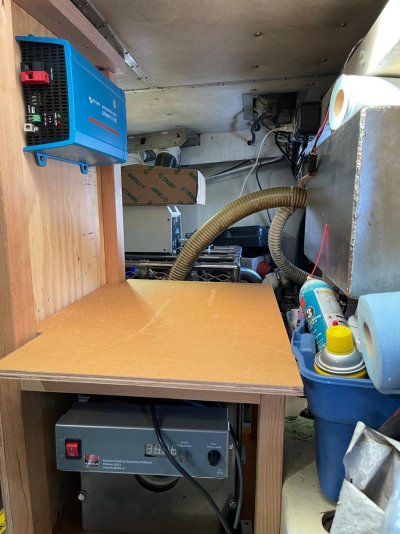
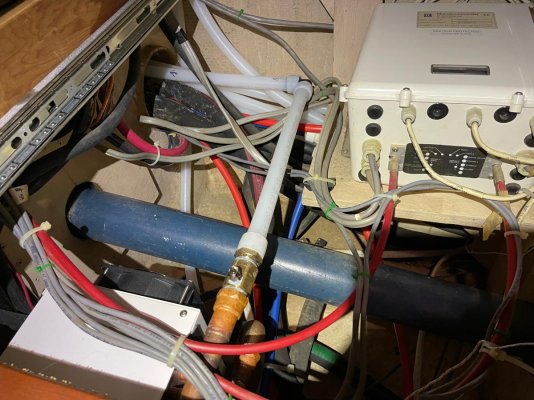
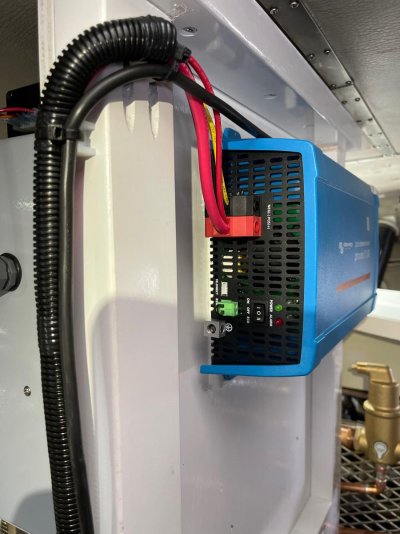
The three options I could find for hydronic systems, were Webasto, and Olympia boiler from Sure Marine, in Ballard, and Kabola from Marinetec in Anacortes. I met with both companies and they were both very helpful and seemed like first class operations, and in the end decided to go with the Kabola. I liked the idea of having a true water jacketed boiler system that was designed for continuous operation, and of the Olympia, or Kabola, the Kabola seemed like it was more specifically designed for the marine environment, and not adapted from home heating use. The biggest downside to the Kabola is that the controls and pump run on 220 50hz power, so it will need its own dedicated inverter, that I assume will use a little more power than just running it off the 120v inverter I already have running for my refrigeration and other house loads.

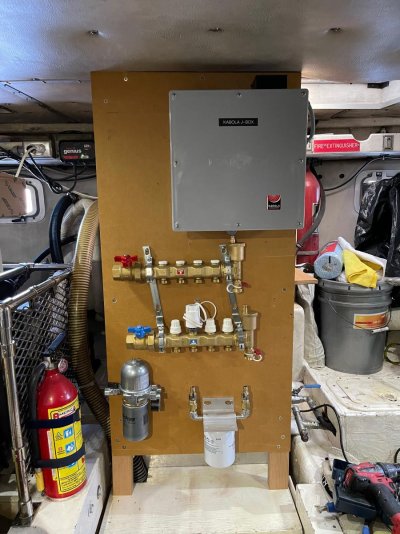
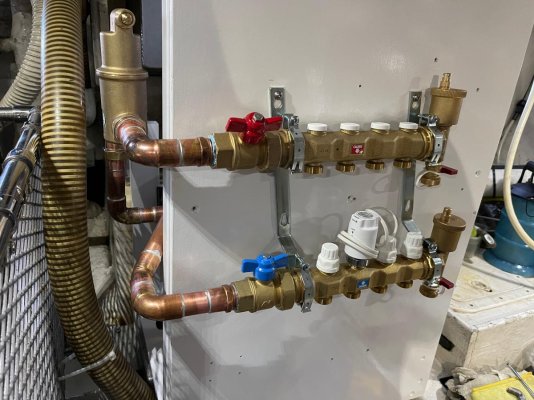
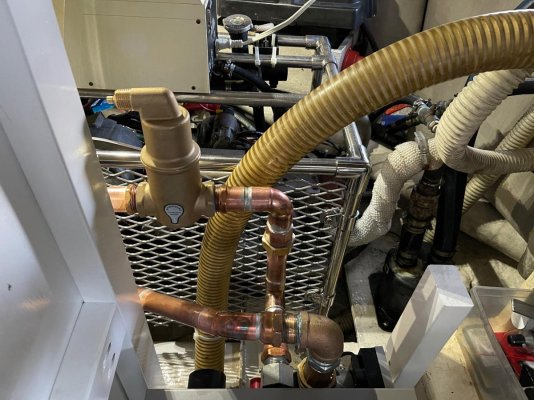
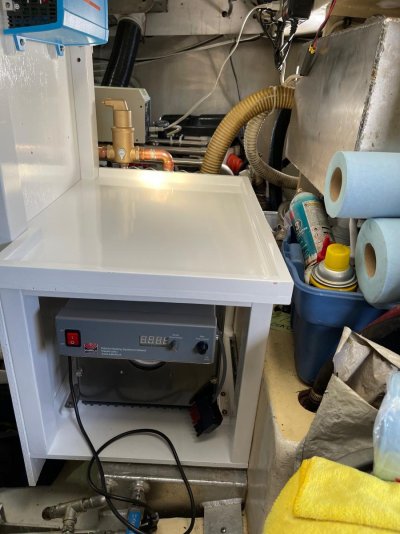
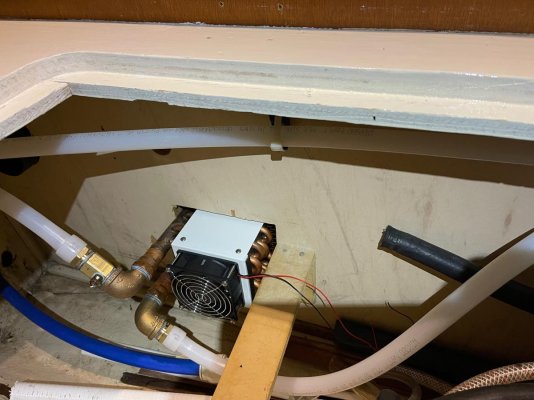
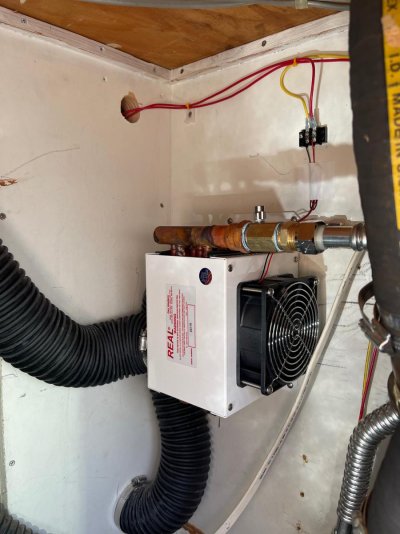
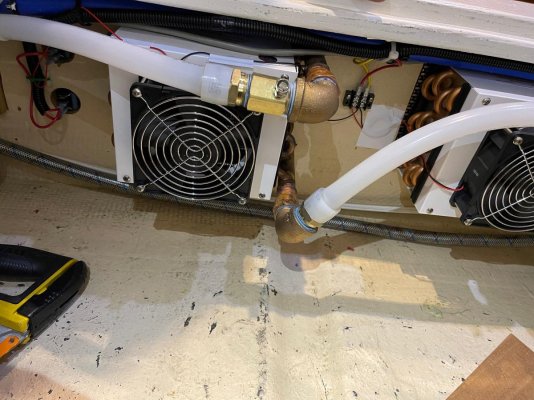
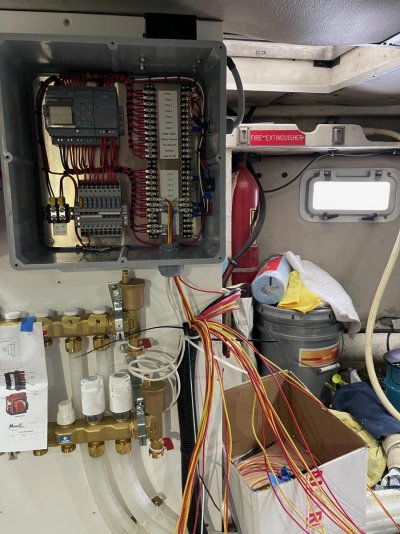
The system will have Kabola compact 7 boiler, 23884btu's, with 10 fan coil units, and 6 control zones. It will also have at least 1 heat exchanger of the heating loop of one of my main engines to grab heat when running, and it will also heat the hot water tanks. I am still working out the details of the hot water heating, and if I want to go with heat exchangers on one engine only, or on both engines.

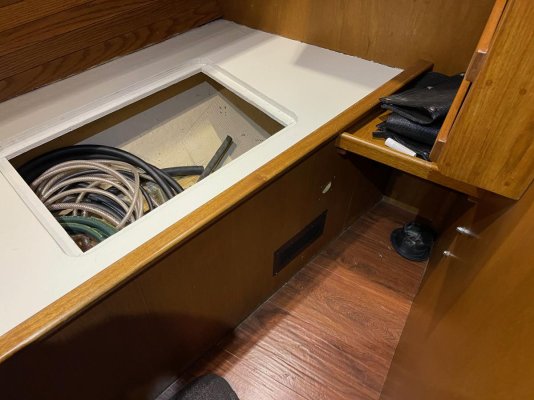
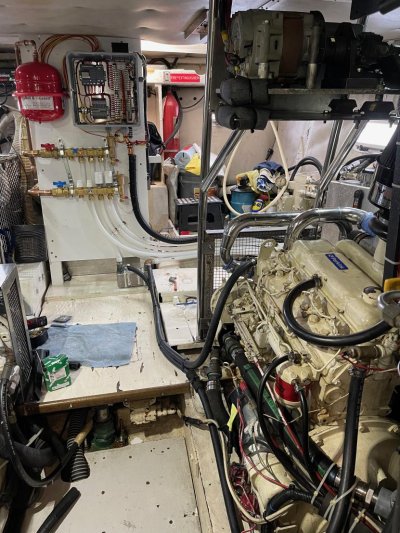
The only real place to put the boiler is in the engine room of the boat, but space is tight in there. Prior to my purchase hydraulic stabilization/stern thruster/alternator were added, and they took up a lot of the extra elbow room the engine room has. Also, there is a overhead hatch in the back corner that has to stay clear below it as it is the emergency escape path for the master bedroom.
 
Sounds like a great system. Although I have an Olympia boiler, I can't say I know anyone who is unhappy with their Kabola.


Will you do the install, or do you have someone lined up to do it?
 
First day working on the project I removed the rusty tool box that was mounted in the spot I am going to put the new boiler. I will miss having a big tool box in the boiler room, but I can live without it, and it was the only good spot. I failed to take any pictures of this part. After removing the tool box, and cleaning up the area, I started building a wooden frame to mount the boiler and it's associated equipment on. It is a lot of pieces to pack into a small area. There is the boiler itself, the inverter, large control box, expansion tank, manifolds, boiler exhaust, fuel filter, coolant conditioner filter, and a heat exchanger. The shelf over the boiler will be removable to access the boiler, and for storing stuff, and also to keep any dripping salt water from above off of the boiler itself. I think I have all the leaks fixed now, but there was definitely leaks in the past as the tool box was super rusty and messed up.
 

Attachments

  • IMG_0289.jpg
    IMG_0289.jpg
    140.6 KB · Views: 59
  • IMG_0290.jpg
    IMG_0290.jpg
    166.4 KB · Views: 68
Next step was to take it all back apart, and bring all the wood parts I made home for painting over the weekend.
 

Attachments

  • IMG_0291.jpg
    IMG_0291.jpg
    100.3 KB · Views: 54
  • IMG_0292.jpg
    IMG_0292.jpg
    95.1 KB · Views: 52
  • IMG_0293.jpg
    IMG_0293.jpg
    113.4 KB · Views: 52
Then I brought them back to the boat early this week and started the install for real. First step was to reinstall the wood frame, then mount the boiler on it. I put the boiler itself on top of drideck tile to keep any water that gets under it off the boiler, and I built in wood pads around the sides at the same level where the mounting brackets attach. Once the boiler was in I put in the plywood front on the frame and mounted the control box, manifolds, expansion tank, and inverter.
 

Attachments

  • IMG_0296.jpg
    IMG_0296.jpg
    143.5 KB · Views: 51
  • IMG_0297.jpg
    IMG_0297.jpg
    126.1 KB · Views: 49
  • IMG_0298.jpg
    IMG_0298.jpg
    134.3 KB · Views: 52
  • IMG_0299.jpg
    IMG_0299.jpg
    72 KB · Views: 47
  • IMG_0307.jpg
    IMG_0307.jpg
    106.1 KB · Views: 48
  • IMG_0308.jpg
    IMG_0308.jpg
    148.9 KB · Views: 50
Next up was to run the 1" pipe from the boiler to the distribution manifolds. Since I mounted the manifolds so close, this was a short run, but very tight space wise so it took some head scratching to make it come out clean looking. The air seperator also was part of this section of pipe. I decided to use 1" sweat copper for this pipe since it seemed easier to keep it really neat looking in such a tight space than pex pipe.
 

Attachments

  • IMG_0309.jpg
    IMG_0309.jpg
    153.1 KB · Views: 43
  • IMG_0310.jpg
    IMG_0310.jpg
    166.9 KB · Views: 47
  • IMG_0311.jpg
    IMG_0311.jpg
    127.3 KB · Views: 41
  • IMG_0312.jpg
    IMG_0312.jpg
    133.5 KB · Views: 44
  • IMG_0313.jpg
    IMG_0313.jpg
    161 KB · Views: 47
The next step was to start installing the fan coil units and running the 3/4" Uponor He pex pipe to them. So far I have 4 fan coils completely piped and about 90% of the pex pipe roughed in. This part is going easier than I thought it would, but I have a lot of experience with piping projects. Things will slow down when I get to the electrical part which I am not quite as handy with.
 

Attachments

  • IMG_0315.jpg
    IMG_0315.jpg
    182.1 KB · Views: 45
  • IMG_0317.jpg
    IMG_0317.jpg
    176.8 KB · Views: 52
  • IMG_0318.jpg
    IMG_0318.jpg
    196.5 KB · Views: 41
  • IMG_0319.jpg
    IMG_0319.jpg
    171.7 KB · Views: 44
  • IMG_0321.jpg
    IMG_0321.jpg
    118.3 KB · Views: 44
  • IMG_0322.jpg
    IMG_0322.jpg
    167.7 KB · Views: 43
  • IMG_0323.jpg
    IMG_0323.jpg
    155.5 KB · Views: 42
  • IMG_0324.jpg
    IMG_0324.jpg
    106.8 KB · Views: 42
That brings the project up to where I am now on it. I think I have about 5 full days of work on the boat into it, a few partial days at home painting, and lots of trips to various plumbing parts houses, Fisheries, lumber yard, etc, to round up parts. This was a very overwhelming project starting out as there are so many parts to put in, but I am feeling better about it now that I am into it and making progress. There is still a lot to finish. Install and pipe 4 more fan units, power wires from each fan back to the control panel, 6 thermostats and the wiring back to the panel, fan switches for each fan unit, the main control panel switches, run 6 ga power wires for the new inverter, run a new diesel supply line for the system, heat exchangers and water tank piping, run the air ducts, and the boiler exhaust, then start up and commissioning. Hopefully I can get it running in 3-4 weeks. The worst part is that I live about 75 miles from where we keep the boat in Anacortes, so it is a lot of driving up there and back, and makes for a long day.

I think the total cost for the parts will end up being around $19K. I was told by a couple of people that having it all professionally installed would be another $20-30K, but I did not actually get any bids, or talk to any installers. I am too cheap for that and in too big a rush to have a boat with heat, so we can use it this winter.

I will try and update this thread as I make progress on the project.
 
Last edited:
very professional job. Looks really nice!!
 
The other big reason I chose the Kabola I forgot to mention is very anecdotal, but I am only human. My next door neighbor at the marina that I am friends with, and lives aboard full time, put in a Kabola about 20 years ago that he runs 24/7 all year long for heating, and making hot domestic water, and he has had almost no problems with it the the entire time. It was a very convincing testimonial.
 
I was told by a couple of people that having it all professionally installed would be another $20-30K, but I did not actually get any bids, or talk to any installers. I am too cheap for that and in too big a rush to have a boat with heat, so we can use it this winter.

I will try and update this thread as I make progress on the project.

You're doing a first class job! Far higher quality work than the "professional" work I had done. $32K for installation of a Hurricane system with 3 zones, four air handlers, loop to the water heater. I already owned the boiler, air handlers, thermostats and much of the required materials.
 
Your copper sweat fittings are nicely done. Pro job!
 
Good looking install in a tight space. You may find the Sure Marine Real heat exchangers a bit anemic, due to the weak (but quiet) fans. If you upgrade them to something a little noisier you get a lot more heat from them. With the supplied fans they will not put out the heat spec'd (which is for the core alone under lab conditions).
 
Good looking install in a tight space. You may find the Sure Marine Real heat exchangers a bit anemic, due to the weak (but quiet) fans. If you upgrade them to something a little noisier you get a lot more heat from them. With the supplied fans they will not put out the heat spec'd (which is for the core alone under lab conditions).

Interesting. Will keep that in mind if I don't get enough heat.
 
Insulate your water lines (both directions) so you get the heat where you want it and aren't just heating the engineroom and bilge. It makes a big difference in cold weather. It also heats a cold boat faster. I went from 5 gallons of diesel a day to 3 in zero F weather. It also heats a cold boat faster.
 
Very impressive, thanks for writing it up.

What type of sealant are you using from the pex to the copper, please? I have a drip in a connection to fix.
 
Very impressive, thanks for writing it up.

What type of sealant are you using from the pex to the copper, please? I have a drip in a connection to fix.


There is no sealant where it goes pex to copper. At the manifold it uses a compression fitting with a part that goes inside the pipe, and a little ferrel on the outside that compresses it. at the heater units you use a special tool to stretch the pipe, and the little pex ring you put over the end of it, than just put it over the special hose barb and it tries to shrink back to it's original size and grabs onto the hose barb.
 
Spent another day at the boat today (Day 6) and got the last 4 fan coil units installed and piped. I was confused and had miscounted the fan coils and thermostats when I posted this the other day. I actually have 8 fan coils, and 5 thermostat zones. Not 10 and 6. The heating loop piping is done now, but I still have the loop for engine heat exchangers and domestic water heating. I am going to put that one off for awhile since it is all in the boiler room. I want to get all the wire roughed in first, so I can put the boat back together and clean up a little. One of the things that is a pain about this project that I did not quite see coming is that I have had to take most everything out of most of the cabinets on the port side of the boat, remove a bunch of cushions, take off access panels etc, to run the pipes and wires the length of the boat. It is a ton of crap that you have to put somewhere, and my boat is complete chaos at the moment. Once I get the wire roughed in I can put most of it back and life will be better. Planning on starting on that next Wednesday.
 

Attachments

  • IMG_0330.jpg
    IMG_0330.jpg
    124.1 KB · Views: 27
  • IMG_0333.jpg
    IMG_0333.jpg
    119.2 KB · Views: 30
  • IMG_0335.jpg
    IMG_0335.jpg
    149.2 KB · Views: 27
Spent 3 more days working on the heating this week. Up to 9 days total now. I got all the wire pulled, and roughed in, and 4 of the 8 units wired on the unit side. I am trying to get all the stuff in the boat done so I can put everything back in the cabinets, and put all the cushions back, and regain a little bit of order in my life. I will work on the engine room stuff once all the stuff in the rest of the boat is done in a couple more days. I decided to run all the wire with individual wires, then cover it with conduit or split loom in any areas where it might get bumped. The main trunk coming out of the engine room I ran in 1 1/2 bilge pump hose to keep it all together, and contained. The conduit is 25' long with a couple holes holesawed in it before I started along the way where wires needed to branch off. I ran a piece of tuna cord through it first thing then looped it back to itself through the middle of the cabin, so I would have a continuous line to pull the subsequent 30 wires through with. That part worked really well. It all started to jam up after about 12 wires, but I got some wire lube and it helped a ton.
 

Attachments

  • IMG_0344.jpg
    IMG_0344.jpg
    104.2 KB · Views: 35
  • IMG_0349.jpg
    IMG_0349.jpg
    131.9 KB · Views: 37
  • IMG_0351.jpg
    IMG_0351.jpg
    118 KB · Views: 37
  • IMG_0352.jpg
    IMG_0352.jpg
    151.3 KB · Views: 31
  • IMG_0353.jpg
    IMG_0353.jpg
    133.2 KB · Views: 35
  • IMG_0354.jpg
    IMG_0354.jpg
    169.5 KB · Views: 36
A big project mess, and a wire dispenser I was pretty proud of myself for coming up with.
 

Attachments

  • IMG_0336.jpg
    IMG_0336.jpg
    187.5 KB · Views: 45
  • IMG_0337.jpg
    IMG_0337.jpg
    180.7 KB · Views: 44
Impressive work!
 
Spent a couple more days, (11 total now) and finished up all the electrical work, except for one temp sensor that will have to go in my existing hot water tank, and all the work inside the main boat. All the remaining work is in the engine room. I still have to run the loop for hot domestic water heating, the diesel supply line, water conditioner filter, and boiler exhaust. I was pretty proud of myself how all the wiring came together at the controls box. It was the first time I had done anything like this and was worried that it was going to come out looking like a bowl of spaghetti.
 

Attachments

  • IMG_0361.jpg
    IMG_0361.jpg
    174.3 KB · Views: 47
  • IMG_0362.jpg
    IMG_0362.jpg
    198.8 KB · Views: 46
  • IMG_0365.jpg
    IMG_0365.jpg
    196.2 KB · Views: 44
  • 65464927153__2B93F093-7F38-464C-B9D5-D8A6430E98C9.jpg
    65464927153__2B93F093-7F38-464C-B9D5-D8A6430E98C9.jpg
    111.9 KB · Views: 39
Nice work. Will you install a heat exchanger loop for using engine heat when cruising thus negating the boiler operating?
 
Nice work. Will you install a heat exchanger loop for using engine heat when cruising thus negating the boiler operating?

Yes, there will be a heat exchanger on the loop that heats the domestic hot water. I am still trying to decide if I want to have 2 of them, one on each engine, or just one heat exchanger off one engine. The engine room is already kind of a spaghetti bowl of pipes due to the addition of the hydraulic system for the stabilizers, alternator, and stern thruster. I don't want to make it worse than I have to.
 
Beautiful work, I'm especially impressed by that soldering work but it is all very tidy. That boat found its way into the right hands.
 
Spent the day on the boat today and got the domestic hot water loop and engine heat exchanger piped. I am not super happy with it, but it was the least bad option in the already overpacked engine room. The hot water tank is completely buried under other systems. In the second picture you can see the new white pex pipe behind all the other mess of existing lines. It was a challenge to get the old fitting off the water heater, and the new ones on.
 

Attachments

  • IMG_0367.jpg
    IMG_0367.jpg
    167.5 KB · Views: 30
  • IMG_0369.jpg
    IMG_0369.jpg
    171.5 KB · Views: 29
  • IMG_0371.jpg
    IMG_0371.jpg
    197 KB · Views: 31
  • IMG_0372.jpg
    IMG_0372.jpg
    199.2 KB · Views: 34
Last edited:
lol, if wiring can be sexy... That's about the sexiest looking electrical panel I've ever seen!!!
Love following along and you are doing an absolutely amazing job!!! WOW!!!
 
Your system looks great. Just one off the wall question. Have you ever considered running your coolant for the heating system through your closed loop cooling system on your generator to use the heat of the engine to heat boat. I have done that on my Boat and I love it. I just don't hear others talking about it. Free heat while the generator is running and when it is not running use the boiler.


John
 
Looks like a great job, and I've done 3 Kabola systems, two KB-75's and an HR-500. One of these I integrated with a Cruiseair tempered water system. One of these systems does run 24/7/365, and I know firsthand that it ran more than 900 consecutive days before it got its first 'annual' service.
 

Latest posts

Back
Top Bottom