Mainship 400 Generator Coolant

The friendliest place on the web for anyone who enjoys boating.
If you have answers, please help by responding to the unanswered posts.

CaptainEd

Member
Joined
Dec 20, 2015
Messages
15
Location
United States
Vessel Name
Sanctuary / Misty
Vessel Make
58 Hatteras MY / 41 Hatteras Convertible
Those that have this model know that the generator is mounted under the cockpit. There is no clearance on top to get to the coolant tank cap. I'm replacing the heat exchanger (also a frustrating part to get too) and will need to somehow fill this tank again. Short of un-installing the generator, has anyone figured out a way to fill it?

I am considering trying to pump coolant through the overflow tube back into the tank, but not sure if that's going to work.

Thanks for any insight.

-Ed G.
 
Our 400 has 2 circular deck plates right above the Genset what looks to be his attempt to gain access to that area. I used one to access the air filter when I replaced it but have not thought about coolant replacement yet.....Hmmmmm
 
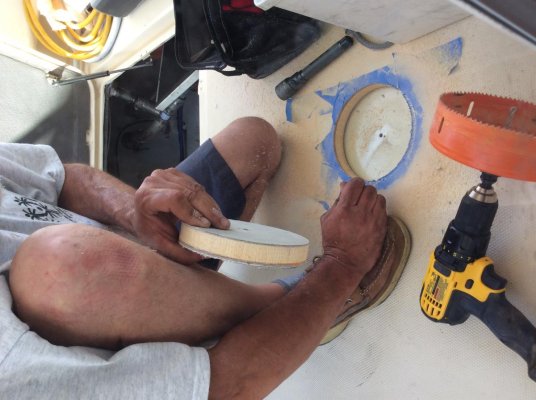
I installed a 6" deck plate above the coolant fill. Used the same hole saw to remove the sound shield above the coolant fill.
 
Take your sound shield off and throw it away. You won't miss it, I promise.


I'm a fan of access plates in the right place, but there is no need to cut holes in your deck for this job.


Use a 2' long piece of rubber tubing pushed onto the end of a large funnel to fill through the top cap. The 8Oez is easy to airlock. You have to burp it by squeezing the heck out of the cooling hoses high on the stb side with the genset running and the cap off. If you have a second person on hand, have them hold up the funnel adding coolant gradually as you burp it.


Mine has airlocked all three times I have changed the coolant.


Let me know if you figure out a way to drain it without getting coolant all over the Laz.


This job is a bit of a pain, but you can do it.


Doug
 
Last edited:
An outboard squeeze bulb fuel line shoved on the pressure cap overflow fitting can make quick work of this. Especially if you can crack the pressure cap loose while pumping coolant in.

Some of these have a vent fitting on the high side of cooling system, loosen that while pumping in coolant and then pressure cap need not be loosened.

Who ever designed this install should be mercilessly beaten about the head and shoulders.
 
Take your sound shield off and throw it away. You won't miss it, I promise.

The Admiral has stated a hard "No" to that suggestion, but then, she doesn't do the maintenance.....


Use a 2' long piece of rubber tubing pushed onto the end of a large funnel to fill through the top cap. The 8Oez is easy to airlock. You have to burp it by squeezing the heck out of the cooling hoses high on the stb side with the genset running and the cap off. If you have a second person on hand, have them hold up the funnel adding coolant gradually as you burp it.


Mine has airlocked all three times I have changed the coolant.

This job is a bit of a pain, but you can do it.

Ha! I'll let you know if I survive it! I figured "while you're in there" I'd replace the belts too. Turns out someone in the past had taken off the alternator bracket and couldn't get it back on, so it was just wedged up against the engine block for "leverage" and wearing away at the metal. I don't know how long it's been that way, but I can't get a bolt to thread back into the mounting hole. It's in a completely blind spot I can't even get my phone into to take a photo. I suspect the threads are gummed up, but no way to tell.
 
Can’t we just build some sort of “slide-out tray” and put the genny on that so when it’s time to do maintenance, we can just “unlatch” it so to speak and pull it forward?
 
I installed a 6" deck plate above the coolant fill. Used the same hole saw to remove the sound shield above the coolant fill.

Do you by chance have measurements for placement of the deck plate? I'm going to try to get behind the genset and pop the rear cover off before I commit to cutting into the deck, but I'm not hopeful that I'll be able to get back there.

Thanks,

-Ed G.
 
Who ever designed this install should be mercilessly beaten about the head and shoulders.

You've got that right for sure! :banghead::banghead::banghead:

I bought a pump and some hose to hookup to the overflow line. I couldn't blow through it, so I'm not sure I get get fluid through it without releasing the cap.

I'll know one way or another shortly. I'm going to try and get behind it, pop the back cover and get to the cap. I'm just waiting for the Admiral to return in case I get stuck trying to get in there.
 
Totally agree with Doug.... throw away the sound shield. Didn't miss it that much.


You "can" remove the rear screws that hold it in place, and remove the one in the front starb side and "twist" is out a bit, but don't believe that's necessary.


Move what ever stuff is on the starboard side for better access to the side for heat exchanger removal, and it's fairly easy. Most likely, the start battery is there and easy to move.


Clean and fix (if necessary) the heat exchange on the bench. Also, change the zinc then. Be sure to inspect the hose that goes to the back of the gen as this would be an easy time to replace. Check that little flow sensor on the forward side of the heat exchanger. It is dirt cheap to replace, but will shut down the gen, if it fails. Also, change the impeller at this time.... just easy to do.


When putting the heat exchanger back on be SURE the supports are solids. I had one break, drop down on that sensor and caused the gen to quit.


====
As for replacing the coolant, a hose with a tube to the cap is easy to figure out. Fill with just a pint less than it holds.


Then put some paper towels around the cap, keep hose there, lower the funnel below the lever of the cap and pour a pint in. Then lift the funnel slowly above the cap and the coolant will flow in. Ease it in slowly so when it barely overflows, you'll see it and can stop, with minimal mess. Yes, you want it absolutely FULL.


Burp as needed per Doug, however, I've never had to do that.


NOW, if you really want a tight generator, get a 430 aft cabin....... that guy should be shot, too.
 
Do you by chance have measurements for placement of the deck plate? I'm going to try to get behind the genset and pop the rear cover off before I commit to cutting into the deck, but I'm not hopeful that I'll be able to get back there.

Thanks,

-Ed G.

Sorry, no. It was a by feel operation. Access both sides of deck. Find the right position. Utilize a pilot hole and adjust accordingly. Epoxy exposed core and installation screws. Do not expose core to any possibility of moisture.
 
Those that have this model know that the generator is mounted under the cockpit. There is no clearance on top to get to the coolant tank cap. I'm replacing the heat exchanger (also a frustrating part to get too) and will need to somehow fill this tank again. Short of un-installing the generator, has anyone figured out a way to fill it?

I am considering trying to pump coolant through the overflow tube back into the tank, but not sure if that's going to work.

Thanks for any insight.

-Ed G.


Others have suggested removing sound shield but even that is difficult. I also drained and flushed coolant on my 8EOZ and what I did was lift the top sound shield by removing the 3 screws on the rear facing and forward starboard side. I ended up using a small pair of vice grips to grab the screw tops to get them loose. Using a large screwdriver and jamming it between the upper frame and cover, I was able to lift the top shield enough to reach up through the starboard side and unscrew the cap. You need to push it down to get it to turn. Difficult but not impossible. Then using a 3-4 foot piece if tubing attached to the end of a funnel, fill with pre-mixed coolant. After filling and installing the cap I ran the unit for 10 minutes, removed the cap and added more. I also filled the overflow bottle and marked a line at the level. Because of the way the cap is designed, the system will suck in fluid when low and let some out if overfilled. What I found was that after running it a couple of times for a short period the overflow bottle was almost empty,. That told me the system was not yet full. Now it is full. I don't think I ever got an air lock.
 
Here it is.
 

Attachments

  • A81EFF4D-2000-4768-8934-5227947D6960.jpg
    A81EFF4D-2000-4768-8934-5227947D6960.jpg
    127.4 KB · Views: 24
  • 9FAAEED0-DAE2-4A9E-8907-251A40C2E52D.jpg
    9FAAEED0-DAE2-4A9E-8907-251A40C2E52D.jpg
    118 KB · Views: 27
The Admiral has stated a hard "No" to that suggestion, but then, she doesn't do the maintenance.....


Ha! I'll let you know if I survive it! I figured "while you're in there" I'd replace the belts too. Turns out someone in the past had taken off the alternator bracket and couldn't get it back on, so it was just wedged up against the engine block for "leverage" and wearing away at the metal. I don't know how long it's been that way, but I can't get a bolt to thread back into the mounting hole. It's in a completely blind spot I can't even get my phone into to take a photo. I suspect the threads are gummed up, but no way to tell.

I found a similar issue and it turned out the bolt broke off in the water pump housing. I removed the water pump, drilled out the metric bolt, reinstalled the water pump and the bolt. I used a dab of clear silicone on both the o ring and water pump gasket. No leaks. Good luck.
 
The Admiral has stated a hard "No" to that suggestion, but then, she doesn't do the maintenance.....


Ha! I'll let you know if I survive it! I figured "while you're in there" I'd replace the belts too. Turns out someone in the past had taken off the alternator bracket and couldn't get it back on, so it was just wedged up against the engine block for "leverage" and wearing away at the metal. I don't know how long it's been that way, but I can't get a bolt to thread back into the mounting hole. It's in a completely blind spot I can't even get my phone into to take a photo. I suspect the threads are gummed up, but no way to tell.


Take the access panels off of the sound shield, close the laz lid, start the generator and run it for a while. You won't notice much difference in sound volume. Especially if you are inside the cabin with the cockpit door closed. It is louder in the cockpit, but very little difference inside the boat.


On the other hand, having access to the generator will add YEARS to its life, and maybe yours as well, lol. I took mine off at the recommendation of Eric at Marine Systems in Carrabelle, who is a generator wizard. I do most of my own work, but I had a guy here in Stuart come adjust the valves, he told me taking the shield off was a great idea and that my unit looked better than any Mainship 400 or 430 he had ever worked on. No rust and very well maintained. I'm not a great mechanic, or super particular, so I attribute this to the shield removal.


I can change the zinc in 5 minutes. Belt tightening takes maybe ten. Pulling the HE is a very manageable job, even for a ham fist bumbler like me.


Putting an access plate in the deck helps to get to the filler cap, but you still have to get the sound shield top off, which is not easy if I recall, and it doesn't help with anything else.


I'll get off of my soap box now.


Hope your fluid change went well.


Doug
 
I installed a 6" deck plate above the coolant fill. Used the same hole saw to remove the sound shield above the coolant fill.


Hey Skip,


Did cutting a six inch hole in the top of the shield have an affect on its sound deadening? Or did you cover the hole in the shield somehow?


Doug
 
Hey Skip,


Did cutting a six inch hole in the top of the shield have an affect on its sound deadening? Or did you cover the hole in the shield somehow?


Doug

I used the same hole saw to cut the sound shield. Put a bolt/washer in the middle of the cut out and laid it in place.
 
Those that have this model know that the generator is mounted under the cockpit. There is no clearance on top to get to the coolant tank cap. I'm replacing the heat exchanger (also a frustrating part to get too) and will need to somehow fill this tank again. Short of un-installing the generator, has anyone figured out a way to fill it?

I am considering trying to pump coolant through the overflow tube back into the tank, but not sure if that's going to work.

Thanks for any insight.

-Ed G.
It pops off to acsess the oil dipstick just slide up
 
Mermaid, do you think you could measure where the hole is so I can pinpoint where to drill?

Sure. The boat is in hurricane storage right now and I won’t see it again until November. Remind me if you don’t see another response pop up here.
 
Can’t we just build some sort of “slide-out tray” and put the genny on that so when it’s time to do maintenance, we can just “unlatch” it so to speak and pull it forward?


I was told that the generator on my 2004 MS 400 is actually mounted to the “quiet box” and that the “quiet box” is somehow mounted to the shelf over the bilge. Question: Has anyone successfully found and loosened the mounting screws that hold the “quiet box” to the shelf? My mechanic thinks that generator should somehow slide out a bit once the mounting screws have been loosened. Any help will go along way as I have taken all 4 of the sound shields off and not yet found the mounting screws.
 
I was told that the generator on my 2004 MS 400 is actually mounted to the “quiet box” and that the “quiet box” is somehow mounted to the shelf over the bilge. Question: Has anyone successfully found and loosened the mounting screws that hold the “quiet box” to the shelf? My mechanic thinks that generator should somehow slide out a bit once the mounting screws have been loosened. Any help will go along way as I have taken all 4 of the sound shields off and not yet found the mounting screws.

Tom, it sounds like you figured out how to get the sound shield off. Now that it is off, you still can't access the fill cap without pulling the genny a bit? Are you planning on putting the cover back on later?
 
One can easily remove the filler cap once the sound shield is off, however a bit tight. If you can't turn it... need to push down to turn, you can put a large vise grip or channel lock to turn while you push down with the other hand. Remove it occasionally so it doesn't get hard to remove.


And, yes, easy to swing the genny out but not really necessary. but to do so, one needs to remove three of the four bolts than hold it in place.


I'm 6 ft, and can fairly easily access whatever needed from the starboard side with the battery removed. Change hoses, belts, etc. The impeller can be accessed pretty easy from the front.


Yes, it's tight. Yes, get rid of the sound shield.
 
Tom, it sounds like you figured out how to get the sound shield off. Now that it is off, you still can't access the fill cap without pulling the genny a bit? Are you planning on putting the cover back on later?


Once I get it repaired, I plan to put all the sound shields back on including the hard to remove top shield. Since the screws that hold the top shield are so hard to access, I hoping that jamming a couple tennis balls up there will work to safely hold the shield in place.
 
Once I get it repaired, I plan to put all the sound shields back on including the hard to remove top shield. Since the screws that hold the top shield are so hard to access, I hoping that jamming a couple tennis balls up there will work to safely hold the shield in place.


Leave it off, it doesn't do much other than cause delayed maintenance issues. Take the frame off too and throw it away.
 
Additional issues with the unit.

Great discussion here, You guys are all over it.

The genny on my 08 MS 400 runs perfect with at flick of a switch. I really love her.

The PO cut the hole in the cockpit floor so access to the coolant cap is fairly easy. It’s probably time for a routine coolant change.

It’s pretty easy keeping up with oil changes and she has just over 300 hours on the clock. Impeller maintenance and heat exchanger inspections are a breeze too.

A couple of issues give me fits:

The pencil zinc faces to port and down at about the 8:00 position on the heat exchanger. The real bugger is to access the zinc I have to remove a motor mount to get any tools on it. I’m a pretty good mechanic but this one has me stumped. I have been removing the motor mount every 6 months or so to replace the zinc as I can’t figger another solution.. What a PITA!

Only other issue is on last inspection I noticed one of the straps holding the heat exchanger in place is busted. I installed temporary fix to keep it from rattling around and destroying itself and the flow switch mentioned. I’ll replace the straps if I can find them or fabricate as required. My concern here is the design is not up to the task and vibration fatigue will break it again.

Otherwise she’s golden.

Any ideas how to solve or mitigate theses issues?

I’ll start a new thread if this one is too far off the rails.
 

Attachments

  • 8635EEA7-3954-4F7D-A9D8-FBEFAAC7ED05.jpg
    8635EEA7-3954-4F7D-A9D8-FBEFAAC7ED05.jpg
    97.9 KB · Views: 30
Great discussion here, You guys are all over it.

The genny on my 08 MS 400 runs perfect with at flick of a switch. I really love her.

The PO cut the hole in the cockpit floor so access to the coolant cap is fairly easy. It’s probably time for a routine coolant change.

It’s pretty easy keeping up with oil changes and she has just over 300 hours on the clock. Impeller maintenance and heat exchanger inspections are a breeze too.

A couple of issues give me fits:

The pencil zinc faces to port and down at about the 8:00 position on the heat exchanger. The real bugger is to access the zinc I have to remove a motor mount to get any tools on it. I’m a pretty good mechanic but this one has me stumped. I have been removing the motor mount every 6 months or so to replace the zinc as I can’t figger another solution.. What a PITA!

Only other issue is on last inspection I noticed one of the straps holding the heat exchanger in place is busted. I installed temporary fix to keep it from rattling around and destroying itself and the flow switch mentioned. I’ll replace the straps if I can find them or fabricate as required. My concern here is the design is not up to the task and vibration fatigue will break it again.

Otherwise she’s golden.

Any ideas how to solve or mitigate theses issues?

I’ll start a new thread if this one is too far off the rails.


Odd.


My Zinc faces about 1:00 rather than 8:00 like yours. Access to it was one of the main reasons I took off the sound shield frame, without it I can change the zinc in about 5 minutes. Belt adjustment is also way easier. I guess you can't rotate the HE because of the way the hoses attach to it. Maybe you could remove the HE and have a machine shop tap in a new place for the zinc? I saw a thread somewhere for someone who did that. Maybe it was on the Stella Blue site?


Not sure about the straps, but thanks for the tip, I'll look at mine more closely now.


One other issue when doing a coolant change is that a couple of the drains are so low that it is impossible to get the coolant out of them without making a big mess. I've considered sucking the old coolant into a shop vac as it drains out, but I'm concerned about the safety hazzard of that. Anybody know if coolant is flammable?
 
Last edited:
Well I bit the bullet this past weekend and "attempted" to remove the sound enclosure so I would be able to change the coolant. I seem to have less overhead clearance than some others, something like 1/4" or so. Since the sound cover is constructed before the deck is put on the boat, many of the fasteners cannot be reached easily. But, by prying and cutting I did get the frame parts off across the top at the front and right side, and also got the vertical pillars off on the right end, both the one closer to the bulkhead and the one aftward.

I also managed to unscrew all four screws holding the lid down.

So here I am with the lid loose and able to move a couple inches the the right and toward me, but as the top crosspiece closest to the bulkhead is still in place, I can't move the lead in that direction.

Unfortunately, the lid cannot be removed because there seems to be various hoses and possibly other components that are sticking up into the lid (and the sound insulation thereby attached) which leaves me with a "floating" lid that I can't get out without breaking something. I only have about a quarter of an inch clearance, which isn't enough to lift the lid up to remove.

So, after two days of struggling, I fell back to re-group. I am almost out of ideas.

For my next attempt I am going to see if I can locate three of the four screws holding the base to the shelf, which may allow me to swivel the genny towards me and, with luck, I can get the lid off. I am not holding out hope that it will give me any more clearance, though.

For all of you who have removed the sound enclosure, did you encounter this problem and how did you solve it?
 

Attachments

  • Capture1.JPG
    Capture1.JPG
    97.8 KB · Views: 31
Hey Gary,


I worked with my mechanic to get my shield off. He used a bottle jack and carefully raised the cockpit deck enough to slide the top cover off. There is some flex there.


There is a vent hose that was going through the lid that he left in place. I will be back down at the boat after Thanksgiving, I can take pics of my Genset if it helps. Sorry to make you wait that long.


Doug
 
Back
Top Bottom