Short-ish Haul, 34 Mark1

The friendliest place on the web for anyone who enjoys boating.
If you have answers, please help by responding to the unanswered posts.
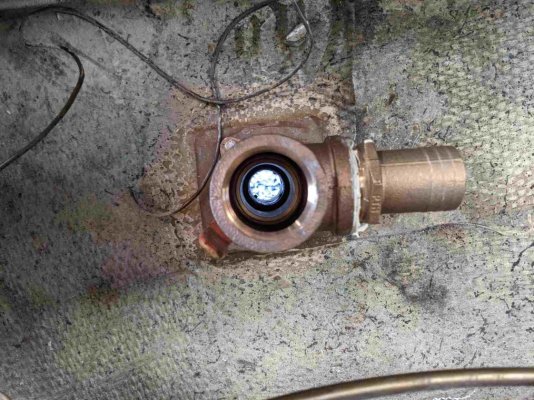
Groco makes an external strainer/scoop that mounts a bronze ring on the bottom of the hull, and the strainer/scoop is mounted with screws so it is removeable. Doesn't allow clearing with a stick, but you can dive on it to remove the screen and clean it out.

https://www.groco.net/products/raw-water-strainers/hull-strainer/sc-series

If you do decide to add a scoop/strainer at some point, you might look into that series as a compromise on serviceability.

This does look like a great option, thanks for pointing it out. Might be something I add on the next haul out. In my area we rarely get large amounts of grass floating on the surface or suspended. I don't have any plans to venture very far with the boat this season but hopefully next season I will have finished going through the major systems and venturing further. When the boat comes back out of the water in the fall, I plan to have it soda blasted and left to dry out over the winter so I would probably just 5200 the ring to the barrier coat.

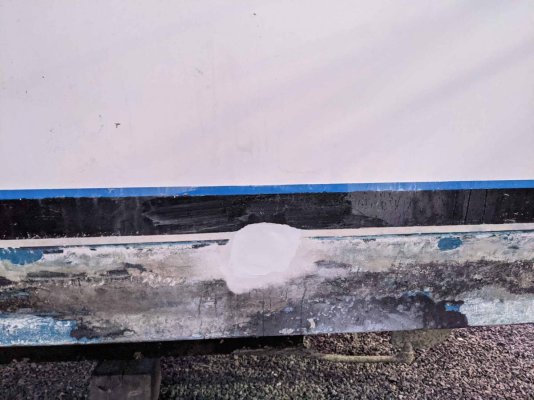
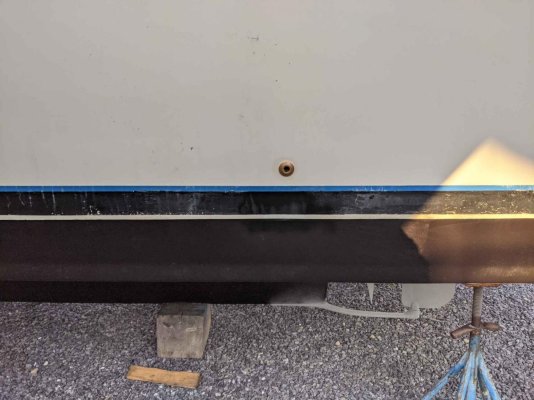
On Saturday, I was fortunate to have my father lend a hand in the yard for a pretty full day, he tackled the loose paint around the water line while I worked on my hull projects, I'm much closer to being ready to roll paint back on.

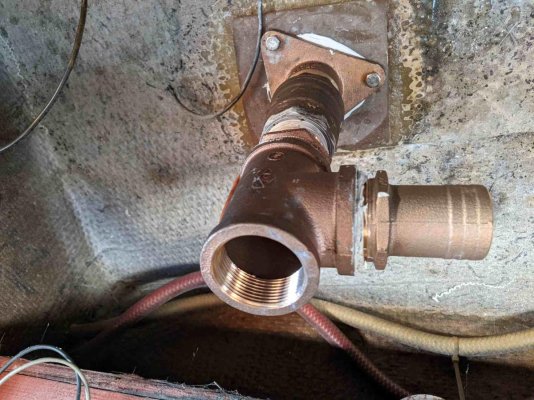
Last night I hit a couple minor snags assembling my engine intake plumbing. I ordered the wrong pipe thread to hose nipple adapter, 1.5" to 1.75" instead of the 1.5" to 1.5" that I need, I also realized that the hose between the thru hull and the strainer was 1.25" rather than 1.5", which is the size between the strainer and engine and then I believe the hose size running between the cooling components. So I'm remedying this situation of course with new hose and fittings on the strainer to stay 1.5" the whole way.

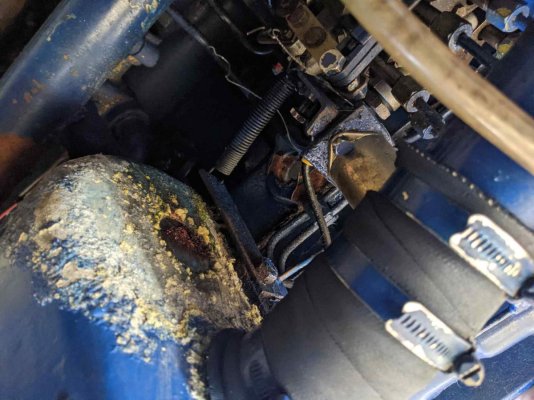
A short job or replacing my bilge pump hose turned into another unexpected ordeal. I removed and trashed the old one while cleaning the bilge, which is the only effective way I know to clean any sort of oily corrugated hose. The thru hull for the outlet is outboard of a large wooden battery box which houses 2 of my 4 group 31 batteries and the only way to reach it is disconnecting the batteries, unscrewing the 8 wood screws half with partially stripped heads. Apparently the last person to tackle this task took a shortcut and just spliced the bilge hose just inboard of the battery box rather than moving it, could have been the same genius who installed a 1.25" hose to feed a 1.5" cooling circuit. At any rate, that monkey business is now remedied with a new, continuous length of hose.

I also bit the bullet and ordered a new AC for the boat, the dometic unit on the boat, which is only about 5 years old, took a lot of abuse running with a loose connection in the shore power system as well as the 1.5 kw promariner inverter attempting to power the unit whenever left unattended and the shore power went out. I rewired the inverter to remedy this problem but it appears that permanent damage to the AC occurred. It will run for a while then start acting haywire, I'm not sure if the compressor is going out or something in the controls is damaged but at this point I'm replacing it with a Cruise Aire (with an "e") and will see about having the Dometic Unit repaired as a spare or to sell. My wife likes to use the boat as an office and I really need to prioritize her uses as I'm dumping a copious quantities of time and money at the boat.
 
Last edited:
Hello ABL,
You mentioned you put in a transom door. That’s one of the last big projects I would like to tackle on my 1980 mainship34. I would be most interested in how you did it, what size door, and any lessons learned.
My biggest concern would be how it affects the structural integrity of the boat.
 
OK here's my sad tale ..... Check your drains Mainship owners !!
Threads were completely gone. Nothing to hold the plug in. The yard said it 'crumbled' when they took it out to re-seal it.
Could have sunk the boat. Dodged a bullet !!

Yikes!!! Yep, I do believe you've wrangled all of the life out of that drain and then some.
Ours must've been replaced at some point if that T-handle is original equipment. We have a 1/2" NPT square-head plug that is mounted externally.
 
Hello ABL,
You mentioned you put in a transom door. That’s one of the last big projects I would like to tackle on my 1980 mainship34. I would be most interested in how you did it, what size door, and any lessons learned.
My biggest concern would be how it affects the structural integrity of the boat.

While we would love to have a transom door, there isn't even a small chance I would ever attempt to put one in our boat. Although replacing the decks & flybridge floor with 3/4 marine ply & multiple layers of biaxial glass stiffened her up to like new or better, a beam sea still causes the hull to twist slightly at the salon bulkhead, where you can watch the top corner between the glass of the door and the fixed glass open and close 1/4". We're talking Chesapeake Bay & Albemarle sound beam seas and most everyone knows there's no taming them! I'm not concerned because it's nothing structural failing and realize all boats "work" to different degrees but I wouldn't want to sacrifice any of the hulls integrity for the convenience of not having to climb over the transom!
 
Hello ABL,
You mentioned you put in a transom door. That’s one of the last big projects I would like to tackle on my 1980 mainship34. I would be most interested in how you did it, what size door, and any lessons learned.
My biggest concern would be how it affects the structural integrity of the boat.


I am interested in this modification as well, it is down my list of priorities. I have not fully adjusted to just how high the transom is, I have long legs but it is more of a climb over versus a step over. The mk2 and mk3 have a much lower transom and even without a door, it is easy to step over but my MK1 is a real hurtle.
 
Thanks for the heads up on the drain plug, that will be first on my list when i haul out this winter.

Boomerang, can't say if my hull twists like you say because I'm on the flybridge during those 8 foot seas trying to keep her upright. (only happed a few times, but no notice of anything flexing) My wife is usually trying to avoid things flying around the cabin. Ha ha. That said, if you've done your decks, this will be an easy job for you!! I don't feel like much integrity has been lost. I probably would have sold the boat by now because it is such a pain climbing over all the time. Especially with a 50 pound dog, now it's a dream. I comment on the door at least once a trip. and it's good for older people when they come on board.
 
I'll start a new thread for the transom door. Gdavid, you're doing an awesome job! Looking forward all your projects.
 
Thanks for the heads up on the drain plug, that will be first on my list when i haul out this winter.

Boomerang, can't say if my hull twists like you say because I'm on the flybridge during those 8 foot seas trying to keep her upright. (only happed a few times, but no notice of anything flexing) My wife is usually trying to avoid things flying around the cabin. Ha ha. That said, if you've done your decks, this will be an easy job for you!! I don't feel like much integrity has been lost. I probably would have sold the boat by now because it is such a pain climbing over all the time. Especially with a 50 pound dog, now it's a dream. I comment on the door at least once a trip. and it's good for older people when they come on board.

Swing that door open for me 'cause I'm one of those older people! I didn't say I wouldn't use one, I'm just too much of a chicken to install one!
I'll watch 8' seas from the beach. More than 3' seas and my wife Liz would be calling the attorney to begin divorce proceedings. If she's not too busy throwing up.
 
Ha ha! My wife loves the rolling more than I do! I say go for it, it's not as intimidating as drilling a hole for a bow thruster!!!!:eek:
 
I've developed a reputation for traveling in inclement whether, working around a schedule dictated by vacation time, reservations and my kid's calendars. A schedule is the most dangerous thing to carry aboard and I'm trying to get better about this but my poor wife has been treated to some pretty nasty conditions in my father's old MK3. Nothing more that 4' but in the bay, a 4' chop with a short and nasty interval. When driving from the the lower helm, the fiberglass cap that forms the dash would shift about 1/8" to 1/4" relative to the companionway bulkhead. They are good boats with a really solid design for taking on head seas but they just weren't build to be passage makers.
 
When i say 8 footers, i'm talking huge rollers. I do my boating off the Massachusetts and Rhode Island coastline.....when the wind picks up from the Southwest, my rides can get pretty squirrely trying to get home, or pounding into it trying to get to Block Island. We now plan for the overnight no matter what. Sunrise cruises home are calm and beautiful. Like you Gdavid, trying not to work around a dictated schedule.
 
I failed to take many pictures of my hull patch but here are a couple of my attempts at matching the gel coat. It is a bit of an art and I am not an artist. I might post them in the wrong order but the better match is what I hope to be the final coat, assuming I don't burn thru is when sanding it.

I am not going to drive myself nuts for a perfect match, all but a couple square inches will be hidden under boot stripe or bottom paint.
 

Attachments

  • PXL_20210623_005227892_compress53.jpg
    PXL_20210623_005227892_compress53.jpg
    132 KB · Views: 8
  • PXL_20210622_221019137_compress62.jpg
    PXL_20210622_221019137_compress62.jpg
    190.7 KB · Views: 7
The first pic is the "final" attempt at matching the gel.
 
Don't drive yourself nuts,looks great!
 
Almost ready to go back in the water. Didn't get to some of the elective work like installing my new anchor pulpit but I am itching (literally) to get the boat back in the water and enjoy the thing.

My entire boot stripe is fading and in bad shape, I would really like to remove the entire thing but it won't happen on this haul out. For some reason the section I applied in gloss came out flat which kind of a small good fortune because it matches the rest of the faded stripe. I got my new bronze thru hull in place about 7-8" high than the old position, as high as the deck will allow. I considered mounting it further forward where 8 could make it higher, remove the trim panel in the port saloon and behind my futon but didn't want too much restriction of flow.

I spent a marathon session on the bottom paint Saturday, I gave the entire bottom at least a light sand and was dead set to get a coat on everything not encumbered by the boat stands. Unfortunately I found a poorly repaired blister to port of the prop and just couldn't look past it. I ended up grinding out about 1 square foot. It appears that west system filler was used to fill damage from blisters or perhaps a crab trap wrapped around the prop. The filler was a orangish yellow like west system low density fairing filler, it may be something else but it had voids above it holding moisture. It was all pretty shallow, no signs of damage from inside.

I cleaned the area out. Filled in 2 layers of mat after sanding that out, I faired the area with thickened gel coat. I still need to give this a quick once over with the sander and then apply the bottom paint in this area. Gel coat really offers no more protection to moisture than bare glass but this will do until it is stripped for barrier coat in the fall.
 

Attachments

  • PXL_20210628_104047528_compress91.jpg
    PXL_20210628_104047528_compress91.jpg
    122.3 KB · Views: 7
  • PXL_20210628_104054591_compress42.jpg
    PXL_20210628_104054591_compress42.jpg
    140 KB · Views: 10
Last edited:
My entire boot stripe is fading and in bad shape, I would really like to remove the entire thing but it won't happen on this haul out. For some reason the section I applied in gloss came out flat which kind of a small good fortune because it matches the rest of the faded stripe.

High humidity or moisture on the surface before the paint dries can cause gloss top coats to dry to a flat finish. I've had that happen, not great when you really were expecting a gloss finish.
 
This is the final product of the engine cooling intake (prior to installing the new hose). You can see the intended effect of a straight shot to clear instructions. While I am sure that I am more likely to suck grass or bags into the internal strainer than if I had an intake grate, I feel that it will be much easier to clear. In the spring, the water colder than I would prefer to get in, during much of the summer there are likely to be jellyfish and by the time they are gone, the water is cold again. I would much prefer clear any obstruction from inside. I will definitely install a hull mounted strainer before attempting to transit anything like the dismal swamp.

The boat was relaunched yesterday, so I was able to pick her up after work and put her in her slip. Glad to have it back in time for 4th of July festivities which I will be enjoying from the comfort and safety of my slip.
 

Attachments

  • PXL_20210628_222611797_compress5.jpg
    PXL_20210628_222611797_compress5.jpg
    200.5 KB · Views: 7
  • PXL_20210628_222618770_compress80.jpg
    PXL_20210628_222618770_compress80.jpg
    180.9 KB · Views: 11
What do you plan to put on the vertical portion to make it easy to insert something for obstruction clearing?
 
Do the seacock flange bolts go all the way through the hull to the outside or did you incorporate threads in the mount plate you built? I went through the hull with countersunk flathead bolts for the A/C pickup and holding tank discharge but I'm still contemplating how I'll mount the engine intake seacock. The less holes ,the better, AFAIC.
 
Do the seacock flange bolts go all the way through the hull to the outside or did you incorporate threads in the mount plate you built? I went through the hull with countersunk flathead bolts for the A/C pickup and holding tank discharge but I'm still contemplating how I'll mount the engine intake seacock. The less holes ,the better, AFAIC.

They do not go through the hull, I threaded the fiberglass mounting plate. I agree with you that the fewer holes the better. I will probably fabricate some sort of brace for this whole assembly, (from the top to the stringer) but the wire reinforced hose that connects it to the strainer does offer some degree of support.
 
What do you plan to put on the vertical portion to make it easy to insert something for obstruction clearing?

There is a bronze tapered thread plug there, it has a square head. I keep pipe wrenches onboard to adjust the prop shaft packing but I plan to keep the correct box end wrench for this as well. A scrub brush handle is a close enough fit to clear any obstruction.
 
My haul out is over but the maintenance backlog on this thing is still very much a project in process. I figure I'll continue adding to this thread for the sake of comparing notes, especially for the other classic mainshippers.

After getting the boat back in the water, I installed my new AC unit and I'm very satisfied with it. It is a little on the small side but if I keep the saloon shades pulled, it will stay cool at the dock, it really wouldn't be able to keep up on a hot day with after the engine room is hot and the shades are up but that is a lot to ask. Eventually, I'd like to repair the unit I removed or just buy a second and add another zone for the trunk cabin and V Berth area to really be able to cool the boat down at will.

I started replacing my oil and transmission cooler, I'm finding a hodgepodge of cooling line diameter variation. It is 1.5" from the strainer to the aftercooler, then the transmission cooler that was added is 1.25" diameter, and then it steps down further to a 1" combination oil cooler and transmission cooler where the transmission side is abandoned. Then it continues as 1" through the raw water pump, through the heat exchanger and I didn't really check the sizes past that. The new oil cooler and transmission cooler that I'm adding is 1.5" so this will simplify things a little but it is still going to step down to 1" at the pump. I suspect that someone added the aftercooler to my engine after the fact. I after a real close look at just how bad my expansion tank is, I bit the bullet and ordered a replacement from mrcool.com this morning. The tube bundle that connects to it looks quite new but the tank is in bad shape with areas that looks porous, and while it is not wet on the outside, there is residue from what looks like coolant seeping through.

Prior to tearing the cooling system apart, my wife and I were able to sneak away for a couple nights and it was our first time testing out the boat's systems at anchor overnight. My first error/surprise was leaving the fresh water pump on underway and apparently there was a loose connection on the hot water side which blew apart, emptied the tank into the bilge and left the pump running. Fortunately it didn't kill the pump and it was easy to reattach the line and properly tighten the hose clamp so I don't have this adventure again. I should keep the pump off underway as a matter of habit unless in use but it really shouldn't have come undone. Fortunately we were never far from a marina and refilling the tank was only a minor inconvenience.

I found my battery life in running the refrigerator a little disappointing. I expected it to run the fridge via the inverter for 18-24 hours but in practice found it to be 8-10 hours. My battery bank is 4 - group 31 AMG's with a nominal total capacity of 420 AH. My house bank is primarily serviced by a promariner 1500 QS, modified sine wave inverter/charger unit. It came with the boat and I am keeping it for now until I decide what direction I want to go. I believe part of my problem was having it set for the wrong battery profile, there are two AGM profiles to choose from and I inadvertently selected one that was only charging to 13.4 volts, I've switched it to another profile that should got to 13.8 volt, this should extend the performance. The alternator was also running through a diode type isolator which really kills performance and I believe that I'm actually loosing voltage underway unless the generator is running. I'm going to change this to an Automatic charging relay and possibly upgrade the alternator, I'm also planning to add flexible solar panels to the bimini on the bridge. If that doesn't yield the performance I'm looking for, I'll be upgrading the charger/inverter so that I'm bringing the batteries back up to a higher voltage, quickly during breakfast and dinner when I'm running the generator and potentially making AC power a little more efficiently.

I went ahead and swapped out my old danforth anchor for a rocna vulcan 20 just in time for our trip and I'm very glad I did, it turned out to be a windy weekend with a couple other boats in the anchorage (Rhode River) dragging.

Overall, I'm pleased with the boat and glad that I can enjoy it now while making my plans for future improvements along the way.
 
The alternator was also running through a diode type isolator which really kills performance and I believe that I'm actually loosing voltage underway unless the generator is running. I'm going to change this to an Automatic charging relay and possibly upgrade the alternator...

You might look into one of Sterling's Battery to Battery chargers, or one of Victron's DC-DC chargers instead of an ACR. I think you'll find that it's a much more effective system than simply joining the banks with a relay.
 
This is the pitiful state of the expansion tank. There is a ten day lead time on the new tank, I will continue to put the rest of the cooling system back together but probably won't run it again until I get the new tank is in place.
 

Attachments

  • PXL_20210713_133909087_compress45.jpg
    PXL_20210713_133909087_compress45.jpg
    142.4 KB · Views: 18
I appreciate you keeping us up to date with your maintenance and improvements. Just as you said, it's of special interest to those of us with the same boat as yours.
You might've mentioned it previously, but what refrigerator do you have? An inverter, even a late-model one, is still not super efficient. I don't miss the dumb old under-the-counter Norcold we used to have. The one we have now (the brand escapes me and I'm too lazy to walk down to the boat & look) has a Danfoss DC compressor which seems to be a little more efficient and only uses about 3 amps while cooling. It is still a college-dorm room size but we make out ok with it and can stay on the hook for a couple of days before the 270 ah house bank is down to 50%. Keep in mind thats also using the fresh water pump, fans , lights etc.

Where did you mount your AC unit & what size is it? Ours is 10k mounted outboard of the refrigerator on a shelf I built and it keeps the salon comfortable on hot days. 10k doesn't pull the temps down to 70 when it's in the 90's but it draws lot's of humidity out of the air (I plumbed the condensate drain into the shower sump & I hear it come on often). It really helps to have the blinds drawn too. I know it's undersized but it's what I had and I can't say that we aren't satisfied with it's performance. It could use another duct but we make out ok with it for now with a strategically placed fan or two to direct the air across the salon & also up forward.

I'm procrastinating but I guess we'll haul out next week & tackle the engine spruce-up. I'm planning on a few unexpected surprises but when I strip all of the bolted on stuff off to facilitate the engines removal, I'm hoping we don't encounter any major cooling system problems, to be specific,the oil cooler & perkins heat exchanger/expansion tank. Most of the other stuff has been replaced so I'm hoping we won't go too far over budget.
 
I don't recall the brand and model but the fridge is a 120v AC only dorm room sized unit. I am sure that it is not efficient but it is already on place and if the modified sine wave inverter kills it, I really won't be out much. It is a bit bigger than the stock ”never cold” but fits under the counter. Eventually, I would like to build a proper top loading icebox into the galley with multiple cold plates. I would use thru hull condensers that dump the heat outside of the boat rather then heating up the cabin. I would also like the flexibility to run a belt driven compressor. All of this is really beyond the needs of a weekend cruiser but is the direction I would go before going crazy with a high end battery and inverter system to power an inefficient fridge.

My air conditioning is mounted to starboard just outside of the lower helm station. It is on a shelf such that it is pretty tight below the side deck and then the whole area is boxes in with white expanded PVC trim panel. Below that shelf are the AC voltage panel, the generator panel and a blue seas breaker that is wired online between the shore power and the generator panel. The install looks to have been pretty recent and probably not the original location. There was a 16k btu cruise air unit here that worked intermittently then the panel would start to go haywire and it the compressor would quit. I replaced it with a 14k btu Marine Aire unit
, The footprint was slightly larger and I had to adjust the carpentry. They rigged up an odd but clever ducting for it, there is a plenum box with vertical louvers that can be closed off just aft of the unit on the starboard side of the saloon, flex duct connects the unit to this and there is also flex duct running forward to the head and the v berth are. When the louvers are closed off, air is forced to run forward to feed the head and v berth. It kind of works but there is a lot of restriction in that long flex duct run.

Outboard of the fridge, to port below the counter top is empty. This is were the unit was located on my father's mark 3 as well as your boat. If I can revive the cruise air, I will probably install it here.

Now that my new unit is up and running, I am leaving it on all the time set to 82 degrees even unattended. This makes life easier on the fridge and keeps the cabin tolerable when I step aboard (usually to work on it).
 
I forgot to remark on your new anchor. We bought the same Rocna Vulcan, except a 15 & not a 20 as yours. We previously had a 35lb Delta & we were happy with it's holding characteristics in the mostly mud & sometimes sandy mud bottoms where we anchored. We put the Delta to the test several times with squalls and multiple boats rafting alongside so I figured the 15kg Vulcan would suffice. I guarantee you'll sleep soundly with the 20! The only time we've gotten a chance to test ours overnight was over the July 4th holiday and it was flat-calm the whole time & I don't think the chain ever even came tight, much less test the anchor holding! I do know it continues to hold with a super short scope because we anchored off of our local beach for a couple hours one afternoon in 15-20 mph winds and the damn thing didn't want to let go until we were over top of it!
We chose a Vulcan because of it's one piece welded design. I'm not enthralled with the nuts & bolts method of securing the fluke to the shank and the roll bar thing on the regular Rocna. Again, for me, the less hardware ,the better. I think we'll be happy with it when we start using it in earnest later this season.
It'll be interesting to compare anchoring notes in the future.
 
The 20 kg vulcan is probably overkill for my boat but I am in the process of upgrading the anchor platform and windlass anyway so I figured I would oversize it and be done with it. My parent's mainship 390 came with the vulcan 20 and I'm quite impressed with it, that boat is significantly heavier and has more windage than our Mark 1's so I knew it would be more than enough anchor for my needs (no, I did not steal their anchor, I bought my own).

My boat came with a powerwinch windlass that has a smooth drum and requires being tailed like a sailboat winch. This makes it a two person operation and frankly it is just as easy to pull in the line by hand until the rode becomes vertical and at that point, I'm almost to the chain, which the drum can't handle anyway. The winch also has a toggle switch right on it that is really easy to turn on by accident when handling bow lines, rather than adding a more convenient disconnect switch in the boat. I just disconnected the wiring for now and am replacing with a lewmar profish 1000 that will handle chain or line remotely. I probably won't get around to completing this project till the fall so I'm just pulling it by hand for now.

Running the boat while I pull the anchor is my daughter Lilly's special job and she is getting quite good at it. When I first started working on charter boats, only about half of the boats carried a windlass and on a typical day I would set and retrieve the ground tackle 2-4 times for a 40' charter boat in 30' of water so I go about pulling the anchor with minimal effort, I only retrieve line with no load on it and tie it off tight when the rode is vertical and let the boat to the work of breaking it free. I am also lazy about cleaning the anchor so I'll leave the boat in reverse until the anchor and chain has cleaned itself as long as I have room in the anchorage to do so.

I have not replaced my rode yet either, it only has about 5' of chain. I haven't decided how much chain I plan to go with, probably 110-120' which is plenty of scope for most of the anchoring that I do but I'll have another 100' 3 strand twisted to back it up.
 
Last edited:
This is the pitiful state of the expansion tank. There is a ten day lead time on the new tank, I will continue to put the rest of the cooling system back together but probably won't run it again until I get the new tank is in place.

Well, I made a liar out of myself. I managed to get the new oil and transmission cooler installed and took the boat out and put some more hours on it. The job would have been more straight forward if I had measured the oil cooler more carefully and ordered the exact configuration as the one I had. Instead I ended up with a slightly longer unit with larger diameter raw water connections. In the end this should improve the oil cooling capacity but it did complicate the installation. My expansion tank for the engine coolant side of the system should arrive Wednesday. The heat exchanger bundle that bolts to it was replaced recently, I'm sure the receipt for that work is somewhere in the old suitcase of receipts that came with the boat. The tube bundle appears to be a bit shorter than the original as the mounting bracket for it is now in a location that a hose clamp interferes with one of the cooling line connections, I'll try and reconfigure this bracket when I have the exchanger removed.

I broke my engine oil dipstick tube in the process of cleaning up and repainting the port side of the engine while I had the raw water pump removed. It had been a bit wobbly but I thought it was just a bit loose, turns out that it was rusting through just above the hydraulic line nut that secures the tube. It turned out to be easy to replace, a 3/8" section of brake line cut to fit works perfect, save and reuse the line fitting that was on the original. A dripping raw water pump provides a perfect opportunity to rust out this tube. My father's perkins had a dipstick on either side of the engine, when his rusted out, we just plugged the hole and used the starboard side dipstick. His engine had the manicooler so we checked the coolant level on that side of the engine anyway.

At times, it feels like I still have an endless list of repairs and upgrades for this boat but occasionally I stop and look at what I've checked off the list so far and feel a little better. I am thankful that I did not overextend myself buying a more expensive or complex boat. While I've been dumping money into parts and materials on a pretty fast pace, nothing has been a major surprise so far and I'm glad I had a good idea of the cost of maintaining an old boat before I took the reigns to this old nag.

I see posts from guys and gals shopping for trawlers and/or motor cruisers asking about fuel consumption and I cannot help but think that they missing the big picture. There is no way I would be comfortable dumping the amount of money it would cost to maintain and repair this boat if I had to pay for someone else's labor, it would be outrageous but some of the questions that are asked of boat shoppers (many of which are asking about 30-40 year old models) lead me to suspect that they would be hiring out for every job. This is were it starts to make sense to spend a lot more and buy a much newer boat I guess.

Sorry about the rambling.
 
Last edited:
I've about halfway or better through installing my new heat exchange expansion tank. I bought it from Mr.cool.com and it showed up in about 1 week. I had been warned of a 10 day lead time but apparently there must have been one on the shelf at their manufacturer.

As promised, the tank was a direct replacement and the threaded bolt holes all lined up perfectly. There are 8 - 1/4" 20 bolts that mount the tube bundle into the expansion tank and there are 2 more bolts on the forward end of the tank to secure it to the mounting bracket (I don't recall the size, probably 3/8", I reused the old ones). I should have planned ahead and ordered the 2" hose for the connections on the coolant side as mine were brittle and due for replacement, Defender is getting that out to me quickly like they always due (unless backordered). The tank and bundle are in place and connected to the raw water side, I just need to button the coolant side back up.

I had originally planned to refinish my existing expansion tank but the more I looked at it prior to removal the more skeptical I was of the remaining wall thickness and I loathe having my boat out commission for any period during the boating season so I went with a new tank. I cleaned out the tank and it probably could have been saved, there is an expansion plug on the forward end that is painted over and flush to the surface, mine was nearly rusted out from the inside which tell me that the coolant was not frequently changed and perhaps the coolant level was left low with air exposure from the inside. It looked solid from the outside but a couple taps with a hammer put multiple holes in this expansion plug. There is a lip that it sits in, cast into the aluminum tank. I did not realize this and removed the freeze plug by hammering a chisel on the edge of the plug to drive it loose and remove it, I damaged this lip, separating a portion from the rest of the tank. It could probably be repaired, repainted and used as a spare.

The thermostat housing was pretty rough looking so I've removed, wire wheeled the outside and filled in some pitting on the sealing surface with JB weld. I'll probably end up replacing it eventually but there is plenty of metal left to it and I'm comfortable reusing it after I finish painting it.
 
Last edited:

Latest posts

Back
Top Bottom