Short-ish Haul, 34 Mark1

The friendliest place on the web for anyone who enjoys boating.
If you have answers, please help by responding to the unanswered posts.

Gdavid

Guru
Joined
Jan 4, 2016
Messages
1,384
Location
US
Vessel Name
Graceland
Vessel Make
Mainship 34 MK1
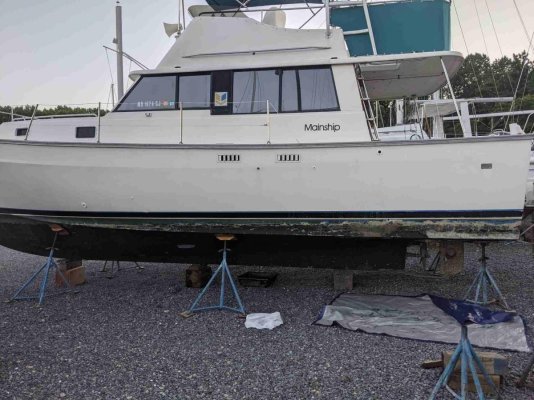
I'm going to track my first haul out in this thread for the purpose of comparing notes with others and just tracking my progress. When I was purchasing the boat, it was already in the water so the surveyor did the in water inspection, we hauled out and hung it in the slings for the out of water survey and relaunched for the sea trial. I would have preferred to reverse the order of sea trail and haul out and then had the boat blocked up so I could repaint the bottom, but the yard was still full of boats coming out of winter storage.

The bottom paint on the boat was probably about 1 year old and holding up pretty well at the time of survey but pressure washing for the survey blasted off a lot of small chips, particularly around the waterline so the boat was starting to get fouled pretty quickly. I really don't want to lose much of our peak boating season out of the water but I also don't want the bottom to turn into a real mess. There are some small blisters, nothing concerning but I do plan on soda blasting down to bare gel in the fall and letting it dry out thoroughly over the winter and barrier coating in the spring. For now I just need a coat of paint to get me through to the fall. I'm using the blue water copper shield 45 ablative.

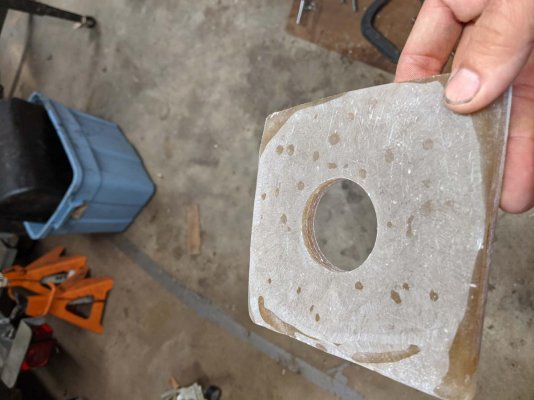
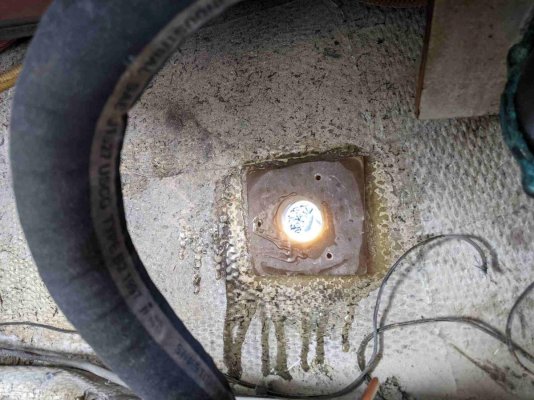
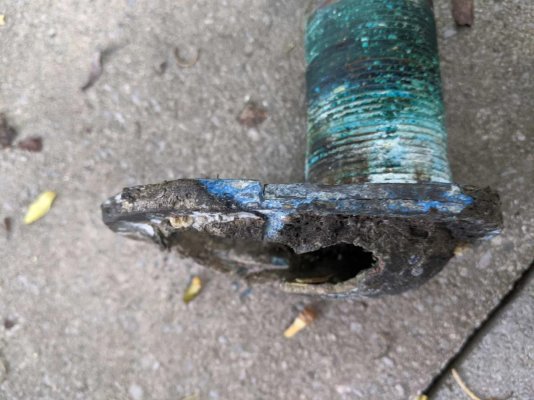
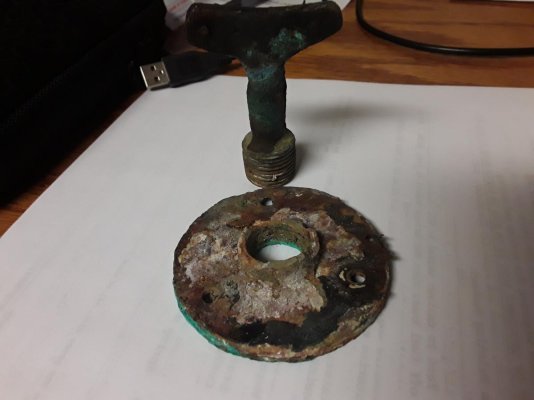
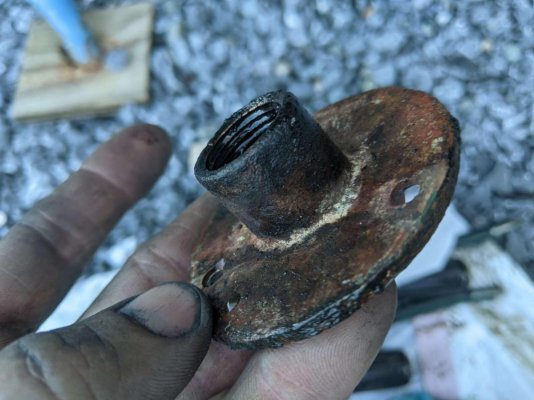
The engine cooling thru hull needs to be replaced. It has external grating which has broken up which probably means the whole fitting is weakened so it will be replaced. I have an internal strainer and I don't feel the need to run both external and and internal screening so I'm going with a regular mushroom thru hull so I can clear it with a dowel rod if it gets fouled with growth. The easiest way I have found is to install a bronze T fitting above the ball valve and have nipple and hose headed to the strainer come out the side then put a threaded plug at the top of the T fitting in line with the valve and thru hull, that way I can close the valve, remove the plug, insert a rod/stick/ whatever, quickly open the valve all the way and then run the rod clear through the valve and out the bottom of the boat to ensure a clear path. As slow as my boat is, I don't think a scoop is needed.


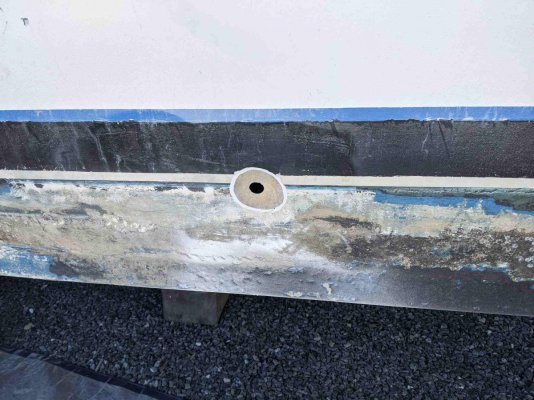
I have a couple nylon (not marelon) thru hulls above the water line that I need to replace as well. The garboard drain is definitely getting replaced too.

I would like to finish up my new anchor pulpit project and get that mounted while I'm in the boat yard and can make a mess without disturbing my dock neighbors but I've been a bit slow on the job and the glass work is no where near done.

While it doesn't need to happen on land, I'll also install the new combination oil cooler and transmission cooler that just arrived from Mr Cool. The transmission side of the stock cooler has been abandoned and replaced by a standalone transmission cooler but the engine oil is still being cooled by the original. It seems like a good time to refresh the whole system and hopefully avoid the oil side of the cooler failing, it should declutter the engine just a little. The transmission lines appear to have been shortened when it was retrofitted so I'll have to replace at least one of them with a longer line to reach the stock position.

I have some pretty bad cracks through the gelcoat on the starboard side where someone must have struck a dock or piling pretty hard, there must be damage to the substrate fiberglass for the crack to be so large, I'm not sure if I will bet to this project or not. My survey who also does glass repair (or used to) recommended just covering it up with shrink wrap tape and waiting till the off season. I'll probably go this route.

I've done much of the yard work on my Father's boats for years so this feels familiar but different at the same time. When you are ultimately responsible for the decisions and cutting the checks, it just changes things. It is nice to have him as a sounding board as well as this forum to consult on priorities for projects and especially when to say enough and just use the damn boat.
 
Last edited:
Misery loves company! Still waiting for the 'fun' part to start.
I'm in Washburns waiting on a drain now. I'm having them check the other thru hulls and seacocks.
Post pics when you can too. Love seeing how other people do things.
 
Misery loves company! Still waiting for the 'fun' part to start.
I'm in Washburns waiting on a drain now. I'm having them check the other thru hulls and seacocks.
Post pics when you can too. Love seeing how other people do things.

Will do, I just got the call that the boat was hauled and the yard location. I am up at Herrington Harbor North because it is so much closer to me but the people at Washburn's are great. HHN is such a big a busy operation, they have you tie up in an empty slip and get to it when they can.
 
I've brilliantly decided to wait until after July & the hottest time of the year to haul. My thinking is we really would like to get the 4th in as a boating holiday plus the boatyard wont be busy. Hopefully the engine removal/seal replacement won't turn into a can of worms and we can get back in the water for Labor Day. We'll see.
I guess I'll need to replace our engine raw-water through hull too. It's functional but very hard to turn on/off. I think the rubber in the seacock body is distorted from years of use and honestly, I've been too embarrassed to post a picture of the totally incorrect installation of the assembly that mainship did years ago. The flange of the valve, which is supposed to sit flush on the inside of the hull, is 2" in the air! Mainship screwed a nut on the through-hull and then screwed on the flanged valve without cutting the fitting to length. I don't know how it's sealed since the threads are straight and not tapered! I have a new 1 1/2" perko seacock assembly so I suppose the time to replace it is when the engine is out.
I also just found out yesterday ,from this forum, about MrCool. I suppose I'll order one of those Perking combination coolers to replace the current one, just as a matter of principle.
Gee wiz! The list of to-do's while we're hauled keeps getting longer!
 
I don't know how it's sealed since the threads are straight and not tapered! I have a new 1 1/2" perko seacock assembly so I suppose the time to replace it is when the engine is out.

That is odd but not a surprise, there are all kinds of shenanigans with thru-hull fittings. My valve has been replaced with a non-flanged ball valve so that is tapered but it is screwed directly onto the non-tapered threads of the thru hull, which I assume to be original. I'm going to use one of the flanged adapters that Groco makes to make the transition, it has a triangular base with a straight-female thread on the bottom and tapered male plug on top. It is secure and makes for pretty simple replacement of the valve it it goes bad, it is less sturdy than a flanged valve directly on the hull but it is a good compromise in my opinion.


I also just found out yesterday ,from this forum, about MrCool. I suppose I'll order one of those Perking combination coolers to replace the current one, just as a matter of principle.
Gee wiz! The list of to-do's while we're hauled keeps getting longer!

I believe that tractor supply has the hoses and fittings that I need to route my transmission lines back to the original position, you won't need to do this but I'll let you know if they work as it is a convenient and cheap source.

How close to the hull is your oil pan? Mine is darn near touching on both sides in a section where the pan widens out. I can turn the prop shaft pretty freely by hand so I don't think my motor mounts are sagging which would throw off the shaft alignment. I'm using disposable roaster pans to span the sump of the hull, under the engine and transmission to hold oil absorbent pads in place under old leaky but it is hard to get pans in place in this area. While I'm on the hard, I'm planning to really get the bilge clean and hopefully keep it clean through aggressive pad placement and addressing whatever leaks can be addressed from above.
 
IMG_0023.jpg

Is this pitiful or what?
 
Yes the oil pan has hardly an inch of clearance. It’s definitely tight under the engine!
 
Mine is tighter than that, probably 1/4" clearance. I know there is a lot of variation in things boats like this but it is really too close. I should probably unbolt the flange and check the alignment after I get back in the water. I may need to replace the engine mounts. Damn growing list.
 
That's odd that they (Mainship) would've bored the shaft log at a different angle than ours but as noted, it wouldn't be a huge surprise. If you can turn the shaft by hand, you wouldn't think it would be that much out of alignment. Keep on plucking on the big issues first. You'll have a good boat when the bugs are worked out.
 
I finally got started tonight, I removed the 1.5" thru hull for engine cooling, the scoop was crumbing, it felt more solid near the flange and threads but is was definitely compromise. The garboard was more solid than I expected but the replacement is beefier.

I am starting to work my way around the waterline and scraping all loose paint off, the yards are pretty helpful with the pressure washing to get most of the growth off but this is pretty hard on little bit of retaining paint near the water line. This is basically requiring me to remove it all down to the gel coat, so it's slow going. After about 6 inches below the waterline, the paint is still adhering pretty well and I will just scuff and paint over it. That is the plan at least.

I have one more bad through hull to replace, someone placed a thru hull for the aft bilge pump right at the waterline, in fact it was installed over bottom paint. I can only guess that they were trying to hide an oily discharge of bilge water or they could not get higher because the cockpit deck was in the way, it fell apart when I hit it with a scraper.
 

Attachments

  • PXL_20210615_235936312_compress26.jpg
    PXL_20210615_235936312_compress26.jpg
    168.9 KB · Views: 18
  • PXL_20210615_235920623_compress39.jpg
    PXL_20210615_235920623_compress39.jpg
    185.4 KB · Views: 17
  • PXL_20210616_000006545_compress44.jpg
    PXL_20210616_000006545_compress44.jpg
    110.4 KB · Views: 14
You're right, the garboard drain doesn't look too bad but you'll sleep better with the new one installed. I hope you photo-document the engine intake replacement since that task will be upcoming for us.
I would really think hard about new the thru-hull external shape strainer you're going to use. I guess the scoop-type is a little more expensive and I know you mentioned you were going with the round style since you had a slow boat. I don't know where your pickup is located because ,as we've all seen, Mainship seemed to change the building plans with each model. Out intake is located on the port side between the inboard & outboard stringers, kind of beside the transmission. The transducer for 1 of the fishfinders is close to the same area. It's a flush mount transducer, with the face being roughly the same size as the round strainer you plan to use. When I push the speed up to above 8 1/2 -9 knots (2000 rpm & more), I start to see turbulence on the screen. At that speed, yes the engine temperature does come up and we have the scoop-type strainer. I'm wondering aloud if not having the scoop would cause the less-than-clear water flow that is evidenced by the fishfinder picture to raise the temp even more. Sometimes , like last year when we were trying to make a bridge on time, I was glad I was able to push ours without the engine overheating.
I'm not trying to be your typical know-it-all forum pundit but like I said, I'm just thinking out loud. Now is the time to be sure which strainer you want to use.
 
I'll be sure to take some pictures of the cooling intake replacement, I didn't snap a pic before i disassembled it but it looked exactly like yours with the exception of a simple ball valve screwed onto the thru hull thread rather than a flanged valve, number of exposed threads appeared about the same, maybe a little less. I'll take pics of the damaged scoop, take a careful measurement of the hull thickness and document the assembly. My intake is on the starboard side, just aft of the transmission and between the inner and outer stringers. They certainly didn't build them like an assembly line.

I do appreciate the thoughts and it is something I will be monitoring closely. I won't have any external screen, just a standard thru hull fitting and am relying on my internal strainer to catch all debris. I believe this will be a net improvement because most external screens or grates that I see coming back out of the water are pretty fouled with growth. With the T fitting and plug, i will be able to ream out the passage from inside the boat conveniently. This is my first time setting up an engine intake this way but it has worked with generators in the past including ones that ran underway all the time. As long as I keep a close eye on the temps especially when I push the speed up, it should be very low risk, I'm coming back out in the fall and can swap it out then if I am not getting enough flow.
 
I think the external strainers are so the water flow along the hull doesn't suck the water out of the intake or reduce the flow. Plus if you pick up a plastic bag, shutting down for a bit would allow it to drop off.
No big deal either way as long as you monitor it.
The boatyard wouldn't guarantee the work on the drain unless it sat overnight. Afraid the sealant would wash out even at idle going around the corner to our slip. For me most all the intakes seem to have them, good enough reason to leave it on.
 
I run a 315 HP Yanmar at 3000 RPM (15-16 MPH) for hours with no heating issues with only a mushroom fitting at the bottom. Don't know why you guys are concerned at all about over heating sans scoop. If you do overheat at the slow speed you are speaking of, I'd say you have engine-related issues. OTOH, I installed circular perforated bronze strainers over the intakes for the main engines and genny on my trawler. Pulling a pin allowed them to hinge downward for easy cleaning both afloat and on the hard. My Pilot's genny intake has a rear-facing slotted scoop-type external strainer to avoid forced water to the genny while underway with it shutdown, BUT it works just fine underway at high speed sucking in the water.
 
I run a 315 HP Yanmar at 3000 RPM (15-16 MPH) for hours with no heating issues with only a mushroom fitting at the bottom. Don't know why you guys are concerned at all about over heating sans scoop. If you do overheat at the slow speed you are speaking of, I'd say you have engine-related issues. OTOH, I installed circular perforated bronze strainers over the intakes for the main engines and genny on my trawler. Pulling a pin allowed them to hinge downward for easy cleaning both afloat and on the hard. My Pilot's genny intake has a rear-facing slotted scoop-type external strainer to avoid forced water to the genny while underway with it shutdown, BUT it works just fine underway at high speed sucking in the water.

Rich, I don't doubt your claim one bit that you don't have an overheating issue on your particular boat and hull size/shape. But is sounds like you're insinuating that scoop type strainers aren't needed on any boat and that just isn't the case. The need to have an intakes flow assisted by a scoop is a very real scenario on many boats. I'm going to have to assume that's why the scoop shape was designed in the first place!
Flow assistance (and protection from debris) was what Solly & I were suggesting and it's a small investment to install one now rather than be launched and find one is needed & have to rehaul. Again, it's the owners boat & the owners decision.

I promise I will report back with my findings but I would be really shocked if it creates a problem. Most of the sailboats I have run over the years don't have external strainers or scoops and they do just fine and these include some long waterlines that can power along at 9 knots if needed. I value being able to to clear an obstruction from inside the boat particularly when the jellyfish are thick, without a strainer or scoop in the way, I can run a stick clear through if needed.

I believe a more common restriction or limitation of cooling capacity on these engines is unmaintained after coolers or oil coolers. It's is my understanding that the perkins models are set up a few different configuration s and very well could have been modified from their stock configuration. From memory I believe my raw water path is : strainer To aftercooler To trans cooler To oil cooler To pump To heat exchanger To exhaust manifold To exhaust elbow and out. My serial number is for a 160 (or 165) HP rating and I did not think it came with a intercooler but I have one and it is raw water cooled. The separate trans cooler was added recently according to the repair receipts I have. Elsewhere the boat was listed with a 200 HP rating, they may have re-rated it when/if the aftercooler was added, it really doesn't matter to me as long as it runs cool and makes rated rpms. I treated the system with a descaling soak shortly before pulling the boat but haven't run it hard then then at idle since to see if this improved things. A bottom end overhaul may very well be in my future this fall.

I am looking forward to getting my new oil cooler/transmission cooler in place and hope it improves my oil pressure at idle after the engine is up to temp. I don't have a oil temp sensor but I hope the new cooler will do a better job and keep the viscosity higher. The hour meter was replaced without any records and only shows about 780 hours which I am sure is not accurate. I foolishly skipped an engine survey but plan to just run it as long as it lasts.

I plan to use the boat for a variety of uses including trolling at pretty slow speeds which can meet idling for hours in pretty warm water temps. I know this isn't really a health habit for a diesel but as long as the oil pressure and temps are fine, I'm not really worried about glazing up the cylinder wall at this point, that point of the boat is to use and enjoy it.

My haul-out will probably extend longer than I'd like, as I'm also in the middle of renovating my basement and it is limiting my time in the boat yard.
 
Last edited:
The need to have an intakes flow assisted by a scoop is a very real scenario on many boats. I'm going to have to assume that's why the scoop shape was designed in the first place!
Flow assistance (and protection from debris) was what Solly & I were suggesting and it's a small investment to install one now rather than be launched and find one is needed & have to rehaul. Again, it's the owners boat & the owners decision.

I don't know of a boat which requires scoop assisted flow to cool the engines. That would seem exceedingly poor design to me. In fact, most of the boats I see in the yard have the gratings facing to the rear as that works better to shed grass/debris. As I noted, even my tiny little one-lung generator works well at all speeds with this backward-facing setup.

I am all about debris protection, and as stated took pains to install hinged circular exterior gratings (with the attendant concern over their clogging) on my slower trawler with its less demanding engines, but on this Yanmar with its up to 35-gallon a minute cooling flow, I thought I might not bother. Six years on and only one sea strainer cleaning last month just to end up finding NOTHING in the basket. So kick it up to 15-16 MPH and let the grass slid by. :) Just kidding.
 
The intake thru hull fitting turned out to be made of two casting with rivets connecting them. The majority of the thru hull, was pretty sound but the external stainer was not a replaceable item. There was no real danger due to this part but I would have never known without replacing it.

I fabricated a backing plate from 12 layers of mat and polyester resin, about 6" square. It is a little over 1/2 thick. The hull is about 1/2" thick is in the location of this thru hull so I had to cut the thru hull fitting down by about 1" to avoid the thru hull bottoming out when screwed into the Groco, triangular base straight thread to tapered thread adapter. I trilled and tapped the fiberglass backing plate for 5/16" treads (18 threads per inch). Between the flange thickness and the thickness of my backing plate, only about 3/4" bolts are needed, I couldn't find any this short at my local hardware store so I cut them down.

At the boat I sanded the inside of the hull clear of gel coat and flat and then laminated 3 layers of mat really wet and pressed my new backing plate on top, the light shining thru the hull allowed me to center it up. The hull required a little cleaning up on the outside as the gel coat had some cracking and wasn't flat. I ground it out and filled it in with some waxed gel coat thickened with colloidal silica. After sanding this flat, I redrilled my 2" hole and assembled with 5200 between the thru hull flange and the hull, pipe thread sealant on the treads of the thru hull and then 5200 between the Groco adapter and the backing plate that is now glasses to the hull. The thru hull treaded into the adapter is the primary clamping force to hold it all together but the three 5/16 bolts and 5200 holing the adapter to the inside of the hull is my backup plan. Not quite secure as a thru hull bolted directly thru the hull but I am comfortable with this set up.
 

Attachments

  • PXL_20210619_112137317_compress13.jpg
    PXL_20210619_112137317_compress13.jpg
    121 KB · Views: 9
  • PXL_20210619_112128017_compress6.jpg
    PXL_20210619_112128017_compress6.jpg
    102.3 KB · Views: 7
  • PXL_20210619_183137880_compress90.jpg
    PXL_20210619_183137880_compress90.jpg
    176.6 KB · Views: 10
  • PXL_20210619_112134524_compress69.jpg
    PXL_20210619_112134524_compress69.jpg
    144.2 KB · Views: 8
  • PXL_20210619_105057700_compress76.jpg
    PXL_20210619_105057700_compress76.jpg
    144.8 KB · Views: 7
  • PXL_20210619_105102933_compress90.jpg
    PXL_20210619_105102933_compress90.jpg
    110.3 KB · Views: 10
  • PXL_20210619_105039302_compress14.jpg
    PXL_20210619_105039302_compress14.jpg
    128.7 KB · Views: 10
  • PXL_20210619_105046842_compress80.jpg
    PXL_20210619_105046842_compress80.jpg
    142.1 KB · Views: 10
I got my new garboard in as well. It had been replaced at some point or at the very least remounted because the flange had 3 holes but there were 6 hole around the hole. They were wood or sheet metal screws, stainless but erroded from stray current. I oversized all six, filled them with thickened resin and capped it all with a layer of glass. After this cured, I drilled my hole and filed a notch for the keyway the casting has. The new flange had 4 screw holes and I mounted it with machine screws and 5200.
 
You sure do first class work when you start a project! The fiberglass backing plate looks nice. I'm going to dig around and find a piece of glass already laid up to use as a plate for our new thru-hull. Maybe a piece of swimming pool skimmer cutout since I have a friend in the business. Regarding your new garboard drain, the self tapping screws will hold it in place until the 5200 kicks and then you won't have to worry about it ever coming loose!
Keep up the good work!
 
I appreciate the encouragement Shawn. A cutout from a skimmer install would be perfect. I used some scraps of expanded PVC trim board that I had lying around the shop to make a dam around my layup and was surprised how well the polyester adhered to it, I expected to just pop them off easily by hand but I had to clamp each piece in the bench vise to pull them off. It would probably do just fine as a backing block, the original wood did just fine for 40 years.

The last of my hull projects was glassing in the aft bilge pump outlet which was just too low and plastic as well. I didn't do a good job of photographing this job, there is nothing really special about it, lots of other write ups on the web. I do have a shot of the dished out hole, you can see that it is below the bottom paint line, I will have to match the gel coat as well as touch up the boot stripe which is just annoying. I was tempted to replace with a bronze thru hull properly configured with a valve and running it through a vented loop but I am going a little cheaper and simpler with a marelon fitting about 14" higher up and a vented loop, and doing away with the check valve that is currently in the line.
 

Attachments

  • PXL_20210618_152843266_compress59.jpg
    PXL_20210618_152843266_compress59.jpg
    180.4 KB · Views: 9
There was a recent thread on the forum about filling in holes debating going with smaller to larger or vice versa in patches. In my experience you really don't have an option of smaller to larger patches on small holes like this because the fibers are just too long. When I make patches, I tear them from the sheet to avoid hard edges which are hard to sand out. There is no way to have small patches stay within the area of the repair so don't even try. I wet out the bare glass on the boat, apply the patch, which will extend over the finished fiberglass, beyond the area of the repair, and I only wet out the inner section of mat and leave the excess just hanging out there, I usually apply 2 or three layers at a time and then when it sets, I remove the excess dry glass by grinding the edge of the patch just a little below the finished surface of the surrounding gel coat. When I am done grinding the excess material away, it effectively uses a large patch to smaller patch approach, even though the patches applied where all the same size. I patched this hole from both sides and did the majority of the build up from the inside of the hull to try and minimize the area of disturbance on the outside.

Then fill in the divot with gel coat thickened with cabosil, let this set, sand it smooth and apply my tinted gelcoat to match with a foam brush and wet sand and polish it out. It is easer said than done but one of the keys to success is not sanding too far out, burning through the surrounding gelcoat and increasing the size of your repair.
 
Just following along

I'm into a lifelong restoration project on my MK1 also. So, I too would like to follow along. While hauling up my anchor last fall, i noticed my windlass sinking into the deck....and the whole deck shaking. Realized it was the soft core so I tore up all my decks while at the dock, and replaced the plywood and re-glassed in the fiberglass deck i cut out. Then removed the deck on the flybridge, it had a soft spot and about a 4' x 8' wet spot. Left it all for the winter. I then installed a nice mount for my windless and raised platforms for my bollards and bow rail bases. Finished fairing and sanding the flybridge and laid down some Faux Teak EVA foam. So far the foam is holding up well and is very pleasant on the bare feet. So i also added it to my cockpit floor which used to get slippery when it got wet. Life is good now. Also upgraded the generator and use an induction cooktop now instead of butane. Other upgrades include, adding Auto pilot, Mantis anchor, large fridge and freezer where the stove used to live. Also cut a transom door, (HIGHLY recommended). Along with new thru hulls with re-routed intakes, repacked the rudder and shaft, new battery charger, all new plumbing for the fresh water system, cut a recess in the galley wall for my mini microwave. Lots of little things to make life a little easier. Not to mention all the engine work including cleaning the injectors (huge difference)!
The boat is really starting to come along. Decks have fairing compound on them, but I won't be sanding and painting till fall when its cooler. All in all it's been a lot of work but very rewarding. You'll get there eventually, happy to answer questions. Of course, my project will be on-going....doing some electroics upgrades too!!!:)
 
Groco makes an external strainer/scoop that mounts a bronze ring on the bottom of the hull, and the strainer/scoop is mounted with screws so it is removeable. Doesn't allow clearing with a stick, but you can dive on it to remove the screen and clean it out.

https://www.groco.net/products/raw-water-strainers/hull-strainer/sc-series

If you do decide to add a scoop/strainer at some point, you might look into that series as a compromise on serviceability.

I liked and mounted several of these - mount the hinge forward.
https://www.groco.net/products/raw-water-strainers/hull-strainer/rsc-series
 
OK here's my sad tale ..... Check your drains Mainship owners !!
Threads were completely gone. Nothing to hold the plug in. The yard said it 'crumbled' when they took it out to re-seal it.
Could have sunk the boat. Dodged a bullet !!
 

Attachments

  • 20210621_203639.jpg
    20210621_203639.jpg
    59.5 KB · Views: 11
  • 20210621_203713.jpg
    20210621_203713.jpg
    68.9 KB · Views: 12
That is sobering. My father's looked the same when I replaced his 4 or 5 years ago now. I thought I posted about it at the time but I should have reached out directly to you at the time.
 
Back
Top Bottom