screw mounting in cored deck

The friendliest place on the web for anyone who enjoys boating.
If you have answers, please help by responding to the unanswered posts.
Just to be clear many of the suggestions were not to just tap into fiberglass, but rather into structurally thickened epoxy (or G10).

We'd have to know a lot more details to know for sure whether or not it would be strong enough, IMO -- but it can be very strong. Also of course it depends on the type of force(s) being put on the hardware.
 
Using all the good advice, I did a test on a scrap piece of wood today. Waiting for the epoxy to set.
 
OK, so it looks like the epoxy set REALLY well. Just a note: WD40 does NOT work well as releasing agent. The test screw is now a permanent part of the scrap wood.

So what is a very good releasing agent that you would recommend that is also readily available? I’d like to try it again with another releasing agent. If it doesn’t work really well, I’ll look at drilling and tapping.
 
Screw Mounting in Cored Deck.

Hi Dave,
WD40 was never going to work. WD40 contains 60% Naphtha (petroleum); 25% Petroleum base oils; 10% Trimethyl Benzine; and other Isomers, plus the low vapour Hydrocarbons, mostly solvents which will attack and dissolve epoxy just as Acetone does. There are various release agents. I usually have waterproof or marine grease handy. The one I have at present is pink so its not dirty to use. Petroleum Jelly is excellent (a very common brand is Vaseline). My pick is Lanolin which is Wool wax or wool grease from sheep. Get a little jar from your pharmacist. Make sure you cover all the bolt surfaces - BUT only thinly. I wipe off all the excess with my finger - particularly in the threads.
I am going to send a few photos to further support what I have described
in a sperate post (in case they wont go through) Regards RonT
 
Screw Mounting in Cored Deck.

Hi again Dave,

I noted some suggested through bolting as being the best option. I totally disagree. Great in some applications but actually disastrous on the deck of boats. The one thing top boat builders avoid is through bolting on decks. Boat move and through bolting eventually become a source of leaks and/or damage to timber/ coring material even fibreglass. Here are photos of a yacht I built 20 years ago. Note the sail tracks for the headsails and on to of the coach-roof is the mainsail track. All these are fastened to the deck by casting in female threads in epoxy. There is NO through bolting with any deck fitting. The only exception is the Windlass; the bolts of which are 2205 stainless steel, welded into a cage, that was then fully glassed, epoxy, into the heavy timbers below. If you look closely every fitting including those tracks, are raised on glassed in plinths. These then have a concave coving along their edges. All glassed and painted. The loadings on those tracks are massive when we jibe in 40 knots of wind, with a 450 sq ft sail. Far in excess of your dinghy chocks. I have sailed this boat in the Southern Ocean up to 400 kilometres below Australia. We have at times kept sailing to windward in a gale of over 40 knots. Look at the photos of the underside of the solid coach-roof. Like your wife, I didn't want through bolts there. That solid dodger gets its strength through a 10 inch wide band of carbon fibre across the top down, across the decks and down along the hull. None of those fitting have had their fixings fail. Sorry about this being so long. I am just trying to be clear.
 

Attachments

  • Cnv0028.jpg
    Cnv0028.jpg
    62.8 KB · Views: 13
  • Cnv0029.jpg
    Cnv0029.jpg
    47.7 KB · Views: 12
  • Cnv0020.jpg
    Cnv0020.jpg
    59.1 KB · Views: 11
  • Cnv0036.jpg
    Cnv0036.jpg
    49.9 KB · Views: 10
  • Cnv0032.jpg
    Cnv0032.jpg
    76.8 KB · Views: 11
  • Cnv0024.jpg
    Cnv0024.jpg
    46.3 KB · Views: 10
OK, so it looks like the epoxy set REALLY well. Just a note: WD40 does NOT work well as releasing agent. The test screw is now a permanent part of the scrap wood.

So what is a very good releasing agent that you would recommend that is also readily available?

Assuming that what you want to release is the fastener, I've used automotive paste wax. But another way is to heat the fastener (say with a soldering iron on the head). With the heat I haven't used wax or anything else to release it.

(I found cleaning the wax from the threads to be a pain, so if I use that method now I'll often use new screws for the actual job.)
 
This morning I started two more tests. I found an old can of Meguires Canuba paste wax. I coated the screw with some wax and rubbed it in really well with my fingers. I then used a shop towel to wipe it down to expose the threads. Again, bedded it in the thickened epoxy. I’ll check it tonight.

I also filled a blank hole and will try drilling and tapping it. I’ll see which works the best for an incompetent such as myself.

Ron, that is a nice looking boat. I do have lots of Lanoliln. It would be very easy to work with. Here you can buy it as “Bag Balm”.
 
Probably not a great idea to screw-mount something with the windage potential of a dinghy.

Either through-bolt with backing plates or fender washers or cut out a circular area of the coring material and fill with solid epoxy reinforced with chopped fiber, or do both. I'd do both to keep water seepage around the bolts out of the core material.
 
So what is a very good releasing agent that you would recommend that is also readily available? I’d like to try it again with another releasing agent. If it doesn’t work really well, I’ll look at drilling and tapping.

I used silicone grease. I’m thinking dialectic would probably work too.
 
Well, I tried removing the screw tonight that had lubed with wax. It came out with almost no effort. The Canuba wax worked great. I’ll do another test with Lanolin and see how that works.

I do have a question though… how much thread contact is needed to secure the machine screw? My understanding is that a rough rule of thumb is that the length of screw that should engage the threads is 2x the diameter of the screw. So by that, if I’m using a 1/4” diameter screw then at least a 1/2” inch of its length should engage the threads in the epoxy.

So is there any advantage to using more screw than needed? If the mounting plate is 3/16” thick and there is another 1/8 countersunk depression in the epoxy, would a 1” long screw be plenty of holding power? In other words would 11/16” of thread be enough?
 
Hi again Dave,

I noted some suggested through bolting as being the best option. I totally disagree. Great in some applications but actually disastrous on the deck of boats. The one thing top boat builders avoid is through bolting on decks.

"...top boat builders avoid..."? Please cite your source for this. Based on my 33 years in the industry, building and repairing boats, nothing could be further from the truth. Nearly all deck hardware on FRP vessels is through bolted and in 95% of the cases it's not "disastrous". If done correctly it is strong, reliable and leak-free. Water can only leak into core if the core is not properly closed out, and doing that is straightforward enough.

"Casting" fasteners in epoxy, to avoid a through bolt, is a proven approach, and well-detailed in the West System Handbook section 7 https://www.westsystem.com/wp-conte...ass-Boat-Repair-and-Maintenance-Manual-lr.pdf however, while it can be used for these applications, it's rarely used on highly loaded parts like cleats, winches, windlasses, stanchions etc. Casting, if done incorrectly, in fact can be disastrous.

The typical release agent for casting fasteners is pure wax, without cleaners. There are proprietary mold release waxes.

While I don't recommend it, I installed a life raft using cast fasteners. Through bolting was simply impossible with the design (you can see the raft on the cabin top in these photos). The vessel was a Willard 30 Bill Parlatore, the then editor of PassageMaker, and I piloted from Chesapeake Bat to Bermuda, without incident (I believe it holds the record for the smallest inboard power vessel passage from the US mainland to Bermuda). On the return passage the crew ran into some rough weather, a wave swept the boat and triggered the raft's hydrostatic release. The crew didn't know this but eventually realized when their speed dropped, because they were towing an inflated raft by its painter. They retrieved and deflated the raft and lashed it in the cockpit for the remainder of the passage. The painter was attached to the raft's aluminum cradle, which deformed as a result, but the cast fasteners remained firmly set. Granted, the load was in shear, but it was still an impressive test for the technique.

Given the choice, I would through bolt this hardware. If simply impossible, casting is an option, but the loads make this risky unless the installer has a full grasp of the technique.
 

Attachments

  • 010115006A.jpg
    010115006A.jpg
    125.5 KB · Views: 18
  • 010115004A.jpg
    010115004A.jpg
    159.7 KB · Views: 16
screwing to cord deck

I had to mount some deck chairs to my balsa corded roof on my mainship . here's what I did, got some 1/2 in thick fiberglass board, drilled & counter sunk 1/4 in bolts epoxied through the 1/2 in fg board, then epoxied the fg to the deck where I wanted it . once you have a 1/4 in stud sticking up you can put whatever you want on it . will NEVER pull off !!
 
Short and sweet fiberglass some wooden blocks to your deck and bolt to those .quite drilling holes in decks or anything else on a boat ,I hate Holes !!!!!!!
 
The typical release agent for casting fasteners is pure wax, without cleaners. There are proprietary mold release waxes.


……..

Given the choice, I would through bolt this hardware. If simply impossible, casting is an option, but the loads make this risky unless the installer has a full grasp of the technique.


Thanks Tony. The Wax worked really well. After 24 hours, that resin insert is amazingly solid.

I’m pretty comfortable with casting into the deck. It is sandwiched with plywood in that area. I’m very confident on the strength I will get in the resin cast in that section of the deck.

Any thoughts on the length of machine screw to use?
 
Don’t make holes or penetrations. Water will find them and ruin your deck.

Some mounting can be accomplished by actually mounting the item from the side. I have an 18’ OB boat whereas the seats were mounted to the floor w screws. Of course the floor is now weak where there is rot in the wood floor where the screws penetrated.

I gooped up all the holes w 5200 and covered it w a carpet material that gets along well w being wet.
To mount the seats I plan to secure them via brackets (that I will be made from easy to fabricate aluminum). There is a 3/4” plywood piece on the inside of the hull sides to attach the alum. brackets. Won’t secure the seats vertically but I don’t plan on being up-side down.

For other attachments one can make a plywood pad (or other material .. plastic or metal) and attach items to the pad from underneath. Of course the strength will be dependent on materials and design. I wouldn’t mount an anchor rode cleat this way but things w only lateral tension would hold fine. One can install numerous tie down points so one coming un-attached wouldn’t be much more than an inconvenience.

There’s always other ways of doing things. And avoiding holes in decks and floors is a must not do thing IMO.
 
Screw Mounting in Cored Deck.

Hi Dave,
Your assumptions about the 11/16” of thread in the epoxy is quite correct and very appropriate for the application.

But let me expand on a few items: Firstly, I called them speed bits. Well, I think you guys call them spade bits. Bosh title theirs ‘Bosh Self Cut Speed Wood Bits’. I particularly like the ones with the outer raised cutting point, which makes for a very neat cut. The Bosh one is like this.

Whether using 3/16”, ¼” or 5/16” bolts, I almost always use the 1” speed bit and the 1” OD stainless washers. (I have cast with larger bolts, bigger washers etc.) I use the 1” because it allows me to easily push the epoxy down the hole, with the end of a ½” chisel.
I do not leave any countersunk depression under the fitting or on top of the epoxy. I bring the epoxy flush with the surface.

In keeping everything as neat as possible I usually put masking tape around the hole. So, I drill the 1” hole (at the centre punched point for the deck fitting). I stick down a piece of 2” or 3” masking tape over the hole. Then using a sharp retractable Utility knife and a pair of tweezers , I cut out 1” diameter tape over the hole. One of my favourite tools for this job is a scalpel. I always have a scalpel handle and a packet of blades. The whole reason for the masking tape is after fairing the top of the glue nice and level, I pull off the tape before leaving it to set.

You are right about the threads needing to engage twice the diameter of the screw. When casting using epoxy, my rough rule of thumb is a little deeper; say 3 times the thickness of the screw or bolt. But where there is not sufficient depth of the base material I have come back to 2 x dia. I have also gone deeper.

I always want very stout stanchions and lifelines. Look at the photos of the stanchions. They are up on plinths and the machine screws are 8-mm (5/16”) Those had close to 2 inches in the epoxy. (overkill). Many years ago myself and a shipwright carried out some tests by casting a couple of stanchions using epoxy onto either end of a 8 foot length of 8” x 2” pine timber. The epoxy was about 1” deep. After letting the glue set, we threw ourselves against the stanchions to see if we could break them out. The fitting never moved – the stanchions bent.

I said I push the 1" dia. washer down through the glue. At time I just put about 1/4" of glue in the hole; put the washer in place and push on it to level it; then fill to about 1/4" from the top with glue; carefully insert the screw vertically and into the washer ID; Lastly top off the epoxy to the surface.

There is very little tolerance between your chosen screw and the hole in your fitting. SO the 1" washer is the secret to accuracy with the whole project.
If you sand the glue surface or are not screwing down your fittings straight away, leave the bolts in the casting so nothing drops in the holes. Enjoy yourself - I am sure you will be using lots of acetone cleaning your hands!
Regards RonT
 
Steve,
You appeared to have taken offence at what I said about through deck bolting. I concede I may have generalised a little too much. But I go back to the Erick Hiscock and Donald Street days and timber boat building using seasoned timbers, bronze and copper fastenings etc. Even L Francis Herreshoff’s recommendations to do away with shelves and clamps in favour of knee joining every frame and deck beam, close to 100 years ago. Even back then shipwrights minimised the number of through deck fittings. I fully respect your expertise and some of the excellent contributions you have made. And FRP is the great success story of boat and yacht ownership of the last number of decades. And FRP generally lends itself to through deck bolting.
Firstly, I am only trying to help a fellow sailor who had a specific requirement. ‘To Not through bolt’
You state “it's rarely used on highly loaded parts like cleats, winches, windlasses, stanchions etc. Casting, if done incorrectly, in fact can be disastrous”.
I did not say anything about not through bolting Cleats, Winches and Windlasses. Funnily enough if you look at vessels designed and built early last century, they did not through bolt their stanchions. In many cases the ‘Shelf’ was too far inboard. They actually screwed the stanchion base to the deck and gave it its main support via ‘Bulwark brackets’ or a ‘bulwark brace’ or a combination of both.
Nor did I at any time describe a disastrous casting method. This is an area where I do have skill and experience. If the detail I describe is followed, the outcome will be most satisfactory.
My statement about the problems of through deck bolting was directed at those who don’t fully appreciate the implications and how to best do the job on any medium, and just rush into drilling another hole in the deck.
I built plywood skiffs in the 60s using resorcinol glues. Very few of those are around anymore. They failed where fittings were attached to the decks and the resorcinol glue was too thick. Later in the seventies I built a 40-foot cutter in steel and I was involved is supplying welding consumables to as many as 50 steel shrimp trawlers being built in our region. Fittings were welded to the decks on the best of them. But many owners took the easy way; by through bolting. These were all rusting badly within 10 years. Even though considerable care was taken with complex painting systems using 3 pack zinc epoxies or tar epoxies etc I believe next to none of those 50 vessels are still afloat. Many well-built vessels be they FRP, composite epoxy etc will be around for decades. BUT sailors should still minimise through deck fittings.
Thank you for all of your contributions. Regards to all RonT
 
To answer your question on thread depth, yes, a steel threaded fastener tapped into epoxy or laminate will benefit from greater thread depth. It is quite stiff compared to the epoxy/laminate and so behaves differently than in a steel nut, sharing the load along the length more. A threaded fastener is much stronger tapped into G10 than thickened epoxy so it depends on what strength is required for the application. Chocks for the dinghy I think you said, which would not be very heavily loaded. I have mounted some very heavily loaded sailboat hardware with fasteners tapped into G10 (many tons of working load).

There have been several methods described above which involve overdrilling a hole in the top skin and then filling it without undercutting the core. I disagree with this method, your only seal against water intrusion into the core is the bond to edge thickness of the skin. Far better to reef out and undercut the core so that the filler can bond to the skin's inner face. For that to be reliable, you want to make sure you have removed all the core, and aren't just bonding to bits of core still stuck on that didn't get removed.

Another tip on filling any hole in cored laminate: beware of outgassing of the core as this will create bubbles in the filler, enough sometimes to produce a leak into the core. Also aggressive mixing of thickened filler can entrain air leading to the same result. I have a horror story about that, suffice to say you do not want it to happen. Sometimes the outgassing can be mitigated by filling late in the day when the core is cooling rather than heating up. Less of an issue with plywood vs foam but still happens.
 
There have been several methods described above which involve overdrilling a hole in the top skin and then filling it without undercutting the core. I disagree with this method, your only seal against water intrusion into the core is the bond to edge thickness of the skin. Far better to reef out and undercut the core so that the filler can bond to the skin's inner face. For that to be reliable, you want to make sure you have removed all the core, and aren't just bonding to bits of core still stuck on that didn't get removed.

I'm glad you are posting in the thread. I saved a post you made some years ago to a sailing forum (IIRC) about tapping G10 tubes and then bonding them. So far I've only done this where structurally thickened epoxy was okay, but saved your post for "someday." Thanks!

Just to clarify if I was one of the "above" people, when I say "overdrill" I actually mean make the hole bigger by removing core. Actually I guess overdrill is a dumb word for it because I generally try NOT to make the drilled hole in the fiberglass skin(s) bigger, but rather to remove around 1/2" of core all the way around while leaving the skins intact (but clean of core on the underside). So it's kind of like the iceberg of holes: Looks small on the outside but is much larger diameter below where you can't see it (that then gets soaked in plain epoxy and then filled with thickened).

I have sometimes enlarged the hole in the lower/inner skin to make core removal easier. Usually when I'm going to thickened epoxy bed an FRP backing panel to the inner side anyway. But if both skins can stay intact so much the better.

Thanks again for your G10 article back then.

Frosty
 
Hi Dave,
One little point I overlooked. When you are fixing a bracket etc using hex head machine screws into the female casting of epoxy, the flat or spring washer you put under the head of the machine screw etc, ensures the bolt down will lock down tight. But some fittings such as the sheet tracks in my photo have bolt holes that are countersunk for countersunk screws or bolt heads. There is no opportunity to put a washer under the head. Thus the bolt may bottom out before it is tight on your fitting. SO, in such cases calculate the length of bolt you need above the surface. Then deduct about 1/16" or maybe 1/8". That will ensure the bolt will lock down on your fitting. Regards RonT
 
Steve,
You appeared to have taken offence at what I said about through deck bolting. I concede I may have generalised a little too much. But I go back to the Erick Hiscock and Donald Street days and timber boat building using seasoned timbers, bronze and copper fastenings etc. Even L Francis Herreshoff’s recommendations to do away with shelves and clamps in favour of knee joining every frame and deck beam, close to 100 years ago. Even back then shipwrights minimised the number of through deck fittings. I fully respect your expertise and some of the excellent contributions you have made. And FRP is the great success story of boat and yacht ownership of the last number of decades. And FRP generally lends itself to through deck bolting.
Firstly, I am only trying to help a fellow sailor who had a specific requirement. ‘To Not through bolt’
You state “it's rarely used on highly loaded parts like cleats, winches, windlasses, stanchions etc. Casting, if done incorrectly, in fact can be disastrous”.
I did not say anything about not through bolting Cleats, Winches and Windlasses. Funnily enough if you look at vessels designed and built early last century, they did not through bolt their stanchions. In many cases the ‘Shelf’ was too far inboard. They actually screwed the stanchion base to the deck and gave it its main support via ‘Bulwark brackets’ or a ‘bulwark brace’ or a combination of both.
Nor did I at any time describe a disastrous casting method. This is an area where I do have skill and experience. If the detail I describe is followed, the outcome will be most satisfactory.
My statement about the problems of through deck bolting was directed at those who don’t fully appreciate the implications and how to best do the job on any medium, and just rush into drilling another hole in the deck.
I built plywood skiffs in the 60s using resorcinol glues. Very few of those are around anymore. They failed where fittings were attached to the decks and the resorcinol glue was too thick. Later in the seventies I built a 40-foot cutter in steel and I was involved is supplying welding consumables to as many as 50 steel shrimp trawlers being built in our region. Fittings were welded to the decks on the best of them. But many owners took the easy way; by through bolting. These were all rusting badly within 10 years. Even though considerable care was taken with complex painting systems using 3 pack zinc epoxies or tar epoxies etc I believe next to none of those 50 vessels are still afloat. Many well-built vessels be they FRP, composite epoxy etc will be around for decades. BUT sailors should still minimise through deck fittings.
Thank you for all of your contributions. Regards to all RonT

Ron:

I wasn't offended in the slightest, my skin is much too thick for that. I simply disagreed with what you said from a technical perspective. You've now qualified your comment with wooden boats, plywood skiffs, and steel shrimpers, which have very little in common with modern FRP cored composite construction. I do agree, through bolting on a steel vessel makes no sense. The original question, which had to do with chocks, which are often heavily loaded, applied to fiberglass vessels...

I know you are trying to help a fellow sailor, your good intentions are not in question, that's what most of us are doing here.
 
I have sometimes enlarged the hole in the lower/inner skin to make core removal easier. Usually when I'm going to thickened epoxy bed an FRP backing panel to the inner side anyway. But if both skins can stay intact so much the better.

Thanks again for your G10 article back then.

Frosty
If you are doing one large hole and no undercutting of core, the backside is definitely better for the large hole. Clearly, it is better to bond to the faces of both skins, as it ties the skins together and makes the local area stronger to receive whatever fastener you use.

Sometimes if I have access to the backside, I will drill a hole large enough to do the core removal on top, then a very small hole on the bottom, and fill the void with a syringe or caulking gun from the bottom. This can make it much easier to ensure no air pockets in the installation.

Another trick I have used to fix already drilled (but not decored) installations is to drill the top hole a bit larger to do the decore, then put soda straws in the holes through the bottom, and cast the epoxy around the straws. That preserves the location of the holes for reinstallation of the hardware.
 
If you are doing one large hole and no undercutting of core, the backside is definitely better for the large hole.

In those (rarish) cases where I make one hole (typically the lower one) a bit larger, I am still removing core (typically 1/2" or so). It just may make it a bit easier to get a tool in there, and to clean the inner surfaces of the skins afterward. Then I use the upper skin hole (which I have not enlarged) to locate the drill for re-drilling at the end.

(For example I did this around some cleats. I used a 3/4" hole saw from the bottom - the pilot bit was the same size as the original hole so could go up through the top of the deck without enlarging that hole. The hole saw took 3/4" of the bottom skin and a disc of core. Then I removed additional core around the perimeter of the new larger bottom hole, coated with clear epoxy, filled with thickened epoxy. Did this for all four cleat fastener holes, then bedded a ~4" x 6" 3/8" block of pre-made GRP board to the underside of the deck so it would be parallel to the top deck (original inner surface was irregular so original backing washers were distorted), drilled the original holes down through that as well, then re-bedded/re-installed the cleat with through bolts.)

(I can see it's an art to include enough information to be clear, but not so much that no-one can get through it!)
 
So today I was able to get a 1/4-20 tap and test it out on epoxy that had been set in an enlarged holes in a piece of scrap wood. The epoxy had been completely cured for a week. It worked much better than I would have thought.

I did it in 100 degree temperatures in the direct sun. Not ideal as the tap, wood, and cured epoxy were are almost too hot to touch. Even so, starting it with a tapered tap then finishing with a blind tap worked really well despite the expoxy getting slightly softened with the heat.

Comparing it to the cast threads I found the tapped threads to be slightly loser. I used a 13/64” bit instead of a #7 bit for the hole, but i doubt if that would make a difference. the advantage of the tapped threads was that it was easier to ensure that they were perpendicular to the wood surface and would be easier to be precise in the location.

So, rather than casting I think I will drill and tap. The next test will be with expoxy thickened with West System 404 instead of the colloidal thickener that I have used in my tests so far.
 
I always enjoy reading feedback from an experiment :flowers:

When I've tapped thickened epoxy, I've done a few things.

One is I did use a smaller drill bit (than for metal, say).

Two is that I was careful to "relieve" the epoxy shavings, just like you'd do for metal (tap a bit, reverse, get the shavings out, tap a bit, etc.). I figured that would keep the cuts as clean as possible.

Three is that I used a mixture of colloidal silica and WEST 404 high-density filler (which they note as "high load").

If you do an equivalent hole to your prior ones, but just change the variable of filling it with a mixture of colloidal and 404 (vs. just colloidal), I'd be interested how you think they compare.

I've heard of people using chopped up fiberglass strands but I never have. It seemed like it might not allow the tapped threads to be as smooth. Hence I've gone with the 404 as the structural additive.
 
Hi Dave, Like Frosty, I like to see the results of experiments. DONT give up on the casting for your project. You stated "the advantage of the tapped threads was that it was easier to ensure that they were perpendicular to the wood surface and would be easier to be precise in the location." That is not correct if you use my spade drill bit and location washer system. Check out photo 1: The first is a hole drilled in scrap timber, plus a few of the options for bolts, washers etc. These are all imperial; an 1 3/4" x 1/4" Hex head bolt and the washer beside it; 1 1/4" OD and 1/4" ID. I used this bolt and washer for the demo and the 32-mm spade bit. (identical size to the 1 1/4" bit but the newest I had) Also in the photo an alternative 1" OD washer with a 1/4" ID. (This is the size I would normally choose. But I decided the 1 1/4" washer and hole might be easier to see in the photo. Lastly there is a 1 1/2" OD washer with a 3/8" ID and a 1 1/2" bolt for a larger job.
Please note: the point on the spade bit leave a cone, dead centre in the bottom of the hole, that creates an exact location for the bottom end of the bolt. To commence the job I centre punched before drilling the hole. Also you will see another centre punch mark on the right, where I might drill a second hole for the deck fitting etc. These are at 2 1/2" centres.
In the second photo I have mask-taped around the hole to keep everything clean. Note I have filled the hole about three quarters with the glue and have slid down the 1 1/4" OD washer, which absolutely centres the bolt and ensures it is perpendicular. (2 different masking tapes for contrast only) Also note as well as turning the bolt clockwise as I push it into the glue (to better fill the threads) I have also pushed down on the washer a little, to further force glue into the threads and come up around the washer. In the third photo I have filled the hole with glue to the surface; screeded it off level and remove the masking tape. This ensures no glue gets on your deck surface. Note the Vernier caliper demonstrates the centres are still 2 1/2".

The one thing to make sure is you leave a little less bolt protruding from the hole than the actual thickness of your deck fitting. You don't want the bolt to bottom out and have to grind a bit off it. I have used Micro balloons (micro spheres) , both glass and acrylic, Talc (talcum Powder), West 404 etc. over the years for various jobs. For casting the West 404 might be the best. When I used to drill and tap I found the harder products like 404 could be a little too brittle. And my experience was that leaving the glue to set hard for a week certainly led to the thread points fracturing to a degree, resulting in looser threads. (visual inspection) If you do go down the tapping method Frosty is probable correct about the colloidal and 404 mix. I have actually tried the chopped up fibreglass strands and found you just can't get the glass wetted out sufficiently and it ends up a very poor job. Maybe rethink the casting. It is dead accurate; there is no issue with shavings etc. and you will get maximum strength. Always screw the bolt back in until you do the actual deck fitting to make sure nothing drops in. Regards RonT
 

Attachments

  • DSCN4291.jpg
    DSCN4291.jpg
    118.9 KB · Views: 10
  • DSCN4296.jpg
    DSCN4296.jpg
    159 KB · Views: 10
  • DSCN4298.jpg
    DSCN4298.jpg
    137.3 KB · Views: 12
Ron, that is pretty impressive.

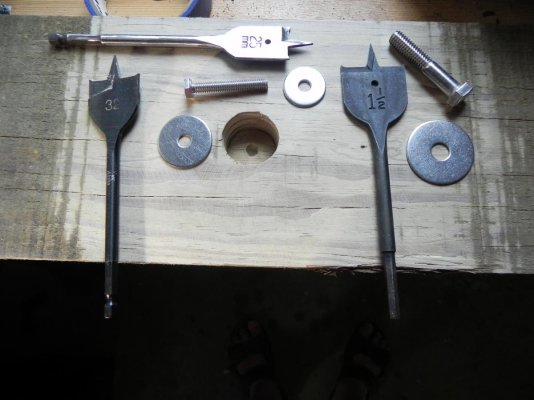
I really like the idea of the washer, but I don’t want to have that large of a hole in the surface fiberglass. Instead, I want to drill a 1/2” hole in the deck, and then use a Dremel to undercut the plywood.

However, I think that washer idea is elegant. I’m working an idea in my head that would accomplish the same thing without burying the washer in the epoxy.

Incorporating many of your suggestions, here is what I’m thinking at the moment. I’m still waiting on confirmation but I believe the total thickness of the deck where I’m working is 1.75” thick. If this is the case, here is what I’m considering.

Start off doing what I did before, drill a 1/4” hole 1.5” deep. Follow that with a 1/2” hole 1.25” deep. Then using a Dremel, undercut the plywood under the surface fiberglass. This will result in an almost cone like area under the fiberglass with a 1/4” deep extension underneath it.

I’ll then make up a template, again from the deck mounts themselves, but instead of a 1/4” hole in the template, I’ll use a 15/32” hole which should be just large enough for the head of the machine screw.

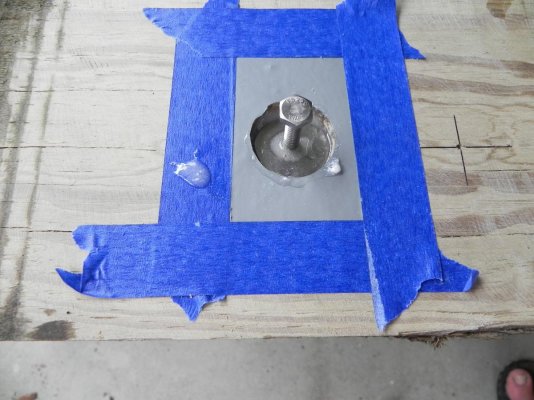
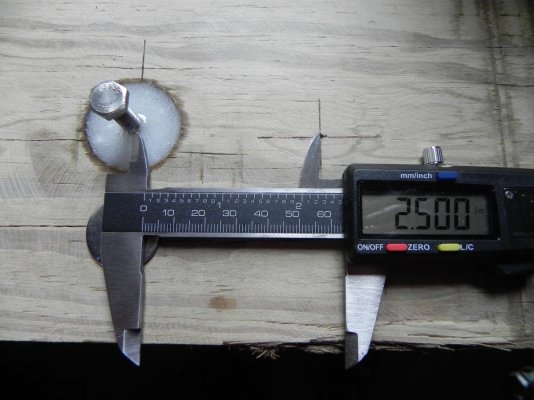
As before, I’ll fill the cavity I have created with thickened epoxy about 3/4 full, then insert a 1.75’ machine screw that I’ve waxed and then coated with epoxy into the cavity getting it all the way down into the bottom 1/4” well at the bottom. Fill the rest of the cavity with epoxy and level the top.of the epoxy. Again, much as you have done in your example. However, then I’ll put the template with the 15/32” holes over the screw heads and align the template into position. This will center the top of the threads with the holes for the deck plates.

I’ll use inexpensive machine screws for this and then use good quality 1.25” 316 Stainless machine screws for the final assembly.

Some details I need to figure out such as what material to use for the templates. How to ensure I don’t bond the template to the deck. Make sure that the registration for the templates is accurate etc…. If I can figure those things out I’ll do a test on scrap to see if it works out. Here is a simple diagram of the basic idea.
IMG_1101.JPG
 
Hi Dave, we'll have to stop meeting like this! Firstly congratulations on your well thought plan. I will make a couple of more contributions:
I do not know the dimensions of your RIB deck brackets and how many holes for attachment. I looked at a lot of available ones on the internet and most appeared to have stainless deck plates of about 1/4" stock. And most had 4 holes for attachment probably with 1/4" holes. Some had 6 holes; some were cast with 2 attachment holes up to 1/2" thick; looked to be countersunk.
1/ You stated you don't want such large holes in the deck surface. I only used the 1 1/4" for clarity. I regularly use 1" and with many jobs, 3/4" holes and fill washers are called for. Look at my first photos; Those stanchions bases are varnished and the 4 holes in the stainless are close to the edge. So I could only use 3/4" and quite likely 5/8" holes and washers. Check out the radius you have from the centre of the holes in your brackets.
2/ You have a quite a good depth for attachment - say 1 1/2". Naturally you will have to be meticulous with your drilling; measurements etc. When I have had any depth limitation I have done a couple of other things: See the spade bits in the photo above - the pointed cone guide is 5/8" long in all three spade bits. In looking through my spade bits I found a 5/8" one, a 3/4" and a 1" one where I used the angle grinder to reduce that 5/8" length to just 3/16". It is still large enough to drill very straight (but I do run a 1/16" or 3/32" twist bit down the centre as a guide. I don't know if you regularly use spade bits? But let me assure you they are by far the choice for drilling straight accurate holes in timber. (use you power drill not your battery drill - unless you have a very fast one). I drop a tiny amount of the glue in the bottom of the hole and then drop in the correct washer; so the 1/4", or whatever it is, hole in the washer is used to centre the machine bolt later on when gluing. If precise accuracy is needed I use an additional washer in the glue close to the top. Make sure you don't get any lubricant on the washers - you want the glue to bond to the washers.
3/ After using this system for over 40 years I am totally convinced of the strength that is achieved. You might consider doing a test yourself to assess the strength. Do one with the one, (or the two) washers. Remove the bolt after the glue has set; screw the bolt back in and let it cure for a week. Then take a pinch bar and try to pull it out! You will be amazed. Even the brackets for the hydrostatic relief on the life raft were cast into the deck. You will be able to far surpass the strength needed to hold down your RIB.
4/ I always use masking tape (best quality) On the very odd occasion when the hole is larger than the bracket etc. I mix a small amount of 2-pack polyurethane paint of the right shade; warm it up a little then drizzle it onto the epoxy surface; just enough so it runs to the masking tape and leaves a perfect finish. Carefully pull up the masking tape when the paint is starting to tac but wont run.
5/ Personally I don't believe using the Dremel is going to add much to your project and you will need to be so ever careful; particularly with the drive shaft at deck level.

I did an interesting job the other day for a family member. 12 foot tinny with a 15 -HP outboard and an electric trolling motor on the front. There are 2 thwarts, aluminium filled with floatation and carpet covered 3/4" seat tops. The job the was to install two plastic rotating upholstered seats for improved comfort. These seats have a pair of 7" square stainless plates under them that are only 5/8'" apart. You can swivel one to 45-degrees to get about 3/4" of height. The owners friend had done a similar installation by bolting the seat to a 30" long piece of plywood and then screwing the ply to the thwart. Pretty untidy. So as a favour I did the job for him. The holes for attachment were slotted. There wasn't enough height for the 1 1/4" fastenings. So I decided to use stainless coach screws. I think in the USA you call them Lag Screws. Without the seat attached I marked out the 4 holes. lightly greased the bottom of the stainless plates and then cast the Lag screws in place. Once set I took out the Coach Screws (Lag Screws) and fitted the seat back to the swivel plates. Because these were Lag screws I didn't need to get them vertical before getting the pointed end into the cast holes. Lying in contortioned position I was able to get an open-ended spanner under the seat and bolt the seat down. Looked very professional when finished. And I didn't tell the owner how I drilled holes under the seats and bolted them down. I did tell him in the end! Anyway I hope you picked up something from the above. I am off to golf in the morning. Regards Ron
 
Dave, A couple of things I thought of. When doing a full boat build in timber, epoxy and various cloths I have preferred West products. Usually buy 44-gallon drums of their sheathing resin. Then for gluing we add micro balloons to thicken to glue consistency. Advice: Don't over thicken your resin with filler. Not too viscous. It should run easily and be slightly runnier than normal epoxy glue. The epoxy itself is incredibly strong.
For most application putting one washer in the middle of the glue and visually making perpendicular is quite sufficient.
When sheet attachments such as main sheet tracks on a yacht are cast. the strength is remarkable. You can jibe running down wind in 35 knots. The boom violently smashes over; the noise in incredible; the whole yacht shudders; all the forces are on those screws in the epoxy and nothing ever moves. ( I'm trying to talk you out of the Dremel undercut - just isn't necessary)
Never use a mild steel bolts initially. The threads are minutely different to those on 316 bolts. Just use the 316 bolt straight off.
I have used offcuts of polycarbonate or acrylic sheet for templates. (from a sign or plastics fabricator) Regards Ron
 
Welcome back Dave! Sorry I missed this thread. Hope you can make it back up here soon.

Just to toss a few more ideas out there:

Have you considered casting in some inserts? AKA finserts or some made on a lathe, or possibly of even some easily found T-nuts. Still oversize the core hole of course. Even casting in a nut at the bottom of the hole may be a good idea; have a nut on the bottom threads of the bolt when casting in place.

Thread engagement length is always a factor in the tensile strength. You will need longer threads in epoxy relative to the same length in Stainless steel. This will be dictated by your cabin top thickness.

The one thing about drilling and cutting threads in epoxy is that you can do that with the chock in position, as opposed to hoping your alignment is spot on when cast in. Also you don't have to worry about air intrusion causing gaps in the root of the cast thread.

Either way, I have found the machine threads in epoxy is pretty darn strong, so maybe not the weakest aspect.

Use good quality fasteners. Cut threads, are nice, but at least ensure that rolled threads are consistent in the thread depth. A visual check would suffice. I've seen a lot of junk lately in quality and they jump right out. Full threads instead of a shank will give you more strength obviously.

I would be more concerned relying more on the tensile strength of the system where the epoxy bonds with the core, ie popping the epoxy core out through the skin of the fibreglass due to a bond failure. My guess is that tensile stresses will be more of an issue than shear.

I do like the idea of casting in studs as you wont be disturbing the threads by removing and reinstalling. You could further increase the strength by epoxying a aluminum, SS, or teak pad on top of the roof over the studs when you set them in place. Then just use nuts and a lock washer to affix your chocks. The pad would hold everything nice in alignment and also act as a water intrusion barrier.

Personally, I would spend more time on perfecting the aesthetics of the cabin side of a thru-bolted joint. Teak is always nice :)

Edit (again): I'm not sure if anyone has mentioned this reference as I am coming late to the conversation: https://www.westsystem.com/the-gougeon-brothers-on-boat-construction/
 
Last edited:
Back
Top Bottom