You are using an out of date browser. It may not display this or other websites correctly.
You should upgrade or use an alternative browser.
You should upgrade or use an alternative browser.
GB 32 How to lift engine to change mounts
- Thread starter Marinex
- Start date
The friendliest place on the web for anyone who enjoys boating.
If you have answers, please help by responding to the unanswered posts.
If you have answers, please help by responding to the unanswered posts.
Nomad Willy
Guru
Fork lift.
Busterbrown
Veteran Member
- Joined
- Jul 16, 2013
- Messages
- 74
- Location
- USA
- Vessel Name
- SCRAMBLER
- Vessel Make
- 1974 Grand Banks 32 #536
I took off the head first before lifting the motor out to reduce the weight I also temporarily reinforced the floor.
I took off the head first before lifting the motor out to reduce the weight I also temporarily reinforced the floor.
Just curious: Do you really have to lift the engine "out"? to replace the mounts?
Comodave
Moderator Emeritus
- Joined
- Jul 2, 2015
- Messages
- 21,287
- Location
- Au Gres, MI
- Vessel Name
- Black Dog
- Vessel Make
- Formula 41PC
Probably not out of the engine room, but up off the motor mounts. I made a crane to pull my engines. But I was lifting them up and out of the ER. Put some 2x4s from the bottom of the deck to the stringers. Then build an A frame on each side of the engine with some kind of beam between the A frames and use a chain fall or large come along.
Pete Meisinger
Guru
- Joined
- Oct 7, 2012
- Messages
- 3,145
- Location
- USA
- Vessel Name
- Best Alternative
- Vessel Make
- 36 Albin Aft Cabin
Unless room is a primary problem the engine will only have to come up about two inches. front first then the rear, without the tranny. Just a beam over the floor should do it. You don't say which engine you have but a common six cylinder diesel will only about 900 pounds.The same as three or four big guys standing on the floor.
pete
pete
OP
OP
Marinex
Veteran Member
Thanks for all the ideas so far!
The problem we are having is the rear mounts can be replaced just by lifting the engine with a sling and 4x4's. You only need about two inches and then you can just unbolt the bracket from the motor and change the mount.
But...
The front mounts are another issue. The front bracket for the mount is cracked in half and I have a replacement to install, so we cant use the bracket to lift.
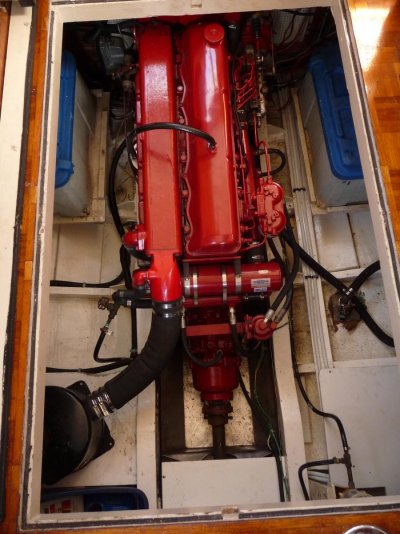
The only lift point on the engine front end is a lift ring , which on our 32 is positioned under the floor and not lined up with the engine room hatch, so we can't lift there. Its on left front in the attached picture
We thought about jacking from the keel up somehow but there is a drain pan suspended from the stringers under the engine and it doesn't touch the keel its just hanging.
Still scratching my head, my latest thought is I may have to sacrifice the under engine pan to get to the keel and put an inflatable bag lift or something in there?
How does one replace get the engine out of these boats? That may be a clue. I imagine they are done in pieces.
I have removed our generator and two 8d batteries out of this boat using a block and tackle and a sturdy stepladder spanning the hole but those were both only about a 200 lb lift.
Today I built a criss crossed 4x4 lift point spanning the gap to lift the rear, I'll add photos later for reference.
The problem we are having is the rear mounts can be replaced just by lifting the engine with a sling and 4x4's. You only need about two inches and then you can just unbolt the bracket from the motor and change the mount.
But...
The front mounts are another issue. The front bracket for the mount is cracked in half and I have a replacement to install, so we cant use the bracket to lift.
The only lift point on the engine front end is a lift ring , which on our 32 is positioned under the floor and not lined up with the engine room hatch, so we can't lift there. Its on left front in the attached picture
We thought about jacking from the keel up somehow but there is a drain pan suspended from the stringers under the engine and it doesn't touch the keel its just hanging.
Still scratching my head, my latest thought is I may have to sacrifice the under engine pan to get to the keel and put an inflatable bag lift or something in there?
How does one replace get the engine out of these boats? That may be a clue. I imagine they are done in pieces.
I have removed our generator and two 8d batteries out of this boat using a block and tackle and a sturdy stepladder spanning the hole but those were both only about a 200 lb lift.
Today I built a criss crossed 4x4 lift point spanning the gap to lift the rear, I'll add photos later for reference.
Attachments

Busterbrown
Veteran Member
- Joined
- Jul 16, 2013
- Messages
- 74
- Location
- USA
- Vessel Name
- SCRAMBLER
- Vessel Make
- 1974 Grand Banks 32 #536
Just curious: Do you really have to lift the engine "out"? to replace the mounts?
I missed the end of the question (mounts) and assumed the engine was coming out of the boat for some other reason hopefully someone else has replaced the mounts and can share a easy lift procedure.
Comodave
Moderator Emeritus
- Joined
- Jul 2, 2015
- Messages
- 21,287
- Location
- Au Gres, MI
- Vessel Name
- Black Dog
- Vessel Make
- Formula 41PC
What about putting a strap or sling around the engine and using a come along or chain fall to lift the sling? A good 2” nylon strap should lift the front of the engine.
twistedtree
Guru
What about putting a strap or sling around the engine and using a come along or chain fall to lift the sling? A good 2” nylon strap should lift the front of the engine.
I was thinking the same thing, positioned aft of the mounts and where you can lift from a beam spanning the hatch opening.
Comodave
Moderator Emeritus
- Joined
- Jul 2, 2015
- Messages
- 21,287
- Location
- Au Gres, MI
- Vessel Name
- Black Dog
- Vessel Make
- Formula 41PC
Probably fine if you spread the weight out with a piece of padded plywood. Or maybe go in front of the pan?
STB
Guru
Mine, on a Perkins 6.354, was done by blocking under it with scrap wood and then supporting/lifting that corner up by using a hydraulic ram with a spreader attachment to lift/push/pry/spread the engine-side bracket off of the blocking. Basically the shaft was unbolted at the hub and wiggled a bit back, the top nuts were removed from the pair of mounts, the corner we were working on was slightly lifted, the mount and stringer bracket were removed, the stringer bracket was cleaned up and reinstalled with new bolts, the new mount was reinstalled, the corner of the engine was lowered, the nuts were put back on the top of the mounts, and the shaft hub posted back up-- and it was all done in /minutes/.
The thin top spreader "blade" easily got under the engine side bracket even with the motor mount still in place.
The hydraulic ram kits with spreader attachment seem to sell for $125 - $250 for 4ton - 10ton kits at places such as Amazon, Harbor Freight, and Home Depot. The kit we used was a 10 ton from Harbpr Freight, but a 4 ton would seemingly have been fine. Most of the weight was actually shifted to the other pair of mounts, not lifted.
Pete Meisinger
Guru
- Joined
- Oct 7, 2012
- Messages
- 3,145
- Location
- USA
- Vessel Name
- Best Alternative
- Vessel Make
- 36 Albin Aft Cabin
That looks like a F.L. 120. The pan is cast aluminum. Very stout. It can handle a strap or sling under it. Don't overthink the project, it should be pretty simple and straightforward.
pete
pete
tiltrider1
Guru
- Joined
- Aug 2, 2017
- Messages
- 4,346
- Location
- Pacific North West
- Vessel Name
- AZZURRA
- Vessel Make
- Ocean Alexander 54
Instead of thinking fore and aft. Think starboard, port. Disconnect the shaft and slide it back an inch. Unbolt starboard mounts and use wedges and a Jack to lift the starboard side of the engine. Replace both mounts, then move on to the port side.
I can't see the lifting ring in your picture, but it looks like there is some clearance below the saloon floor structure. You could try a chain from the lifting ring at the front of the engine to an attachment at the stern end of the engine, then leaving the rear mounts looses but still attached, lift from the middle of the chain. That may get the front high enough to change the mounts. If not, release the rear mounts and lift off all four mounts, swing the engine out of the way.
When I lifted my own, I had enough clearance from the top of the valve cover to go straight up till clear of the mounts, then swing till clear in the opening, then up.
More pictures please, if you don't at first succeed.
When I lifted my own, I had enough clearance from the top of the valve cover to go straight up till clear of the mounts, then swing till clear in the opening, then up.
More pictures please, if you don't at first succeed.
hobbystuff
Senior Member
Here is how I replaced the engine mounts on my FL120.
Worked like a charm.
- Disconnect the prop shaft from the transmission.
- Raise the engine up to the top of the current engine mounts by backing off the top nut and raising the lower nut.
- Select the first engine mount you want to replace. Remove the top nut on the mount, then lower the bottom nut until there is space. The engine will balance on the three remaining mounts.
- Undo the bolts on the brackets attached to the engine and remove the bracket, this allows you to then remove the old engine mount. I had sprayed all my fasteners down with a penetrating oil and working the fasteners for a week before hand so they all moved easily, and the mounts came out of the brackets quite nicely.
- Clean the bracket up as required, check the bolts and then reverse the process to install the new engine mount with the bracket. Then do the other three.
- Do an initial engine alignment, then run the boat and check it again after a dozen or so hours.
Worked like a charm.
Last edited:
OP
OP
Marinex
Veteran Member
As I was sitting down to type this out I see Hobbystuff has posted the exact procedure we used today and it worked like a charm. It even made changing our front left cracked bracket a breeze!
All you have to do is crank up the three mounts you are not changing and then change them one by one. No stress and it all can be done in a couple of hours without any heavy lifting.
I would like to acknowledge Brian at American Diesel for all the excellent phone support this last week as I struggled to find mounts that would replace the ailing DF-100. The DF-100 will fit but are under rated and in the end we managed to use R&D mounts Part Number 800-036.
The only issue we had is that the front right mount closest to the helm has to have the adjustment bolt shortened to match the existing mount you are removing or when you lower the engine it will bind on the front corner of the block. The new mounts all have longer adjustment bolts we found.
wkearney99
Guru
- Joined
- Feb 17, 2018
- Messages
- 2,164
- Location
- USA
- Vessel Name
- Solstice
- Vessel Make
- Grand Banks 47 Eastbay FB
Were you fortunate enough to discover this BEFORE things were precariously balanced? Or worse, installed and trying to lower?The only issue we had is that the front right mount closest to the helm has to have the adjustment bolt shortened to match the existing mount you are removing or when you lower the engine it will bind on the front corner of the block. The new mounts all have longer adjustment bolts we found.
OP
OP
Marinex
Veteran Member
I already had the mount in and was lowering it and fortunately thought to have a look as I cranked the nut down on the other side. No damage done!
But I did have to disassemble it all and take it home to my shop and zip disk an inch or more off the mounting bolt. The front right corner is also hard to get a wrench on, a 12 point box end 15/16" can get in there but a stubby would have helped! No room for a socket of any type
But I did have to disassemble it all and take it home to my shop and zip disk an inch or more off the mounting bolt. The front right corner is also hard to get a wrench on, a 12 point box end 15/16" can get in there but a stubby would have helped! No room for a socket of any type
rgano
Guru
- Joined
- Oct 8, 2007
- Messages
- 4,995
- Location
- USA
- Vessel Name
- FROLIC
- Vessel Make
- Mainship 30 Pilot II since 2015. GB-42 1986-2015. Former Unlimited Tonnage Master
I changed all four engine mounts on my stbd FL120 after level winding a 1/2" nylon mooring ball line between the prop hub and the second strut of my GB42. Three mounts were actually bent, and the forward port bracket you spoke of was broken too. I just disconnected the shaft and used car jacks with short lengths of chain to lift the engine a few inches. This was a wooden boat, and all work was done while bobbing around at a mooring ball in San Diego Bay. The weight on the jacks was spread out using lengths of lumber in on the bottom.
Tim
Veteran Member
Motor Mounts
You do t have to lift the engine to change motor mounts. At least I didn’t on my 32. Simply raise all mounts to maximum and then proceed one at a time to lower the first to remove. With three mounts holding the engine up you can slide the other out. Replace that one and then do the same on the others. Always keep one Mount up on each side.
Good luck. My boat did not have mounts on tranny. That could change things but probably still workable.
Keysdisease
Guru
Some mounts, the Cushyfloat/Metallastic mounts I know for sure, have removable studs. This means you can lift the engine just enough to get a saws-all blade between the bracket and the mount. Saw the stud off, slide the old mount out and the new mount in, and then thread the new stud in from the top. You dry fit the stud before all this and count turns or take measurements so you know how far to thread the stud.
This means you don't have to disconnect anything, jack and change.

This means you don't have to disconnect anything, jack and change.
Attachments

ronobrien
Guru
If you have 3 friends that total 900 lbs, just get them to pick the engine up.Unless room is a primary problem the engine will only have to come up about two inches. front first then the rear, without the tranny. Just a beam over the floor should do it. You don't say which engine you have but a common six cylinder diesel will only about 900 pounds.The same as three or four big guys standing on the floor.
pete
av8r
Senior Member
Here is how I replaced the engine mounts on my FL120.
- Disconnect the prop shaft from the transmission.
- Raise the engine up to the top of the current engine mounts by backing off the top nut and raising the lower nut.
- Select the first engine mount you want to replace. Remove the top nut on the mount, then lower the bottom nut until there is space. The engine will balance on the three remaining mounts.
- Undo the bolts on the brackets attached to the engine and remove the bracket, this allows you to then remove the old engine mount. I had sprayed all my fasteners down with a penetrating oil and working the fasteners for a week before hand so they all moved easily, and the mounts came out of the brackets quite nicely.
- Clean the bracket up as required, check the bolts and then reverse the process to install the new engine mount with the bracket. Then do the other three.
- Do an initial engine alignment, then run the boat and check it again after a dozen or so hours.
Worked like a charm.
This. The three remaining mounts will support the engine just fine, and you can take the opportunity to repair the broken alternator bracket.
Mike GB32
Senior Member
Keysdisease-
Have you used the Cushyfloat type mounts?
I've been following this thread because I'd love to change the mounts on my FL 120. I've read about those mounts in the past, on another forum, and would love to hear of some firsthand experience.
Have you used the Cushyfloat type mounts?
I've been following this thread because I'd love to change the mounts on my FL 120. I've read about those mounts in the past, on another forum, and would love to hear of some firsthand experience.
Keysdisease
Guru
Hello Mike,
I do have some experience with Cushyfloat mounts. My first advice is that the easiest engine mount replacement is for same/same. Changing mount holes in foundations and especially height differences can be problematic. They are very reasonably priced. There is a knock off on the market from a Spanish company AMC which seems very comparable.
Cushyfloat mounts are very common. Many engine manufacturers use them as original equipment for both gas and diesel engines. They perform very well, better than many mounts, and have as good a lifespan as any other natural rubber mount.
As mentioned because they are available unassembled they can make replacement very easy. There is a MAJOR difference between needing to lift an engine 2-3 inches or just 1/2".
Take a look here
http://www.missionsupplyonline.com/pdf/Cushyfloat_eng.pdf
Keysdisease-
Have you used the Cushyfloat type mounts?
I've been following this thread because I'd love to change the mounts on my FL 120. I've read about those mounts in the past, on another forum, and would love to hear of some firsthand experience.
Last edited:
Here is how I replaced the engine mounts on my FL120.
- Disconnect the prop shaft from the transmission.
- Raise the engine up to the top of the current engine mounts by backing off the top nut and raising the lower nut.
- Select the first engine mount you want to replace. Remove the top nut on the mount, then lower the bottom nut until there is space. The engine will balance on the three remaining mounts.
- Undo the bolts on the brackets attached to the engine and remove the bracket, this allows you to then remove the old engine mount. I had sprayed all my fasteners down with a penetrating oil and working the fasteners for a week before hand so they all moved easily, and the mounts came out of the brackets quite nicely.
- Clean the bracket up as required, check the bolts and then reverse the process to install the new engine mount with the bracket. Then do the other three.
- Do an initial engine alignment, then run the boat and check it again after a dozen or so hours.
Agree. This is the correct method. No engine removal required. If you measure the height of the existing mount first you may be able to get a jumpstart on the realignment.
Similar threads
- Replies
- 4
- Views
- 354
- Replies
- 14
- Views
- 1K