Cleaning and Painting Trim Tabs

The friendliest place on the web for anyone who enjoys boating.
If you have answers, please help by responding to the unanswered posts.

kernr

Senior Member
Joined
May 29, 2020
Messages
144
Location
United States
Vessel Name
Serenity
Vessel Make
Grand Banks 47 Europa
Good morning from the cold and very windy (today) Northeast -

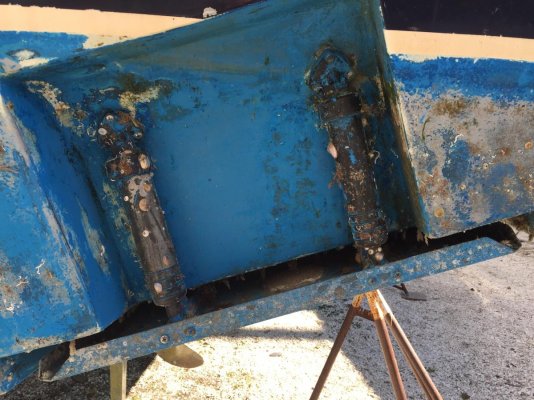
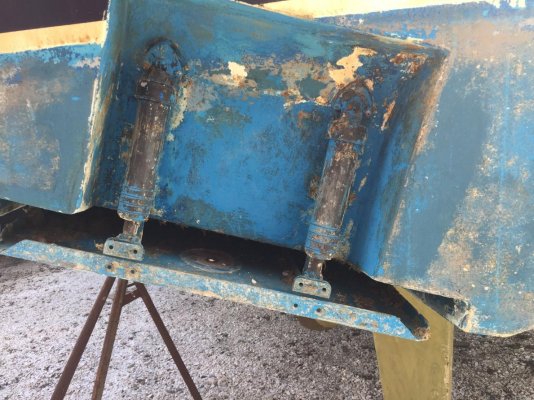
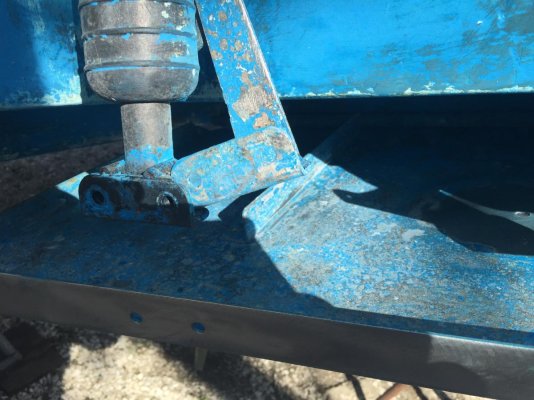
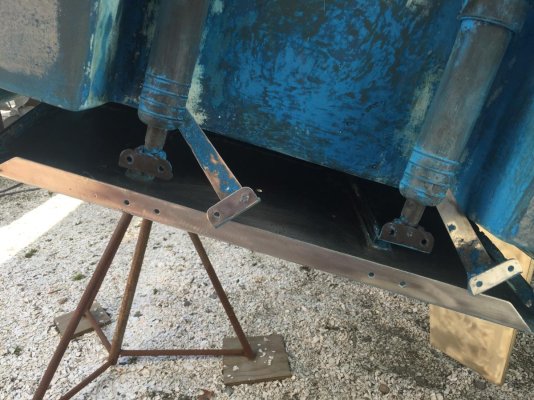
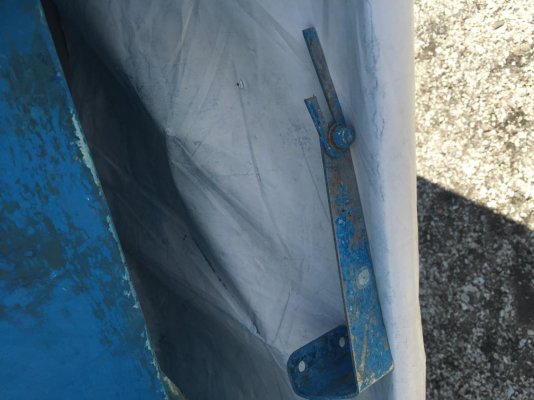
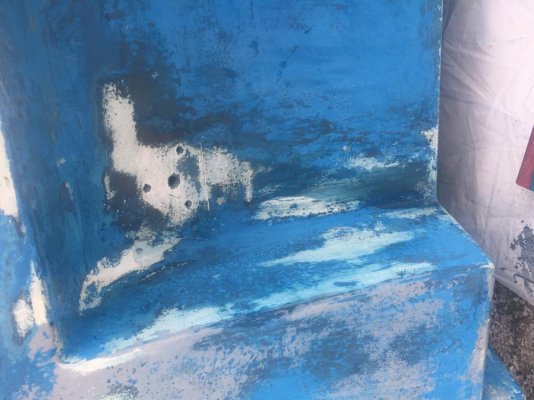
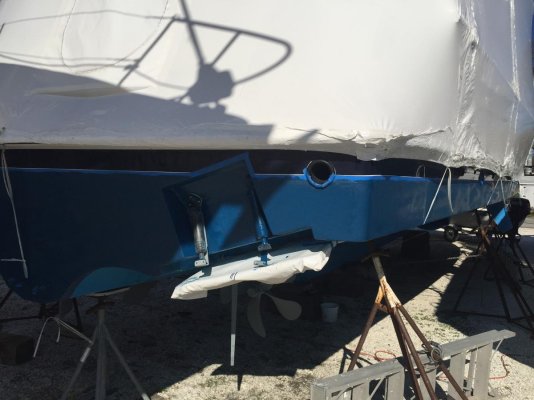
For the past several days I have been trying to clean up the trim tabs on the GB 47. According to the Bennett brochure they only move down from the stow position about 2 1/2". So it is very difficult to get in there and get all of the barnacles and other creatures out of there - yes, I unbolted the actuator hinges from the trim tab but it's still difficult. They look like they have 10 coats of ablative paint on them. I have removed the paint from the under side and was thinking a metal antifouling paint would be better for their preservation (already some minor pitting) than the typical bottom paint. Ideas on paint to use and if they need to be stripped of all paint prior to new pain. Also best way to remove old paint?

I've attached a few photos.

Thanks
Bob
 

Attachments

  • Starboard Trim Tab 10-9-2020.jpg
    Starboard Trim Tab 10-9-2020.jpg
    179.3 KB · Views: 25
  • Starboard Trim Tab 4.jpg
    Starboard Trim Tab 4.jpg
    172.5 KB · Views: 15
  • Starboard Trim Tab 5.jpg
    Starboard Trim Tab 5.jpg
    166.8 KB · Views: 18
  • Starboard Trim Tab 2.jpg
    Starboard Trim Tab 2.jpg
    195.9 KB · Views: 20
Have you tried a pressure washer to clean them out?
 
Hey Bob, I'm right around the corner. A blustery day indeed!

You can put new ablative paint on top of old ablative that's been roughed up with a sander, generally.

Good luck!
 
Trim Tab Cleaning

All -
Thanks for the response. I have been able to remove most of the imbedded shells and barnacles from between trim tab and hull. Today I will try high pressure water. I agree with the comment of painting ablative over with more ablative but I want to use Petit's metal antifouling paint on the running gear this year - not sure that should go over ablative bottom paint to be effective.
Bob

PS - I have been told that the bottom paint on Stainless Steel does cause some corrosion problems - I've not verified this comment. I do know that non SS tools used to clean them causes crevasse corrosion problems.
 
Just out of curiosity, do you guys find the tabs effective? I’ve disconnected mine and have them in the upper most position. Just wondering if I should rehook them up. Being only 6” or 8” wide with almost 40,000 lbs of boat, I wouldn’t think they’d do a whole lot, but...... Any thoughts??
 
Trim Tab Cleaning

All -

Well I power washed the heck out of those tabs today and saw some stuff come off but still a lot of paint and shell remnants left. See photos after power wash. regarding the effectiveness. The ones on this 47' are quite a bit larger - I would say each one is probably 18" wide and 12" deep. I do know on sea trials at top end she was doing 25 knots and tabs were all the way down - I am pretty sure that she would not have achieved that speed without the trim tabs. now if you ask about 10 knots I would say they help somewhat but it is marginal at slower speeds.

Any other cleaning ideas?
Thanks,
Bob
 

Attachments

  • Port Trim Tab 7.jpg
    Port Trim Tab 7.jpg
    174.5 KB · Views: 12
  • Starboard Trim Tab 6.jpg
    Starboard Trim Tab 6.jpg
    175.2 KB · Views: 10
  • Starboard Trim Tab 7.jpg
    Starboard Trim Tab 7.jpg
    139.1 KB · Views: 12
To get the shells and growth off, maybe a diluted solution of muriatic acid and let it sit for a bit. Then hose off and try pressure washing again.
 
A lot of us use regular bottom paint over stainless steel items like shafts and whatnot by roughing up the steel for something like Interlux 2000 primer coat to get a grip on the metal. Then the metallic bottom paint is applied over it.
 
Different locations may see different results but in my experience,hard a/f works better than ablative on running gear, in which I include trim tabs. Propspeed works better again than hard, but I doubt it`s worth doing propspeed on trim tabs.
 
Trim Tab Cleaning

Good Morning -

Anyone have any experience with a product called Barnacle Buster made by Quality Chemical - it talkes about use on fiberglass but I am obviously working on SS?

Bob
 
Trim Tab Cleaning

All -

Okay here is what has been done and I believe most of the calcium has been removed from Trim Tabs. First I tried to sand off shells - really hard stuff to get at in a two and one half inch opening. I did not dare take the forward hinge off for fear of just creating a bigger problem than necessary. I then used a power washer that removed more of the loose stuff. Then I used "On Off" solution and finally a product the yard recommended called "RYDLYME" - see photo. Currently the TT look like as shown here. It looks like a grey undercoat which adhered well to metal was put on before the ablative bottom paint. It is tough to remove. I will try as best I can to sand the remaining blue bottom paint off then apply the grey Petit metal antifoul paint. More to come....

Bob
 

Attachments

  • Barnacle Cleaner.jpg
    Barnacle Cleaner.jpg
    132 KB · Views: 11
  • Port Trim Tab 8A.jpg
    Port Trim Tab 8A.jpg
    186.6 KB · Views: 14
  • Starboard Trim Tab 8A.jpg
    Starboard Trim Tab 8A.jpg
    168.1 KB · Views: 12
Ready to paint

Good Morning all -

Well I finally got these Trim Tabs to a point that they are ready for painting. I also learned a, after talking to our friends in Grand Banks Malaysia that these tabs are: PN 21500-038 - BENNETT TRIM TAB 29"X 15.1/8" GB47H
NOTE : GB44EU BENNETT MARINE 29"x15.1/8" REINFORCED, PARALLELOGRAM - so that is good info to know if I need to replace later on - if still in stock.

What I learned from this experience is that I need to get some protection on these puppies so I never have to put this much elbow grease into them again. Next year I am hoping for a light sanding of trim tabs and recoat with Petit Prop paint. Pictures of cleaned up trim tabs attached.

Thanks,
Bob
"Serenity"
GB 47 Europa
 

Attachments

  • Port Trim Tab 9.jpg
    Port Trim Tab 9.jpg
    179 KB · Views: 12
  • Starboard Trim Tab 10.jpg
    Starboard Trim Tab 10.jpg
    158.4 KB · Views: 13
Broken Retention Bracket

Good Morning -

Ah it is a boat!! So while sanding one of the four retention brackets it broke in two. My guess is that the previous owners, or yards they used, were using a antifouling paint that had a lot of copper in it because it was pretty seriously pitted. Right where the break is it is almost hollow from crevice crack corrosion. That is why I was sanding them to get the old paint off and some metal paint like Petit's Barnacle Barrier paint on them to stop the pitting. Oh well, now I need to remove the actuator associated with this broken bracket which probably has 3M's 5200 on it. Never a dull moment. Photos attached.

Anyone familiar with this job of essentially replacing an actuator to get the bracket under it? Let me know also where I can get one bracket made in the Newport, RI area.

Thanks for any help,
Bob
 

Attachments

  • Retension Bracket - broken 4-19-21.jpg
    Retension Bracket - broken 4-19-21.jpg
    106.7 KB · Views: 11
  • Retension Bracket - broken 4-19-21A.jpg
    Retension Bracket - broken 4-19-21A.jpg
    133.1 KB · Views: 9
  • Retension Bracket - broken 4-19-21B.jpg
    Retension Bracket - broken 4-19-21B.jpg
    61.5 KB · Views: 15
Retention Device Replacement

Good Afternoon -

I did get the retention device from Yamaha (who now handles the parts from Bennett Marine (They own them). It was about $100 for two retention devices including shipping. I need to make some slight mods to the bracket so it fits to hull better and drill a hole to get the correct length of the device. Today I got the wife into a very tight spot in transom to remove old elbow and tube from the actuator. When I took the old actuator off I found silicon was what was used to originally put it together and as you can see from photo it was pretty badly rusted out. I will attempt to shape the bracket to better fit up to hull and then paint with Petit metal paint. My plan is to put it back together with 3M 5200 and not silicon. Seems to me that you really want something solid holding it together and preventing water from coming up the screw and tube. What do you guys think?

One photo of hull where actuator with retention device fits up - you can see the three screw holes and the hole for the tube that pernitrates hull.

Thanks for any free advice.

Bob
 

Attachments

  • Starboard Trim Tab 11.jpg
    Starboard Trim Tab 11.jpg
    131.2 KB · Views: 9
  • Starboard Trim Tab 12.jpg
    Starboard Trim Tab 12.jpg
    142.6 KB · Views: 6
Your wife probably did not need to disconnect the plumbing on the inside, the retention device is slotted so all you should need to do is loosen the upper hinge of the actuator enough to slide the broken units off and the new ones on.

Be very careful when re-attaching the plumbing as once those nipples have been seated in the plastic they can be fussy. You will want to put the nipples on before you re-attach the actuator to the transom, put a piece of tape over the open end to keep it clean, she will have to attach the elbow and tubing using vice grips to keep the nipple from turning. Threading too far will close the hole in the hinge to the actuator :facepalm:

The part numbers you have should be good if you ever need to replace the tabs. Bennett keeps excellent records of custom tabs, and will make to order. Nothing else is going to fit in that pocket and no-one but Bennett makes that bottom mount hinge.

The retention device is there to prevent the tabs from being pulled off the lower hinge should you back down hard with the tabs down. Unlikely this might happen with these "smallish" tabs with dual actuators in pockets. Bennett stock tabs are single actuator up to 42" x 12". The amount of water that could get on top of the tab in R in a pocket is limited as compared to tabs on the transom where the entire tab is exposed.

You can paint the hell out of the actuator, and the ram even full down. There are no seals at the bottom of the actuator that might be damaged.

:socool:
 

Attachments

  • bennett ram.jpg
    bennett ram.jpg
    18.9 KB · Views: 53
Keysdisease -

Thanks for the note. I really wanted to take the actuator off because one of the three screws holding it on had the head broken off and I needed to get it out to replace it. Do you recommend I put 3M 5200 in the holes when I replace actuator? There was silicon on there but I can see by the rust on the screws that there was also some water intrusion into the screw holes.

Thanks again,
Bob
 
Do you recommend I put 3M 5200 in the holes when I replace actuator? There was silicon on there but I can see by the rust on the screws that there was also some water intrusion into the screw holes.

Sealants and adhesives are personal preference. 5200 is a very good adhesive, I have seen it delaminate fiberglass. Silicone is a fair sealant and an OK adhesive. Even with the broken screw head I would wager that installation a decade + old. For something that gets wet and dry cyclically in salt water, with maybe some exhaust fumes thrown in from the station wagon effect, a very corrosive environment, Grand Banks and Bennet did pretty good. :ermm:

For something that is attached with fasteners that actually do the mechanical fastening and does not need additional adhesive, something you may want to take apart someday, 5200 would not be my first choice.

I am biased :socool:
 
Retention Device

All -

Decided to go ahead with a small amount of 3M 5200 under the retention device and in the four holes - since these holes are under water all the time when boat is in the water. All hooked up but not tested yet. I had to take some time to shape the retention bracket to fit the hull pocket contour around trim tab area. Painted with two coats of Petit metal paint and will eventually go over with the ablative bottom paint. See Photo.

Bob
 

Attachments

  • Ultra hard paint on Verticals 1.jpg
    Ultra hard paint on Verticals 1.jpg
    108.3 KB · Views: 9
I always use a wire wheel

All -

Well I power washed the heck out of those tabs today and saw some stuff come off but still a lot of paint and shell remnants left. See photos after power wash. regarding the effectiveness. The ones on this 47' are quite a bit larger - I would say each one is probably 18" wide and 12" deep. I do know on sea trials at top end she was doing 25 knots and tabs were all the way down - I am pretty sure that she would not have achieved that speed without the trim tabs. now if you ask about 10 knots I would say they help somewhat but it is marginal at slower speeds.

Any other cleaning ideas?
Thanks,
Bob

A wire wheel will clean it up in a jiffy.
 
Asking why metal running gear always has more growth than wood or fiberglass. Pettit told me years ago that bottom paint is useless over metal w/o a barrier between it and the metal. Not just that it won't adhere well but that it won't repel growth. Barriers can be non-metallic primer, epoxy, or even multiple layers of "dead" bottom paint. I applied epoxy to my running gear (not propeller) and never a problem again.

Sandblasting is the best way to get paint to stay on stainless.
 
Back
Top Bottom