Helmsman Hacks

The friendliest place on the web for anyone who enjoys boating.
If you have answers, please help by responding to the unanswered posts.

Hydraulicjump

Senior Member
Joined
Apr 13, 2012
Messages
213
Location
USA
Vessel Name
Off Leash
Vessel Make
Helmsman 38e
Hey all you Helmsman owners. I thought I would start a new thread since the "New Start" thread has gotten so long it is a bit hard to find great stuff in it (and there is a ton of great stuff).


In this thread I am asking Helmsman owners to post things they have done that make life aboard simpler or better or both so that the rest of us can learn from and adopt them. I am not suggesting design changes or things for the factory to do in new boats, but rather owner adaptations to their boats. And the simpler/cheaper the better.


I will post a couple to seed the discussion. First will be how to deal with being "height challenged". And also how to light dark places, mount kayaks, put a Starlink dish on the rail, etc.


Stand by.
 
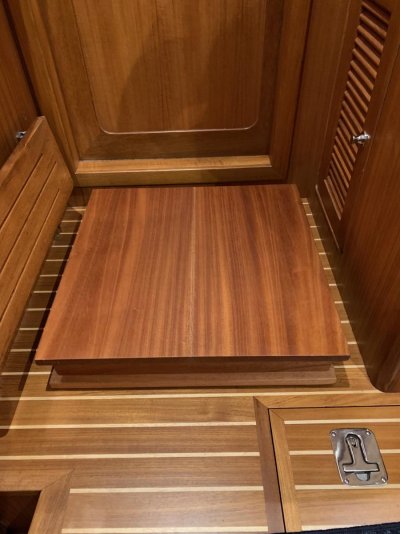
Improving sight lines for short people

I am 5'8" according to my driver's license, which as Mark Twain might say, is a "damnable lie". As good as sight lines from the helm are on our Helmsman 38e--and they are very good for a boat this size--I am too short and would like to see better when docking. So I built the following.


From Home Depot I got a 1' x 8' length of mahogany and made this 2' x 2' 4" tall step. It took about an hour to build it and screw and glue it together then multiple hours to put 5 poly coats on it. I added furniture pads on the base of it so it wouldn't scratch the teak/holly floor. But it is a lifesaver for a short guy like me. I tip it up when I need to get into the cabinet under the helm seat, but otherwise it is very helpful there beneath the helm.


And now--voila--I am 6' tall. According to my driver's license. My wife disagrees.


Jeff
 

Attachments

  • IMG_2459.jpg
    IMG_2459.jpg
    111.8 KB · Views: 55
Last edited:
mounting a starlink dish on the railing

I mentioned this in the New Start thread, but I thought this a good place to post pictures of the railing mount.

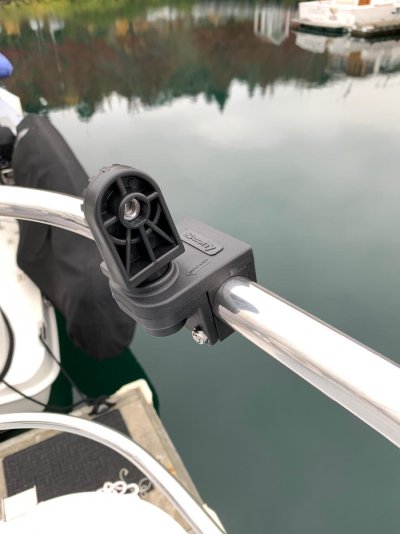
I put the router in the cabinet above the microwave in the salon. In our boat there is a nice panel in the back of this cabinet that allows you to easily fish the dish cable up to just beneath the helm on the flybridge.


I then got this:

https://scotty.com/product/245-1-14-round-rail-mount/

and this:

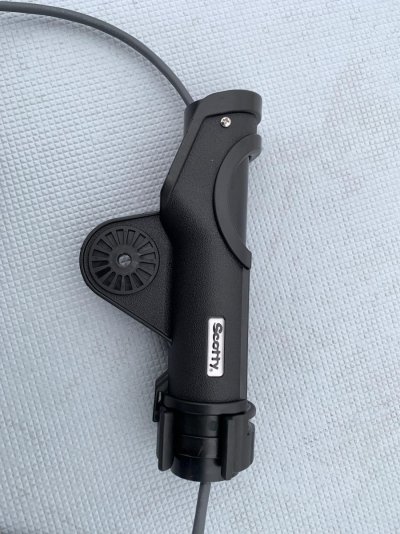
https://scotty.com/product/no-229-power-lock-with-no-mount/


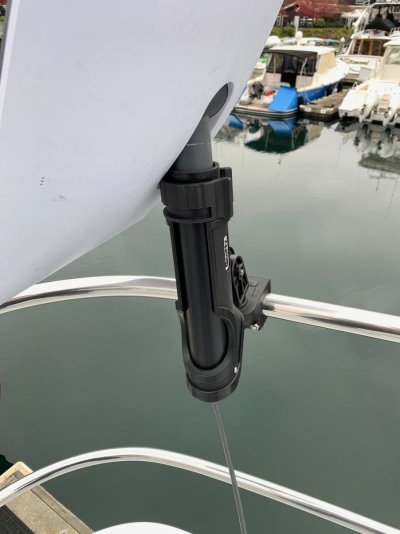
along with a length of 1.5" PVC. The pvc fits nicely inside the Scotty rod holder. I put screws in the base of the rod holder and through the PVC to keep the dish in place and leave space for the cable.


Some pictures to help visualize this.
 

Attachments

  • IMG_2449.jpg
    IMG_2449.jpg
    75.1 KB · Views: 36
  • IMG_2450.jpg
    IMG_2450.jpg
    167.6 KB · Views: 41
  • IMG_2451.jpg
    IMG_2451.jpg
    74.9 KB · Views: 39
lights in dark places

Finally (again, this is just to seed the thread) when we got the boat we kept running into a problem with the light in the head in the forward stateroom. Well, I did when I would get up at night to use it. A couple of times a night. Never mind.

The light switch is mounted on the outside of the head and next to the hinges on the door. Usually when you enter a head in the dark you grope for a switch inside of it. On our boat you have to go back outside of the head, close the door and turn on the light on a switch opposite the handle on the door. The door, if open, blocks access to the switch.

Then, being a well-lit head with a bright LED light, you blind yourself and your bunkmate, followed by complaints about waking her up and all.

For a few $ we solved this problem easily. We bought battery operated touch puck lights

https://a.co/d/1Ry70tE

and mounted one underneath the medicine cabinet just over the sink. Problem solved. No more groping for a light and no more complaints from my beloved. We added them to several cabinets where lighting is a challenge, especially the cabinet in the galley that is beneath the starboard stairs to the flybridge.

Dumb, obvious, and cheap, but great for domestic tranquility on the boat.

Jeff
 
Thanks for these. Its a good idea to create a spot for such ideas.

My wife is 5 ft tall. I've known its likely some sort of hack will be needed for her, but since I had no good ideas for a customization its just one of those items I knew I needed to address when the boat arrives. Idea tucked now tucked away. Thanks
 
Great ideas. I’m also 5’8” and Patti is even shorter.

Since our 38E hasn’t yet arrived, our hacks are theoretical and unproven. We have spent a lot of time imagining how things will work. When our boat finally completes its wayward journey to Seattle, we will see if they work.

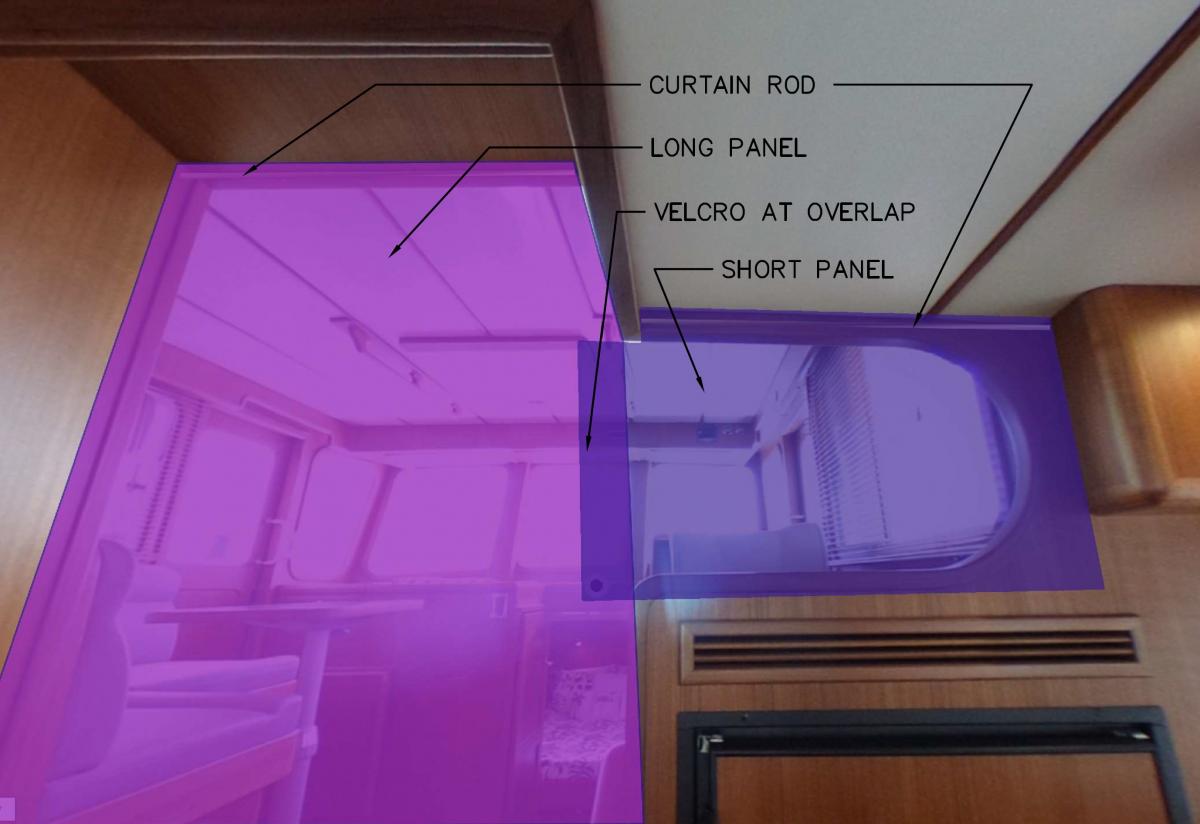
Creating separate sleeping compartments of the salon and pilot house was one we gave a lot of thought to. Putting eye hooks in the beautiful teak and running a taut cable fore and aft in the salon to carry a large privacy curtain was not appealing. Our solution was to separate the salon from the pilot house with a blackout curtain held up with an easily removable spring loaded curtain rods. The whole assembly can be stowed when not needed. It also preserves night vision for the pilothouse occupants if light is needed in the salon.

28403-albums1128-picture7510.jpeg


Having a shower curtain in the master shower to protect the door to the stateroom is apparently a much debated Helmsman topic. Our solution is an untypically inexpensive one requiring no holes in the bulkheads. The angled walls were problematic and the brackets we found for that condition were expensive, bulky and made for an unnecessarily heavy 1” rod. We will give this a try.

https://www.amazon.com/Vongfome-Adhesive-Curtain-Bracket-Fixing/dp/B09K514KBQ

Problems not yet solved
1. Stern tie reel (type, location and hand). Looking at hanging it on the starboard staple. Looking at https://www.fisheriessupply.com/shoreline-reel-compact-stern-tie
2. Bow rail burgee mast (the best we could find for the 1 1/4” rail is over $200.)
3. Stemware rack that will hold wineglasses in rough seas. Looking at under shelf type below projection over door to day head. We might have to modify one of these. https://www.containerstore.com/s/ki...abinet-wine-glass-rack/12d?productId=10000703

Now that we have another two and a half months to get ready, we’ll keep dreaming up ways to make things work for us. Suggestions welcome.
 
I don’t want Doug to go through that insane procedure. Plus, it wouldn’t help me at 5’ 2 1/2 “” see better. Oh yeah, I guess taller Doug would just have to do all the driving. ��
 
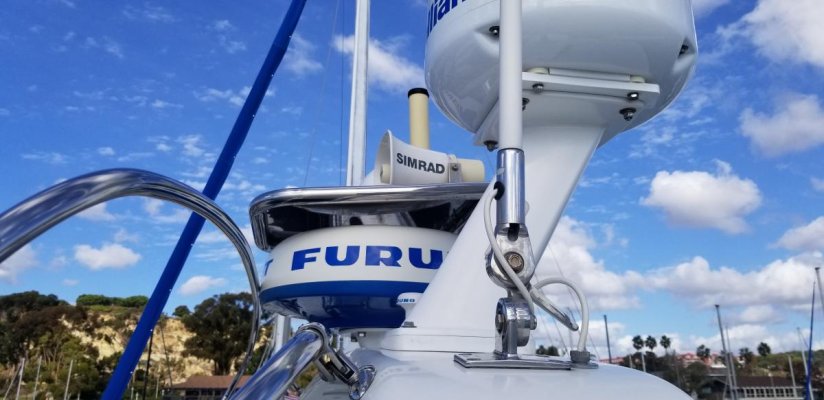
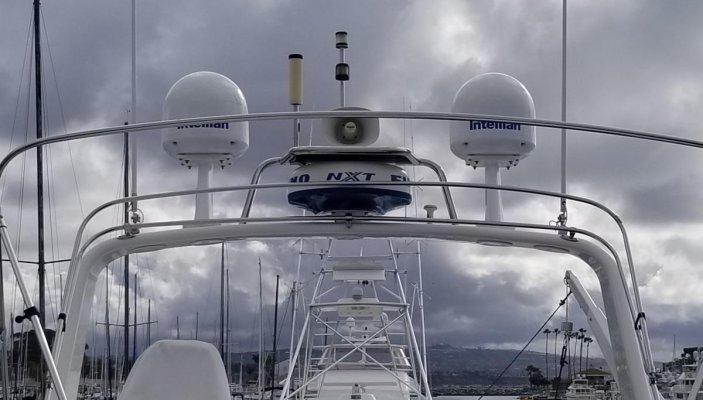
One hack that I saw in a picture recently was Fletcher’s. He had a stand built that attached to his arch which supplies a flat area over his radar for instruments. I have reached out to a metal worker to see what it would cost to build one that can be used for the flat Starlink panel. Could also be used for the Starlink RV portable version for those who detach the pole and leave it flat. When Bill sees this topic, perhaps he could post a picture. Pretty cool.
 
One hack that I saw in a picture recently was Fletcher’s. He had a stand built that attached to his arch which supplies a flat area over his radar for instruments. I have reached out to a metal worker to see what it would cost to build one that can be used for the flat Starlink panel. Could also be used for the Starlink RV portable version for those who detach the pole and leave it flat. When Bill sees this topic, perhaps he could post a picture. Pretty cool.

I should explain further. The reason for a platform needed above the radar comes from the way the arch and the pole holding the steaming and anchor light. The light standard measures 8.5” back from the arch. The standard was 16” to the steaming light, and the steaming and anchor light measure 10” from bottom to top. That has since changed to 20” to the bottom of the steaming light, I think.

So, with radars getting bigger, one solution is to order without the shop supplied standard. The hack is a solution if you have the existing standard. The geometry does not lend itself to a Seaview aft leaning mount on the arch. If you want two stacked instruments, then you are height restricted to either 16 or 20”, depending on the standard height. In addition, it is better to allow a little room under the light, for ships passing close by. This works especially well for those instruments affected by the radar beam, of which Starlink is one that is.
 
I had edited the above arch and light standard hack but didn’t hit save and can’t edit it. The issue that it resolves is the geometry of the standard. The standard runs back from the arch 8.5 inches, so an aft leaning mount gets in the way. A dual mount is even tougher. The height of the standard is either 26” or 30” from the arch. That limits what you can “stack” there. Since the Starlinks are radar sensitive, as are other instruments, this is a solution to get two devices in a constrained area. Sorry for the multiple posts!
 
Thank you everyone for starting and contributing to this thread! There's nothing like owner's hacks from those with personal experience to help others.

Once my boat arrives next spring I hope to participate with my own experiences.

In the meantime, I'll second the ouch! comment by @Helmsman on this -


I think I'd rather stay the height I am than go through this. Seems little different from the 'rack' of medieval torture times...
 
One hack that I saw in a picture recently was Fletcher’s. He had a stand built that attached to his arch which supplies a flat area over his radar for instruments. I have reached out to a metal worker to see what it would cost to build one that can be used for the flat Starlink panel. Could also be used for the Starlink RV portable version for those who detach the pole and leave it flat. When Bill sees this topic, perhaps he could post a picture. Pretty cool.

Photos attached showing the secondary arch support. It was fabricated by a local welding shop in our area. I am going to remove the Hailer and temporarily set the Starlink Flat/HP up there to verify it will work ok with the domes (obstructions) before I permanently connect it. I should be able to keep the WiFi booster in the same spot.
 

Attachments

  • 22D5240C-355B-4ACD-A8B7-C43A71100816.jpg
    22D5240C-355B-4ACD-A8B7-C43A71100816.jpg
    83.7 KB · Views: 37
  • 85EE4E8B-0E69-4D1E-B9EC-7F1C9B8F8706.jpg
    85EE4E8B-0E69-4D1E-B9EC-7F1C9B8F8706.jpg
    92.2 KB · Views: 38
Hi and welcome. Good choice in boats. We have done many upgrades and changes to suit our personal needs. Here are 3 easy ones.
We installed a roller blind on the aft sliding patio door for privacy when docked stern in. Home Depot.
https://www.homedepot.ca/product/lu...roller-shade-light-filtering-linen/1001655812
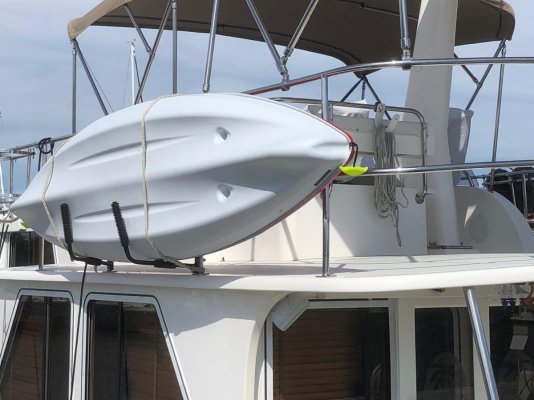
We carry our kayaks on the port and starboard upper railing. Installed with SS hose clamps. Keeps upper deck clear and doesn't interfere with docking or going through locks. Amazon. Cheap.

Also installed a double roller to take the pressure off the winch when hauling up anchor.

There are many many more. Enjoy your boat.
Barrie
The six stages of life: Toyboat, Sailboat, Motorboat, Motor Home, Nursing Home, Funeral Home.
 

Attachments

  • kayak 2.jpg
    kayak 2.jpg
    114.8 KB · Views: 24
  • double roller.jpg
    double roller.jpg
    57.5 KB · Views: 25
Blackwater Tank: Trust but Verify

Great hacks you all. Here is another poco nada we have done on our boat. When we got the boat, the gauge on the blackwater tank was clearly stuck. Following the advice of Scott we let the tank get pretty full (a guess) and added a cup of Tide then went out and got beat up by a wind-against-tide day to shake things up. Clearly it broke the sending device loose, but we really can't say how full the tank is at any time based on the gauge. And based on a pretty awful experience of a stuck sending device on our Ranger Tug, we are hyper-cautious.

Here is our "calibration" technique. We bought two of these digital counters:
https://a.co/d/793RkXs
and mounted them with double sided tape right next to the flush control panel. Each flush, you add a count.

On our boat we have the Dometic Masterflush and leave it on the lower volume "dry flush" setting in both heads. This puts .45 gallons plus your additions into the 45 gallon waste tank. So conceptually, that is 100 flushes from empty to full, with a subtraction for whatever volume you have added. Conceptually. And testing that would be a disaster. So we just assume .66 gallons per flush and count them up. Then using the classic rule of thirds applied to fuel tanks, when we get to 30 gallons (roughly 45 flushes) combined it is time to pump out with room to spare.

And what we have found so far is the tank gage is non-linear and is not to be fully trusted until you measure it with the counter. And then, keeping track of flushes is useful to see if it is stuck again.

Scott has pointed out that cleaning the sending device is easy if unpleasant, so that is certainly an option. Not ready for that one just yet.

More hacks! Would love to hear rule of thumb relationships on differences between port side and starboard side fuel levels to level the boat (ours has a small list to starboard due to weight on that side of the boat) and how much to trust the fuel gauges.


Jeff
 
The light switch is mounted on the outside of the head and next to the hinges on the door. Usually when you enter a head in the dark you grope for a switch inside of it. On our boat you have to go back outside of the head, close the door and turn on the light on a switch opposite the handle on the door. The door, if open, blocks access to the switch.

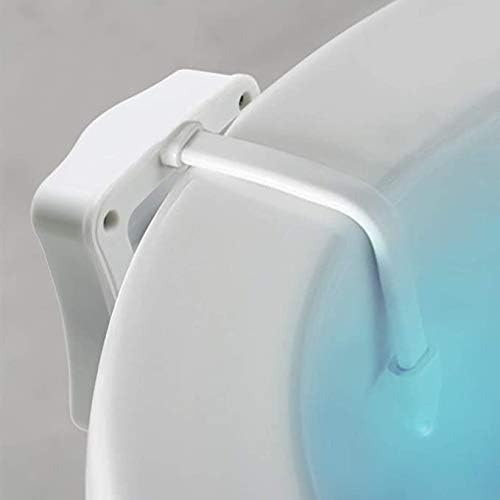
Not sure what they were thinking with that forward head light switch. I also manage to need a few trips each night. My solution is the toilet bowl light. The unit has an LED at the end of a bendable arm that hangs on the rim. Outboard is the battery pack and motion sensor. The inboard end is watertight and, well, resistant to organic liquids. I set mine to red to help with night vision. Provides plenty of illumination to get the job done!

https://www.amazon.com/Changing-Tol...669066450&sprefix=toilet+light,aps,104&sr=8-8

31RDFabiz5L._AC_.jpg
 
We have had good luck with these mounts. We put the kayaks onboard when going into a tight berth but leave them in the racks the rest of the time.

Ric

We had those on our old boat. They worked great but I was always nervous about hitting them on a dock piling. It just occurred to me that they could be hung on the aft rail of the boat deck and the kayaks carried transversely. Our dinghy is going on the swim step so the kayak racks would not conflict with launching. The inboard kayak would just be set on the deck and strapped to the rail.
 
Our dinghy is going on the swim step...

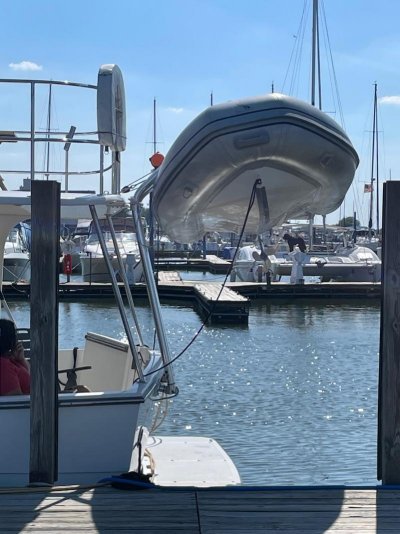
Our boat had St. Croix davits when we bought it and they mean the swim platform is out of service when the dinghy is stowed. No sitting, no swimming, no boarding to port. I'm sure it's different these days with those awesome bulwarks gates in the cockpit, but our answer was the Dinghy Butler. Stowed up at bridge deck height, it is out of the way for all swim platform use and completely stable underway. Food for thought.
 

Attachments

  • IMG_9810.jpg
    IMG_9810.jpg
    117.6 KB · Views: 41
In an effort to keep kayaks (Crescent Ultra Lite) on the boat we chose to mount the brackets (brand logo
Sold by Fishbrain Inc.
Magma Removable Rail Mounted Kayak/SUP Rack - 17.5") on the inner side of the railing allowing us the freedom to tie up to the lock wall , other boats and not be obstructed from pilings cumbersome as it may seem there’s enough room to walk by the kayaks. Just installed them yesterday it was worth the effort looking forward to using them in the Bahamas
 

Attachments

  • 3DF945B3-5FD1-40A8-9923-A0CFEACDAAFA.jpg
    3DF945B3-5FD1-40A8-9923-A0CFEACDAAFA.jpg
    181.9 KB · Views: 40
  • 822C2779-A82C-4D0B-A150-626DB796E0E5.jpg
    822C2779-A82C-4D0B-A150-626DB796E0E5.jpg
    155.2 KB · Views: 33
Last edited:
Our boat had St. Croix davits when we bought it and they mean the swim platform is out of service when the dinghy is stowed. No sitting, no swimming, no boarding to port. I'm sure it's different these days with those awesome bulwarks gates in the cockpit, but our answer was the Dinghy Butler. Stowed up at bridge deck height, it is out of the way for all swim platform use and completely stable underway. Food for thought.

I have been struggling with what type of davits to use. I may just use the roll ups that I had on another boat, and see how they do, then make a decision. Your point about the bulwark doors would make that work. May depend on the measurements required to do the roll ups. The nice thing is that you can take them off if you aren’t using them, and they have a low profile attachment.

I like your solution. May decide that is the best choice for us. My wife doesn’t want the dinghy up there, but I don’t think it would bother me.
 
Our boat had St. Croix davits when we bought it and they mean the swim platform is out of service when the dinghy is stowed. No sitting, no swimming, no boarding to port. I'm sure it's different these days with those awesome bulwarks gates in the cockpit, but our answer was the Dinghy Butler. Stowed up at bridge deck height, it is out of the way for all swim platform use and completely stable underway. Food for thought.

A couple of more questions/thoughts.

Do you have a motor on the davit system?

Your davit system rests at an angle, which might help with keeping the dinghy at rest when stowed. The flybridge comes further back on the 38e. I am sure the folks at Dinghy Butler could weigh in on that.
 
More hacks! Would love to hear rule of thumb relationships on differences between port side and starboard side fuel levels to level the boat (ours has a small list to starboard due to weight on that side of the boat) and how much to trust the fuel gauges.
Jeff

If both tanks are full, yes, there is a list to the starboard in the 38E. When both tanks are full to start, burning about 25 gallons from the starboard tank, will put her level in the water. After that, switch fuel tanks regularly, and that's always a good habit. At refueling, I usually topped up the port tank, and left the starboard one about 3/4 full. No list, and that's ample fuel for several days of cruising.
 
I have cruised my H38 for two seasons now and still think of myself as a beginner. My advice to new owners is to live with the boat for a while before making adjustments that are not immediately necessary. For example, our boat didn’t have a shower curtain and we now know that we wouldn't want one. We don’t have a problem with water leaking through the door, and it takes only a few seconds to wipe down the woodwork in the stall after a shower. I think a shower curtain would be a pain—it would impinge on the small space and may well foster mold.


Same thing for a privacy curtain for the main salon. We have had five people living on the boat for a week at a time, and I don’t think a privacy curtain would really offer much in terms of living comfort. Indeed, I suspect we would find it a nuisance. But this is the sort of thing you can decide after living with the boat for a bit.


Finally, I too couldn’t figure out where to mount a stern-tie reel, so instead I flaked 600’ of line into an Ikea bag, available from Amazon for less than $4. It works just fine: it adds nothing to the weight of the line, allows for quick deployment and retrieval, and stores easily in the lazarette. Here too I would suggest trying this method first before springing for an expensive reel.


The one thing I did have installed immediately after purchasing our boat was an air horn. (We went for a Buell Duplex but there are lots of choices.) I think a loud horn is essential in the PNW, especially in cool weather and fog when other boaters may be driving inside a noisy pilothouse.
 
A couple of more questions/thoughts.

Do you have a motor on the davit system?

Your davit system rests at an angle, which might help with keeping the dinghy at rest when stowed. The flybridge comes further back on the 38e. I am sure the folks at Dinghy Butler could weigh in on that.

Yes, the Dinghy Butler system uses a 12 VDC winch to lift the RIB. They supply two wireless remotes that work fine, but I went with the wired remote in a deck box mounted in the transom. Slick, in my opinion.

In its stowed position, the dinghy rests in the nook of the lifting arms. We use the stainless ratchet straps that come with it to secure for travel. It has just enough rise in the bow to drain while stowed.
 
If both tanks are full, yes, there is a list to the starboard in the 38E. When both tanks are full to start, burning about 25 gallons from the starboard tank, will put her level in the water. After that, switch fuel tanks regularly, and that's always a good habit. At refueling, I usually topped up the port tank, and left the starboard one about 3/4 full. No list, and that's ample fuel for several days of cruising.

Our Mariner 37 is hull 3 and it lists slightly to starboard even when the starboard fuel tank is ½ or less. I really can’t notice it except in the shower “seat” where water is retained. Did they fix that in later hulls? I’ve thought about pouring acrylic into that space so that water drains on its own, but wiping down with a camp towel after each shower has proved not too bad.
 
Every time I see this idea, I have the same question and concern. How do you keep the 600 feet of line from getting tangled up making it difficult to pull out enough line quickly? I’m sure there must be a trick to how you lay it in the bag.


As long as you flake the line into the bag without introducing any twists, and as long as you keep the working end of the line out of the bag at the end, there is no danger of anything becoming tangled. I tie the working end to one of the handles of the bag, to make sure it doesn't fall into the bag. This is no different at all from the way the anchor rode piles up in the chain locker. As long as you don't drop the end of the rode into the locker (which won't happen as long as it remains attached to the anchor!), the rode will play out fine, irrespective of how it is piled up in the chain locker. (If you want some tips about how to flake a long line quickly without introducing twist, ask a sailor.)
 

Latest posts

Back
Top Bottom