Slipping V-belt Sheave advice needed

The friendliest place on the web for anyone who enjoys boating.
If you have answers, please help by responding to the unanswered posts.

Snapdragon III

Senior Member
Joined
Sep 1, 2016
Messages
415
Location
USA
Vessel Name
Snapdragon
Vessel Make
Custom 56' Skookum trawler
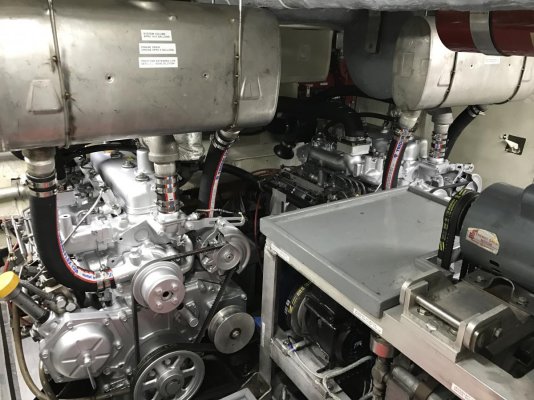
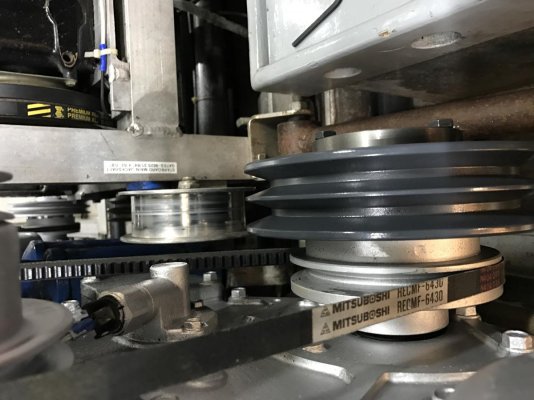
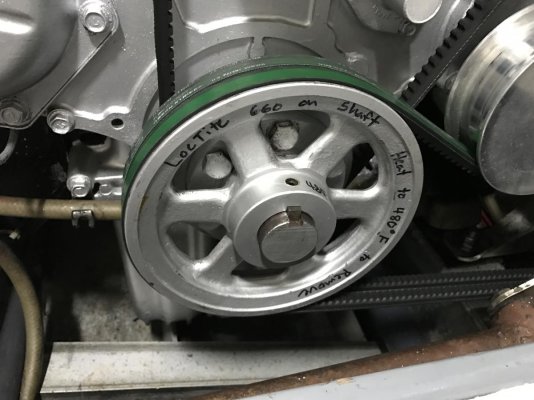
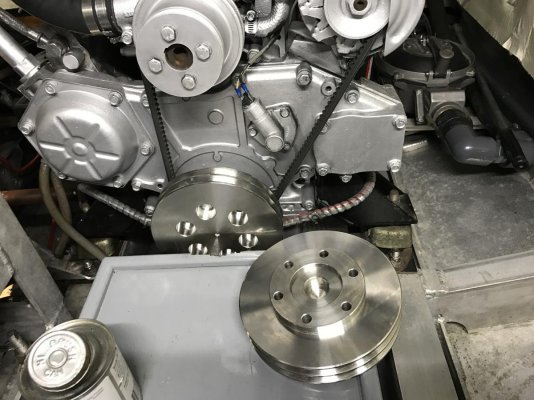
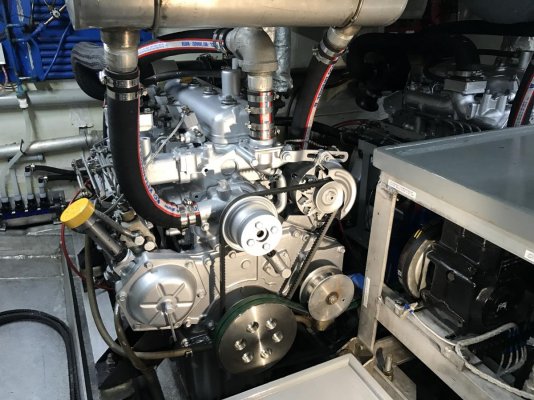
My boat has a double V-belt sheave that is installed on a 1 1/4" keyed shaft that is bolted on the end of the crankshaft of the Starboard main. It drives and accessory shaft that has alternator, fridge compressors, hydraulics, etc off of it. I recently removed the double sheave as part of an engine painting project I just finished. Everything was rusty and nasty and I had a heck of a time getting it off the 1 1/4" shaft. I ended up using a 3 arm gear puller, and heating the sheave with a torch to get it off. After cleaning it all up it slid back on easily. It has two set screws on it one on the key, and one at 90 degrees to it that bites right into the shaft. This weekend we took the boat out for the weekend for the first time since doing the work and after about 3 hours of motoring, the sheave loosened up and slid partially off the shaft, causing the brand new belt to jump off the tensioner, grind it's self up, and make a huge amount of black rubber dust in the engine room I had just spent a ton of time cleaning. When I discovered it after we had anchored, (I had checked the engine room several times, during the trip, but it must have happened right at the end) I took it apart, cleaned off the anti seize I had put on the shaft so it wouldn't get stuck, and put it all back together, tightening the set screws as much as I dared not wanting to strip them, or break off the allen wrench. I checked it a bunch of times on the way home, but never shut off the engine and checked the tightness of the set screws. When I got back to the marina after about 4 hours of crusing, The sheave was loose again, and the set screws were loose!

What is happening?
How should I fix it?

My thoughts are: Should I put some sort of lock tight on the set screws? Should I put some kind of lock tight on the Shaft? Could that be why it was so hard to get apart in the first place? Is it a thermal expansion issue where the sheave is growing more than the shaft as it heats up? Should I heat it in boiling water, put it on, and tighten the set screws with it hot?

Thanks in advance for any good advice. Other than this we had a fun weekend out in the cold. First time pulling crab pots in the snow.
 

Attachments

  • IMG_0425.jpg
    IMG_0425.jpg
    111.8 KB · Views: 201
  • IMG_0367.jpg
    IMG_0367.jpg
    154.9 KB · Views: 214
  • IMG_0417.jpg
    IMG_0417.jpg
    132.9 KB · Views: 195
I would use some locktite 620 on the shaft, it is a special product for interference fits and I would also use some of the regular stuff on the set screws. Did you use a drift to get the sheave back on the shaft first? It needs to be TIGHT. I would say that Never-Seize is the wrong product for a shaft. I would also investigate a guard for those belts.

What does that motor on the bench drive?
 
Last edited:
I would use some locktite 620 on the shaft, it is a special product for interference fits and I would also use some of the regular stuff on the set screws. Did you use a drift to get the sheave back on the shaft first? It needs to be TIGHT. I would say that Never-Seize is the wrong product for a shaft. I would also investigate a guard for those belts.

What does that motor on the bench drive?

That sounds like exactly the advice I need. I am not sure what " A drift to get the sheave back on the shaft first" means? The sheave slid right on. It didn't seem to have any play, but it was not super tight feeling either. If I use locktite 620 on the shaft will I ever be able to get it back off?

A few belt guards are definitely on the list of projects. For now I just turn off the engines if I need to get near them, as I don't want to have my arm ripped off, and bleed out, while my wife sits up above in the cabin not hearing a thing over the racket of the diesels. (I may have spent some time worrying about this scenario.)

The electric motor can be used to drive the aux shaft, to drive the fridge and freezer compressors when you are plugged into shore power.
 
Replace the set screws. They should have a hollow point to bite into the shaft. The crown of the point is probably blunted down and not biting in. If the sheave is moving on the shaft, clearly the set screw isn't doing its job. That application may also require dimpling the shaft with a drill bit through the set screw hole to give the set screw a larger contact area.

Ted
 
I would use new set screws, dimple where they seat and use Locktite or JB Weld on the sheave. Heat will loosen the Locktite, etc. when you want to get it off.

David
 
All good advise, but I'd argue to put the Loctite on the set screw after you got new ones. Can be removed with heat and tool.
 
Sd3.

You ask "whats going on". My guess is that when you cleaned all the rust off the parts you destroyed the fit of the sheeve on the shaft.
It should be a tight fit, like size for size or very slight interference, not clearance like it obviously is now.
Because there is clearance the sheeve will wobble on the shaft and the screws then work loose. They will do this regardless of what you do until you fix the fit. Correct fix is a new sheeve with bore size same as the shaft..... But you can try and measure the clearance ( between shaft & sheeve) with feeler gauges. If the clearance is too small to measure you might get away with it by using loctite on the shaft and inside the sheeve as you slide it on as suggested elsewhere. Do not get loctite in the screw holes and do not tighten the screws until the shaft loctite has cured. Then use loctite on the screws and get them as tight as you reasonably can.
It might work.
If there is a few thou clearance you might also be able to bodge it with a shim brass "liner" inside the bore of the sheeve plus the loctite in and out of the liner.
If you cant get shim brass try a beer can.

Might last you till you get a new sheeve, thats the correct fix.
 
Is the key way fit correct?
 
Replace the set screws. They should have a hollow point to bite into the shaft. The crown of the point is probably blunted down and not biting in. If the sheave is moving on the shaft, clearly the set screw isn't doing its job. That application may also require dimpling the shaft with a drill bit through the set screw hole to give the set screw a larger contact area.

Ted
This is what I would do .
 
Get a taper lock pulley. That will SOLVE the issue. A straight bore pulley with setscrews will not handle the torsional energy on the front of a diesel crank.
 
Get a taper lock pulley. That will SOLVE the issue. A straight bore pulley with setscrews will not handle the torsional energy on the front of a diesel crank.
Best idea yet. I work at lumberyard/ sawmill . We use them on all kinds of applications. I've never seen one fail .
 
Get a taper lock pulley. That will SOLVE the issue. A straight bore pulley with setscrews will not handle the torsional energy on the front of a diesel crank.

Ditto this. I have seen pulleys held only with setscrews walk off the shaft more times than I care to count. Taper lock or bushing bore pulleys are easy to deal with on and off, but will NOT move on the shaft once properly tightened.

https://www.mcmaster.com/#v-belt-bushing-pulleys/=15jhosv

:thumb:
 
Last edited:
Ditto taper lock pulley. You're probably taking too much hp thru that style pulley and over time the pulley heats up and expands. Any expansion renders the set screws loose. The taper lock pulley will solve that. If you wait too long, you'll have the shaft all scared up.
You can buy a pulley online or at most tractor or farm suppliers.
 
Thank you all for the good advice. I like the theory that the pulley is heating up and expanding effectively loosening the set screws. I think I will try the lock tight, and new set screws first at it is cheaper, and somehow this existing set up has worked well for 25 years until I came along and started messing with it. I am confident that I didn't change the fit of it. It was rusty on the outside, and I media blasted it, but I was careful to tape off the machined surfaces so I didn't destroy them. They weren't really rusty and cleaned up quickly with a little solvent and scotch bright. It is probably a little looser than it should be, but there is no where near a beer can thickness of clearance. I would be surprised if I could get it on with a sheet of tin foil in there.
If that doesn't work I will pursue the tapered shaft option.
 
You don't need a tapered shaft. You can buy a pulley with a tapered bushing that fits on a straight shaft. Snug the lock bolts and the tapered bushing grabs the shaft firmly.

Done.

Forget the set screws and locktite etc, those will fail here.
 
I like the tapered pulley best too, I had a notion the one you removed had a taper too, but then I confess I didn't look that hard at your photos. The cost of not buying the locktite will more than pay for the new pulley. I rebuilt an old 944 one winter for shyts and giggles and I bought some of that no-spin stuff for that project but I'll be darned if I can remember what I used it for; but I do remember it worked great!
 
I think if you want to save money and keep using the pulley, why not drill and tap more set screws into the pulley. If you have 3, goto 6, and drill into the crank small dimples a place for the set screws to sit.
And use a loctite on the pulley. But if the old pulley is wobbly loose forget it and go with the new pulley.

Odd the crank nose has no center bolt and washer holding a machined pulley onto the shaft?
 
Use green locktite on shaft and pulley-let it cure(6 hours) then blue locktite on "New" set screws. If you have to remove pulley again you will have to use a puller and torch. Start the engine before putting on the belts and check that pulley is running true.
 
Last edited:
Some annoying PO/mechanic thought it appropriate to affix the engine flange to the propeller shaft with Locktite. I had to cut the shaft to get it apart. New shaft and split flange went back in.

Perhaps wire the setscrews?
 
Look up Dodge taper bushings.
And. Ringfeder bushings.
Don,t screw up the shaft.
 
You could have the wrong belts on the pulley. The wear marks should be in the center of the sidewalls. It appears from the picture that the belts may be bottoming out in the sheave. This will cause overheating. Steve D'Antonio just posted an excellent article on belts. Belts | Steve D'Antonio Marine Consulting
 
Some annoying PO/mechanic thought it appropriate to affix the engine flange to the propeller shaft with Locktite. I had to cut the shaft to get it apart. New shaft and split flange went back in.

Perhaps wire the setscrews?

His engine shaft is easy to heat and put on a puller if using loctite.
Interesting but seems a bad idea to use loctite on a propeller shaft coupler where you have little room to work. I need a new coupler and will get a split coupler. I think they work better with old shafts where the shaft end might be worn.
 
Thanks again for all the help. I have ordered some Loctite 660 and an hoping it is going to be just the thing. I suspect it may have been put together with that in the first place. There was a tube of loctite that I thought was pipe dope in one of the bins of spare parts that came with the boat, but I now suspect it may be for this very shaft. I will work on it after the holidays.

The wear in the photos is from the brand new belt jumping off the tensioner when the pulley slipped, and being dragged through the side of the tensioner upside down.

The shaft this is going in is not the end of the crank shaft, it is a short shaft that is welded to a flange, which is bolted to the front of the tapered OEM pulley that runs the water pump and alternator. The only crumby part is you have to slide the outer pulley out a little bit to be able to loosen the flange bolts. This is hard if it is glued on there.
 
Why don't you get a taper lock pulley and be done with it???
 
If anyone is interested, here is how all this turned out. I was pretty excited about about the lock tight initially, but then decided I should fix it right and go with the taper fit pulley. I spent a bunch of time on line finding the right size pulley and bushing to go with it. When I installed it, it didn't work out at all. I didn't have enough adjustment in the shaft, to get is as close to the engine as I needed it for the belts to line up. Big waste of many hours and a couple hundred bucks.
 

Attachments

  • IMG_0702.jpg
    IMG_0702.jpg
    117.2 KB · Views: 48
Next I ordered some Locktight 660 and some special locktight cleaner/ activator spray. I put the old pulley's back on with this. It worked sweet for about 20 hours, then one of the two pulleys loosened up again. I was pretty bummed out.
 

Attachments

  • IMG_0921.jpg
    IMG_0921.jpg
    114.8 KB · Views: 41
After all this I was very disappointed, and feeling very unconfident in this setup, which runs my refrigeration compressor, freezer compressor, house bank alternator, hydraulics. In all this messing around I also discovered that the original pulleys were about 1/8" too far out from the engine for the belts to be perfectly aligned, which is suspect might have unevenly loaded the belts, and been part of the cause for them loosening up. I decided to take the nuclear option, and open up the checkbook. I took the parts To a local machine shop and had them make me some new custom stainless steel pulley's that were the proper alignment, and incorporated the flange to attach to the factory engine pulley, and the sheave all in one piece. Of coarse, the second original pulley that was still stuck with the locktight 660 was about impossible to get off. Heating it up to 450F on the engine took me forever. I finally got it off, and was very relieved to put the new ones on and find that I had figured the measurements right and the belt alignment was perfect. It cost a bunch, but they look sweet, and I am very confident they will never fail, or give me any trouble, and they are much easier to get off than the old setup.
 

Attachments

  • IMG_0943.jpg
    IMG_0943.jpg
    149 KB · Views: 49
  • IMG_0944.jpg
    IMG_0944.jpg
    174.8 KB · Views: 57

Latest posts

Back
Top Bottom