Raw Water Pump Impeller Replacement

The friendliest place on the web for anyone who enjoys boating.
If you have answers, please help by responding to the unanswered posts.

SlowsailNC

Veteran Member
Joined
Sep 16, 2014
Messages
63
Location
US
Vessel Name
Miss Deb
Vessel Make
Nordic Tug 37
This really should not be that difficult but then again I've been wrong before. PLEASE OFFER SUGGESTIONS!

First time changing the raw water impeller on our 6BTA5.9. It still has the Sherwood pump.

Got the old impeller out okay and the new impeller is in . . .. almost.

The impeller vanes are slightly proud of the sealing face of the pump and if I dry fit the Speedseal cover it rocks slightly.

I have the original pump cover and bolts and found a hard rubber disk that is app. the same size as the impeller hub. Stuck the rubber disk to the center of the old cover using a dab of grease, put it against the impeller hub and then used the bolts to try and drive the impeller the last fraction of inch onto the shaft.

Took the bolts to dead tight, removed them and the impeller had not budged. Still slightly proud of the sealing surface.

What's next?? :banghead:

Thanks,

Gene
 
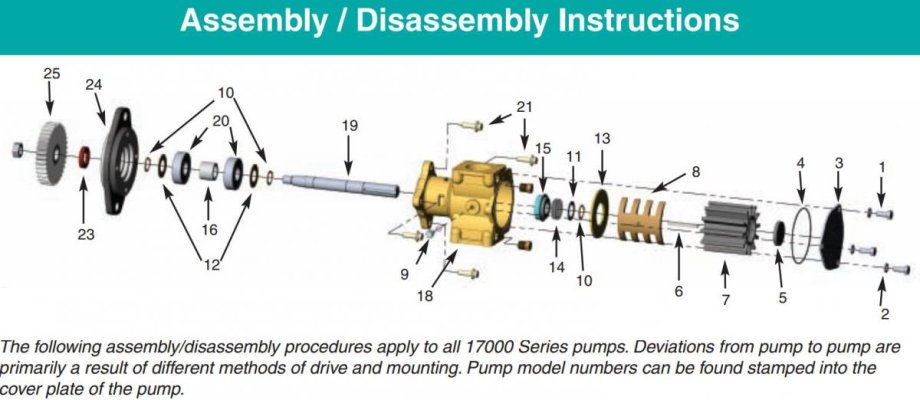
If you don't already have it, download the Sherwood 17000 Pump Series Technical Guide where you will find a clear breakdown of the pump and complete instructions for rebuilding it.

I guess the first question I have is if the impellers are the same width. That rubber disk is called an impeller cap and should fit into a recess in the impeller. In some models it prevents the key from damaging the cover plate.

Is this a genuine Sherwood 17000 impeller? If so it sounds like either the impeller or wear plate are not seating completely into the pump housing, or somehow you have the wrong impeller. Good luck:thumb:
 

Attachments

  • 17000.jpg
    17000.jpg
    70.5 KB · Views: 215
Compare the old impeller with the new one as far as length. Make sure they are the same length.
 
Larry, thanks for the reply and the link.

It is a genuine Sherwood 17000 impeller. I did not remove the cam or the wear plate. Just replaced the impeller after visual inspection of the other parts.

The vanes are only proud of the face by a very small amount, perhaps 1/32", but I suspect even that small amount is too much.

I may try removing it and reinstalling.

Sherwood says do not use a petroleum based grease to lube the impeller, Tony Athens says you can. I always hate it when the manufacturer and a very well respected authority have different recommendations.

Gene
 
For 50+ years I have lubed the shaft and places where the impellers rub with waterproof grease. Compared to what I read here, my impellers last forever. I think it helps with the initial priming so the pump never really runs dry. I don't know how long the grease lasts, because there's no sign of it when I inspect the impellers. Impellers in 2 Detroit Diesel, Perkins 4108 and Onan/Cummings MDL3 are all 5+ years old.
 
Actually will that cause it to bind, the impellers need to fit close on the sides.
There is a backing plate. Is it corroded or bent or not sitting flat in the pump body?
Take out the cam and backing plate and make sure everything is clean and looks proper.
And is the impeller able to slide down all the way with the backing plate out of the pump, that would tell you the splines are not hanging up the impeller fitting all the way down the shaft.
 
Last edited:
Is it possible the impeller is in backwards?

Permatex silicon grease works really well. It's thick enough to really stay on rather than just run off.

Another trick I've used to seat the impeller - just today in fact - is a large pair of channel lock pliers. You get one jaw around the back side of the pump body, and the other centered on the impeller hub, being careful not to damage anything. Then a little squeeze will usually push it home.

I hate replacing impellers, and it becomes exponentially more difficult as they get bigger.
 
Twisted Tree - not in backwards. One end of the impeller bore is threaded so that you can use a bolt or the Sherwood impeller puller to help remove the impeller. The threaded end is facing the end cover.

But you are right, this is a far more aggravating job than it should be.

It looks like the next step is to remove the new impeller and then verify that the wear plate is seated well. I will also measure the OAL of the impeller. My memory is telling me that there is a post somewhere in the archives where someone had an impeller that did not seat fully, tried another and it did.

Someone else mentioned splines - this shaft/impeller is not splined. The impeller is driven by a key. I used a new key and verified that it fit the shaft and impeller before starting the install of the new impeller.

Thanks to all for spending some of you Saturday replying.

Gene
 
Just because the package of the new impeller has the proper number on it doesn't make it so. Ask me how I know. Compare the length of the old to new.
 
Just because the package of the new impeller has the proper number on it doesn't make it so. Ask me how I know. Compare the length of the old to new.

+1 put some calipers on the old and new. Had conflicting info in my PO's records for my pumps ran into similar (although more obviously wrong).

Also, re grease - petroleum products very unlikely to damage rubber in short term (e.g. minutes hours or even days)
 
The Cummins QSCs that I had on my last boat were tough impellers the change, and they were also sherwood. One thing that happened on mine might be happening on yours too.

Inside the pump body there are openings for the water intake and outflow. When I would install the impeller, I would get it part way in and it would bottom out on something. It turned out that the fins were expanding as they passed by the intake and output openings, then catching on the edge of the far side of the opening. This might be what you are encountering.

To work around it, I had to remove the hose housings from both side and reach in and push the edge of the fins in and over the edge. With that, the impeller would seat fully.

As I recall, mine bottomed out with a lot more than 1/32" sticking out, so you might have a different issue. But it's worth considering.
 
I have CAT motors with the hateful Sherwood 1700's. Changed the impellers last week. My hands still hurt. I know sbmar makes a replacement pump for Cummins motors with the Sherwood 1700 but I don't know if they make one for CATS.

One trick you can use to seat the impeller is to "bump" the engine but don't let it start and then give the impeller another push. Good luck.
 
I use a number of electrical wire ties to compress the vanes and liberal amounts of dawn detergent to lube it up. as it goes in I continue to turn it, cutting each wire tie in turn, until almost seated, only then do I install the key. I have never had a problem getting them seated. Don't forget the new O Ring. I use some grease to hold it in place while bolting up. The detergent is also a good check when you fire up again as all the bubbles tell you that it is pumping water.
 
Everyone has their own way of tackling this job.
I use Speedseal kits on our boat and washing up liquid as a lubricant.
When I fit impellers I simply squeeze them by hand, use a hammer to LIGHTLY tap it into place, never worry too much if the vanes are not all facing the right way because as soon as you fire up the engine they will pop back into place.
If it sticks as yours appears to have done, the cause can only be one of 2 things, a vane catching on an pump opening and as hmason has already posted, turn the engine but DON'T let it start, either by a flick on the key, OR a large wrench on the front crankshaft nut.
The second reason as Bigsfish has said is that the impeller is not what's stated on the box. Check around the inner rim of the impeller body for the number/type.
Yup ! I once saw a guy in a chandlery shop open a box and exchange the impeller for one he had in his pocket.
Good luck with your wee job.
 
Last edited:
IF the pump is hard to reach/see , you might consider replacing all the tiny cover screws with similar SS cap screws.

The hex head can be operated by feel easier than a slotted screw.
 
Go up to the bridge, sit down. Open a very cold beer, sip slowly. Admire the other boats, look for birds, hear the sounds of nature on a peaceful day. Take deep breaths. Now, put calipers on the old and new impeller. If they are the same, install it. If not, go get a different one. And more beer.
 
Update

The advice to grab a beer and enjoy the scenery is the one that I chose last night. It was time for a break before frustration caused me to do something stupid.

Pulled the new impeller this morning and compared length to the one that came out, exact match. Checked that the wear plate was properly seated and began again.

Used dish soap on pump internals and impeller, wire tires for compression.

Impeller went back in easily and seated deeper into the pump, the vanes were essentially flush with the face of the sealing surface. Removed pump discharge cover and no vanes were caught on the slots. Suction side way too difficult to get to and impossible to see.

A local diesel mechanic happened to be at the marina talking to another owner and I asked him to take a look. He said that it looked good and should not be a problem.

Installed the O-ring, cover, opened the thru hull and started the engine.

While my wife verified water flow I dropped back to the engine room to look for leaks. No leaks, but touched the cover of the water pump and it was really hot. Back up, shut down the engine, scratch head.

Per my wife there was an initial spurt of water then air. So, I am thinking the pump did not prime. Could it be air-locked? Opened the top of the Groco strainer, heard the hiss of air. Secured that back.

Restarted, good water flow, cover cool after ~ 3 minutes of running.

So the next question, could less than 1 minute of dry running have ruined the new impeller? I'm hoping the soap in the pump and on the impeller protected if for that run time. Cautiously optimistic - tell me if you think that is a mistake. Doing this again next weekend would not be fun but it would be better than doing it away from the dock.

Gene
 
The soap saved your impeller. no worries. It is always good to open your seacock just before giving the last few turns on the cover plate. This assures you that all the air is out and the water leaks are stopping as you tighten down and water is immediately available for the pump.
 
Last edited:
Unless the water pump is below the water line and as long as the boat is attended there's no need to close the seacock.
The washing up liquid will have protected the impeller.
I use a Speedseal kit which when fitted only has 4 large knurled knobs so no need for screw drivers or spanners and it can run dry for up 20 minutes, once the knobs are unscrewed a little the cover plate swings up and away allowing an easy impeller change.
I would recommend when fitting it to put a spot of Loctite on the screws for peace of mind.
Speedseal details and purchase from Speedseal.com , I've no connection except as a satisfied user.
Now it's my turn for a beer !
 
Last edited:
I have twin 225 Lehmans. The starboard impeller is very difficult to change. The mechanic that had been doing work for 15 years for the PO said he had to pull the pump to replace the impeller. It is a bear to get out. I bought a Jabsco impeller puller. The supplied T handle would not turn due to hoses and pipes so I got some metric allthread and used double nuts on it to pull out the old impeller. Not too bad getting the old one out. The problem was getting the new one in. I got a tool from impellertool.com to insert the new impeller. It is an aluminum sleeve that you insert the impeller into. Then slide the sleeve into the pump and pull the sleeve out. I had to use a screwdriver to lever the sleeve out but it worked great. I then installed Speedseal covers on the pumps. I can now change the previously impossible impeller in about 20 minutes. The sleeve tool will get around the problem mentioned about vanes opening in the pump cavities since the sleeve goes all the way into the pump before you slide it out and leave the impeller in. It really is a great little tool. I woud not be able to change the impeller without it. No interest in any company mentioned, just very happy user.
 
Just went back to re-read this thread following an impeller change on my Perkins T6.354's last week. Things went fairly smoothly, and my knuckles are healing nicely.

Still, I don't relish doing this job. The pump plate is buried deep in a maze of hoses and components, leaving barely enough room for a screwdriver, and no leverage at all for turning it to remove the slotted screws. Surely there's a better way!

My concern is that the screw heads will eventually strip out, and on one engine the only access leaves me doing some seriously painful boat yoga. Anything I can to do make the process quicker and more reliable will be a big improvement.

I see the Speedseal recommendation, but I'm wondering if the thumb screws will be any easier. I can barely get my hand in there, and twisting a screw with any useful torque might be a challenge. Perhaps a socket wrench with a hex bit would be feasible.

Should I just change out the bolts for hex heads?

Wondering if anyone else has made modifications to make this job easier.
 
Greetings,
Mr. CT. I have not done it yet but I have purchased some SS socket head cap screws to replace the slotted ones on my Jabsco plate. NEXT change out I will replace the old slots...

th


As you can see there is some knurling around the top which SHOULD aid in initial insertion and tightening (HAH...Should).

I hear ya' on the healing knuckles brother...

200.gif
 
Greetings,
Mr. Mk. I'm not on board now but I took one of the existing slot screws to the store and purchased replacements with the same thread and length. I hope they fit. 8-32 X 3/4" MAYBE???? Do NOT quote me on the size. I don't even know what day of the week it is without looking most times...

200w.gif
 
Thanks! They're cheap enough that I'll order a set on line and see if they fit.
 
Greetings,
Mr. Mk. Whoa, whoa....Do NOT order anything until you check the size of YOUR screws please. They could easily be 10-32's....I stressed, I can't remember the actual size.

There's a Fastenal store in Pompano Beach. Take one of your screws out and match it at the store.

https://www.fastenal.com/locations/details/flpom
 
Last edited:
Unfortunately, my boat is not in Pompano at the moment. I did confirm via an online merchant that the Jabsco screws are 8-32x 3/8. So, I ordered a pack of 25 in 316 for $8 off eBay.
 
MK

Pack of 25? You drop things like I do. :)
 
Back
Top Bottom