DIY rebuilding of diesel engine Yanmar 6LY

The friendliest place on the web for anyone who enjoys boating.
If you have answers, please help by responding to the unanswered posts.
Update 03/31/2023

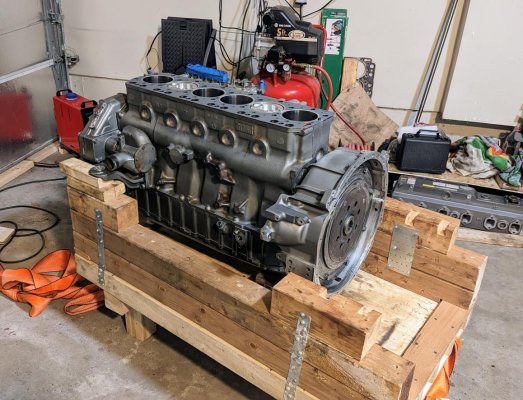
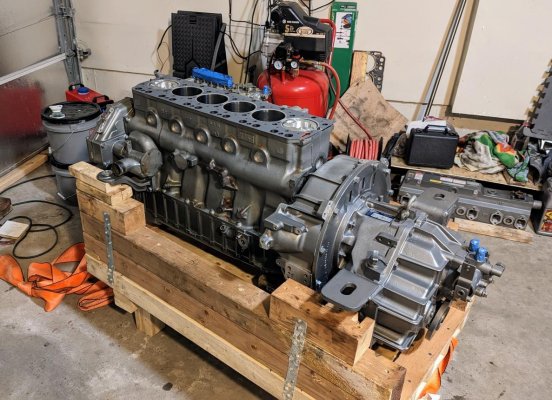
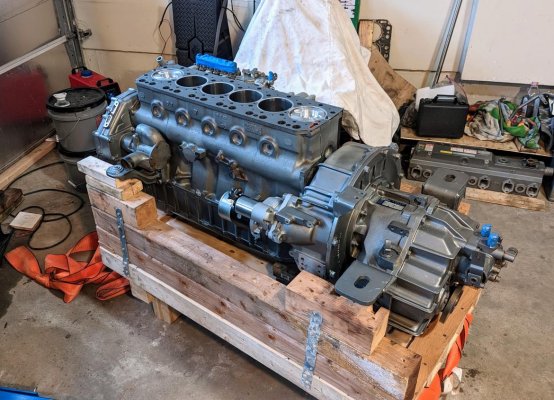
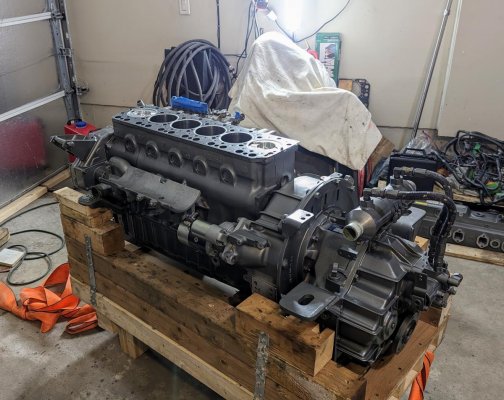
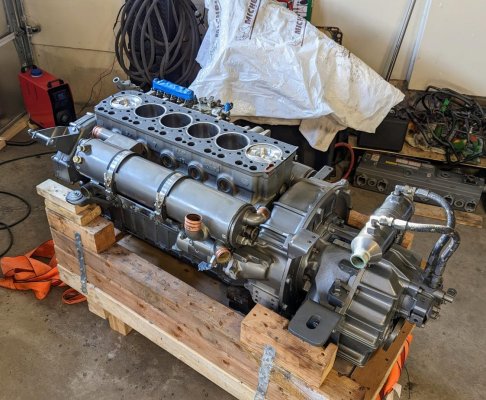
The head is off AGAIN! ?

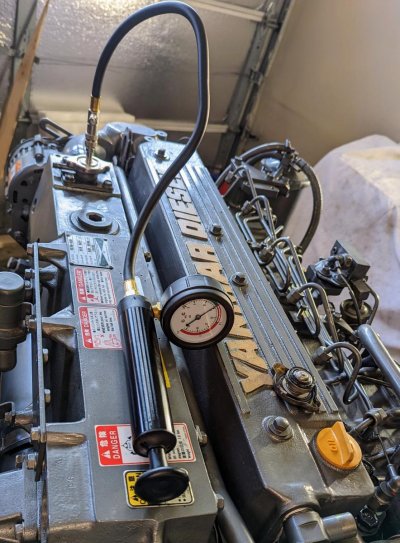
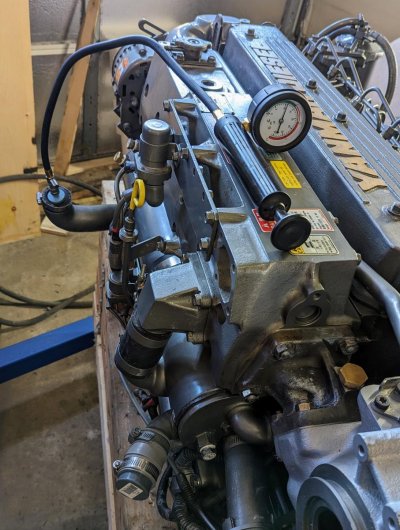
After testing all 6 cylinders for leaks, I was blessed with the knowledge that I suck at valve lapping. 2 cylinders had a 5% leak, which is acceptable, 2 had a 15%, and 2 had a 35% leak.

Doing the manual valve lapping again did not change the numbers a bit, so I took the head off and brought it to a machine shop for a proper valve job. They promised to finish in a week but will call me before they start. This was two weeks ago, no call. When I called, they said they would "take a look today or tomorrow". ?
Man, I hate working with the local machine shops. Extremely frustrating.
I wish AI could do this kind of work. Well, someday... ?

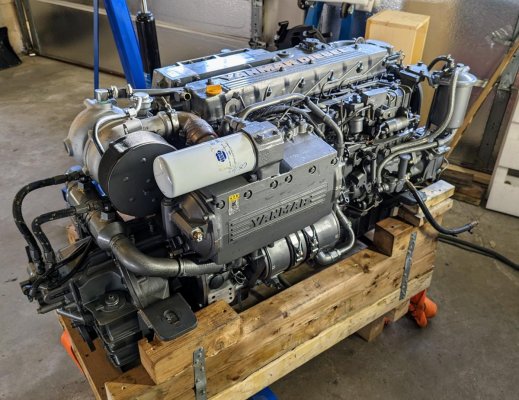
The gearbox is installed.
2 of 3 large heat exchangers are installed.
So, waiting for the head now to install the rest.

Lessons learned:

1) If you find a machine shop that does what it promises, buy them a case of beer and keep them happy?

2) Test everything! If I kept this head with leaking valves on, the engine would probably work, but performance would be lower than optimal. And with the high diesel price, I want the best performance I can get out of my engines.

3) From what I found, a proper valve job must be done in the machine shop to connect valves and seats at the proper angle. So, save time and bring the head to a shop from the beginning. If I did that, it would be done b the time i need it for the assembly.

4) Manual valve lapping can be done after this to get the last few % of valve leakage away. To do this, you will need a fine-grit valve lapping compound (600+). Most auto stores sell only very coarse compounds.

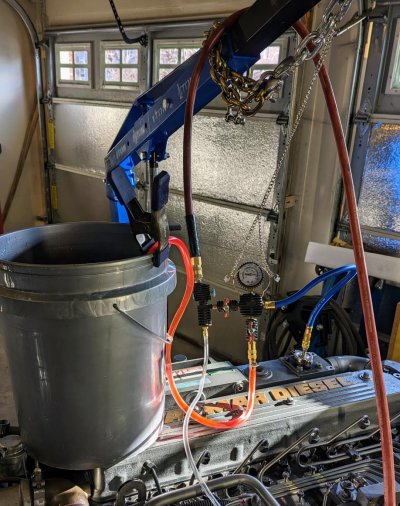
5) If you want to do a leak test, get a more expensive OTC Cylinder Leakage Tester Kit instead of a cheap Harbor Freight-type tester. I got a cheap tester first, and the readings were all over the place. I returned it and got an OTC unit spot on every time I retested.

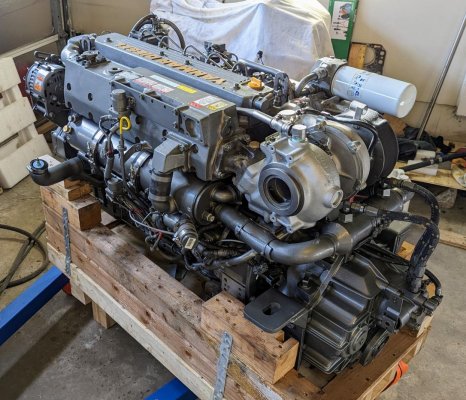
I am attaching the few days' progress photos for your enjoyment.
 

Attachments

  • progress-0323.jpg
    progress-0323.jpg
    197.3 KB · Views: 22
  • progress-0324.jpg
    progress-0324.jpg
    196.7 KB · Views: 21
  • progress-0325.jpg
    progress-0325.jpg
    196.6 KB · Views: 21
  • progress-0326.jpg
    progress-0326.jpg
    180.7 KB · Views: 21
  • progress-0329.jpg
    progress-0329.jpg
    199.3 KB · Views: 21
Thanks for the update. I would have made the same mistake with the head, so I have learned something new today.
 
That's purdy! Looks like a brand new engine!
 
I learned that manual valve lapping doesn't work in 1971. Bought a 61 Chevy Impala with a 283 V-8 that needed a valve job. Having zero money, I lapped all the valves myself. The good news is that it worked and the engine ran fine----for about 2 months and 1000 miles. Then it started to misfireand steadily got worse.
But I got the 2 months out of it that I needed.

Your decision to get the head to a shop was the right one, no matter how long it takes.
 
I found a video on the tube where a professional mechanic explains why doing a valve job in a shop is a better idea:

and this one shows a valve/seat performance as received from the shop and when the difference is made using different grits of lapping compound

I'm not sure if 0% leak is worth pursuing on the trawlers. from what I found, up to 20% leak is acceptable but may be worth watching as educational material.
 
I'm not 'rubbing it in' but I do feel like I really was trying to help. :facepalm:
From Feb. 12:
Just a thought:
Are you aware that valves are typically ground with a different angle than seats?
This is to provide a superior seal - particularly good in high compression diesels.
The suction cup and grinding paste method is intended for small, cheap engines.
I didn't use that method on my 60 year old 7.5 to 1 C.R. Landcruiser engine and
wouldn't on any diesel.
Before the head goes on talk to the shop that is resurfacing the head (you're
hopefully getting that done) and see what they charge to properly do the valves.

If there was no wear than why touch them at all? Oh, they had rust and pitting.
Same engine that was immersed in water.
Same engine that needed pistons, rings, liners, injectors and many other parts.
Just out of curiosity, how much $ are you saving by doing your own 'valve job'?
 
These were new valves, yes? Were the seats cut by a machine shop or a valve seat cutter? Or were you attempting to use the original seats and just lap them in?
 
yes, yes, i know. it's not you, it's me.

i have to see the numbers to decide if I want to spend extra $ or not.
someone telling me "i have" to do something just because they did it is not a good enough reason for me to spend $$

this is why i did the leak test and 25% leak tells me I have to spend extra $.
this is why i tested my injectors, and incorrect firing pressure tells me I have to send them to the shop because I'm not comfortable doing those adjustments.

the head work was quoted in another shop at $1500 (I do not know how much it will cost in this one but hopefully a bit less), and rebuilding injectors was $1200.
this is not pocket change for me and I have to justify this expense for myself first.
 
These were new valves, yes? Were the seats cut by a machine shop or a valve seat cutter? Or were you attempting to use the original seats and just lap them in?

New valves. I tried using the original seats and just lapped them in.
 
The good news is that when you are done the total bill will likely be less than it
might have been if you just had a shop do the rebuild and assembly.
You are fortunate to have the time and dedication to see this through and the
knowledge gained from your experience should benefit you in the years to come.
 
The problem with a leaking valve, even if you aren't concerned about performance, is that you are opening the door to a burned valve. Once you get combustion gasses passing through a gap, it will erode the metal, even valves with hardened seats will eventually fail completely. Hardened seats and the metallurgy of modern valves have reduced this effect but not cured it.

No need to beat yourself up, at least you learned the head work is a necessary cost. Good machinists are hard to find and yet another profession that our modern way of life under appreciates in our disposable society that has outsourced production of cheap aftermarket parts. The problem of course arises when you need an uncommon part, something there is no market to produce for aftermarket or when the aftermarket parts are so bad that you are just wasting your labor installing them.

Many engine builds, especially first time attempts, lose momentum, or fail for a number of reasons. Guys are pretty good at ordering a bunch of parts, dreaming and never getting around to the hard work. You are doing a great job on an engine not commonly overhauled DIY style, thank you again for sharing and I wish you the continued best of luck.
 
Thank you. I appreciate the encouragement.
The day of the first start up is getting close and it will be an epic event for all DIY mankind!
 
New valves. I tried using the original seats and just lapped them in.

Yeah, you needed to have the seats cut. The cheap way is to cut the seats at 1 deg less than the valve angle, and allow them to beat their way to a seal. The racer way is a three angle cut on the seat with the middle cut the same angle as the valve, determined by bluing the seat. The long life heavy duty way is to cut the angle the same as the valve, determined by bluing the seat, then lapping with fine compound. I used to have all the equipment to do that, but it is easier to take it to a shop that does it all the time.
 
Thank you. I appreciate the encouragement.
The day of the first start up is getting close and it will be an epic event for all DIY mankind!


Are you planning to test run it out of the boat? Or will you wait until it’s installed?
 
Are you planning to test run it out of the boat? Or will you wait until it’s installed?

I'll run it on the cradle out of the boat to see if it starts and runs.

The plan is to spin it with the starter first to build up the oil pressure and check the compression while doing that,
after this, install the injectors, connect injector lines, put fuel into the on-engine filter, and run the engine for 20 seconds to ensure there are no leaks or weird sounds.

I watched a pro diesel mechanic explaining the danger of running a freshly rebuilt diesel engine unloaded for too long and wanted to follow his advice.

I planned to install the raw water impeller when raw water is connected inside the boat so it will not run dry on this trial start.
Or maybe I will connect the raw water to ensure there are no leaks in that circuit because this is not something I can pressure test (as I can with the coolant system). I can run it with the water being sucked from a bucket filled with the hose. I have not decided yet.
 
Last edited:
i officially hate machine shops :mad:

i finally got my head back.
i asked him to do a proper valve lapping, he said: "sure, it will take a week"
That waste of sperm kept the head for more than a month, telling me "It will be ready in a few days" every time i called.
he took it apart, mixed all the components, put it together, and charged me for an hour of work :banghead:

he told me he did a vacuum test, and there is nothing wrong with the head because his test machine is accurate within 15% anyway

Why did you remove the valves if you did not see any problems on the vacuum test? why did you take this job when i told you i have 15% air loss if you can not even test it with more precision than 15%?
and this is a machine shop that specializes in engine heads since 1787 or something like that.

why, why, why ChatGPT can not work on the engines to replace all those morons! come on, Elon Musk, instead of stupid electric cars, make us smart robots!

if anyone is doing the head, f***k machine shops!
here is an easy way to do a 3-angle valve seat cut at home -
using cutters from https://www.newaymfg.com/parts/cutters
the 3-angle kit would cost ~$250

and here is how to check and lap the valves:

i have a few fun hours of manual lapping to look forward to. wish me luck...
 
Last edited:
i put the head on, and sure enough, all cylinders are licking air at 15-20% now because he mixed up previously lapped valves into the wrong cylinders, and the marks I made on each are smudged up now, so I do not know where they have to be.

and this guy's business is called "R.A.M. Cylinder Head & Machine. since 1977" - you would think he learned by now to put parts into the same place after disassembly.

what a joke. I'm done with canadian machine shops. No competition means incompetent people get away with crappy work because they can always get a new sucker to screw up.
this is very disappointing, i hope you have it better in US.

... I apologize for complaining. no more crying.
at least i've got my head back and do not need to wait for anybody.
I'll lap the valves again, check if they are leaking under 15%, and start assembling the engine

time to go boating :dance:
 
valve lapping update

After another valve lapping, the air loss is under 15%. From what i could find, it's acceptable, and it will get better while the engine is breaking in.
If I had more time and patience, I would do another round of lapping as described in this video:


The idea is not to use a drill and stop raising the valve after a few laps because the compound gets finer and finer. By raising the valve, you introduce a fresh coarse compound which is not what we want by the end of the lapping. Anyway, the guy explains the process and measures the results to prove the technique.
 

Attachments

  • pressure test.jpg
    pressure test.jpg
    178.3 KB · Views: 145
  • raw water pressure test.jpg
    raw water pressure test.jpg
    175.8 KB · Views: 145
  • yanmar 6LY assembled side 1.jpg
    yanmar 6LY assembled side 1.jpg
    187.3 KB · Views: 146
  • yanmar 6LY assembled side 2.jpg
    yanmar 6LY assembled side 2.jpg
    202 KB · Views: 152
  • coolant vacuum fill.jpg
    coolant vacuum fill.jpg
    197.7 KB · Views: 144
"the beast" is ready for testing!

I'm happy to report that "the beast" is ready for testing!

It took me two full days on the weekend to assemble everything.

attachment.php


attachment.php


Next, I pressure-tested and filled the coolant system using this awesome "Radiator Pressure Tester Kit, coolant Pressure Tester kit coolant Vacuum Refill kit for Cooling System"

attachment.php


I will never work with the coolant system without it again. No issues with trapped air, and all 5.1 Gallons of coolant went inside in a couple of minutes. I used "MotoMaster Long Life Diesel Concentrated Anti-Freeze/Coolant" from Canadian Tires. Before I bought it, I read this post from Stellablue
https://www.scyr.org/stellablue/index.php/systems/13-engine/78-yanmar-engine-coolant
on the coolants to use for Yanmar. Steven recommends Havoline "Dexcool" formula (7994) or the Texaco ELC formula (7997), but I did not find any of those locally. "MotoMaster Long Life Diesel Concentrated Anti-Freeze/Coolant" offers similar protection for coolant system metals and cavitation protection.

attachment.php


I also pressure-tested the raw water system by plugging on the exchanger discharge line.

attachment.php


Last, 5 gallons of Shell Rotella T4 15W-40 oil went in.

I'm working on the wiring to the starter to do the compression tests, bleed the fuel system, and test the injection timing.
It looks like my small 12v auto battery is too weak - the solenoid is clicking, but the starter does not turn. Hopefully, it's an easy fix because this is a new starter.
 
The beast is alive!

After 6 months of disassembling, hours of research and sorting thru youtube BS and useful knowledge, waiting for parts, and machine shops' nonsense, the engine is finally back together,
and this is the first start in 15 years. :dance:
  • Youtube (1st start):
  • Youtube (2nd start):

attachment.php


Lessons learned:

1) It's important to ensure you get oil pressure after 5 seconds of cranking before you even think about starting the engine with the fuel. This is from the manual and not something you can easily check without connecting the engine to the control panel.

I had my stress hormones spiked after I put a mechanical pressure gauge into the sensor manifold and did not get any pressure readings. Research showed a gazillion nasty reasons for that, most of which would require a complete disassembly again.

Luckily, i screwed it into the wrong port, which is for the boost sensor, not the oil pressure sensor. I removed the electrical oil pressure sender and screwed the mechanical gauge in there, and 5s of cranking showed 20 psi of pressure (I had to do it twice to get the oil filter filled). Easy fix.

attachment.php


If you want to add a new gauge or sensor to that block, the thread is 1/8" BSPT female. Here is an adapter to use to convert it to a more common here 1/8NPT:

British Thread Brass Adaptor 1/8" NPT Female - 1/8" BSPT ( R ) Male

2) I could not easily find if the stop solenoid has to be energized to open or if it's normally opened and has to be energized to close (stop fuel delivery).
It's all over on Yanmar engines. On 6LY the stop solenoid is normally opened and has to be energized to close (stop fuel delivery) so the engine can run without any power connected to it, which is good news.

3) You have to bleed the fuel system before the start. My injector lines were disconnected when i did that and I used the on-engine manual pump to push the fuel until i saw it coming out of the injector lines and there was no bubbles in the return line - just a solid column of fuel.

4) Regarding the 12v power supply. A small 12v starter battery did not work (i think it's damaged), adding a Lithium boost pack to the battery did not work, connecting to a battery in the small car with a running engine did not work - all of the above was too weak to rotate the engine pass the compression stroke probably because of the long boost cables and poor electrical connection via the clips.

I've got the largest 12v battery I could find in Walmart and connected it with 2' power cables to the engine ground bolt and starter bolt. I used $10 starter button connected to a positive terminal and a small contact on the starter's solenoid. Worked like a charm.

4) It's safe to run the engine for a few minutes without raw water supplied as long as it does not reach the working temperature and without the impeller, which will get destroyed quickly without the water.
If you have an exhaust hose and muffler connected, running for too long without the raw water can melt your muffler and damage the exhaust hose.
This was not an issue in my case, but worth keeping in mind.


I'm waiting for a proper compression gauge for a diesel engine to arrive today (mine was for a gas engine, and the max pressure was 300 psi which was exceeded).

Anything else should I test before I declare the second part of this project a success and start preparing for the 3rd part (putting it back into the boat)?
 

Attachments

  • oil_pressure_gauge.jpg
    oil_pressure_gauge.jpg
    153.6 KB · Views: 208
  • the beast.jpg
    the beast.jpg
    167 KB · Views: 207
Last edited:
After 6 months of disassembling, hours of research and sorting thru youtube BS and useful knowledge, waiting for parts, and machine shops' nonsense, the engine is finally back together,
and this is the first start in 15 years. :dance:
  • Youtube (1st start):
  • Youtube (2nd start):

attachment.php


Lessons learned:

1) It's important to ensure you get oil pressure after 5 seconds of cranking before you even think about starting the engine with the fuel. This is from the manual and not something you can easily check without connecting the engine to the control panel.

I had my stress hormones spiked after I put a mechanical pressure gauge into the sensor manifold and did not get any pressure readings. Research showed a gazillion nasty reasons for that, most of which would require a complete disassembly again.

Luckily, i screwed it into the wrong port, which is for the boost sensor, not the oil pressure sensor. I removed the electrical oil pressure sender and screwed the mechanical gauge in there, and 5s of cranking showed 20 psi of pressure (I had to do it twice to get the oil filter filled). Easy fix.

attachment.php


If you want to add a new gauge or sensor to that block, the thread is 1/8" BSPT female. Here is an adapter to use to convert it to a more common here 1/8NPT:

British Thread Brass Adaptor 1/8" NPT Female - 1/8" BSPT ( R ) Male

2) I could not easily find if the stop solenoid has to be energized to open or if it's normally opened and has to be energized to close (stop fuel delivery).
It's all over on Yanmar engines. On 6LY the stop solenoid is normally opened and has to be energized to close (stop fuel delivery) so the engine can run without any power connected to it, which is good news.

3) You have to bleed the fuel system before the start. My injector lines were disconnected when i did that and I used the on-engine manual pump to push the fuel until i saw it coming out of the injector lines and there was no bubbles in the return line - just a solid column of fuel.

4) Regarding the 12v power supply. A small 12v starter battery did not work (i think it's damaged), adding a Lithium boost pack to the battery did not work, connecting to a battery in the small car with a running engine did not work - all of the above was too weak to rotate the engine pass the compression stroke probably because of the long boost cables and poor electrical connection via the clips.

I've got the largest 12v battery I could find in Walmart and connected it with 2' power cables to the engine ground bolt and starter bolt. I used $10 starter button connected to a positive terminal and a small contact on the starter's solenoid. Worked like a charm.

4) It's safe to run the engine for a few minutes without raw water supplied as long as it does not reach the working temperature and without the impeller, which will get destroyed quickly without the water.
If you have an exhaust hose and muffler connected, running for too long without the raw water can melt your muffler and damage the exhaust hose.
This was not an issue in my case, but worth keeping in mind.


I'm waiting for a proper compression gauge for a diesel engine to arrive today (mine was for a gas engine, and the max pressure was 300 psi which was exceeded).

Anything else should I test before I declare the second part of this project a success and start preparing for the 3rd part (putting it back into the boat)?


Excellent job. Sorry it took so long with so many hassles, but you pulled it off. Now what about the other engine?[emoji3]
 
Excellent job. Sorry it took so long with so many hassles, but you pulled it off.

Thanks. Come to think of it; it could be way worse. i just read yesterday a story of a guy not getting oil pressure on a freshly rebuilt engine for which he paid a lot of $ to a shop. Besides a gazillion other problems he found with old and wrong parts installed, the engine block crack was repaired with epoxy and painted over. he is suing them now.
and my experiences with the machine shops here point to a very high probability of a similar result.
so, yes, it could be much worse.

Now what about the other engine?[emoji3]

... while i have the gantry crane in the saloon and a trailer which will bring the port engine ... interesting ...
:facepalm:

no, no. Summer is for cruising, not playing with engines. there are winters for that. I hope to get out of the slip before next winter.
 
I had to log on explicitly to thank you for the time you have taken to post your DYI rebuild , no only including your success but also your missteps and how you went about remedying them. I'm like you...if I couldn't do it myself, I doubt we would own a boat because it's doubtful we would be able to afford paying a mechanic to maintain a boat for us (Upfront, I did get outside contractors to rebuild the clutch and do some major engine work on our last boat but we were under a bit of a time crunch plus it wasn't that much money...the marina owner is a friend of mine).
Folks like you are why I joined this forum and I try to reciprocate when I have useful information to post. I could care less threads where the owners biggest problems are which bbq grill to get the builder to install on their flybridge or what color toolbox to have the builder install in the engine room.
 
Thank you for your kind words. I hope my posts will help someone, and i also got a ton of help from others which I'm grateful for.

And I would go with Dickinson bbq and stainless steel toolbox :D
 
The engine had 350 hours or so but was left for years with water in the oil. one valve stuck and others did not look too good because water was in some cylinders. Valves were not very expensive so I just got new as the head was out anyway.
 
Thanks. I had great support from you guys.
 
Back
Top Bottom