BDofMSP
Guru
- Joined
- Sep 5, 2013
- Messages
- 905
- Location
- USA
- Vessel Name
- Gopher Broke
- Vessel Make
- Silverton 410 Sport Bridge
Onward...
One of my projects this weekend is aftercooler maintenance. This boat is now a freshwater boat, so I wanted to get these components cleaned and serviced for their long life ahead. I think what I found is sort of a mixed news scenario, but I'm not experienced with these matters. BTW Cummins 6CTA 8.3 450s here.
On the positive side, both came off just fine, came apart just fine, and the tubes slid out with no issues - no Kroil, no nothin. Very little clogging of any tubes, as they had been serviced in 2018.
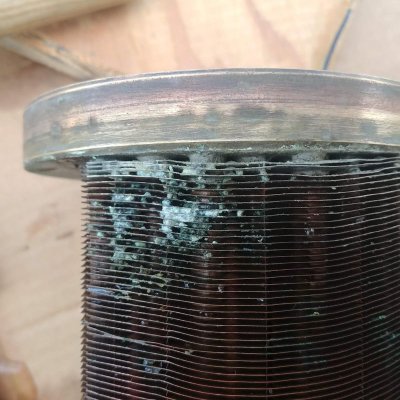
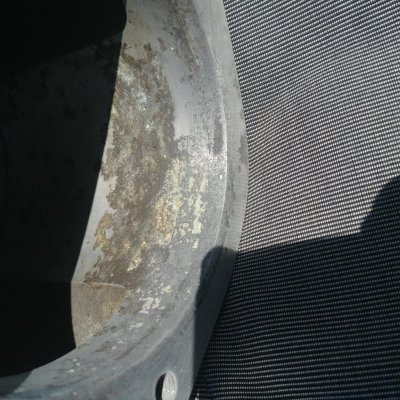
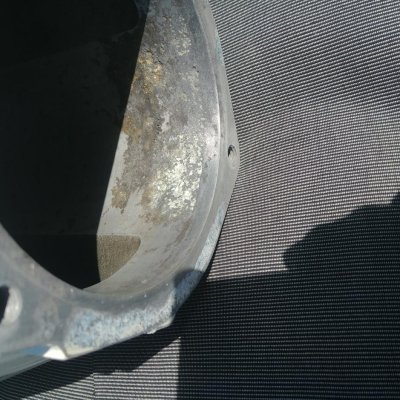
So I THINK I already know the answer to the question about the water side. No, I didn't bring it to a shop or any other pressure test method. But I'm pretty sure that there must be some sort of leak on the water side based on a) the green oxidation on the copper on the air side, and b) the pitting and corrosion on the housing. Photos of the starboard side are included. Port side is similar, but definitely much less pitting. First photo is of the tubes, second two are each side of the housing.
I'm resigned to replacing the core tubes, and happy to do so. Now that I'm in fresh water I have little concern for continued corrosion on that end, and I'm more than willing to do the maintenance every couple years to make sure it's solid. My question is on the housing. Yes there is pitting on the housing, but how much is "too much"? It seems that the seal from the water side comes from the o-ring. It seems like I'm not concerned about water seeping through the pits, because they are on the air side, not the water side. Also, it's aluminum so welding doesn't seem to be the best idea, but is there a way to repair those pits?
Thanks for your inputs. Much appreciated.
BD
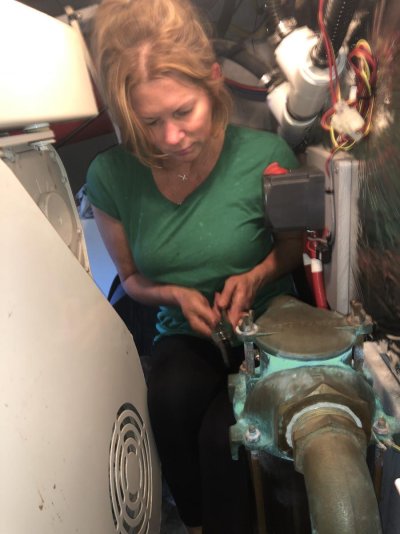
PS - I hate to brag, but yesterday I did the starboard side and my wife watched and handed me tools. Today, when I struggled to squeeze myself between the port engine and the water tank, she said "Don't worry about it. I got this." and climbed in, pulled all the hoses, pulled the aftercooler, and disassembled and cleaned the whole thing. She then climbed back in there and installed the whole thing with me doing little more than holding it in place and handing tools.
I couldn't imagine a better partner in this whole endeavor.
One of my projects this weekend is aftercooler maintenance. This boat is now a freshwater boat, so I wanted to get these components cleaned and serviced for their long life ahead. I think what I found is sort of a mixed news scenario, but I'm not experienced with these matters. BTW Cummins 6CTA 8.3 450s here.
On the positive side, both came off just fine, came apart just fine, and the tubes slid out with no issues - no Kroil, no nothin. Very little clogging of any tubes, as they had been serviced in 2018.
So I THINK I already know the answer to the question about the water side. No, I didn't bring it to a shop or any other pressure test method. But I'm pretty sure that there must be some sort of leak on the water side based on a) the green oxidation on the copper on the air side, and b) the pitting and corrosion on the housing. Photos of the starboard side are included. Port side is similar, but definitely much less pitting. First photo is of the tubes, second two are each side of the housing.
I'm resigned to replacing the core tubes, and happy to do so. Now that I'm in fresh water I have little concern for continued corrosion on that end, and I'm more than willing to do the maintenance every couple years to make sure it's solid. My question is on the housing. Yes there is pitting on the housing, but how much is "too much"? It seems that the seal from the water side comes from the o-ring. It seems like I'm not concerned about water seeping through the pits, because they are on the air side, not the water side. Also, it's aluminum so welding doesn't seem to be the best idea, but is there a way to repair those pits?
Thanks for your inputs. Much appreciated.
BD
PS - I hate to brag, but yesterday I did the starboard side and my wife watched and handed me tools. Today, when I struggled to squeeze myself between the port engine and the water tank, she said "Don't worry about it. I got this." and climbed in, pulled all the hoses, pulled the aftercooler, and disassembled and cleaned the whole thing. She then climbed back in there and installed the whole thing with me doing little more than holding it in place and handing tools.
I couldn't imagine a better partner in this whole endeavor.

 Post pictures!!! Many have fallen in love!!!