Capterik
Newbie
- Joined
- Dec 12, 2022
- Messages
- 2
- Vessel Name
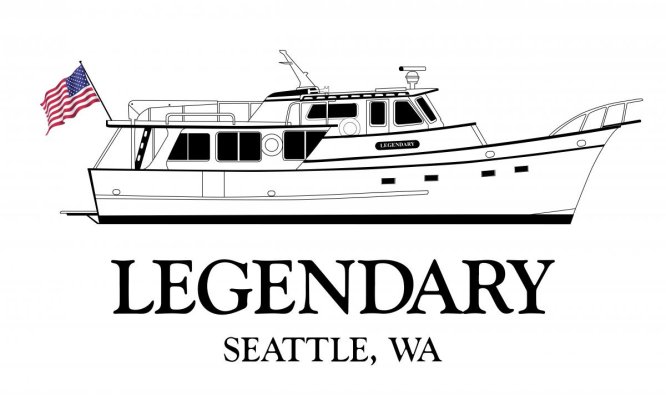
- Legendary
- Vessel Make
- Grand Banks Alaskan
New member from the Puget Sound
I’ve sourced a lot of great information from the forum over the years, most of the information has been accurate and some somewhat accurate ?, hopefully I can help contribute in the future.
My main profession has evolved into the maritime industry- growing up aboard classic vessels that my dad restored & chartered and my moms side coming from a Norwegian fishing family, my profession evolved from “abnormal daily chores” in my early years… - I then took up sailing from the age 5 to 25, racing aboard 40’-80’ sailing vessels in regattas such as the swiftsure, Transpac, Vic-maui then onto Round Barbados, Antigua Sailing Week, Newport Bermuda and many more. A lot of those regattas also lead me into a sailing vessel delivery business for many years.
In between vessel deliveries, I’ve done a lot of seasonal contract work for Delta Marine and Newport Shipyard, mostly doing custom carpentry work. Which may sound fascinating, but due to NDA’s it was never a good resume builder…
9 years ago a 1973 GB Alaskan found me, in need of a lot work, the previous owner knowing my background knew I would be the best caretaker - and he was right ?
I’m now approaching over 30k combined hours into fully restoring her and I’ll soon be selling her as I’ve not only been itching to get back into a sailing vessel but a vessel with a proper layout that would best suit my soon to be fiancé who is paraplegic - potentially a catamaran.
Eventually from neighbors and fellow YC members watching me restore my current vessel, people started chasing me down with blank checks and big smiles to restore and maintain their vessels. Allowing me to finally market myself with work to show for.
If you would like to see some of my work, here is a link to my personal vessel with organized albums-

And a customers 1978 GB Classic 42, original owner!-
The work I’ve completed with my GB Alaskan-
You can follow this build on fb or instagram: legendaryalaskan
Currently 8 months into the current and final refit, and approaching 8500 combined hours (30k hrs combined since 2013)-
Instagram: legendaryalaskan
2013-
Became the caretaker
Hauled for survey, bottom paint & maintenance
Rebuilt both upper decks
2014-
Replanked port side, both midship and aft sections
Spring through mid summer 2016, major refit-
Over 5 months, 6man shipwright crew including myself-
-Replanked stb side midship area
-Removed starboard rub rail, replaced planks behind rub rail
-Wooded down entire hull above the waterline
-Reef and corked seems, bow to stern, water line to cap rails
-New midship entry doors
-All new seacocks and thru-hulls
-Shaft logs removed, cleaned, inspected and packed, new cutlass bearings
-New custom bronze shaft log strips
-New props
-New prop shafts
-New shaft couplers
-New strut cutlass bearings
-New PSS dripless shaft seals
-New steering/rudder stuffing boxes
-R/R shaft log, new cutlass bearings
-Rebuilt rudder post stands
-Wormshoe refastened
-Bulwarks replaced from 4’ back from pulpit
-Ray marine autopilot system
-Teak caprails on bulwarks and pulpit removed, sanded, rebedded
-Hull above waterline prepped for paint
-New bottom paint
-1 coat of paint applied at/by Jensens
Much more
2017-
By spring of 2017, vessel returned to Jensens for final coats of paint. Also replaced a section of the port side teak cap rails and plank below rail.
Winter of 2017/2018-
I finally got around to installing the original teak swim step that I had previously rebuilt & extended
Come early spring of 2018-
I decided to rip down the canvas from the ceilings in the main stateroom, head & salon, exposing beautiful wood beams. I then applied a few coats of primer & paint, which made a huge difference in adding more space & brightness.
I also gave the washer & dryer a nice modern replacement
Late summer 2018-
I began scraping/sanding/fairing down all of the exterior teak caprails and trim, then applied awlgrips awlwood varnish (basecoat/primer & 12 coats of clear).
Early winter 2018-
I spent dozens of hours soda blasting and later buffing out the original bronze chocks/hawse pipes and finally re-installing them.
Also in early winter 2018, rather than painting the heads walls around the shower stalls, I drafted up a few templates, I dropped the templates off at Ballard Sheetmetal where I had a few sheets of stainless steel custom milled and installed around the shower stalls.
Mid winter 2018-
Removed/Reinstalled the aluminum name/letters on the transom that I had soda blasted, re-powedercoated and re-vinyled.
New PAW Series Forced Air Wall Heaters (3)
Spring 2019-
-Hauled out for bottom paint
-R/R both transmissions to be overhauled by Everetts Harbor Marine
-Installed an automatic oil changing manifold system for the mains, transmissions and genset
-New seastrainers for mains and genset
-New AGM batteries
-New power inverter/charger
-New Balmar Alternators
-New 20gal stainless water heater
-New electric Tecma toilets
-Installed one of two new reverse cycle A/C units in salon
-Removed exterior midship steps, fabricated custom removable teak steps
Winter of 2020/2021-
I had an unfortunate experience with my port main deciding to tank on me during my 2020 Labor Day Weekend voyage in the San Juan Islands, turned out to be blow-by in Cylinder #6, apparently not an uncommon issue from coolant passage ways becoming clogged (from prior improper coolant).
Since these Lehman 2714e’s were nearly 50 years old, I figured it would be best to overhaul both engines, clean & paint the engine room and replace the original CAST IRON fuel tanks with new modern aluminum fuel tanks - with modern fuel level senders and larger inspection plates.
Removing the mains in this Alaskan is and was what I would consider a “fortunate breeze” - with the open layout, removable galley counter and floorboards, large aft door giving easy access to the aft deck to place the mains.
The only part that killed my pride was for or the first time in my 38 years on the seas, I called Vessel Assist - I had Vessel Assist tow me down to Seattles Fishermans Terminal where I used a large crane to hoist the mains off the aft deck to load onto a truck.
After removing the mains, I then had a joyful time removing the original engine mount studs from the stringers, to later replace with larger studs for the new beefier motor mounts.
Next project went on to removing the original Cast Iron fuel tanks - I started off removing the beams that secured the tanks in place allowing both the port and starboard aft tanks to slide out. I was also able to wiggle out the starboard forward tank. The port forward tank wasn’t as fortunate- as it had an odd shape that angled down in front of the stringers, the only way that tank could have been placed into position was with the boat built around it (common, I know). So I busted out my plasma cutter and went to town, cutting it up into many pieces, I was baffled by how many baffles were in these tanks!!!
I had the all the new fuel tanks made 3” shorter, allowing the installation to be a breeze compared to the removal. Also had the fwd port tanks bottom made flat, with beams fabricated in front of the stringers to allow a smooth and solid mounting installation. The old fuel tanks tankage was just under 800gallons, new tanks are 620gallons.
After removing the tanks, I began the long process of cleaning & painting areas that the sun had never seen! I also removed and replaced the old insulation with new high quality sound-thermal insulation.
The mains were rebuilt with the assistance of a friend with a nice machine shop-
Complete engine overhaul kit-
-Cylinder sleeves
-Piston/kit - balanced
-Connecting rods - balanced
-Complete gasket sets
-Crankshafts turned & balanced
-Crankshaft bearing kit
-Camshafts grind/polished
-Intake/exhaust ports polished
-Cyl heads and short blocks hot tanked
-Cylinder heads rebuilt & decked
-Short block decked
-Timing drive gears
-Oil pumps
-Complete hose kits
-Fresh water circulation pumps
-Updated raw water pumps
-Thermostats
-Oil coolers
-Transmission coolers
-Heat exchangers
-Rebuilt fuel injectors
-Rebuilt injector pumps
-Fuel pumps
-Injector lines
-Injector return lines
-Rebuilt starters
-Drive plates
-Transmissions/gear boxes inspected and re-sealed (overhauled in 2019)
-R&D motor mounts
-Exhaust elbows
-Exhaust hose and mufflers
I invested into every nook and cranny into these engines, balancing the the crankshafts, pistons and connecting rods resulted into these engines running super smooth, this vessel no longer feels like a tank when idling. It was worth every effort.
With the new fuel tanks, I had a new fuel manifold system custom fabricated, fed from new CG approved fuel lines and all new Racor Duplex 500 Turbine fuel filters/water separators.
Also new flush fuel deck fill plates (no more toe stubbers).
As of present, less than 30hrs on the new engines
The only downside of this project, was discovering a few soft planks below the old fuel tanks. Caused by poor airflow. I designed the new fuel tanks to allow much more airflow to prevent this from happening again.
I dug out the soft areas in the planks and replaced with a temporary bandaid/epoxy until my next haulout, continued onto the current 2022 refit below-
2021 summer-
-Exterior cabins were wooded down and painted
-Fresh coat of awlgrip paint on roof decks
-Some interior paintwork
-All interior cabinet shelves painted
-All new portlights replaced (windows)
-New bronze rubrail trim
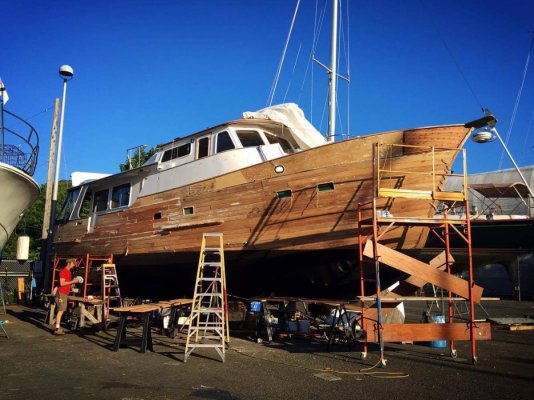
2022, current and final major refit-
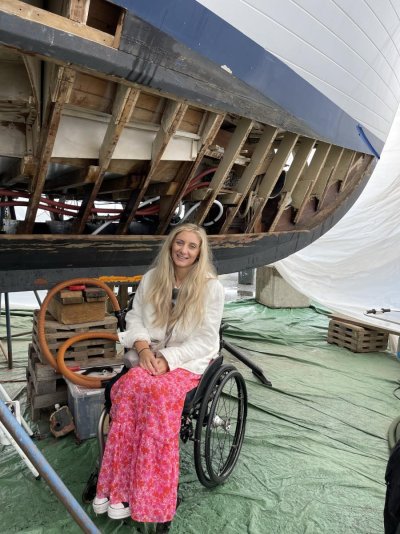
From April 1st through present, I hauled out with the intent of replacing the planks in the areas below the fuel tanks. After removing these particular planks, I then discovered that the cancer had traveled deeper than I anticipated.
As of 12/12/22 the current refit is at 8500hrs combined, with roughly another 1k-2k hrs to go.
This project has been and is currently underway with a professional team of 5 shipwrights, including myself, a certified marine electrician and a crew of professional marine painters.
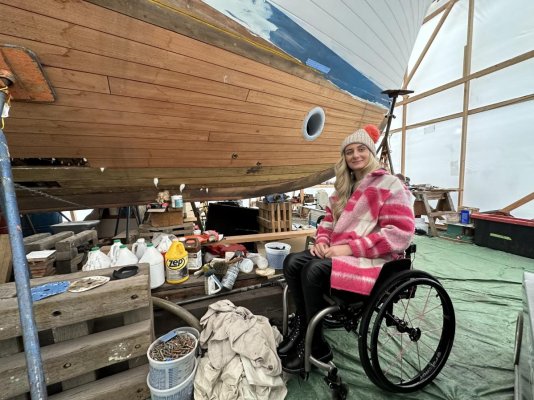
Considering that the hull was original and almost 50 years old, I decided to avoid cutting any corners by replacing over 95% of the planks from below the boot stripe just above the garboard, bow to stern. The few remaining hull planks were wooded down, refastened, seems reefed and corked with the rest of the new hull. Additionally the keel was also wooded down and treated and thoroughly inspected.
I also found a few soft spots on the port side chine, resulting in my fellow shipwrights and I removing and replacing the entire two piece chine. The chine, was fastened back in place with 6” #20 silicone bronze fasteners and 3/8 silicone bronze studs.
With the lumber I was very lucky to have sourced over 3000bd ft of 13-1/4” 20+ year air dried Sipo Mahogany for the chime and planking and purple heart for the butt blocks and frames.
Incredibly, the old fasteners were in near perfect shape, all came out with hardly any pinking or corrosion, most were solid enough to be reused! But of course reusing old fasteners is not my style. The old fasteners were #14 2-1/4” silicone bronze. The new fasteners are now #16 2-1/2” silicone bronze.
After removing the old planks, it was then discovered that some of the cancer latched onto the base of a few frames. Those frames were replaced and sistered with Purple Heart.
My crew and I also decided to replace and beef up all the frame gussets with 1” meranti, treated and epoxied.
All the lower sections of the frames, bilge, top of the keelson and stem lower were thoroughly cleaned, sanded and well treated with linseed oil/turpentine.
The upper sections of the frames, from the engine room bulkhead forward were painted with original Grand Banks beige, engine room bulkhead aft painted with white bilge paint.
All the new planks were either cut to shape or properly steamed, clamped into place until cured, removed, painted interior side and then fastened into place. The lower planks from the garboard up were treated with turpentine/linseed oil.
As we approached the stern area, I removed the bronze exhaust ports, had them blasted and inspected, unfortunately they had a bit too much corrosion to be comfortable with, so I had new exhaust ports custom made in solid silicon bronze. The port side exhaust port block was replaced with 8-1/4” of Sipo Mahogany and rather than a gusset at the base, the gusset was replaced with a 12-1/4” block of Purple Heart to give the aft end of the chime something additional and a lot more solid to fasten to.
Back in 2016 I had the original rudder post stands rebuilt and galvanized, unfortunately they started to form a little rust again, so I had new stands made in aluminum and powder coated in red.
A flaw and poor design of the lower teak deck was the lack of efficient drain scuppers. To help alleviate this issue, I took advantage of the duration of the planks being removed, giving me access to install 8 thru-deck drain scuppers, on each side, plumbed down to 90’ elbows feeding the individual thru-hull drains. To prolong the life of this setup, I utilized very heavy duty 1.5” coupled to 3/4” wet exhaust hose, to easily last 50+ years without any maintenance.
For bottom paint, I will be going with a reduced sharkskin coat of red to penetrate the wood, then a couple coats of teal.
Why teal over red? Ever get that gut sinking feeling when you run into a dead head? If/when that were to take place the red paint would be exposed through the teal paint, easily showing a diver the area of any potential damage. (This trick works great on fiberglass hulls too)
After we removed many of the planks, I had discovered some hidden un-utilized areas that I gained permanent access to by cutting through a bulkhead, adding a hatch door and utilizing the space for the second 16k btu reverse cycle A/C unit, plumbed to the mid stateroom, fwd stateroom and up to the pilothouse!
There was also enough space in this hidden gem to install a new Wallas Spartan forced air diesel heater, also plumbed to the aft stateroom, fwd stateroom and pilothouse!
During the 2016 refit, my team and I had removed the starboard rub rail to replace the planks behind the rub rail. So during this refit we decided to do the same on the port side.
So far during this current refit, the following was also completed-
-New water/waste flush deck fill plates (no more toe stubbers)
-Sanded, prepped and painted the lazarette
-Engine room panels prepped and painted
-Removed, fabricated and replaced the teak trim on the exterior main decks
-New teak hand rails on top of pilothouse
-Fresh Brightwork on transom
-Fresh paint on exterior hull and portuguese
-Props sent to Kruger and Sons to be cut and balanced
-Rudders also sent to Kruger and sons to be inspected, cleaned and sealed
-Prop shafts sent to The Prop Shop, polished, balanced and new couplers, tapered
-New shaft cutlass bearings (6)
-New updated PSS shaft dripless kits
-New bilge pumps and plumbing
-New rudder post stands
-New exhaust from mufflers to exhaust ports
-New custom made bronze exhaust ports for mains and genset
-New windlass remote w/counter
-New Garmin 8612xsv chart plotter and transducer, latest 2023 model
-New Garmin GMR Fantom 24x raydome/radar
-New Garmin autopilot system
-New vesper AIS
-New SH GX6000 VHF Radio
-New blue seas AC/DC main control panel
-All AC/DC wiring inspected/replaced
-New Blue Seas remote battery and relay switches
-New Blue Seas P12 backup battery charger
-New sound/thermal insulation in remaining areas of the engine room
-New fire suppression system
-New black water holding tank
-New canvas covers
-New throttle and shift cables
-New steering cables
-New genset (pending arrival)
More to come
Also an all new modern bonding system- Impressed Current Cathodic Protection - automatic sensing and control of cathodic protection current, no sacrificial anodes to worry about
At this time my crew and I are still planking away, seeing the light at the end of the tunnel approaching with completion.
Back in 2016 I had removed the shaft logs, replaced the lower strips with new custom made bronze strips. Unfortunately the shaft logs were a bit over torqued, damaging the planks below. I am now in the process of replacing these planks with purple heart to make sure this never happens again. This involves removing and later reinstalling the shaft logs and intermediate shaft struts.
I’ve sourced a lot of great information from the forum over the years, most of the information has been accurate and some somewhat accurate ?, hopefully I can help contribute in the future.
My main profession has evolved into the maritime industry- growing up aboard classic vessels that my dad restored & chartered and my moms side coming from a Norwegian fishing family, my profession evolved from “abnormal daily chores” in my early years… - I then took up sailing from the age 5 to 25, racing aboard 40’-80’ sailing vessels in regattas such as the swiftsure, Transpac, Vic-maui then onto Round Barbados, Antigua Sailing Week, Newport Bermuda and many more. A lot of those regattas also lead me into a sailing vessel delivery business for many years.
In between vessel deliveries, I’ve done a lot of seasonal contract work for Delta Marine and Newport Shipyard, mostly doing custom carpentry work. Which may sound fascinating, but due to NDA’s it was never a good resume builder…
9 years ago a 1973 GB Alaskan found me, in need of a lot work, the previous owner knowing my background knew I would be the best caretaker - and he was right ?
I’m now approaching over 30k combined hours into fully restoring her and I’ll soon be selling her as I’ve not only been itching to get back into a sailing vessel but a vessel with a proper layout that would best suit my soon to be fiancé who is paraplegic - potentially a catamaran.
Eventually from neighbors and fellow YC members watching me restore my current vessel, people started chasing me down with blank checks and big smiles to restore and maintain their vessels. Allowing me to finally market myself with work to show for.
If you would like to see some of my work, here is a link to my personal vessel with organized albums-
And a customers 1978 GB Classic 42, original owner!-
The work I’ve completed with my GB Alaskan-
You can follow this build on fb or instagram: legendaryalaskan
Currently 8 months into the current and final refit, and approaching 8500 combined hours (30k hrs combined since 2013)-
Instagram: legendaryalaskan
2013-
Became the caretaker
Hauled for survey, bottom paint & maintenance
Rebuilt both upper decks
2014-
Replanked port side, both midship and aft sections
Spring through mid summer 2016, major refit-
Over 5 months, 6man shipwright crew including myself-
-Replanked stb side midship area
-Removed starboard rub rail, replaced planks behind rub rail
-Wooded down entire hull above the waterline
-Reef and corked seems, bow to stern, water line to cap rails
-New midship entry doors
-All new seacocks and thru-hulls
-Shaft logs removed, cleaned, inspected and packed, new cutlass bearings
-New custom bronze shaft log strips
-New props
-New prop shafts
-New shaft couplers
-New strut cutlass bearings
-New PSS dripless shaft seals
-New steering/rudder stuffing boxes
-R/R shaft log, new cutlass bearings
-Rebuilt rudder post stands
-Wormshoe refastened
-Bulwarks replaced from 4’ back from pulpit
-Ray marine autopilot system
-Teak caprails on bulwarks and pulpit removed, sanded, rebedded
-Hull above waterline prepped for paint
-New bottom paint
-1 coat of paint applied at/by Jensens
Much more
2017-
By spring of 2017, vessel returned to Jensens for final coats of paint. Also replaced a section of the port side teak cap rails and plank below rail.
Winter of 2017/2018-
I finally got around to installing the original teak swim step that I had previously rebuilt & extended
Come early spring of 2018-
I decided to rip down the canvas from the ceilings in the main stateroom, head & salon, exposing beautiful wood beams. I then applied a few coats of primer & paint, which made a huge difference in adding more space & brightness.
I also gave the washer & dryer a nice modern replacement
Late summer 2018-
I began scraping/sanding/fairing down all of the exterior teak caprails and trim, then applied awlgrips awlwood varnish (basecoat/primer & 12 coats of clear).
Early winter 2018-
I spent dozens of hours soda blasting and later buffing out the original bronze chocks/hawse pipes and finally re-installing them.
Also in early winter 2018, rather than painting the heads walls around the shower stalls, I drafted up a few templates, I dropped the templates off at Ballard Sheetmetal where I had a few sheets of stainless steel custom milled and installed around the shower stalls.
Mid winter 2018-
Removed/Reinstalled the aluminum name/letters on the transom that I had soda blasted, re-powedercoated and re-vinyled.
New PAW Series Forced Air Wall Heaters (3)
Spring 2019-
-Hauled out for bottom paint
-R/R both transmissions to be overhauled by Everetts Harbor Marine
-Installed an automatic oil changing manifold system for the mains, transmissions and genset
-New seastrainers for mains and genset
-New AGM batteries
-New power inverter/charger
-New Balmar Alternators
-New 20gal stainless water heater
-New electric Tecma toilets
-Installed one of two new reverse cycle A/C units in salon
-Removed exterior midship steps, fabricated custom removable teak steps
Winter of 2020/2021-
I had an unfortunate experience with my port main deciding to tank on me during my 2020 Labor Day Weekend voyage in the San Juan Islands, turned out to be blow-by in Cylinder #6, apparently not an uncommon issue from coolant passage ways becoming clogged (from prior improper coolant).
Since these Lehman 2714e’s were nearly 50 years old, I figured it would be best to overhaul both engines, clean & paint the engine room and replace the original CAST IRON fuel tanks with new modern aluminum fuel tanks - with modern fuel level senders and larger inspection plates.
Removing the mains in this Alaskan is and was what I would consider a “fortunate breeze” - with the open layout, removable galley counter and floorboards, large aft door giving easy access to the aft deck to place the mains.
The only part that killed my pride was for or the first time in my 38 years on the seas, I called Vessel Assist - I had Vessel Assist tow me down to Seattles Fishermans Terminal where I used a large crane to hoist the mains off the aft deck to load onto a truck.
After removing the mains, I then had a joyful time removing the original engine mount studs from the stringers, to later replace with larger studs for the new beefier motor mounts.
Next project went on to removing the original Cast Iron fuel tanks - I started off removing the beams that secured the tanks in place allowing both the port and starboard aft tanks to slide out. I was also able to wiggle out the starboard forward tank. The port forward tank wasn’t as fortunate- as it had an odd shape that angled down in front of the stringers, the only way that tank could have been placed into position was with the boat built around it (common, I know). So I busted out my plasma cutter and went to town, cutting it up into many pieces, I was baffled by how many baffles were in these tanks!!!
I had the all the new fuel tanks made 3” shorter, allowing the installation to be a breeze compared to the removal. Also had the fwd port tanks bottom made flat, with beams fabricated in front of the stringers to allow a smooth and solid mounting installation. The old fuel tanks tankage was just under 800gallons, new tanks are 620gallons.
After removing the tanks, I began the long process of cleaning & painting areas that the sun had never seen! I also removed and replaced the old insulation with new high quality sound-thermal insulation.
The mains were rebuilt with the assistance of a friend with a nice machine shop-
Complete engine overhaul kit-
-Cylinder sleeves
-Piston/kit - balanced
-Connecting rods - balanced
-Complete gasket sets
-Crankshafts turned & balanced
-Crankshaft bearing kit
-Camshafts grind/polished
-Intake/exhaust ports polished
-Cyl heads and short blocks hot tanked
-Cylinder heads rebuilt & decked
-Short block decked
-Timing drive gears
-Oil pumps
-Complete hose kits
-Fresh water circulation pumps
-Updated raw water pumps
-Thermostats
-Oil coolers
-Transmission coolers
-Heat exchangers
-Rebuilt fuel injectors
-Rebuilt injector pumps
-Fuel pumps
-Injector lines
-Injector return lines
-Rebuilt starters
-Drive plates
-Transmissions/gear boxes inspected and re-sealed (overhauled in 2019)
-R&D motor mounts
-Exhaust elbows
-Exhaust hose and mufflers
I invested into every nook and cranny into these engines, balancing the the crankshafts, pistons and connecting rods resulted into these engines running super smooth, this vessel no longer feels like a tank when idling. It was worth every effort.
With the new fuel tanks, I had a new fuel manifold system custom fabricated, fed from new CG approved fuel lines and all new Racor Duplex 500 Turbine fuel filters/water separators.
Also new flush fuel deck fill plates (no more toe stubbers).
As of present, less than 30hrs on the new engines
The only downside of this project, was discovering a few soft planks below the old fuel tanks. Caused by poor airflow. I designed the new fuel tanks to allow much more airflow to prevent this from happening again.
I dug out the soft areas in the planks and replaced with a temporary bandaid/epoxy until my next haulout, continued onto the current 2022 refit below-
2021 summer-
-Exterior cabins were wooded down and painted
-Fresh coat of awlgrip paint on roof decks
-Some interior paintwork
-All interior cabinet shelves painted
-All new portlights replaced (windows)
-New bronze rubrail trim
2022, current and final major refit-
From April 1st through present, I hauled out with the intent of replacing the planks in the areas below the fuel tanks. After removing these particular planks, I then discovered that the cancer had traveled deeper than I anticipated.
As of 12/12/22 the current refit is at 8500hrs combined, with roughly another 1k-2k hrs to go.
This project has been and is currently underway with a professional team of 5 shipwrights, including myself, a certified marine electrician and a crew of professional marine painters.
Considering that the hull was original and almost 50 years old, I decided to avoid cutting any corners by replacing over 95% of the planks from below the boot stripe just above the garboard, bow to stern. The few remaining hull planks were wooded down, refastened, seems reefed and corked with the rest of the new hull. Additionally the keel was also wooded down and treated and thoroughly inspected.
I also found a few soft spots on the port side chine, resulting in my fellow shipwrights and I removing and replacing the entire two piece chine. The chine, was fastened back in place with 6” #20 silicone bronze fasteners and 3/8 silicone bronze studs.
With the lumber I was very lucky to have sourced over 3000bd ft of 13-1/4” 20+ year air dried Sipo Mahogany for the chime and planking and purple heart for the butt blocks and frames.
Incredibly, the old fasteners were in near perfect shape, all came out with hardly any pinking or corrosion, most were solid enough to be reused! But of course reusing old fasteners is not my style. The old fasteners were #14 2-1/4” silicone bronze. The new fasteners are now #16 2-1/2” silicone bronze.
After removing the old planks, it was then discovered that some of the cancer latched onto the base of a few frames. Those frames were replaced and sistered with Purple Heart.
My crew and I also decided to replace and beef up all the frame gussets with 1” meranti, treated and epoxied.
All the lower sections of the frames, bilge, top of the keelson and stem lower were thoroughly cleaned, sanded and well treated with linseed oil/turpentine.
The upper sections of the frames, from the engine room bulkhead forward were painted with original Grand Banks beige, engine room bulkhead aft painted with white bilge paint.
All the new planks were either cut to shape or properly steamed, clamped into place until cured, removed, painted interior side and then fastened into place. The lower planks from the garboard up were treated with turpentine/linseed oil.
As we approached the stern area, I removed the bronze exhaust ports, had them blasted and inspected, unfortunately they had a bit too much corrosion to be comfortable with, so I had new exhaust ports custom made in solid silicon bronze. The port side exhaust port block was replaced with 8-1/4” of Sipo Mahogany and rather than a gusset at the base, the gusset was replaced with a 12-1/4” block of Purple Heart to give the aft end of the chime something additional and a lot more solid to fasten to.
Back in 2016 I had the original rudder post stands rebuilt and galvanized, unfortunately they started to form a little rust again, so I had new stands made in aluminum and powder coated in red.
A flaw and poor design of the lower teak deck was the lack of efficient drain scuppers. To help alleviate this issue, I took advantage of the duration of the planks being removed, giving me access to install 8 thru-deck drain scuppers, on each side, plumbed down to 90’ elbows feeding the individual thru-hull drains. To prolong the life of this setup, I utilized very heavy duty 1.5” coupled to 3/4” wet exhaust hose, to easily last 50+ years without any maintenance.
For bottom paint, I will be going with a reduced sharkskin coat of red to penetrate the wood, then a couple coats of teal.
Why teal over red? Ever get that gut sinking feeling when you run into a dead head? If/when that were to take place the red paint would be exposed through the teal paint, easily showing a diver the area of any potential damage. (This trick works great on fiberglass hulls too)
After we removed many of the planks, I had discovered some hidden un-utilized areas that I gained permanent access to by cutting through a bulkhead, adding a hatch door and utilizing the space for the second 16k btu reverse cycle A/C unit, plumbed to the mid stateroom, fwd stateroom and up to the pilothouse!
There was also enough space in this hidden gem to install a new Wallas Spartan forced air diesel heater, also plumbed to the aft stateroom, fwd stateroom and pilothouse!
During the 2016 refit, my team and I had removed the starboard rub rail to replace the planks behind the rub rail. So during this refit we decided to do the same on the port side.
So far during this current refit, the following was also completed-
-New water/waste flush deck fill plates (no more toe stubbers)
-Sanded, prepped and painted the lazarette
-Engine room panels prepped and painted
-Removed, fabricated and replaced the teak trim on the exterior main decks
-New teak hand rails on top of pilothouse
-Fresh Brightwork on transom
-Fresh paint on exterior hull and portuguese
-Props sent to Kruger and Sons to be cut and balanced
-Rudders also sent to Kruger and sons to be inspected, cleaned and sealed
-Prop shafts sent to The Prop Shop, polished, balanced and new couplers, tapered
-New shaft cutlass bearings (6)
-New updated PSS shaft dripless kits
-New bilge pumps and plumbing
-New rudder post stands
-New exhaust from mufflers to exhaust ports
-New custom made bronze exhaust ports for mains and genset
-New windlass remote w/counter
-New Garmin 8612xsv chart plotter and transducer, latest 2023 model
-New Garmin GMR Fantom 24x raydome/radar
-New Garmin autopilot system
-New vesper AIS
-New SH GX6000 VHF Radio
-New blue seas AC/DC main control panel
-All AC/DC wiring inspected/replaced
-New Blue Seas remote battery and relay switches
-New Blue Seas P12 backup battery charger
-New sound/thermal insulation in remaining areas of the engine room
-New fire suppression system
-New black water holding tank
-New canvas covers
-New throttle and shift cables
-New steering cables
-New genset (pending arrival)
More to come
Also an all new modern bonding system- Impressed Current Cathodic Protection - automatic sensing and control of cathodic protection current, no sacrificial anodes to worry about
At this time my crew and I are still planking away, seeing the light at the end of the tunnel approaching with completion.
Back in 2016 I had removed the shaft logs, replaced the lower strips with new custom made bronze strips. Unfortunately the shaft logs were a bit over torqued, damaging the planks below. I am now in the process of replacing these planks with purple heart to make sure this never happens again. This involves removing and later reinstalling the shaft logs and intermediate shaft struts.
Attachments
-
 F7386495-26E2-4A8C-A1F9-C699EA1D960A.jpg72.1 KB · Views: 29
 -
 CD0A1B68-CC2D-4C3A-8C3A-F6BFBD428F01.jpg195.3 KB · Views: 41
 -
 D2EF1776-B0F1-4256-B227-43A5B25D85FF.jpg185.7 KB · Views: 39
 -
 581AB8D0-BE3B-48DE-8D3D-637E517A5C58.jpg195.4 KB · Views: 32
 -
 32614B8B-E491-4842-BC15-2F649880D8AA.jpg139.4 KB · Views: 31
 -
 4087A511-06DD-4935-9816-60FFE92F40FA.jpg174.6 KB · Views: 27
 -
 BC6125EF-554D-49DE-9CDF-4F059F6ED905.jpg182.6 KB · Views: 27
 -
 4DDDD371-F001-4ACE-93C8-E1D46E7AE81D.jpg160.7 KB · Views: 23
 -
 E64E539F-4E4A-4E48-A55B-E7DBCDFA057E.jpg168.3 KB · Views: 21

