Rewiring the whole boat

The friendliest place on the web for anyone who enjoys boating.
If you have answers, please help by responding to the unanswered posts.
We are going to be doing some re-writing and putting a new panel in on our Gukfstar 36 this spring so I want to follow this thread..Good luck.
 
Highly recommend you consider changing to lithium while you are at it. More complex and new alternator but worth it.
 
If your old electronics work they are worth a lot to someone else hoping to “plug n play” one component on their boat. The problem is that old systems can’t be repaired without replacing everything. Look on eBay - working vintage components can be well worth full original price to someone else who will be happy to find it
 
Hi There,
You got yourself a good challenge. Congratulations.
I have a 1978 Roughwater 41 that I'm also in the process of upgrading. My wife and I live on on it, so I can only do small, strategic sections at a time without disabling the electrical system for any length of time.
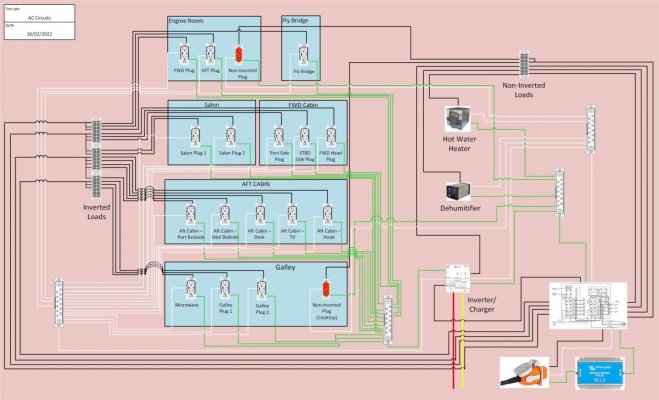
It looks like you have a Victron Energy Multi Plus for an inverter /charger. I just installed my 12/3000/50 with the wiring about half done. i'm also using Visio to create my wiring diagrams. It would be interesting to see what you are coming up with for your boat and if you are interested, I would be happy to share.
Good luck.
Reto
I stumbled on this timely thread and find the discussion interesting. Last night I was surfing boat porn as usual, and looked up Roughwater 41. The Roughwater boats have always been a favorite classic of mine. As I looked at some nice boats… and some pretty worn ones… I was thinking to myself, I wonder how much of a nightmare it would be to refurbish, repower (hey… it was a fantasy), and rewire one of these?

Probably more than I would ever undertake… so kudos to those of you that take on projects such as this. :thumb:
 
@Marco_Flamingo #24:
One of the things I don't see mentioned much with boats is "conduit fill." I know that electrical codes for buildings limits the number of conductors in a conduit, but I haven't seen it for 12V boating.
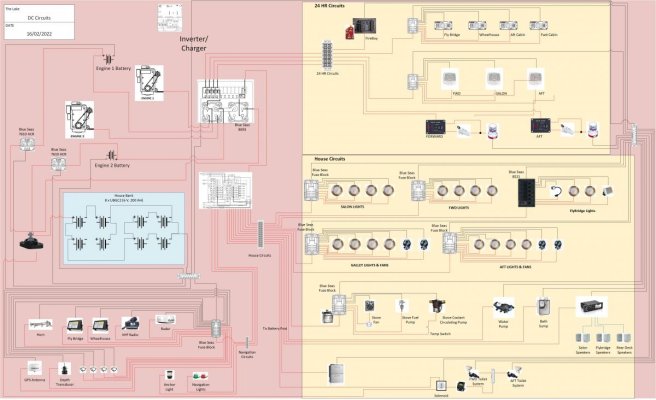
A derating for bundling is provided in ABYC Standard E-11 and ISO Standard 13297.
 
Boat Electrics Course

Highly recommend the boat electrics course at boathowto.com. Useful course if you're rewiring your boat whether doing it yourself or to validate that your electrician actually knows what they are doing. The course is covers both ABYC and ISO standards.
 
For a variety of reasons I have decided to take the plunge and rewire my 80's vintage CHB 42' Trawler.

The project has started and I have removed all my batteries and shore power and I am actively stripping out all the old wiring. I know it's going to be a big job, but I am looking forward to it.

Don't forget to label both ends of every wire and add the label to the schematic. It will go a long ways down the road when you can't remember stuff anymore. Lol.
 
Welcome to my world, started to do the same last summer. Not very difficult if you plan it ahead. I discovered some diamonds from the PO and a bunch of unused wires that were just adding to the old mess. Nice to see wires properly run and identified, and a lot more faith in the setup.

L

What’s your favorite method of labeling all the wires ?
Thanks
 
Different ways depending where but basically:
1. I write an owner manual about what wires are where and keep it updated.
2. When multiple wires running along I am using tie wrap of different colors. For example on port side of my forward V dining are running wires for lights, tv, cooler pump etc. Each pair has a tie wrap of different color every foot, blue, green, yellow, red etc and I keep this documented in my owner manual.
3. Using also printed heat shrink.
4. For bigger flat duplex wires I also write on the white outer sheath with simple sharpie pen.

Nothing fancy but works for me and simple enough not to mess up.

L
 
I think the best way to label is with heat shrink labels using the special printer. It's a bit of an investment but if you are rewiring the entire boat then do it properly. Generally you'll label with a code system and then keep a cross-reference table in your maintenance log book. I really prefer this system over the adhesive flags which some people use.
 
We use a simple Circuit ID Sheet and keep it on a clipboard to annotate as we id wires or add new ones. There are 6 columns labeled as follows:
*ID Number; a sequential number that we arbitrarily start at 100
*Conductor size
*Color; insulation color
*Source; where the conductor is being fed from; circuit breaker, bus bar, terminal strip, load side of a fuse holder, etc.
*Load; for a DC circuit, where is the B- landed?
*Notes

We have been using this simple system for years. At the end of a project I scan the sheets and send them to the owner. If we are judicious with our descriptions the ID sheets are a textual wiring diagram.

For conductors > AWG 10 we use a Dymo Rhino Pro 5200 and nylon tape stock. The tape stock is virtually indestructible. The Rhino Pro costs < $140 and is a good investment for a pro or a DIY'er. I have tried using the RP heat shrink stock in this machine and it just does not work. YMMV.

For AWG 10 and smaller, we use heat shrink labels created with an Epson Labelworks LW-PX900. This is pricey at about $250, but the time saved in comparison to other methods and the quality of the job at the end of the day makes it worth it.
 
I bought a cheap Dymo label gun even though my old Brother still works. The reason was I found Dymo had a white print on black background label tape. My black circuit breaker panel had morphed over the years into a mess of hand labeled and mislabeled switches that were hard to decipher. What did the PO mean by "BRIDGE"? After chasing down (and lots of rearranging) I was able to print out white on black labels that matched so good they aren't noticeable.

I use the same label maker for identifying wires. Put in the name (e.g. "FRIDGE") and press print twice without cutting the label. That gives you "FRIDGE" with a space and then "FRIDGE" again. Wrap the mid point around the wire so that the tape flag sticks to itself (which is what label tape sticks to best). Might as well make two or three "FRIDGE" flags while you're at it and space them out along the wire to the fridge. This works on wires that are dirty, oily, etc., without having to clean the insulation with Windex or something before attaching.
 
Thanks for the great comments and feedback everyone.

The project is progressing. I was able to put the boat on the hard (it's cheaper for me for the next couple of months and I don't have to worry about no bilge pumps, etc.).

I have pretty much all of the old wiring pulled out. I recognize there will be lots of "clean up" before starting to run the new lines (clean and paint the bilges, etc.).

I appreciate all the sound advice from the group. I have my first versions of my new AC and DC layouts (did them in Visio and produced JPEGs for posting). But will be willing to share the Visio's with anyone interested.

I have not passed them by an electrician as of yet. I have work yet to do (e.g., I have not identified the cable length as of yet so no projected cable sizes and fusing sizes), but I wanted to put it out for any thoughts the group might have.

Thanks,

Chris
 

Attachments

  • TheLake AC Systems.jpg
    TheLake AC Systems.jpg
    119 KB · Views: 55
  • TheLake DC Systems.jpg
    TheLake DC Systems.jpg
    115.4 KB · Views: 48
When Ship Shape TV was still on the air they had an episode where Pacer Group made a custom wiring harness for a boat they were refurbishing. It was really nice. Each wire has the circuit printed on the wire like the printing that comes with the wire for size, etc. it had connectors to plug different sections together. I suspect it would be very expensive but it was really nice.
 
Brother has a laminated label maker that includes a flag option so the text is written twice and you fold it over the wide and stick the label to itself. Since it is laminated, there is a clear tape over the printing to prevent fading and smudging.

I used zip ties with tabs on them once, but the tabs got hung on everything.
 
Do you have a link for the heat shrink labeling system ?
Thanks,
 
Chris, nice organized schematics. Some points/questions:
  1. I didn't see any solar panels.
  2. You have 5kWhr of usable battery capacity - is this sufficient for your needs over the long term?
  3. What is your inverter capacity?
  4. If you install a domestic water heater (Home Depot, Lowes) most have double heater elements. So you can change one for a 12V 600 heater watt and thus heat directly from the solar panel or alternator.
 
Do you have a link for the heat shrink labeling system ?
Thanks,

https://www.dymo.com/labels-tapes/rhino-industrial-labels/dymo-industrial-heat-shrink-labels/SAP_18053.html

L
 
When I did mine I used a book of electrician's number's. Just bought a book from Home depot. As did the work just numbered the wires and circuits took notes, sketchs etc and drew the wiring diagrams later.
 
Chris, nice organized schematics. Some points/questions:
  1. I didn't see any solar panels.
  2. You have 5kWhr of usable battery capacity - is this sufficient for your needs over the long term?
  3. What is your inverter capacity?
  4. If you install a domestic water heater (Home Depot, Lowes) most have double heater elements. So you can change one for a 12V 600 heater watt and thus heat directly from the solar panel or alternator.

I am thinking of either a generator or solar sometime in the future. Solar seems to be the way to go, however I have thoughts of eventually getting to hot climates and have considered if a future AC unit may be important. If so, then I was thinking a generator may be better. Either way, not looking to install either of them at this stage - but certainly don't want to do anything that would limit adding them in the future.

Inverter is a Victron Multiplex 3000.

Interesting idea about the domestic water heater. I will have to think on that one for a bit.

Chris
 
One More Thing, if I may...

Aboard Seaweed each place where I have a positive and ground wire, the Red is on the right. You may find this useful for your boat too.
 
Do you have a link for the heat shrink labeling system ?
Thanks,

We use the dymo printers but buy the heat shrink tube from Amazon. We use tons of it for our work doing factory control systems. Our panel builder likes these knock offs from Amazon, https://www.amazon.com/gp/product/B07SRXKBYP/ref=ppx_yo_dt_b_search_asin_title?ie=UTF8&psc=1

There’s different sizes depending on wire gauge so be aware of that when ordering.
We used to use Brady markers, but the dymo is just as good and way cheaper.
 
Hi there,
Looks great. I'm amazed with detail in your diagrams. I'm using Vizio as well for my project diagrams, but it doesn't look any were close to yours.
Would you mind sharing? I would appreciate it.
I have a few suggestions/questions for you.
Have you ever considered installing a isolation transformer? If you do, now might be a good time, if nothing else set up the wiring for it. Also, I did not see a shunt in your system. How are you monitoring your battery state of charge?
I also don't see any over current protection in your DC system between your battery's and and between the main bank and the DC panel and between your Inverter/charger and the house battery's, ABYC is very clear about all of that.
I'm also a great fan of going straight from the alternators to the house battery/s with smart external regulators controlling the alternator output, bypassing the starter cable all together and keeping the engine/s starter battery charged with smart DC to DC chargers eliminating the somewhat problematic ACR's. If you are at all thinking about high output alternators now or in the future, it might be a good idea to up the wiring for them now.
Please let me know if you are interested in more dialogue, I would be happy to keep asking more in depth questions if you are interested. I'm always interested in others opinions and I am eager to learn from them and happy help others.
Happy wiring!
Retog
 
I have and use a label tape printer after which I slip a piece of clear heatshrink tubing over the label. Once shrunk the label is there permanently.

THe printed tubes would do the same thing.

Just a different way of doing it.
 
Here are all my (near final) electrical drawings.

Chris
 

Attachments

  • Charging Circuits.pdf
    454.9 KB · Views: 35
  • 24hr Circuits.pdf
    363 KB · Views: 19
  • House Circuits.pdf
    361.5 KB · Views: 23
  • Panel Layout.pdf
    105 KB · Views: 22
  • AC Circuits.pdf
    386.1 KB · Views: 25
  • AC Back of Panel.pdf
    395.6 KB · Views: 21

Latest posts

Back
Top Bottom