New batteries setup

The friendliest place on the web for anyone who enjoys boating.
If you have answers, please help by responding to the unanswered posts.

Lou_tribal

Guru
Joined
Jan 20, 2016
Messages
4,375
Location
Canada
Vessel Name
Bleuvet
Vessel Make
Custom Built
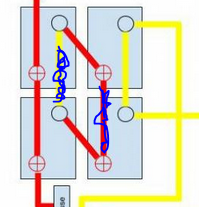
Below is the setup I plan for my new gc2 batteries bank and new charger.
Any comment, input, suggestion will be welcome.

The plan is to keep my old g31 as a thruster dedicated bank.
I am still questioning myself about alternator setup, using either a charge splitter (like ProIsoCharge or equivalent) or 2 VSR to link the 3 bank between them. What do you think?

Bleuvet%20-%2012V%20Circuit.jpg

(Already posted this on my renovation thread but think it would fit here as electrical subject)

L
 
Where is your alternator output going? Is the only way your house and thruster bank are charged is by the AC charger?
 
Where is your alternator output going? Is the only way your house and thruster bank are charged is by the AC charger?
This is exactly the last point I need to clarify and choose.
Different options:
Option 1: install a split charger like Promariner ProIsoCharge, or Sterling ProSplit-R (also an equivalent made by vetus) that will be connected with the 3 banks (starter, house and thruster).
Option 2: install VSR between the banks to isolate/connect them and in that case:
2a: connect the alternator to the start.
2b: connect the alternator to the house.


Not sure what route I will go yet, any pro/con about each?


There is also the option of the Sterling ProAltC that looks very interesting but expensive.

L
 
The 2 vertical jumpers in the "diamond" are not needed.
 

Attachments

  • BattBank-1.PNG
    BattBank-1.PNG
    64.6 KB · Views: 789
The 2 vertical jumpers in the "diamond" are not needed.
It was my initial schema, then I noticed in the calder bible that he mentioned it was a good practice to cross connect positive and negatives on the 4 gc2 to minimize differences in how the batteries perform.

Opinion on this?

L
 
Here is my opinion... i would lose the starter battery. Run the alternator directly to the house bank. Then use an ACR to the thruster bank. Move the 1/2/B switch between the two banks.

Far fewer points of failure... good backup... A single motor doesn’t necessarily need a dedicated start bank. You are able to use the full output of the charger (your way splits the max by three on most chargers) to a single bank for maximum speed of replenishment. Remember to always keep it simple.
 
This is exactly the last point I need to clarify and choose.
Different options:
Option 1: install a split charger like Promariner ProIsoCharge, or Sterling ProSplit-R (also an equivalent made by vetus) that will be connected with the 3 banks (starter, house and thruster).
Option 2: install VSR between the banks to isolate/connect them and in that case:
2a: connect the alternator to the start.
2b: connect the alternator to the house.


Not sure what route I will go yet, any pro/con about each?


There is also the option of the Sterling ProAltC that looks very interesting but expensive.

L

I think that the alternator should feed the house bank. Then either use an ACR to combine the thruster batteries and start batteries, or use a DC-DC charger to to charge the start and thruster batteries.

I prefer the DC-DC option as it is really simple and inexpensive. Something as basic as the Xantrex Echo-charger will keep your start or thruster batteries topped up nicely. Then as Tom mentioned, your AC charger can be directed only to the house bank so they get its full attention.
 
Connect all charge sources to House.

A small Echo Charger to keep Starter topped up.

A larger capacity ACR for the thruster bank if you think that's warranted.

But first check you voltage drop if any of the distances are long. Going to higher cable gauge may help, but a proper DCDC charger may be needed if extreme.

If the EC's 15A limit is OK, that can help reduce voltage drop.

A prior version of Blue Sea's ACR, CL 7600 also featured current limiting for the same reason, but at a higher 60A.

https://www.bluesea.com/support/art...e_Battery_Using_the_CL-Series_BatteryLink_ACR

They go for $50-70 on eBay occasionally, when cheaper I tend to snap them up pretty quickly. :cool:
 
Connect all charge sources to House.

A small Echo Charger to keep Starter topped up.

A larger capacity ACR for the thruster bank if you think that's warranted.

But first check you voltage drop if any of the distances are long. Going to higher cable gauge may help, but a proper DCDC charger may be needed if extreme.

If the EC's 15A limit is OK, that can help reduce voltage drop.

One of the advantages of using the Echo-charger for the thruster bank is the wire size. If you use an ACR then you really should have full sized battery cables. With the Echo-charger's 15amps, you can use much smaller wire which is cheaper and easier to run much distance. In fact, you may be able to use the existing wire that is going from the charger depending on where it is located.

Of course, I could be entirely wrong as well.
 
Last edited:
Echo charger is indeed interesting to set between house and start battery as 15amp will be far enough to replenish the starter bat. After having started the engine. If I understood correctly the docs, if I fit an echo charger between house and start I don't need to connect the start to the AC bat charger as if I am connected to shorepower and charging via the sterling, the echo charger will still do his job.

For the thruster bank I am not sure yet, maybe an ACR would be more suited as it would not be limited to 15A.

As for cables, I plan to go as big as possible to limit voltage drop to the max I can. Do you see any issue to go with 4/0 for connection in/out the banks? Cost would be !imited as there is no real long run as charger and main panel are right mid boat, maybe 4 to 5 feet at most to the thruster bank.

L
 
Yes with such short distances, fat wires are practical.

So if you want to enable high-amp charging of the thruster batt, a Blue Sea ML-ACR is IMO the way to go there.

But from a higher-level design POV, I would eliminate the dedicated thruster batt entirely, add that capacity to House and rely on robust adjustable LVDs to ensure less-essential loads don't pull down that bank too far.

This will give a much higher total capacity for both functions (Peukert effect), less voltage sag, lower DoD drawdown and therefore *much* longer bank lifespan.

For belt & suspenders, use a 1-2 load switch so your Starter batt can be used as a backup in a pinch.

One of the advantages of using the Echo-charger for the thruster bank is the wire size. If you use an ACR then you really should have full sized battery cables.
Except for the Blue Sea CL model, which is designed to do exactly the same thing, but current limited at 60A.
 
I like the scenario that John61 has posited. I also think the most important division is to have a dedicated start battery. If the house bank goes flat, you need to start the engine but if the fridge stops, meh.

Solar! My panels have the house bank in float by noon, most days. I have not run the genset for a year except to heat it up to change the oil.

Also, cable like Calder! Only a few dollars more but it works best, I have that system too.

If you run the alternator to the house bank, use a smart regulator (I don't like Balmar as they are unreliable, nor do I like Xantrex, same reason plus their sh*tty customer service).
 
As for cables, I plan to go as big as possible to limit voltage drop to the max I can. Do you see any issue to go with 4/0 for connection in/out the banks? Cost would be !imited as there is no real long run as charger and main panel are right mid boat, maybe 4 to 5 feet at most to the thruster bank.

There is no real need to max out with the cable gauge unless you are going to pull some big load like a high-amperage inverter going full song. You are only pulling from 4 GCs (With a 900+ AH bank... 8 GC batteries... I am using 2/0). Like anchor selection, it is wise to go 1 size larger than the chart says based on your loads and the length of your run. using 4/0 really limits the flexibility of the wire between battery posts. It also gets kinda expensive when you factor in cable, connectors and crimping. 2/0 should be plenty big for your application.
 
QUestion: what is the difference between the SI-ACR and the ML-Series, except the switch of course? Any other difference? Are they both the same if you set the ML to auto?

L
 
Looks interesting, but overly complex. I wouldn’t bother unless you have a giant alternator... even then... meh. Adds another (expensive) point of failure.
 
Any input comment on this:

https://www.defender.com/product3.j...harger&path=-1|328|2289948|2289953&id=2086361

Looks like interesting to me, act as voltage regulator without having to modify the alt and no need for relay/isolator between house and start.

L
Yes, great unit, but

only works with that alternator as a charge source

does not work with all alternators

Their BB chargers are much more flexible and overcome those two limitations. I take my House bank from boat to trailer to off-grid cabin, and the DCDC charger comes with the bank.

Works with even the craziest modern ECU controlled fuel saving setups, regenerative braking, even hybrid vehicles.

Will let you tap into any old charge source, wind, solar, mains etc without worrying about your bank getting the proper charge profile.

Customizable for any chemistry, including LFP.

180 & 240A versions "coming soon"
 
Another question regarding correct fusing.
I see two way of doing things (of course consider all used wires are of same gauge):
1. Have a main wire coming from battery +, with an anl fuse, and then a busbar where everything is connected (battery charger, alternator, battery switch/main distribution panel)
2. Having each thing fused. So a fused connection between charger and battery, a fused connection between alternator and battery, a fuse connection between switch/panel and battery.

Any advice on this?
The benefit of having a busbar is the single large anl fuse on the battery side.

L
 
That just protects from the batt to the buss.

You still need to protect each wire with a fuse on the source side at each point along the way.

Which is why many distribution boxes incorporate CP into their design.

The point of a buss is to not overload at the batt terminating post/stud, stressing the batt case.

And that more than a few rings stacked per post is too much resistance.
 
Another question (yes I always have question lol).
Does it worth it to buy crimping tools to make my own battery cables or is it better to buy them custom made?
I mean I can order the cables made to my requirements online on different site but I can also buy cables, lugs and crimping tool to make them myself, what would be the best option, money wise, quality wise and usefulness wise
L
 
If you have a local west marine they should have a crimping station in the store. That way you can make your own crimps and not buy the tools.
 
I normally like to DIY, but in this case I decided to purchase made-to-order cables. A quality crimping tool is not cheap. Plus, you need to do it properly. I decided that I wouldn’t get enough use out of the tool to make it worthwhile.

Tiltrider1 has a good suggestion, if your local WM has the right tools.
 
Coming from a sail background we have a Nicro press tool for rigging lifelines and smaller rigging.

It is slow but on the right sized wire does a great crimp.
 
Another question (yes I always have question lol).
Does it worth it to buy crimping tools to make my own battery cables or is it better to buy them custom made?
I mean I can order the cables made to my requirements online on different site but I can also buy cables, lugs and crimping tool to make them myself, what would be the best option, money wise, quality wise and usefulness wise
L


Oh it is totally worth it... but I really enjoy doing stuff like that. Still, unless you are 100% confident in your measuring skills and are 100% sure you where EXACTLY you want to mount things, it is far better to buy a very good crimper and do it yourself. I can tell you from my experience that once you get into a project, things will ALWAYS change. All it takes is an inch and you $60 pre-made cable is junk. I would only buy pre-made cables if I were replacing one and can measure the exact length.
 
Back
Top Bottom