Gauge Removal

The friendliest place on the web for anyone who enjoys boating.
If you have answers, please help by responding to the unanswered posts.

Tony B

Guru
Joined
Jul 18, 2011
Messages
1,251
Location
Cruising/Live-Aboard USA
Vessel Name
Serenity
Vessel Make
Mainship 36 Dual Cabin -1986
I am going to replace my old gauges with new ones. The old gauges are VDO gauges and I am replacing them with Lido Pro Gauges.

Problem: How do I remove these older gauges.
They don't have the little metal bracket. They look like they may screw on but I cant seem to break them loose. Maybe I am doing it wrong.
Any hints?
 
A picture would help, but all my VDO gages are screwed in with a plastic collar.
 
Would be hard for me to get a picture under the dash.
Are you referring to the whole below the dash part as the coller?
 
Every gauge I have worked with has some type of rear clamp.

Either on brass posts or friction grips along the side.

If just screw heads back there....is there some form of cover over all of them and someone replaced the brass posts with machine screws?
 
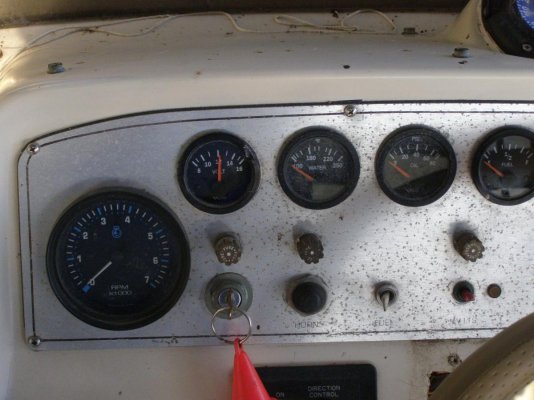
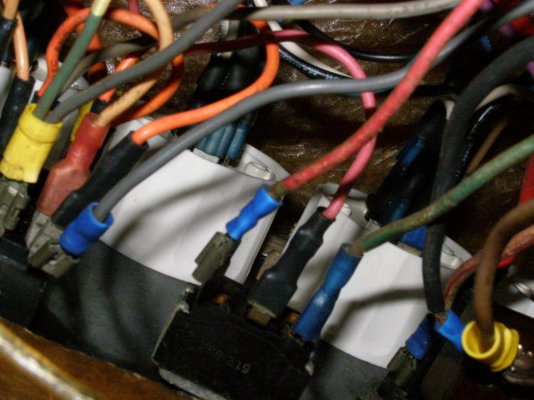
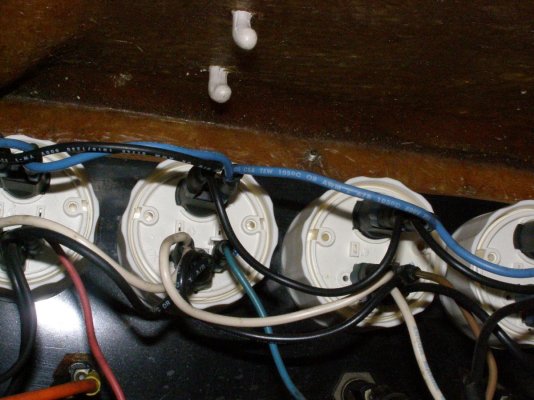
P3270014.jpg

P3270016.jpg


having internet problems, hope this uploads
 
Yes I think there is a collar that holds them in place.
However, I guess it would be possible to simply screw them in if the hole were the correct size.
But now that I zoomed in on your pics it looks like maybe the dash was too thick and the threads did not protrude???


I would remove the wires on one and try to twist from the bottom if you can. I wonder if they are epoxied in place because the clamp ring wouldn't fit?
 
Last edited:
Is there enough slack in the wires that you can remove the Philips screws and pull out the whole dash assembly? That's what I do, makes it way easier.
 
Yes I think there is a collar that holds them in place.
However, I guess it would be possible to simply screw them in if the hole were the correct size.

Yup...looks like a screw on collar from here..You can see the flutes. .Most all gauges are a standard 2 1/16" (52mm) size..
 
If I can ask why are you replacing them? I had gauges on a boat several years ago that the covers were cloudy on. I was going to replace the gauges but then found out the covers could be replaced for less than a $1.00 each. They were Faria gauges.
 
River Cruiser

My gauges and senders are old and inaccurate. I'm sure cleaning up the terminals will help a lot of that. My original plan was to make a new dashboard and replace the entire set-up. Well, I bought the gauges and didn't have time to learn the program for setting up the blueprint for the new dashboard to be fabricated. Now all I want to do is replace everything. I bought white gauges which I like better than black ones and the wire ends will be cleaned up along the way.
 
Tony, I can't tell if you've done it already or not... but if you remove the screws holding the silver panel (in your first picture) to the gelcoat, the whole thing should lift out enough for you to work on connections from the front, so to speak (without having to climb under and into the helm).

It does look to me like there's a collar on each gauge. Ours simply drop in the hole, and a plastic collar attaches to the back (with two screws each) and snugs the gauge down to a removable panel. Look like yours do to, although the "collar" in the back (assuming I see one) seems to work differently than ours.

If you go here CruzPro T60 Digital Water Temperature Gauge and Alarm for example, and then download the user's manual, it has a pic (page 5) of how CruzPro does it. It's slightly different from our current Faria gauges, but should illustrate what I think is the situation for you.

-Chris
 
I spent this afternoon removing and labeling some of the shorter wires that might hold me back a little.
Tomorrow I will cut the juice to the instrument panel (with luck, get it all) and pull the dash back about 8 or 10 inches and try unscrewing them. Maybe that will work.
I'm a little nervous about it because if any of the wires come loose, I might not be able to figure out where they came from.
 
Tony
I did a similar project last year. I did one guage at a time and put different color tape for each guage and then numbered each wire. Work slow and take LOTS of photos.
 
I spent this afternoon removing and labeling some of the shorter wires that might hold me back a little.
Tomorrow I will cut the juice to the instrument panel (with luck, get it all) and pull the dash back about 8 or 10 inches and try unscrewing them. Maybe that will work.
I'm a little nervous about it because if any of the wires come loose, I might not be able to figure out where they came from.

The regular set of gauges is really pretty easy to do.

They are labeled in the back and if at some place the wire bundle going to them has the properly colored wires for the type of sender...it is really not confusing.

Half the wiring mess back there is just for the gauge lighting, which is just jumping from light to light, and so is pos, neg to each gauge to power them.

Don't fret too much...the real question for me doing it every time is how to make up the jumpers, one connection for each wire end or connect two into one ring/spade.....daisy chain them or take them all to a buss bar.....decisions...decisions....
 
Last edited:
Back
Top Bottom