Proud Mary renovation status

The friendliest place on the web for anyone who enjoys boating.
If you have answers, please help by responding to the unanswered posts.
The new overhead LED lights were a challenge. The LED lights are flush mount. So I had to make spacers to permit a space for the wires and connectors between the overhead and the lights.
IMG_2423.jpg
IMG_2424.jpg
 
We finally got around to installing the bead board wall panels and new windows.
The rough openings required quite a bit of preparation, sanding and shimming to get a relatively uniform edge and wall thickness.
IMG_2491.jpg
IMG_2492.jpg
 
The walls then need to be clamped and shimmed until the epoxy or liquid nails sets up.
IMG_2477.jpg
IMG_2478.jpg
IMG_2479.jpg
 
I was able to trim the bead board for the utility closet then glue and clamp.
IMG_2495.jpg
 
Ooooooooooooo... she’s looking nice! I like that beadboard look.
 
Looks very nice. One thing I did when I put in my new Racor was to add a small LED light behind the fuel bowl so that I can see crap in it very easily. On your boat you could also do the raw water strainers too.
 
All I can say WOW, I looked at your boat way back when it was for sale under the name uno mas. Passed on it and decided on a larger boat that was closer to home (FL) Have been following your trip south and the rebuild these past years. You are doing a great job bringing her back to the shape she deserves.


Look forwarded to seeing her back in the water, again I say WOW.
 
Looks very nice. One thing I did when I put in my new Racor was to add a small LED light behind the fuel bowl so that I can see crap in it very easily. On your boat you could also do the raw water strainers too.


That’s a good idea. I was starting to plan what lights I wanted in the engine compartment. When I need to inspect down below I don’t want to squint with a handheld flashlight or goofy headlamp.
 
I like the light behind the Racor. It lights up the bowl and really makes it easy to see. I added about 6 LED lights on the port side this winter. Next winter I will pull the starboard engine and add the lights there then.
 
All I can say WOW, I looked at your boat way back when it was for sale under the name uno mas. Passed on it and decided on a larger boat that was closer to home (FL) Have been following your trip south and the rebuild these past years. You are doing a great job bringing her back to the shape she deserves.


Look forwarded to seeing her back in the water, again I say WOW.


Thanks for the compliment. We are hustling to get it in the water this year to do under power inspections and to tweak things that I didn’t repair correctly or maybe the implemented design wasn’t the best. Overall I think we’re okay but I will have it inspected as I’m still learning every system on the boat.
 
This evening I installed the bead board on the port side where the galley will be. It’s also the backside of the head.
IMG_2504.jpg
 
Yesterday evening I did a job I was procrastinating on doing. I installed the toilet and connected the hoses.
IMG_2509.jpg
IMG_2510.jpg
 
Today two of my sons came over and we installed the vinyl name on the transom of the boat.
IMG_2511.jpgIMG_2513.jpgIMG_2515.jpg
We think it came out real nice.
 
Good to see family having a fun and productive time together.
 
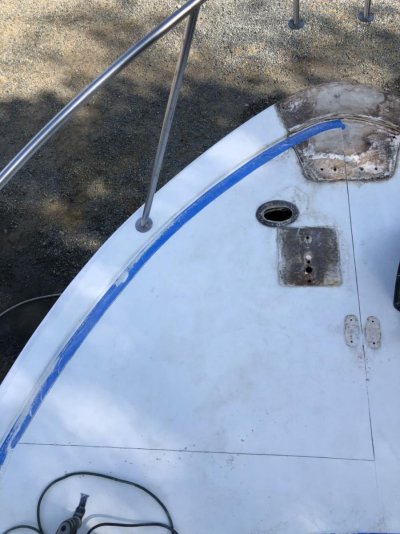
We want to mount a Windlass. However, when I removed the old hardware I could tell the deck was very soft. So I did the Dremel tool cut.
IMG_2537.jpg
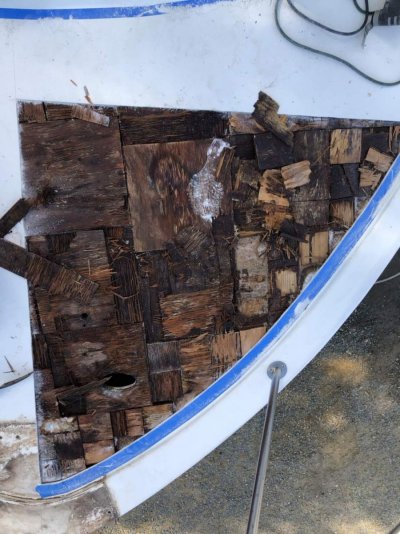
After we peeled back the top fiberglass there was a mess of rotted mushy wood. It didn’t require much effort to remove.
IMG_2538.jpg
After sanding, cutting new pieces of 3/4” plywood and epoxying in place we have this result.
IMG_2542.jpg
More to follow depending on how the weather cooperates.
 
Hat tip to you! From the heart to the bowels to the stern to the stem. You've covered all the bases! Bravo Zulu!
 
Looking great, keep up the good work. Love the photos.
 
We want to mount a Windlass. However, when I removed the old hardware I could tell the deck was very soft. So I did the Dremel tool cut.
View attachment 103259
After we peeled back the top fiberglass there was a mess of rotted mushy wood. It didn’t require much effort to remove.
View attachment 103260
After sanding, cutting new pieces of 3/4” plywood and epoxying in place we have this result.
View attachment 103261
More to follow depending on how the weather cooperates.


why didn't you just make one big piece?
 
The pie shaped arc is 4 feet in length and width. Since we're on the hard with no scaffolding the size of the cutout seemed reasonable for repair access and reach. By the time we had repair materials on the deck, shop vac, epoxy containers, tools, rags, etc. it is a limited workspace. I realize it takes longer but maybe if I was twenty years younger...
 
I know all about the being older thing. What used to take just a day to do, now takes me several days to remember what I was going to do...
 
As I grow older (tenth grade when JFK was shot), I like to imagine that my experiences have helped me to do many things a bit smarter, not harder. Oh, sure there may be a few places I just can't get too....
 
IMG_2562.jpg
IMG_2563.jpg
We completed the repair of the bow deck. Then we reinstalled the repaired pulpit and installed the windlass with new chain and rope to match the gypsy.
IMG_2590.jpg
IMG_2591.jpg
 
With the repaired bow and windlass we were confident enough to launch the boat.
IMG_9156.JPG
IMG_2596.JPG
IMG_9169.JPG
IMG_9167.JPG
IMG_2602.JPG
IMG_9177.JPG
IMG_9178.JPG
Finally in its own slip.
 
When we launched we had a tough time starting the engine. We discovered that three years of using the top of the battery box as a step platform doesn’t help maintain battery contacts.
IMG_2605.jpg
IMG_2606.jpg
They were all replaced with new marine grade terminal clamps. Now the engine starts every time.
 
And it floats!!! Good job. Yes the battery cables needed cleaning up. Now you get to enjoy it a bit while you finish up odds and ends. Have fun.
 
Congratulations, intense moments to see her splashing!

L
 
TRULY good congratulations Proud Mary!

Much hard work!

She looks wonderful. And she will last another 40 years!

There is always something to do. But take some time and enjoy taking her out, just sitting on her in the slip!

Tim
 
Congrats on the launch! She's looking good!
 
Back
Top Bottom