I need to replace some missing teak plugs on my Grand Banks 42. Problem is that 5/16” are too small and 3/8” are just a hair too big. I’m assuming the proper size must be 9mm. Can anyone tell me if that is correct? And, if so, where I can get them? I have scoured the internet, but can’t find metric sized plugs or anything between 5/16 and 3/8 in Imperial.
You are using an out of date browser. It may not display this or other websites correctly.
You should upgrade or use an alternative browser.
You should upgrade or use an alternative browser.
Teak Deck Plugs
- Thread starter Mackin
- Start date
The friendliest place on the web for anyone who enjoys boating.
If you have answers, please help by responding to the unanswered posts.
If you have answers, please help by responding to the unanswered posts.
- Joined
- Nov 8, 2012
- Messages
- 2,315
- Location
- USA
- Vessel Name
- Sandpiper
- Vessel Make
- Bluewater 40 Pilothouse Trawler
I need to replace some missing teak plugs on my Grand Banks 42. Problem is that 5/16” are too small and 3/8” are just a hair too big. I’m assuming the proper size must be 9mm. Can anyone tell me if that is correct? And, if so, where I can get them? I have scoured the internet, but can’t find metric sized plugs or anything between 5/16 and 3/8 in Imperial.
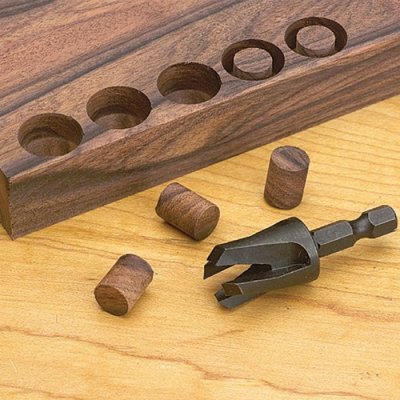
Google tapered teak plugs or tapered bungs and find a tapered plug slightly larger than what you need. Being tapered, they fit oversize and oddball holes.
You could also make your own plugs with a tapered plug cutter and a scrap of teak.
Attachments
Last edited:
I need to replace some missing teak plugs on my Grand Banks 42. Problem is that 5/16” are too small and 3/8” are just a hair too big. I’m assuming the proper size must be 9mm. Can anyone tell me if that is correct? And, if so, where I can get them? I have scoured the internet, but can’t find metric sized plugs or anything between 5/16 and 3/8 in Imperial.
Any tool store will have both plug cutters and bits to drill a matching hole. Even Home Depot or Lowes. A kit will contain all of the popular sizes. Then all you need is a scrap of teak to make your own.
When dealing with missing plugs, the exposed screw head will likely be to close to the surface to allow you to put a new plug in on top of it with any hope of it staying there. Remove the screw, drill the new, slightly bigger hole, put a dab of epoxy in to seal the screw hole and put in the new plug. Use epoxy as you will never need to re-plug this hole. The screw is no longer necessary. It was used to hold the board in place while the bed of slippery black rubber set up. That process was completed about a week after the original deck was laid and the screws have been redundant since then.
Last edited:
Cigatoo
Guru
3/8 Bung works in our 36. As stated above, I remove the screw. Drill 3/8 all the way into glass and core. (Obviously stop before going through bottom layer of fiberglass.) Fill with thickened epoxy and drive in bung.
FBoykin
Senior Member
- Joined
- Feb 13, 2014
- Messages
- 165
- Vessel Name
- Hannah Jane
- Vessel Make
- 2000 Grand Banks 42 Classic
3/8 Bung works in our 36. As stated above, I remove the screw. Drill 3/8 all the way into glass and core. (Obviously stop before going through bottom layer of fiberglass.) Fill with thickened epoxy and drive in bung.
My 2000 GB 42 Classic use 3/8" plugs too and I think that's pretty standard. they are a tight fit and usually need a rubber mallet to drive them in. Some folks use Titebond III wood glue, some varnish and others use epoxy. I think varnish is the traditional way and would use that if the bung will be tight and you think you might need to get the bung out again at some point.
I've also heard from others, that placing a small adhesive dot on top of the screw is helpful if you use glue or epoxy as it protects the screw slots so you can use a screwdriver again (without a lot of trouble). Avery makes adhesive paper dots in the proper size and I got mine at the local Office Depot.
Giggitoni
Guru
- Joined
- Jun 21, 2008
- Messages
- 2,092
- Location
- United States
- Vessel Name
- Mahalo Moi
- Vessel Make
- 1986 Grand Banks 42 Classic
Use 3/8 and that size bit. The dot mentioned above is a good idea. I use Titebond III. I saw off the excess bung with a Feintool and fine-tooth saw. Very light sanding. Then on to the next kagillion bungs...
- Joined
- Nov 8, 2012
- Messages
- 2,315
- Location
- USA
- Vessel Name
- Sandpiper
- Vessel Make
- Bluewater 40 Pilothouse Trawler
I agree that the Fein Multitool is the quick way to trim lots bungs.
If you don't have a multitool, you can use a flush cut trim saw. They have aggressive Japanese saw teeth set one way only - up so the surrounding wood doesn't get marred.
Mine is from Veritas Tools, manufactured in Canada. I've had several and it's my favorite.
If you don't have a multitool, you can use a flush cut trim saw. They have aggressive Japanese saw teeth set one way only - up so the surrounding wood doesn't get marred.
Mine is from Veritas Tools, manufactured in Canada. I've had several and it's my favorite.
Use 3/8 and that size bit. The dot mentioned above is a good idea. I use Titebond III. I saw off the excess bung with a Feintool and fine-tooth saw. Very light sanding. Then on to the next kagillion bungs...
Though a good way to stop the driver hole from filling, no dot is required when you don't put in a screw. Not at all necessary, and possibly provides a path for water to penetrate to the core. For the last 20 yrs and more, teak decks have been assembled in the shop and simply glued down, no screws at all. Older decks are secure, so replacing screws is never necessary.
FBoykin
Senior Member
- Joined
- Feb 13, 2014
- Messages
- 165
- Vessel Name
- Hannah Jane
- Vessel Make
- 2000 Grand Banks 42 Classic
Though a good way to stop the driver hole from filling, no dot is required when you don't put in a screw. Not at all necessary, and possibly provides a path for water to penetrate to the core. For the last 20 yrs and more, teak decks have been assembled in the shop and simply glued down, no screws at all. Older decks are secure, so replacing screws is never necessary.
That's true about the decks glued down. My GB 42 doesn't have near as many screws as older boats. My PO over sanded the decks and I have screw heads showing in places. They're oval headed, so could replace w/flat head and drill a slightly deeper hole, but I know some I'll just pull the screw, seal the bottom where the screw was and just bung the hole.
Giggitoni
Guru
- Joined
- Jun 21, 2008
- Messages
- 2,092
- Location
- United States
- Vessel Name
- Mahalo Moi
- Vessel Make
- 1986 Grand Banks 42 Classic
Though a good way to stop the driver hole from filling, no dot is required when you don't put in a screw. Not at all necessary, and possibly provides a path for water to penetrate to the core. For the last 20 yrs and more, teak decks have been assembled in the shop and simply glued down, no screws at all. Older decks are secure, so replacing screws is never necessary.
I’ve been leaving the screw out most of the time as well. I helped remove a GB deck years ago. After removing bungs and screws, we found the planks were glued down really well. We weren’t able to get very much useable teak after that chore! Just pieces.
FF
Guru
- Joined
- Oct 12, 2007
- Messages
- 22,552
The std. TT "teak covered deck" is simply an overlay that will continue to thin over the coming years.
Eventually it will no longer be repairable , and need to be removed.
It might help to consider if todays plug repairs will harm the deck when the overlay is eventuallyfinally removed.
Eventually it will no longer be repairable , and need to be removed.
It might help to consider if todays plug repairs will harm the deck when the overlay is eventuallyfinally removed.
Cigatoo
Guru
The std. TT "teak covered deck" is simply an overlay that will continue to thin over the coming years.
Eventually it will no longer be repairable , and need to be removed.
It might help to consider if todays plug repairs will harm the deck when the overlay is eventuallyfinally removed.
That’s why I drill a 3/8 hole into the core and fill with thickened epoxy. I figure if the deck has to come up a quick wack with a Hammer and chisel will leave a hole In the deck pre filled with epoxy. No screw to deal with in that particular hole.
- Joined
- Nov 8, 2012
- Messages
- 2,315
- Location
- USA
- Vessel Name
- Sandpiper
- Vessel Make
- Bluewater 40 Pilothouse Trawler
Anyone have a source to find some scrap teak to use to cut plugs? PNW a plus.
I have tons of left over teak scraps. You can have some but I'm in Gig Harbor.
Or you can buy small chunks of teak at Fisheries or WM.
Or you can find some hidden teak somewhere inside your boat to cut plugs from. The color, grain and age of teak from your boat will be a closer match to what you have than a random piece.
On Sandpiper, I found teak frames under the bed that I used to make plugs. I cut the plugs from the underside of the frames so the holes could not be seen. Spaced the holes not to weaken the frame. If strength was a concern, I'd fill the holes with dowels glued in.
Last edited:
stiggy
Veteran Member
- Joined
- Apr 28, 2019
- Messages
- 95
- Location
- USA
- Vessel Name
- Bailey
- Vessel Make
- 46' Grand Banks Motor Yacht
I have tons of left over teak scraps. You can have some but I'm in Gig Harbor.
Dang, I was over there yesterday! Maybe we can work something out if we head over to anchor for the weekend in the next few weeks.
Cigatoo
Guru
Anyone have a source to find some scrap teak to use to cut plugs? PNW a plus.
You can probably find an old teak cutting board or chair or something pretty easily. Lots of old boats laying around in boatyards with teak parts. Use your imagination.
- Joined
- Nov 8, 2012
- Messages
- 2,315
- Location
- USA
- Vessel Name
- Sandpiper
- Vessel Make
- Bluewater 40 Pilothouse Trawler
Dang, I was over there yesterday! Maybe we can work something out if we head over to anchor for the weekend in the next few weeks.
Let me know when you head this way.
If Port Orchard is closer, my boat is there and I go there as often as GH.
mike66
Guru
https://www.widgetco.com/wood?gclid=EAIaIQobChMIhYPMw63X6QIV0QiICR3oZA6bEAAYASAEEgKRdfD_BwE
This is where I got mine. Removed screws, enlarged holes with countersink down into fiberglass. Filled with epoxy and plugged.
Have fun.
This is where I got mine. Removed screws, enlarged holes with countersink down into fiberglass. Filled with epoxy and plugged.
Have fun.
Pete Meisinger
Guru
- Joined
- Oct 7, 2012
- Messages
- 3,145
- Location
- USA
- Vessel Name
- Best Alternative
- Vessel Make
- 36 Albin Aft Cabin
So, the other side of the equation.
I need to remove some window frames (teak). They have been screwed in place and bungs sanded flush to finish.
How do I get at the screws? Drilling out the bungs ruins the screw heads. A chisel or screwdriver usually dents the surrounding area when the bung is pried out.
pete
I need to remove some window frames (teak). They have been screwed in place and bungs sanded flush to finish.
How do I get at the screws? Drilling out the bungs ruins the screw heads. A chisel or screwdriver usually dents the surrounding area when the bung is pried out.
pete
- Joined
- Nov 8, 2012
- Messages
- 2,315
- Location
- USA
- Vessel Name
- Sandpiper
- Vessel Make
- Bluewater 40 Pilothouse Trawler
So, the other side of the equation.
I need to remove some window frames (teak). They have been screwed in place and bungs sanded flush to finish.
How do I get at the screws? Drilling out the bungs ruins the screw heads. A chisel or screwdriver usually dents the surrounding area when the bung is pried out.
pete
Depending on if an adhesive was used and what type adhesive, the bungs can be easily extracted.
Drill a 1/8" hole in the center of the bung until the drill reaches the screw. Do not drill into the screw head.
Drive a sheet metal screw slightly larger in diameter than the hole into the bung. When the tip of the sheet metal screw reaches the head of the screw in the hole, keep turning the sheet metal screw and the revolving threads should lift the bung up and out.
If the bung breaks and a partial bung extracted, use a pick to remove the remainder.
If turning the sheet metal screw does not extract the screw, place protection around the hole and use a crowbar, claw hammer or pliers on the screw driven into the bung to leverage the bung out.
Last edited:
jleonard
Guru
- Joined
- Jun 25, 2008
- Messages
- 5,063
I use a course sheet rock screw with the head cut off and chuck it into the drill.
Then drill the center of the bung. That will break up the bung and not ruin the screw underneath.
Sometimes I use pre made bungs and sometimes I cut my own depending on what the teak looks like. I like the bungs to sort of match in color.
Important.....line up the grain on the bung.
I use a sharp chisel to cut off the bung just above the surface, then sand the bung flat.
Last edited:
Pete Meisinger
Guru
- Joined
- Oct 7, 2012
- Messages
- 3,145
- Location
- USA
- Vessel Name
- Best Alternative
- Vessel Make
- 36 Albin Aft Cabin
Great tips for the removal of bungs. I am a pretty good wood butcher and generally quite inventive but these ideas never crossed my mind.
Cant wait to try them this afternoon.
Thanks, pete
Cant wait to try them this afternoon.
Thanks, pete
jleonard
Guru
- Joined
- Jun 25, 2008
- Messages
- 5,063
Great tips for the removal of bungs. I am a pretty good wood butcher and generally quite inventive but these ideas never crossed my mind.
Cant wait to try them this afternoon.
Thanks, pete
It takes a village.
Let us know how it works out.
WayneDana2
Senior Member
- Joined
- Feb 15, 2019
- Messages
- 148
- Location
- USA
- Vessel Name
- Serendipity
- Vessel Make
- 1977 37' Puget Trawler
So, the other side of the equation.
I need to remove some window frames (teak). They have been screwed in place and bungs sanded flush to finish.
How do I get at the screws? Drilling out the bungs ruins the screw heads. A chisel or screwdriver usually dents the surrounding area when the bung is pried out.
pete
Buy a 3/8 "brad tip" drill bit. Get it from Master Mechanic (True Value) NOT from Dewalt. The brad tip on a Dewalt is too big. The brad tip will go to the center of the screw and clean it out but not tear out the cross point. The outside of the bit will cleanly remove the plug. No picking required.
Thanks for all the helpful responses. I agree that it is neither necessary nor desirable to replace the fasteners. 3/8”plugs are definitely too big for my deck and I’m reluctant to try and coax them with a rubber mallet for fear of splitting/cracking a plank. I don’t think tapered plugs will work because the holes are, for the most part, so shallow that there would be virtually no contact between the side of the plug and the side of the hole. Looks like I will have to cut my own plugs, which is not a big deal except that 9 mm plug cutters are not all that easy to find. But I have just sourced one on the internet, so I’ll give that a try.
jimL
Senior Member
- Joined
- Mar 8, 2015
- Messages
- 358
- Location
- USA
- Vessel Name
- Lemon Drops
- Vessel Make
- 2001 Grand Banks Europa 52
Hi there,
Rather than start a new thread, I thought I'd add to this one.
I replaced my first seven bungs on a 21 year old teak deck. When I re-drilled the hole to make it just a bit deeper, the new sharp drill bit ripped the wood around the hole.
So I have a few questions. How do I prevent the drill bit from ripping the nearby wood? I tried taping the hole and around it, but that didn't work.
Next question is what can I use to fill in around the bung?
Are there any other tips? I did use a very small amount of epoxy to seal the bung.
Thanks all - JimL
mike66
Guru
What kind of bit are you using to deepen the holes? I've been able to use a countersink bit. If I screw things up, I go up a size hole to get a nice clean hole. Example 3/8" hole enlarged to 1/2" with a countersink bit.
Similar threads
- Replies
- 17
- Views
- 3K
- Replies
- 11
- Views
- 1K
- Replies
- 12
- Views
- 1K