Need insight - epoxy filler

The friendliest place on the web for anyone who enjoys boating.
If you have answers, please help by responding to the unanswered posts.

Night Watch

Veteran Member
Joined
Feb 17, 2019
Messages
47
Location
US
Vessel Name
Night Watch
Vessel Make
36’ Nova Sundeck
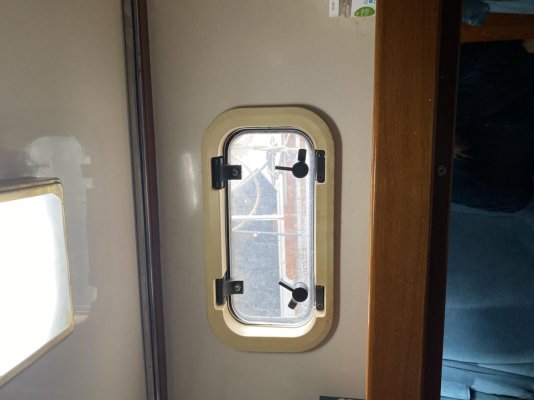
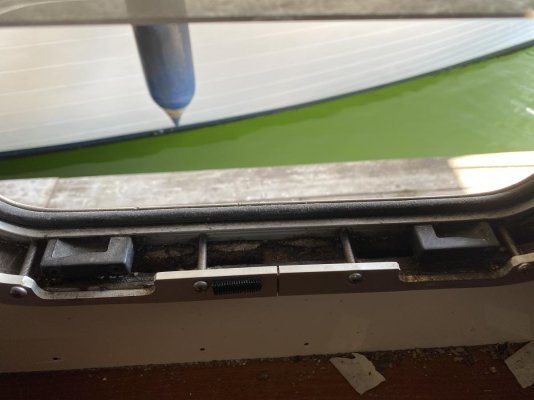
My Nova36’ aft head porthole leaks and the core underneath is mush for about a foot. I even saw where it disolved too when fixing a clogged sink and there is a big wad of fiber that I though was something else then glad it was wood fiber!
The boat is dry now (as I’m undercover for a year) and want to replace/ repair old standard Lewmar hatch. The old plastic trim is shot so want new window/port light with same size whole and better design.
TGOD. (The guy on dock, I think most of us have that guy) says I need to inject epoxy into the space between the outside and inside cabin walls under the port light to stabilize for material that disolved-
Has anyone done this and what product did you use?
Tips and warnings appreciated/ ill do this my self so can use your collective knowledge.
 
What you need is some penetrating epoxy. There is a local company called Smith I believe that many of the boat stores carry. (Fisheries should have it). It has the consistency of water and will flow easily into the wood or whatever is the core material is on your boat. Maybe get some small plastic syringes also to inject it into small holes you may need to drill to get it spread thru out the damaged area.
 
Remove the old port light and dig out as much of the old mush as possible leaving an empty slot. Then using thickened epoxy- West System makes a good one that comes in caulk gun cartridges, fill the gap with the epoxy. Then install your new port light.

David
 
I'd recommend some Splash Zone. Pretty common treatment for stabilizing the area around windows and portlights on old wet boats. Mix by hand 1:1 (w/ gloves) and just jam it into the desired area until its completely sealed up. Not sure on the cure time? A day? It cures even underwater though so the wet core won't be an issue.
 
Last edited:
I second getting all the wet stuff out. Then dump a bunch of CPES (clear penetrating epoxy) in there followed by some form of epoxy which will flow into all the little interstices.
 
Does epoxy expand?

Is there any expansion with these products?
 
Not the splash zone- what you see is what you get.
 
Do it right the first time or it will be back to haunt you. Like DavidM said remove the bad part then fill it back. Depending of area you may use cloth to fill in.

L
 
No expansion. I would dig out all the wet/soft wood then dry the area completely and then treat with some penetrating epoxy first. Keep giving it the penetrating epoxy until it will not accept anymore. Then use a thickened epoxy to build up the missing wood. Smith and Company and Total Boat make the penetrating epoxy. I prefer West epoxy and would use a filler with it like West 404 which is a structural filler at least for the most of the filling. Then use a softer filler for the last bit so it will be easier to sand. The 404 is a bit more difficult to sand. What are you going to do for the finish if the hatch doesn’t cover all the epoxy work?
 
Overall you’ll want to realistically assess your moisture levels. If it’s bone dry and covered you should be fine. If the contact area is wet your common epoxies won’t cure correctly and you’ll need the splash zone. We did a project replacing 8 thru hulls an an old boat in an Alaskan winter last season (rain, hale, snow, storms) and the splash zone was the only thing that cured in this old wet soaked core boat.
 
Last edited:
Agree with removal of all moist core. It will just keep spreading.
I have used West 610 in small areas. It's thick so I don't see it flowing much beyond a couple of inches. If you have access to backside drill a bunch of holes and inject epoxy via holes?
 
Epoxy cont’d

The area I’m filling is between the bulkhead and the outside later of gelcoat. I can poke around with tweezers but I can’t see it without ripping open the interior bulkhead. So it will be hard to know how much is enough penetrating epoxy. Just don’t want things expanding after it’s in the small space and causing cabin to bend
 

Attachments

  • image.jpg
    image.jpg
    78.2 KB · Views: 51
Last edited:
CPES will go a very long way in DRY material. I saw an online demo where they were injecting it into the end of a four foot long 4X4, and it came out the other end after some time. It takes almost 24 hours for it to cure. Does NOT expand. And as stated before, if you do not get the wet out, it will continue to get worse farther afield. Exploratory hole drilling can tell you the extent of the wet and may well lead you to the need to cut away the inner side of the bulkhead to do some wholesale repair.
 
You may not be able to get all the soft wood out without major surgery on the inside paneling. In that case since you are in a covered slip maybe remove the porthole and let it dry up as much as possible and then inject the penetrating epoxy and let it do its thing. Again, keep feeding it in. Watch below to see if it is coming out somewhere you don’t want it to. Then pack the area between the fiberglass on the outside and the paneling on the inside full with thickened epoxy and reinstall the porthole with butyl tape. Go to Compass Marine web site and see how to put a porthole in with butyl tape. Have fun and good luck.
 
Epoxy does not expand as long as you don't use too much epoxy or epoxy filler at once.

Uncontrolled exotherm, caused by the chemical reaction of resin and hardner when too much epoxy is mixed and applied at once can expand, crack and even catch the epoxy mixture on fire. Prevention is to mix and apply smaller batches of resin or filler.

I would wire brush away rotted coring and apply penetrating epoxy to the exposed core. Follow up with epoxy filler to fill the void. If the rot is extensive and a lot of filler will be necessary to fill the void, I would cut pieces of plywood that is slightly thinner than the space between the skins and fill the void. The plywood would not have to be an exact fit since you will be lathering the plywood with epoxy, which will fill the voids. You can use several pieces of plywood to fit all around the opening or cut "L" shaped pieces to fill a side and top and another for side and bottom.

If the fiberglass skins are thin and flimsy after core removal, clamp plywood on either side of the repair area to keep the fiberglass skin from bowing out during the repair of the coring void.

For penetrating epoxy, epoxy and filler, I switched from WEST Epoxy to system Three several years ago after using WEST Epoxy since the 70's,

WEST epoxy forms amin blush as it cures. This waxy byproduct has to be wiped off with water prior to sanding, recoating or bonding. Additionally, WEST Epoxy has to be sanded after an overnight cure before recoating. A lot of extra work!

System Three Silvertip Series Epoxy does not form amin blush and can be recoated up to 72 hours without wiping or sanding. If sanding is required, S3 epoxy is softer to sand during the 72 hours. S3 Epoxy will also cure at a minimum of 35 degrees F with fast hardner. WEST is good to about 40 degrees.

For filler, System Three makes Quick Fair and Quick Fillet. The filler and hardner are different colors and when mixed properly by weight or volume, the color turns to indicate proper proportions. The fillers are non sagging and do not form amin blush. Quick Fair can be hand sanded in 3 hours at 77 degrees and machine sanded in 4.

WEST Epoxy is 1970's technology and System Three is current technology. I still use all the techniques and principles from WEST System outlined in their books but with an easier to use epoxy.
 
Last edited:
Area to be worked

Just a bit more info I’m posting a photo of where I’ll be applying the penetrating epoxy. I’ve been undercover for over a year so it’s as dry as it’s going to get.
I was just concerned that the reaction would as someone above mentioned create heat in that tiny space or expand. There isn’t going to be any sanding just picking out soft wood with foot lonn tweezers
. There is an access panel where the exhaust hoses run that’s obviously the depository for the rotted disolved wood so thanks for the tip - I’ll put something like a tarp or tin foil ? To protect hoses
Let’s see if I can get a photo.
 

Attachments

  • image.jpg
    image.jpg
    83.8 KB · Views: 42
Once you take the hatch out, a vacuum and a wire brush chucked into a drill should remove the rotted wood. To reach down into the narrow space, I would use a wire brush on a long shaft. Wire brushes for cleaning rifle and shotgun bores are available in various diameters and shaft length. Make sure the drills rotation is opposite to the wire brush threads rotation.

The rotating wire brush will eat away rotted coring but leave the good coring. Vacuum running while wire brushing removes the dust and chips.
 
I have done quite a bit of this work most times injecting through multiple holes under decks and inside hulls where the holes are later easily covered. Regular epoxy will soak into dry core enough for most jobs if you use a slow hardener. I use products from U.S. Composites they have a thin epoxy and slow hardener. For filler I use their glass micro balloons. They increase the volume of the epoxy 50+%, they don't weigh anything to speak of, and they can be used behind dark colors unlike other fillers. If the bad core is dry, you really don't need to remove it completely.
 
Issue with injecting large amounts of penetrating epoxy or regular epoxy into coring is the thermal bridging that can occur when converting insulating coring into a solid of epoxy.

In northern climate like the PNW, sweating will form on the areas full of epoxy. Carpeting and liners would mitigate sweating.
 
Knight, as Syjos suggests, try to shop vac out the rot where you can. I got a set of mini-vacuum tools that reach into small spaces. A piece of vinyl tubing duct taped into the vacuum hose works too. I stuck a stick into the rotted places to bust it up, then sucked it out.

Sucking out the rot is way less frustrating than picking it out with tweezers/kitchen too, been there/done that!
 
Last edited:
Given the flexibility of coring, what side-effects are there to consider when replacing it with epoxy?
 
Given the flexibility of coring, what side-effects are there to consider when replacing it with epoxy?

Replacing small areas with epoxy would not be an issue. On larger repairs, mixing large amounts of epoxy and filling a cavity may create heat from uncontrolled exotherm causing cracks, expansion and even fires.

Increased weight and thermal bridging would be other factors to consider.
 
The weight and stiffness would be my concern. But then I've never had to deal with this so I have no idea of the pros/cons. Just thinking about it from the perspective of what limited knowledge I have of materials used in boat hulls.
 
What about filling areas where there is loss of the original material, with foam? We once used it to fill body channels of a rally car, mixing the 2 parts and pouring it into areas we wanted to strengthen. You could tell how far a pour extended by feeling for heat generated. It might be too rigid, or there might be practical difficulties containing it, but it is very good at filling voids and already has marine use in cored panels.
 
Greetings,
Mr. BK. Might the expanding foam cause deformation of thin panels as mentioned earlier (post #16)?
 
What about filling areas where there is loss of the original material, with foam? We once used it to fill body channels of a rally car, mixing the 2 parts and pouring it into areas we wanted to strengthen. You could tell how far a pour extended by feeling for heat generated. It might be too rigid, or there might be practical difficulties containing it, but it is very good at filling voids and already has marine use in cored panels.

Foam is a great coring material. In sheets.

The two part pour in foam would require temporary reinforcement on the inside and outside to keep the area from bowing out from the expanding foam.

Additionally, backing for the hatch mounting screws to screw into would need to be installed around the opening
 
I did a repair under a window with low expansion foam that came out OK, but I had to be real careful about putting too much goo in the space. I braced the exterior against the gunnel.

But it would be real easy to make it a bigger problem than the one you started with if too much foam gets put in the space.
 
Greetings,
Mr. BK. Might the expanding foam cause deformation of thin panels as mentioned earlier (post #16)?
RTF, it is a while ago I used it, but it tended to expand where there was least resistance. In a square tube body "rail" it would expand up the "easier" open end, so it might be ok. It doesn`t need to be done in one go. A bit "trial and error', hopefully less of the latter.
 
Back
Top Bottom