 |
01-24-2015, 11:50 AM
|
#1
|
Veteran Member
City: Tivat
Vessel Name: Nostra Signora
Vessel Model: Marine Trader CHB 34DC
Join Date: Jan 2013
Posts: 97
|
MT 34DC - sliding window repairs
Okay so this will be a fairly long description of a current job that I hope may be of use to someone who may experience the same thing and need advice.
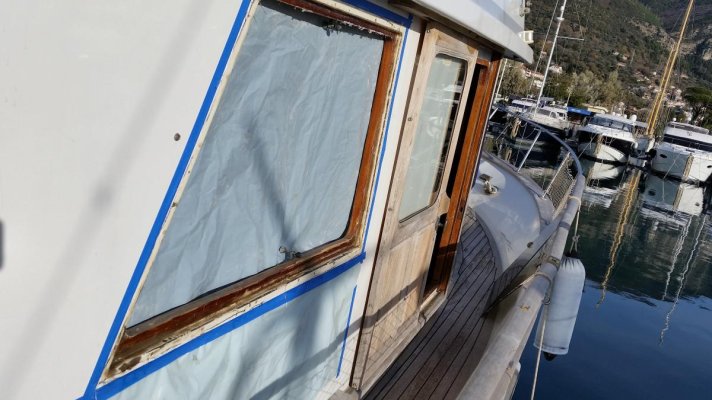
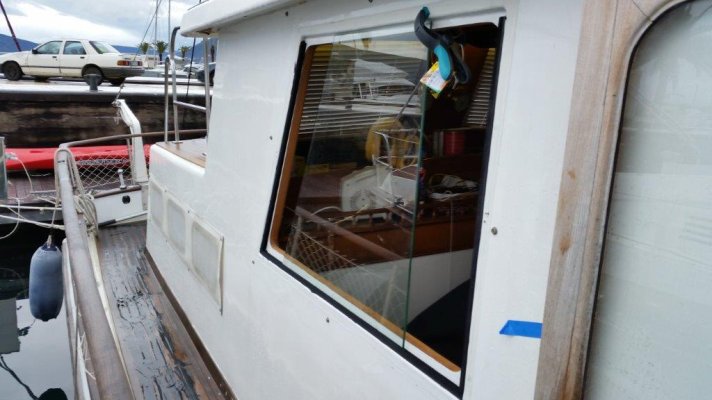
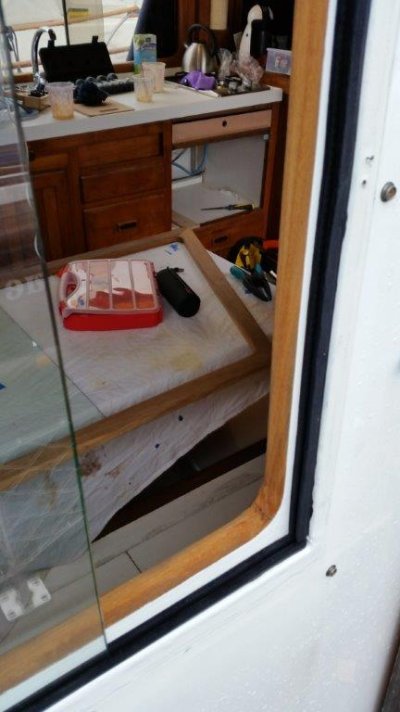
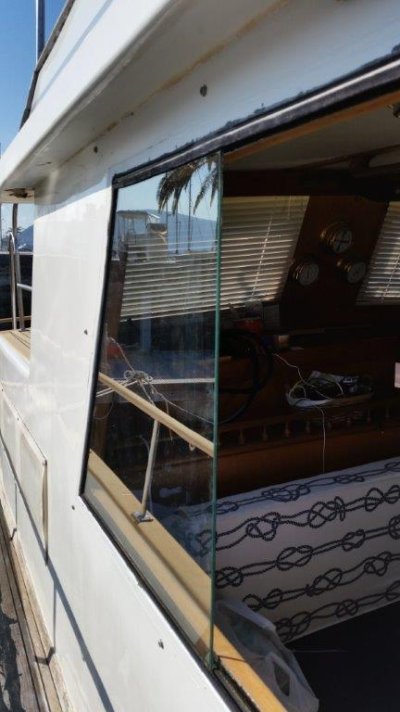
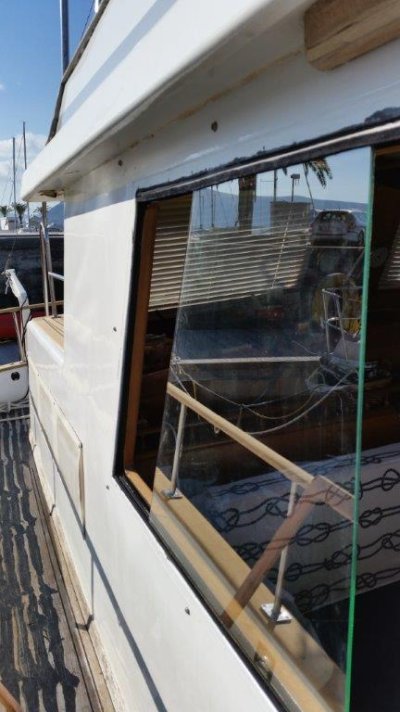
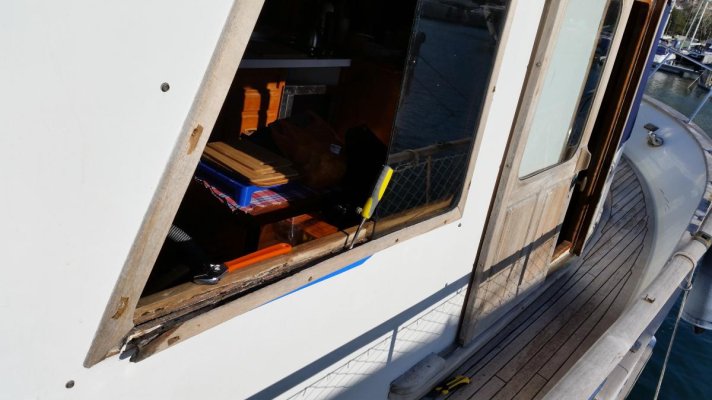
During the original survey of the boat, we realized that the starboard salon sliding window had some leakage issues. The water was finding its way inside the core of the cabin just under the aft lower end of the window and starting to damage the teak veneer on the interior under the window.
I finally got around to investigating the issue fully the other day.
Before I started the job, I researched online to see if anyone else had undertaken this repair and posted their findings. Chuck from Beach house had taken apart one of his windows in a similar way, but his repair was not done one of the sliding windows.
So I have decided to write it up so that anyone else who has this problem, can find some insight prior to taking on the job.
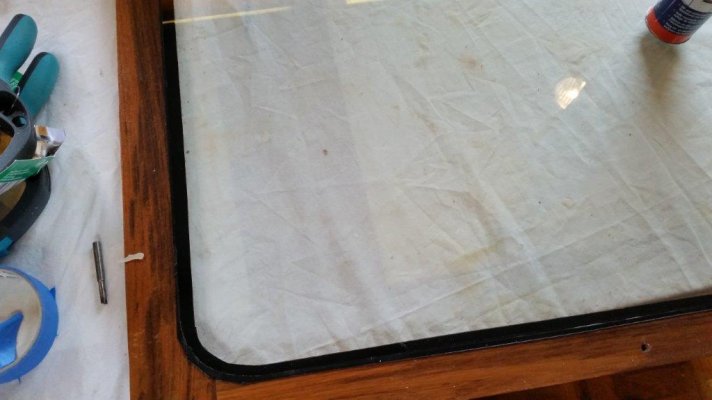
First off I started some unobtrusive investigation to see if I could effect a repair that would not require me to dismantle the entire window. Unfortunately I couldn't really see much beyond the 30 odd years of sealant that had been used with wanton abandon by the previous owners attempt to solve what was obviously an ongoing issue. Finally I decided to undertake proper and permanent repair so that I will never have to think about this one again.
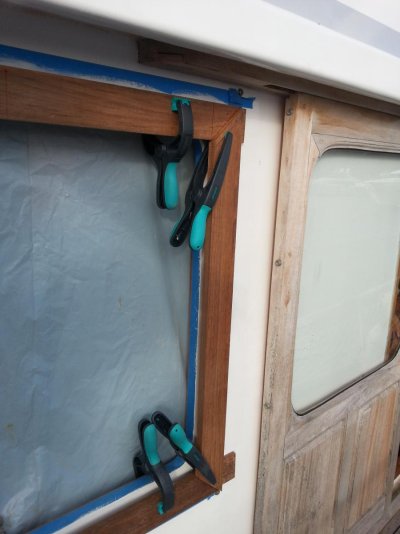
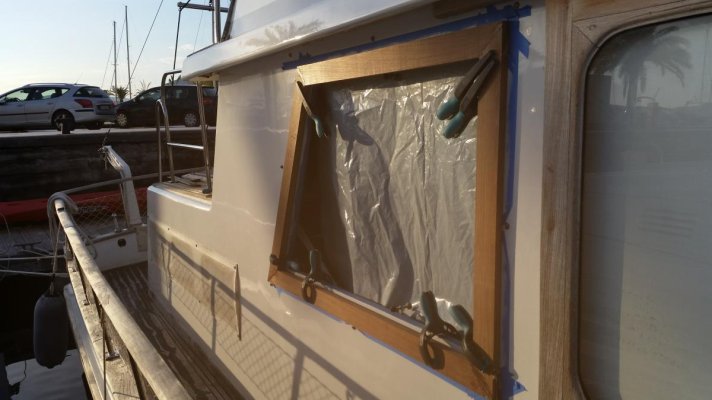
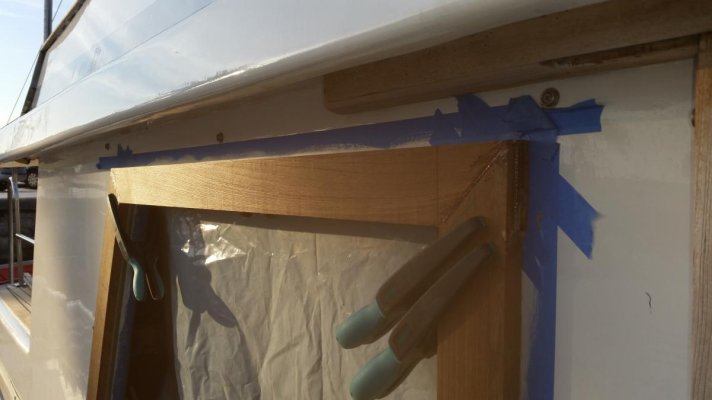
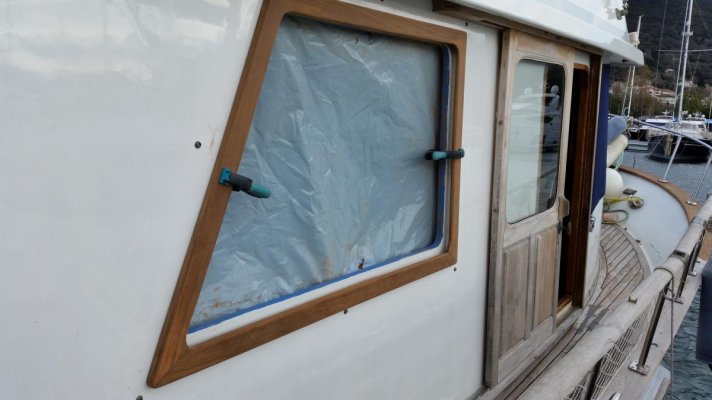
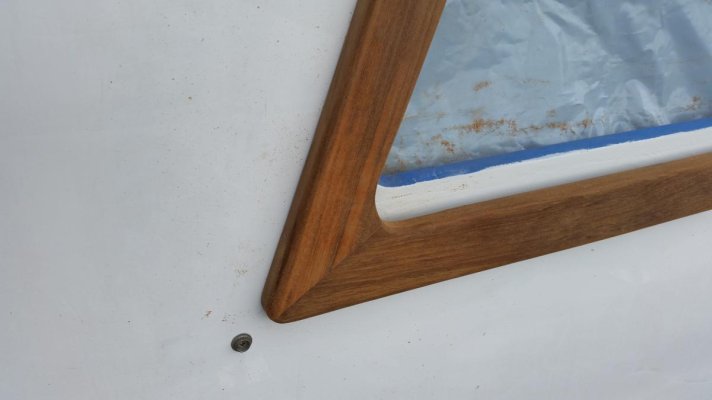
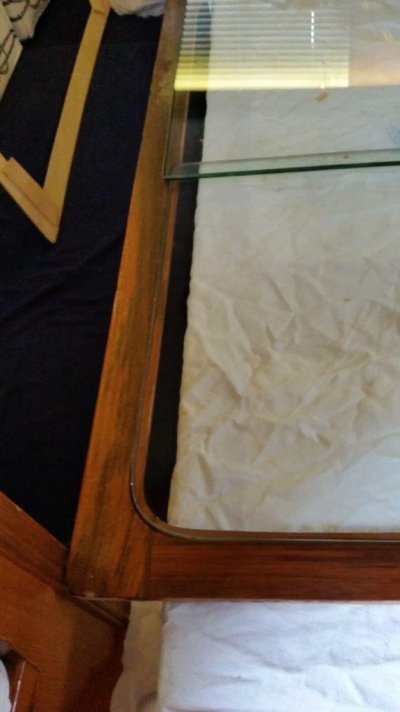
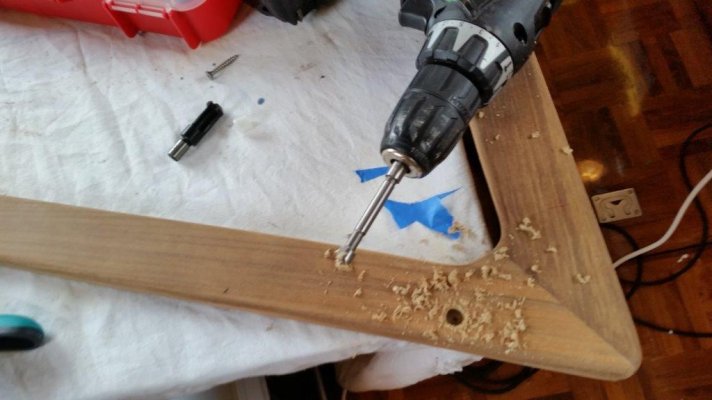
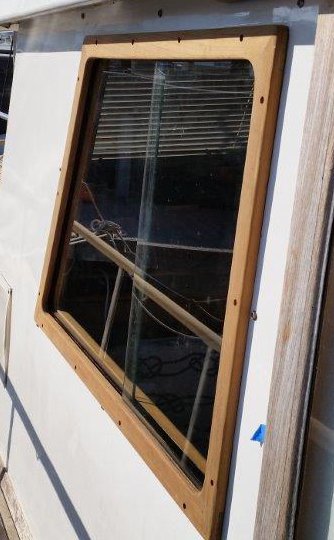
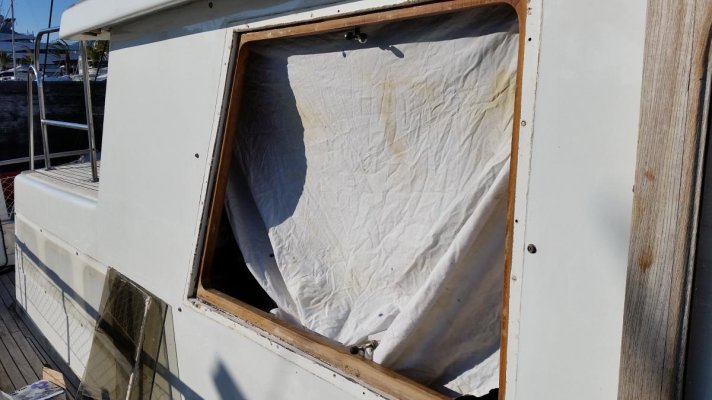
The only way forward was to take off the teak trim, take out the window and have a proper look. Given that the teak trim was not in very good shape, I also made the decision to replace it rather than try to save it. This allowed me to be a little more forceful in the removal of the trim.
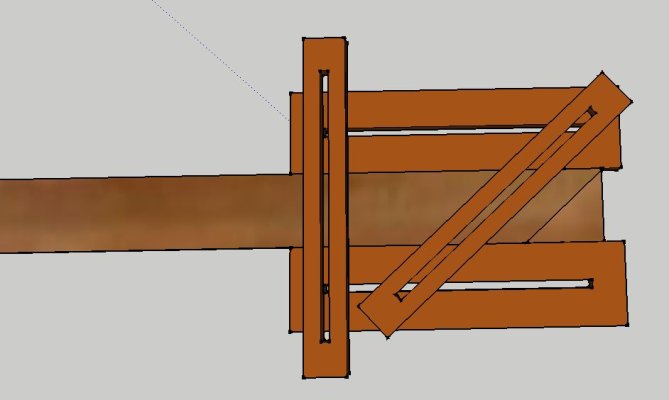
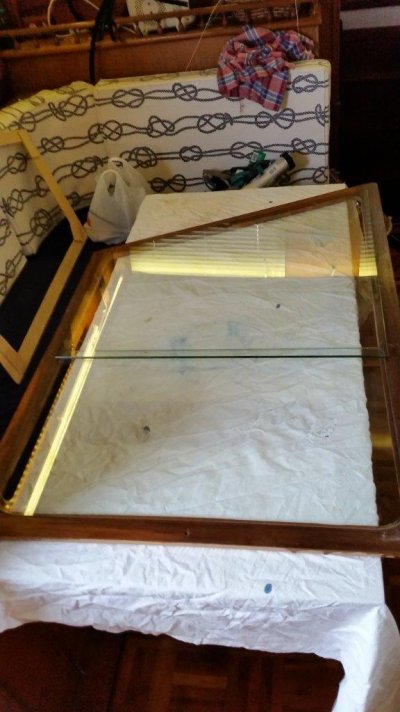
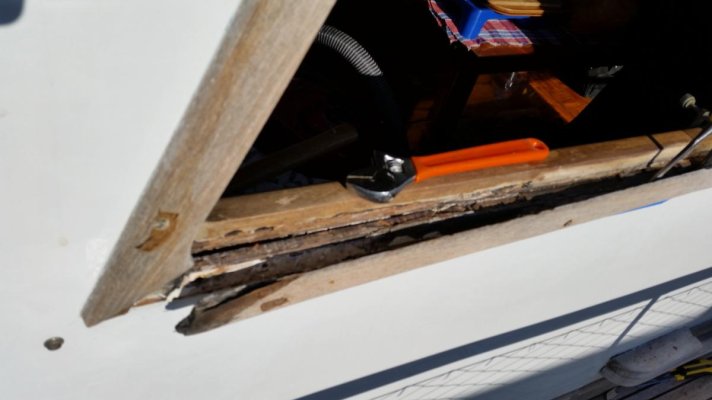
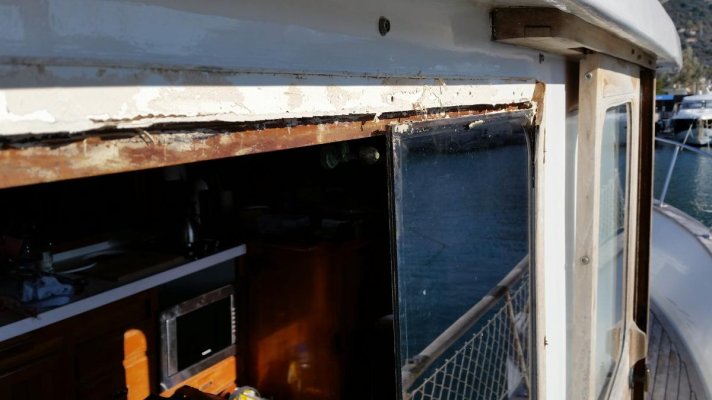
Once the trim was off, the window was out, and the random ply spacers whose purpose was to space out the ill-fitting glass (I assume they must have ordered loads of glass for the production line of these boats, and fitted it as best they could on each boat with packers and spacers) had been removed from around the glass, I could clearly see that the core of the cabin side had not been sealed other than with the bedding compound of the sliding window track. Over the years the compound (and track) had failed allowing water to enter the core, thus resulting in the damage seen to the interior woodwork.
__________________
Tony
|
|
|
01-24-2015, 11:55 AM
|
#2
|
Veteran Member
City: Tivat
Vessel Name: Nostra Signora
Vessel Model: Marine Trader CHB 34DC
Join Date: Jan 2013
Posts: 97
|
Part 2
After cleaning up the entire frame area, I bogged all the gaps and holes, then laid a layer of fiberglass cloth that covered the entire area including up the external surface of the interior teak trim.
This made the whole thing water proof regardless of whether the glass or external teak trim leaked in the future. There is no way for water to find its way inside the core of the cabin side again.
I painted the whole thing with 2 part epoxy paint, before starting to manufacture the new external teak trim.
__________________
Tony
|
|
|
01-24-2015, 11:57 AM
|
#3
|
Veteran Member
City: Tivat
Vessel Name: Nostra Signora
Vessel Model: Marine Trader CHB 34DC
Join Date: Jan 2013
Posts: 97
|
Part 3
Originally, the teak trim on these boats has been constructed with simple miter joints.
As a joiner, I hate to see these joints used in serious outdoor application, so decided to replace them with half lap miter joints.
Given that it is a boat, where nothing is straight or square, I had to make up a jig for my router as per the 3d model I drew to test the idea. Although, I forgot to take a photo of the jig whilst using it in the shop (if anyone is interested I can do)
__________________
Tony
|
|
|
01-24-2015, 12:19 PM
|
#4
|
Veteran Member
City: Tivat
Vessel Name: Nostra Signora
Vessel Model: Marine Trader CHB 34DC
Join Date: Jan 2013
Posts: 97
|
Part 4
We can start to see the results as they progress on the boat whilst doing all the dry fitting of the joints. Quite a lot of back and forth, but worth it in the end.
Finally I have the oversize frame dry fitted and joint glued in situ' ready for the next steps.
The new sliding window track arrives tomorrow, but that if for another day and post!
__________________
Tony
|
|
|
01-24-2015, 12:33 PM
|
#5
|
Enigma
City: Slicker?
Join Date: Oct 2007
Posts: 16,357
|
Greetings,
Oooohhh....I like it!
__________________
RTF
|
|
|
01-24-2015, 12:53 PM
|
#6
|
Guru
City: gulf coast
Join Date: Jun 2014
Posts: 3,440
|
nice work.
since I have had a few windows break you might consider making them easily replaceable.
|
|
|
01-25-2015, 07:57 AM
|
#7
|
Guru
City: Trenton
Join Date: Apr 2012
Posts: 1,499
|
Been there. Done that. Not as well though...
__________________
Al Johnson
34' Marine Trader
"Angelina"
|
|
|
01-25-2015, 09:23 AM
|
#8
|
Veteran Member
City: Tivat
Vessel Name: Nostra Signora
Vessel Model: Marine Trader CHB 34DC
Join Date: Jan 2013
Posts: 97
|
Next part.
Spent a couple of hours today finishing off the teak frame.
It was over sized so that I could trim down the inside edges in order to create the nice rounded corner detail.
This was achieved with the trimmer fitted with a bearing that used the internal teak trim as a pattern.
I am quite pleased with the result in the end!
Now for the glass and final fitting.
And finishing the deck, and the hand rails, service the engines, etc etc!
__________________
Tony
|
|
|
01-30-2015, 01:00 AM
|
#9
|
Veteran Member
City: Tivat
Vessel Name: Nostra Signora
Vessel Model: Marine Trader CHB 34DC
Join Date: Jan 2013
Posts: 97
|
Glass has arrived. I must say, they did a very nice job, even rounded the corners for me!
On the left of the photo is the template I gave them for the sliding glass.
__________________
Tony
|
|
|
01-30-2015, 08:54 AM
|
#10
|
Senior Member
City: Great Lakes
Vessel Name: NONE
Vessel Model: NONE
Join Date: Jan 2013
Posts: 448
|
Very nice, I envy your skills and audacity in tackling such a job! I can fully appreciate that just doing such involved repairs is bad enough let alone taking the time and trouble to carefully document it for others. It is very kind and thoughtful of you! On behalf of all of us out here who are too intimidated to get started on this task, thanks for posting.
|
|
|
02-01-2015, 09:53 AM
|
#11
|
Veteran Member
City: Tivat
Vessel Name: Nostra Signora
Vessel Model: Marine Trader CHB 34DC
Join Date: Jan 2013
Posts: 97
|
Quote:
Originally Posted by Capt Kangeroo
Very nice, I envy your skills and audacity in tackling such a job! I can fully appreciate that just doing such involved repairs is bad enough let alone taking the time and trouble to carefully document it for others. It is very kind and thoughtful of you! On behalf of all of us out here who are too intimidated to get started on this task, thanks for posting.
|
I searched high and low for anyone that had tackled this job before I started. Nothing to be found other than lots of other people looking for the same answers. Pleased if my write up of the job can help someone else in the future.
For an update - today I glued in three sides of the sliding window track. The final one needs to go in with the glass, but I will wait for the other three to dry first.
The track I purchased from the UK at an online car shop called vintage car parts. Great service.
I also bedded the fixed window into the frame, and prepared the frame for final fitting.
__________________
Tony
|
|
|
02-01-2015, 10:08 AM
|
#12
|
Guru
City: Sarasota,FL/Thomasville,GA
Vessel Name: Steppin Stone IV
Vessel Model: Marine Trader Kelly Trawler 46
Join Date: Jul 2013
Posts: 1,815
|
Quote:
Originally Posted by sailtones
I searched high and low for anyone that had tackled this job before I started. Nothing to be found other than lots of other people looking for the same answers. Pleased if my write up of the job can help someone else in the future.
For an update - today I glued in three sides of the sliding window track. The final one needs to go in with the glass, but I will wait for the other three to dry first.
The track I purchased from the UK at an online car shop called vintage car parts. Great service.
I also bedded the fixed window into the frame, and prepared the frame for final fitting.
|
Great work and thanks so much for posting in such detail
I do not have the outside teak but this a job in my future
I have stopped the leaks on mine with outside sealent but this is not a long term fix
|
|
|
02-01-2015, 10:21 AM
|
#13
|
Guru
City: Port Townsend
Vessel Name: The Promise
Vessel Model: Roughwater 35
Join Date: Sep 2012
Posts: 1,568
|
Most excellent work. Here is a source for anti-rattle window locks if you need them.
Fisheries Supply - Marine Supplies Since 1928 Page
|
|
|
02-12-2015, 11:06 PM
|
#14
|
Senior Member
City: Fort Pierce, FL
Vessel Name: Dot Calm
Join Date: Feb 2015
Posts: 105
|
Thank you very much for this priceless information. I don't have the skills you have but now I can share this with a woodworking guy I know who can hopefully work on all of my cabin windows that need repair.
THANK YOU!
|
|
|
02-13-2015, 03:45 AM
|
#15
|
Veteran Member
City: Tivat
Vessel Name: Nostra Signora
Vessel Model: Marine Trader CHB 34DC
Join Date: Jan 2013
Posts: 97
|
Nearly there!
__________________
Tony
|
|
|
 |
Thread Tools |
Search this Thread |
|
|
Display Modes |
Linear Mode
|
Posting Rules
|
You may not post new threads
You may not post replies
You may not post attachments
You may not edit your posts
HTML code is Off
|
|
|
|
» Trawler Discussions |
|
|
|
|
|
|
|
|
|
|
|
|
|
|
|
|
|
|