Leaking Fuel Tank

The friendliest place on the web for anyone who enjoys boating.
If you have answers, please help by responding to the unanswered posts.
Tank bottom in full contact with the well supported (robust full structural shelf) covered with neoprene shock absorbing material. Exactly what all of the sources I've consulted say should not happen. An engineered moisture trap.

Cold tar the bottom (contact points) with PVC strips encapulated into the tar. Should last you another 100 years.
 
Yes, seal the tank bottom and going up the sides a few inches, maybe seal the entire tank.

What you want is a reinforced sealant, not just goo. Easiest to just use milled fibers or cloth.

I would still use something like 3 M 5200 or a less expensive but worth polyurethane like Loctite S30. Both can be set in fiberglass cloth, both will stick very well to aluminum. Epoxy sticking long term to aluminum I have doubts about that. The entire goal being to prevent water from corroding the aluminum, so the coating will keep it dry. And a rubber like polyurethane coating will not crack and will easily move when bumped or temperatures change. Simply adding milled FG fibers to rubbery polyurethanes makes them very tough like your tires.
 
Last edited:
Unlike your tanks mine had corrodion from the inside out thru a faulty weld,gap in the v-shaped area were the tank is shaped up the v of the hull. After cutting the section out,for a repair patch over the area, you could see an area inside were the sediment from the fuel settled and as you said worked thru the fault/corrosion and leaked out . This tank was only 8 yrs old and outside corrosion was not there. Talking to my fuel supplier ,he said that storing even clean fuel from him ,it will degrade over time. If my tank was a box shape this sediment would be on the bottom and not consentrated as in this v-area. Of course, his answer to my problem was burn more fuel to circulate/ clean it or polish it . I'm working on that now. Good luck
 
rajin cajun reminded me that I hadn't followed up on the tank refit. Not a lot to tell, actually. Shopped tank fabrication from Morgan City to Maine. Then one of my pier mates asked me if I'd checked with the old school prop shop about 300 yards from my slip. By old school, I mean no computers, steel pitch dies, torch and bid dense hammer. The guy does a booming business for a tiny shop.

Anyway, found my tank builder for about 60% of what the big guys wanted - and fabbed out of 0.125 material versus the apparently "standard" 0.09 that evrybody else quoted.

Tanks in fab:
 

Attachments

  • Panache Ship 340 x 200 10.jpg
    Panache Ship 340 x 200 10.jpg
    132.6 KB · Views: 50
  • Panache Ship 340 x 200 12.jpg
    Panache Ship 340 x 200 12.jpg
    184.3 KB · Views: 54
"Air hydroed" each unit to 4.5 psi for 24 hours. Did the temperature compensation calcs - tight as a drum.

Due to whatever moisture event happened in the past (see prior pics - the old girl at some point had 8-12" of water in the aft bilge), applied a coat of offshore helo anti corrosion epoxy to the lower foot and a half of the tanks. Scared off of fully coating by some of the references I've read about fully coated tanks "concentrating" galvanic corrosion at localized imperfections in the coating.

This was followed by Starboard stand off strips applied to the bottom with 5200 to permit air circulation to get rid of moisture due to condensation or whatever.
 
Pics this time
 

Attachments

  • Panache TIMAG0224anks.jpg
    Panache TIMAG0224anks.jpg
    33.4 KB · Views: 254
  • Panache TIMAG0225anks.jpg
    Panache TIMAG0225anks.jpg
    41.4 KB · Views: 255
Reinstall in progress.

Hats off to the Viking guys. I didn't need a sawsall for removal/reinstall. Everything accessible by hand tool removal. Tank dimensions were such that they fit through cabin doors and companionway without trim/molding removal. With that, it was just like moving furniture.

The tanks had about 200 gallons of fuel when this odessy started. I did pump it off and drum it. Filtered it and reused.

Although I knew the tanks dry hydroed successfully, I was still apprehensive about reloading. No problems with the partial load. Crossed my fingers, went to the fuel dock and topped them up. All good after a couple of weeks and, now, a month or so.

I might add that I took this opportunity to replace all fill, vent, and fuel feed hoses with the latest and greatest. Took care to route fill and vent to eliminate low spots and cured a persistent "burp" in the stbd vent due to a poorly routed vent line. Net out - good to go.

I should take this opportunity to thank all of the TFers that gave me advice and caused me to consider a bunch of factors that would have escaped me otherwise. And a shoulder to cry on. I was pretty bummed when this started.
 

Attachments

  • Panache TIMAG0227anks.jpg
    Panache TIMAG0227anks.jpg
    49.5 KB · Views: 252
  • Panache TIMAG0228anks.jpg
    Panache TIMAG0228anks.jpg
    34.4 KB · Views: 250
  • Panache TIMAG0230anks.jpg
    Panache TIMAG0230anks.jpg
    36.7 KB · Views: 244
Looks fantastic. I'd be very happy with that installation.
 
sbu, looks like very nice work! Congrats on having it all behind you in a relatively short time.

Can you share with us the cost of the job as a reference point for future replacers?
 
After going through the same thing last year I really felt your pain! Glad to see everything worked out for you. You were very fortunate that you could remove your tank and place the new one in without major tear out!
 
Fly - this is rough as a cob - records are at my office.

I did as much as I could myself. I have a very cooperative yard. For reference purposes, I'll use my time as yard billable time.

The yard activities required were: defueling and storage, cabinetry disassembly and reassembly, old tank disconnect (electrical, mechanical, structural) and removal, hold-down bracket removal (through bolted to stringers) and replacement, transfer tank fittings to new tanks, remove and replace fuel lines (fill, vent, feed to ER manifold), clean the friggin bilge (guess who did that job?).

At their dock for 5-6 weeks, counting the time it took to figure out where the leak was.

$5,100 exclusive of material counting my time at yard grunt rates. Had them keep track so I'd feel better about the non-underway weekends spent cleaning bilges.
 
I don't have receipts handy, but the A1 fuel hoses and clamps were around $500.

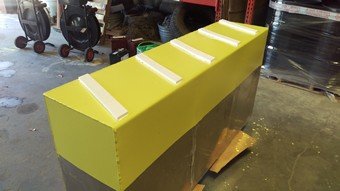
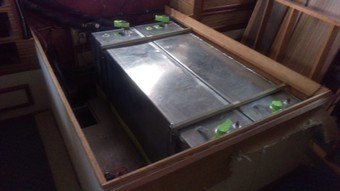
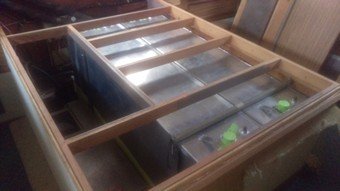
Tanks: the independent guy I got to fab the tanks said he'd want $1500 each, retail, and he gets the old units for scrap. 150 usg, 66 x 32 x 16, 0.125" 5042 with fittings for fill, vent, feed, return, gage. Other prices quoted in FL, east coast, and the oil field marine support types (thought they might be hungry) all came in $2250 to 2600, and all specd 0.09 material, plus freight. Another guy and I hand carried them to the boat.

So $8600 out the door, with the lucky find of the local guy. Otherwise, you'd need to add a couple of boat bucks.

The problem is it's soooo boat specific. I could see the labor going wild if I'd have had to cut them out through the deck, or worse, hull. I've heard that happens sometimes.
 
Fly - Interstingly enough, I've gotten two PMs on this from TFers whose handles you would recognize. Obviously, if they wanted to be identified, they would have posted here. Both are long term TFers and, in my judgement, reliable and experienced boaters.

The first congratulated me for being "lucky" with project. His 40+ footer with 2 leaking fuel tanks required going on the hard and hull cuts to remove/replace and the costs came in north of $27k.

The second has a Taiwan trawler, 55' or so from the pics. It has fuel tanks installed on the keel, using FG as the containment. Long story, but his problem was water contaminated fuel from water intrusion into the tank. The fix in that case was opening the lower level deck that constituted the tank roof and inserting a custom aluminum tank within the confines of the original tank ("tank in a tank"). Unfrtunately, this required partial demo of the forward deck and one bulkhead to allow the new tank to be inserted. That came in about $18k.

Both were done in US Gulf Coast yards.

I think the rule on estimating the cost of fuel tank replacement is "It depends on the boat."

And, thank you again, Viking. I knew it could have been worse, but didn't fully appreciate how much worse.
 
A fellow boater with a 42 Carver has a leaking diesel tank, He is ready for the cut up and remove the tank. His question is how do you remove the fumes when cutting up the tank, so it won't blow up, or start a fire?

Thanks Ray
 
Ray, the guy who cut inspection ports into my diesel fuel tanks left about an inch of fuel on the bottom of the tank while cutting the hole. He said the gas given off by any tank growth once exposed to air is more flammable than the diesel.

After the cut, he finished the fuel polishing and tank scrubbing operation.

Those are great numbers, sbu! Sounds like you found the right folks to work with!
 
The fix in that case was opening the lower level deck that constituted the tank roof and inserting a custom aluminum tank within the confines of the original tank ("tank in a tank"). Unfrtunately, this required partial demo of the forward deck and one bulkhead to allow the new tank to be inserted. That came in about $18k

There are a number of companies that make custom fuel bladders that might have saves $15 grand.
 
Back
Top Bottom