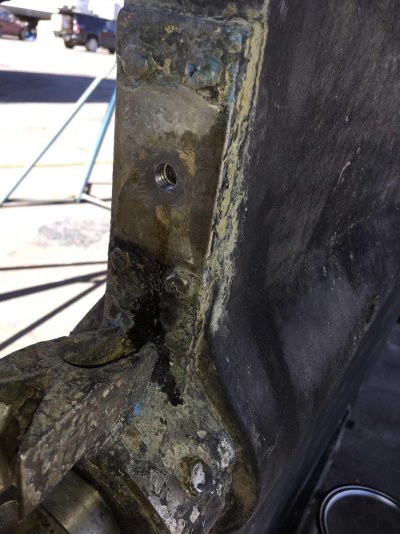
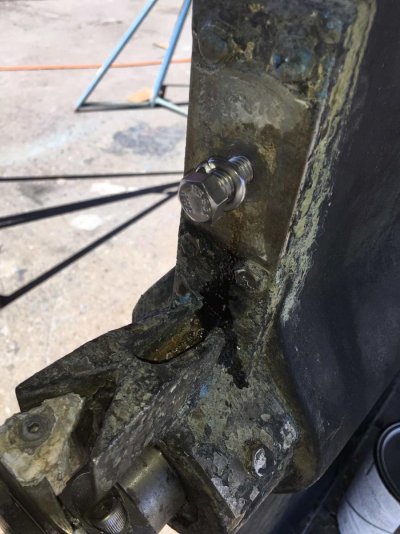
Lag bolt in skeg.

The friendliest place on the web for anyone who enjoys boating.
If you have answers, please help by responding to the unanswered posts.
Stainless Steel work hardens. Use lots of lube and go slow. If you drilled it without lube it probably hardened right up.

You are not the first one to break a tap off in SS.

Bugger.

If I was driving home from YVR tomorrow, I'd volunteer to come and help, but I am flying.
 
I have filled holes with thickened epoxy succesfully.
As already described by Frosty. Raw epoxy into the hole from a syringe through a piece of tape. I poke a small hole in the tape at the top of the hole for air release, then filled the cavity from the bottom with a syringe. That pushed the air out. The needle was pushed in as far as the needle length would allow.

If the hole is opening downwards then the top hole may need a helper with a second syringe to vacuum the air out as you push the epoxy in. Allow the raw epoxy to soak into the substrate for a couple minutes and then suck the excess out.

Follow the same procedure with thickened epoxy. Once filled then cover the holes with tape to hold the mix in untill it sets up.
 
Read post 23.

He IS going to drill and tap the SS.

He needs a solution for the hole in the fiberglass behind the hole in the SS created by the PO sticking a lag bolt in there.

Silly PO.

I am suggesting drilling (if need be) and tapping the glass (resin mixture) behind the stainless , along with epoxy for good measure to glue in threaded rod.

No need to tap the stainless, just drill it out to fit over whatever sized rod used.
 
Last edited:
I know what I did wrong with the taping process. My machinist friend mentioned he often used a crescent wrench. I was having trouble accessing the tap handle so I switched to a suitable wrench. I thought by being careful I would be okay. But it snapped. The welder in the yard said that taps most often break from uneven “side” forces, ie, with only using one side of the tap handle. He said he’d broken many taps over the years. It happens. Fortunately, in my case there was enough of the tap exposed above the material to back it out.

So I’ll get another 7/16” tap and continue the job.

I was just a poor office boy in my former life. Shop teachers scared me in high school. Now with the boat and limited funds to go the full service route, I find that I’m routinely doing metal work, wood work and “trickles”.

Jim.
Sounds like you’re doing a fine job. I’ve broken plenty of taps over the years. Keep up the good work. Nice boat by the way.
 
if you want the hole filled completely I would try filling the bottom as much as possible with thickened epoxy. then push a g10 or other grp rod about an 1/8 smaller than the hole in it should push any air out back up the sides of the rod. you could cut the rod off flush after it that.
 
... fill... the bottom as much as possible with thickened epoxy. then push a g10 or other grp rod about an 1/8 smaller than the hole in it should push any air out back up the sides of the rod

That's an idea I'm going to add to my epoxy playbook -- thanks :thumb:
 
I know what I did wrong with the taping process. My machinist friend mentioned he often used a crescent wrench. I was having trouble accessing the tap handle so I switched to a suitable wrench. I thought by being careful I would be okay. But it snapped. The welder in the yard said that taps most often break from uneven “side” forces, ie, with only using one side of the tap handle. He said he’d broken many taps over the years. It happens. Fortunately, in my case there was enough of the tap exposed above the material to back it out.

So I’ll get another 7/16” tap and continue the job.

I was just a poor office boy in my former life. Shop teachers scared me in high school. Now with the boat and limited funds to go the full service route, I find that I’m routinely doing metal work, wood work and “trickles”.

Jim.

In stainless steel I would use a made in the US, TiN coated tap and SS-spec tapping lube.
It will cost more but maybe less than buying 2 cheaper ones. ;)
 
Necessity has made many of us push our comfort zone regarding boat work. Two things I will pass along to you. 1) stainless steel is very difficult to drill and cut because it's very hard, but when saltwater is involved, it holds up well 2) saltwater corrodes any metal with iron in it. Things don't come apart easily and benefit from penetrating fluid soak before attempted disassembly. Things will still break, sometimes creating huge issues. Slow and easy does it. You're doing well. Cheers.
 
Success with the tap! I took more care this time. Jim the machinist believed it was a low quality tap. He provided a higher quality one this time. I was lucky I think that I was able extract the broken tap yesterday. I will clean out the hole in the FRP material behind it with acetone to remove any cutting oil.

IMG_3931.jpg

IMG_3932.jpg
 
I would be careful boring holes in the trailing edge of the keel above or below the stern tube. I only say this cause if you create a leak it will be impossible to access let alone see, so a haul out would be the answer and some detective work. Most folks just figure there is a lot of glass down there, if not solid, and well that may be the case sometimes but quite frequently not. In Taiwan I never saw any large sail or trawler type hulls laid up in anything but one piece molds with laminators working deep inside rolling and laying up the skin. But as you can imagine there is little working space deep in the aft portion of the keel hollow where the inside tuck of the bilge and shallower hull sections of the run make this an almost impossible area to access. So often it’s filled with ‘ mishmash ‘ or scrap pieces of mat, cloth, putty, hardened resin etc. nothing is wasted in Kaohsiung or that part of the world.

When the hull is lifted out of the mold this area is almost always full of voids and surface imperfections. This is generally not an insurmountable problem for crews that can grind and laminate a fair keel the prep a landing for a steel skeg. But the one area that can create major headaches is the stern tube area. You need enough structure to support the glass tube and bed. There are lots of trick techniques for this job but like sausage you don’t want to know. So drilling holes back in the region could, if deep enough, penetrate a void and that void like any area of this type could create a pathway For seawater into the hull interior.

Actually proper epoxy bedded lags or studs work pretty well to hang anodes
 
Studs are how my cutlass carrier is attached to the trailing edge of the keel.
 
Nice tap job.

A note (that you may already have taken into account) is that stainless into stainless can gall (that means the two parts become one). That would be really irritating to have happen in that bracket. There are some ways around it. 1) Tighten and loosen veeerrry slowly; 2) Use something like Tef Gel (not sure you could do that underwater though if a diver is replacing your zinc); 3) Use a bolt of a different metal (bronze, or etc.). The galling will only be if both the bolt and the female part are both stainless, in my experience.


Yes. A neighbour engineer friend warned me about this, so my approach will be to research this carefully before I attach the parts. He said different stainless alloys tend not to gall. However it’s uncertain as two how different these are in this case. And he mentioned to source an anti galling compound if I could find some. I’ll talk to my machinist friend and see if he has something. I’m sure he will have suggestions. The one time I had this problem was some years ago and another local machinist was able to deal with it, and save the day. The welder in the yard may have something on hand.

It takes a village to raise me...

Thanks all.

Jim
 
I would be careful boring holes in the trailing edge of the keel above or below the stern tube. I only say this cause if you create a leak it will be impossible to access let alone see, so a haul out would be the answer and some detective work. Most folks just figure there is a lot of glass down there, if not solid, and well that may be the case sometimes but quite frequently not. In Taiwan I never saw any large sail or trawler type hulls laid up in anything but one piece molds with laminators working deep inside rolling and laying up the skin. But as you can imagine there is little working space deep in the aft portion of the keel hollow where the inside tuck of the bilge and shallower hull sections of the run make this an almost impossible area to access. So often it’s filled with ‘ mishmash ‘ or scrap pieces of mat, cloth, putty, hardened resin etc. nothing is wasted in Kaohsiung or that part of the world.


When the hull is lifted out of the mold this area is almost always full of voids and surface imperfections. This is generally not an insurmountable problem for crews that can grind and laminate a fair keel the prep a landing for a steel skeg. But the one area that can create major headaches is the stern tube area. You need enough structure to support the glass tube and bed. There are lots of trick techniques for this job but like sausage you don’t want to know. So drilling holes back in the region could, if deep enough, penetrate a void and that void like any area of this type could create a pathway For seawater into the hull interior.


Actually proper epoxy bedded lags or studs work pretty well to hang anodes


The lag bolt got progressively looser over the past several years. The anode was not working because the caulking prevented contact. Something had to be done. I felt this was the best approach and I’m not unhappy with the results. I didn’t open the hole that much from the existing one and on inspection there were no voids. The hole was dry inside and I cleaned it thoroughly with acetone. The epoxy putty was an easy fix and it set hard. I hardly used any of it. It was readily formed into small worms, threaded into the hole and I tamped them into place with the back end of a drill bit. It set up hard quite quickly. As I mentioned. The thickened epoxy was not cooperating so I abandoned that approach.

Jim
 
Last edited:
Had the well driller visit (don't ask) and he had an interesting take.

The new bronze fittings made for drinking water also are subject to seizing when being tightened , just like SS.

Who knew?
 
West Systems sells their two part marine epoxy in a tube with mixing nozzles that take the two components and mixes them in the tube. Simple application and high grade for water use. Plenty thick enough to hold against 'flow'. Or fill as required and simply make a temporary dam across the opening with masking tape. Brush a thin coating of the mixture into the sides and bottom of the cleaned hole before injecting the fill with the nozzle. They provide a separating 'keeper' to preserve the contents until the next project.
 
Success with the tap! I took more care this time. Jim the machinist believed it was a low quality tap. He provided a higher quality one this time. I was lucky I think that I was able extract the broken tap yesterday. I will clean out the hole in the FRP material behind it with acetone to remove any cutting oil.

View attachment 108161

View attachment 108162

That came out perfect. Good job!
 
Thickened epoxy then cover over hole with painters tape to keep it from flowing out.
Can do same with 5200. but with that maybe let it start setting up then fill hole, that stuff takes a long time to cure and it flows.
 
"Can do same with 5200. but with that maybe let it start setting up then fill hole, that stuff takes a long time to cure and it flows."


Moisture sets 5200 glue a quick water pistol hit for a day or two is all thats needed.
 
So a PO has used a lag bolt screwed into the skeg, just above the shaft tube to hold on a zinc to protect the mounting brackets for the line cutters on the shaft. This is a poor approach and involved sikaflex in a half-assed attempt to keep the bolt in place. I’m going to drill out and tap the bracket to put on a bolt.

I’ve bored out this hole to remove all traces of the caulking and it’s now about 5/16” and penetrates a little over an inch. Initially I wanted to fill it with thickened epoxy but that’s proving the devil to get in place.

Is there some sort of epoxy putty that can be rolled into a cylinder, inserted into the hole and tamped into position before it sets? I wonder if this JB weld product might be suitable?

https://www.jbweld.com/product/waterweld-epoxy-putty

If that isn’t suitable, suggestions?

Note: nothing is particularly structural here.

Jim
When ever I am doing fibeglass on a horizontal surface I fill the hole and put duct tape over it to dryseems to work well for me
 
Back
Top Bottom